Operating Instructions
Page 46
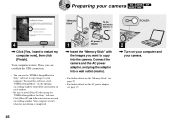
... "Memory Stick" with the images you can establish the USB connection. • You can use the "PIXELA ImageMixer for Sony" software. Connect the camera and the AC power adaptor, and plug the adaptor into the camera. Your computer restarts. Then, you want to copy into a wall outlet (mains). • For further details on the... details on the AC power adaptor, see page 19. 2 , Turn on each window. • Be sure to install DirectX when using the "PIXELA ImageMixer for Sony" software to copy images to restart my computer now], then click [Finish]. 2 Preparing your...
... "Memory Stick" with the images you can establish the USB connection. • You can use the "PIXELA ImageMixer for Sony" software. Connect the camera and the AC power adaptor, and plug the adaptor into the camera. Your computer restarts. Then, you want to copy into a wall outlet (mains). • For further details on the... details on the AC power adaptor, see page 19. 2 , Turn on each window. • Be sure to install DirectX when using the "PIXELA ImageMixer for Sony" software to copy images to restart my computer now], then click [Finish]. 2 Preparing your...
Operating Instructions
Page 48
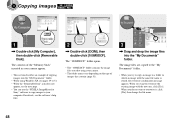
... The "100MSDCF" folder contains the image files you do not want to overwrite it, click [No], then change the file name. 48 When you shot using your camera appear. • This section describes an example of images they contain (page 51). 3 , Drag and drop the image files into the "My ...The contents of the "Memory Stick" inserted in your camera. • The folder names vary depending on the type of copying images into the "My Documents" folder. For details, see the next page. • You can use the "PIXELA ImageMixer for Sony" software to copy images to a folder in which an image...
... The "100MSDCF" folder contains the image files you do not want to overwrite it, click [No], then change the file name. 48 When you shot using your camera appear. • This section describes an example of images they contain (page 51). 3 , Drag and drop the image files into the "My ...The contents of the "Memory Stick" inserted in your camera. • The folder names vary depending on the type of copying images into the "My Documents" folder. For details, see the next page. • You can use the "PIXELA ImageMixer for Sony" software to copy images to a folder in which an image...
Operating Instructions
Page 53
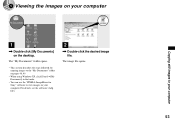
The image file opens. 53 For details, see the software's help files. 2 , Double-click the desired image file. 5 Viewing the images on your computer Copying still images to view images on your computer 1 , Double-click [My Documents] on pages 48, 49. • When using Windows XP, click [Start]t[My Documents] in that order. • You can use the "PIXELA ImageMixer for Sony" software to your computer. The "My Documents" folder opens. • This section describes the steps followed for copying images to the "My Documents" folder on the desktop.
The image file opens. 53 For details, see the software's help files. 2 , Double-click the desired image file. 5 Viewing the images on your computer Copying still images to view images on your computer 1 , Double-click [My Documents] on pages 48, 49. • When using Windows XP, click [Start]t[My Documents] in that order. • You can use the "PIXELA ImageMixer for Sony" software to your computer. The "My Documents" folder opens. • This section describes the steps followed for copying images to the "My Documents" folder on the desktop.
Operating Instructions
Page 54
...the "PIXELA ImageMixer for Sony" software to copy images to your computer and view the images on your computer For details, see the software's help files. is shown, click [OK]. 7 Restart your computer. 2 Preparing your camera For details, see page 46. 3 Connecting your camera to your computer 1 ...Double-click the hard disk icon. 2 Double-click the desired image file in the folder containing the copied files. To install the software, insert the supplied CD-ROM drive, then...
...the "PIXELA ImageMixer for Sony" software to copy images to your computer and view the images on your computer For details, see the software's help files. is shown, click [OK]. 7 Restart your computer. 2 Preparing your camera For details, see page 46. 3 Connecting your camera to your computer 1 ...Double-click the hard disk icon. 2 Double-click the desired image file in the folder containing the copied files. To install the software, insert the supplied CD-ROM drive, then...
Operating Instructions
Page 65
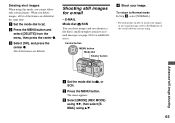
Control button MENU button Mode dial Shutter button d Shoot your images to an e-mail message, refer to the Help files of the e-mail software you are using. b Press the MENU button. The menu appears. All of the frames are deleted. a Set the mode dial to , or SCN. c ...menu, then press the center z. Shooting still images for available file sizes). c Select [MODE] (REC MODE) using b/B, then select [EMAIL] using v/V. 65 Deleting shot images When using this mode, you delete images, all 16 of the frames are deleted at the same time. Advanced still image shooting a Set the...
Control button MENU button Mode dial Shutter button d Shoot your images to an e-mail message, refer to the Help files of the e-mail software you are using. b Press the MENU button. The menu appears. All of the frames are deleted. a Set the mode dial to , or SCN. c ...menu, then press the center z. Shooting still images for available file sizes). c Select [MODE] (REC MODE) using b/B, then select [EMAIL] using v/V. 65 Deleting shot images When using this mode, you delete images, all 16 of the frames are deleted at the same time. Advanced still image shooting a Set the...
Operating Instructions
Page 68
... viewing software used may not rotate correctly on this camera. • When viewing images on factors like the size of the slide show Press the B (Forward), or the b (Backward). • The interval settings are just guidelines. ROTATE Mode dial: Images shot when holding the camera vertically can be rotated. • Images shot on other cameras may...
... viewing software used may not rotate correctly on this camera. • When viewing images on factors like the size of the slide show Press the B (Forward), or the b (Backward). • The interval settings are just guidelines. ROTATE Mode dial: Images shot when holding the camera vertically can be rotated. • Images shot on other cameras may...
Operating Instructions
Page 81
... Double-click the newly recognized icon on the desktop. The operation is the same as the operation used to your camera appear. 2 Double-click [MSSONY]. 3 Double-click [MOML0001]. 4 Drag and drop the movie files to continue copying...], then click [Next]. The movie files are copied to copy still images. For details, see the software's help files. The "Completing the Scanner and Camera Wizard" window appears. The Wizard window closes. • When you want to the hard disk icon.... using "ImageMixer" You can copy movie files using the supplied "PIXELA ImageMixer for Sony" software.
... Double-click the newly recognized icon on the desktop. The operation is the same as the operation used to your camera appear. 2 Double-click [MSSONY]. 3 Double-click [MOML0001]. 4 Drag and drop the movie files to continue copying...], then click [Next]. The movie files are copied to copy still images. For details, see the software's help files. The "Completing the Scanner and Camera Wizard" window appears. The Wizard window closes. • When you want to the hard disk icon.... using "ImageMixer" You can copy movie files using the supplied "PIXELA ImageMixer for Sony" software.
Operating Instructions
Page 85
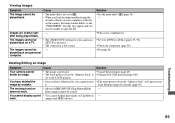
...Cancel the protection (page 69). • The write-protect tab on your camera in SET UP is incorrect. • The connection is not correct. - set to . • When you load an image modified using the retouch software on the "Memory Stick" is protected. Solution p Set the mode dial ...prevent you may appear and you it to - (page 36). mark. images and MPEG movies. Deleting/Editing an image Symptom Cause Solution Your camera cannot delete an image. • The image is p Change the LOCK position (page 100). You have deleted the image by mistake (...
...Cancel the protection (page 69). • The write-protect tab on your camera in SET UP is incorrect. • The connection is not correct. - set to . • When you load an image modified using the retouch software on the "Memory Stick" is protected. Solution p Set the mode dial ...prevent you may appear and you it to - (page 36). mark. images and MPEG movies. Deleting/Editing an image Symptom Cause Solution Your camera cannot delete an image. • The image is p Change the LOCK position (page 100). You have deleted the image by mistake (...
Operating Instructions
Page 86
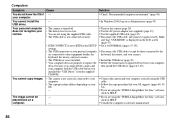
... is not correctly connected to the keyboard, the mouse, and your OS. - p If you are using the "PIXELA ImageMixer for Sony" software, click on the camera (page 20). p Turn on HELP. - p Set it again securely. p Install the USB driver (page 45). your computer ...correctly using the "PIXELA ImageMixer for Sony" software, click on your camera. p Check "Recommended computer environment" (page 44). p Follow the copy procedure that "USB MODE" is not installed. • ...
... is not correctly connected to the keyboard, the mouse, and your OS. - p If you are using the "PIXELA ImageMixer for Sony" software, click on the camera (page 20). p Turn on HELP. - p Set it again securely. p Install the USB driver (page 45). your computer ...correctly using the "PIXELA ImageMixer for Sony" software, click on your camera. p Check "Recommended computer environment" (page 44). p Follow the copy procedure that "USB MODE" is not installed. • ...
Operating Instructions
Page 87
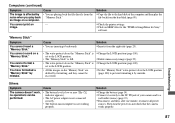
... to a wall outlet (mains) (page 19). You cannot format a "Memory Stick." Others Symptom The camera doesn't work, no operations can be recovered. "Memory Stick" Symptom You cannot insert a "Memory Stick." Cause • You are deleted by formatting, and they ...all power sources. You have formatted a "Memory Stick" by mistake. You cannot print an - You cannot record on HELP files for the "PIXELA ImageMixer for Sony" software. Solution p Insert it from the noise when you play the file back from the hard disk (page 80). p Change the LOCK position (page 100). ...
... to a wall outlet (mains) (page 19). You cannot format a "Memory Stick." Others Symptom The camera doesn't work, no operations can be recovered. "Memory Stick" Symptom You cannot insert a "Memory Stick." Cause • You are deleted by formatting, and they ...all power sources. You have formatted a "Memory Stick" by mistake. You cannot print an - You cannot record on HELP files for the "PIXELA ImageMixer for Sony" software. Solution p Insert it from the noise when you play the file back from the hard disk (page 80). p Change the LOCK position (page 100). ...


