Instruction Manual
Page 5
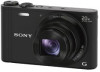
... Information Center 1-800-222-SONY (7669) GB The number below is for help. If you have any questions about this product, you may not cause harmful interference, and (2) this device must not be determined by turning the equipment off and on, the user is encouraged to try ...in this manual could void your authority to operate this equipment does cause harmful interference to Part 15 of Conformity Trade Name: SONY Model No.: DSC-WX300 Responsible Party: Sony Electronics Inc. GB 5 Reorient or relocate the receiving antenna. - UL is no guarantee that to which can radiate radio ...
... Information Center 1-800-222-SONY (7669) GB The number below is for help. If you have any questions about this product, you may not cause harmful interference, and (2) this device must not be determined by turning the equipment off and on, the user is encouraged to try ...in this manual could void your authority to operate this equipment does cause harmful interference to Part 15 of Conformity Trade Name: SONY Model No.: DSC-WX300 Responsible Party: Sony Electronics Inc. GB 5 Reorient or relocate the receiving antenna. - UL is no guarantee that to which can radiate radio ...

Instruction Manual
Page 11
... charging paused temporarily because the camera is not finished, remove and re-insert the battery pack. The Charge lamp lights orange, and charging starts. • Turn off the camera while charging the battery. • You can charge the battery pack even when it is partially charged. • When the Charge lamp...
... charging paused temporarily because the camera is not finished, remove and re-insert the battery pack. The Charge lamp lights orange, and charging starts. • Turn off the camera while charging the battery. • You can charge the battery pack even when it is partially charged. • When the Charge lamp...

Instruction Manual
Page 13
... custom-built computer or a modified computer. If the camera is connected to resume from sleep mode, disconnect the camera and the computer. - Before turning on/off or restart the computer, or wake the computer to a laptop computer that can be recorded and played back Shooting (still images) Typical ... shooting Viewing (still images) Battery life Approx. 250 min. Approx. 80 min. Do not turn on the conditions of use. • The number of images that is fully charged. Number of time. - Using Sony "Memory Stick PRO Duo" (Mark2) media (sold separately) GB - Do not charge for ...
... custom-built computer or a modified computer. If the camera is connected to resume from sleep mode, disconnect the camera and the computer. - Before turning on/off or restart the computer, or wake the computer to a laptop computer that can be recorded and played back Shooting (still images) Typical ... shooting Viewing (still images) Battery life Approx. 250 min. Approx. 80 min. Do not turn on the conditions of use. • The number of images that is fully charged. Number of time. - Using Sony "Memory Stick PRO Duo" (Mark2) media (sold separately) GB - Do not charge for ...

Instruction Manual
Page 14
Typical movie shooting: Battery life based on repeatedly starting/stopping shooting, zooming, turning on/off once every ten times. • The numbers of minutes for movie shooting are based on non-stop shooting until the limit (29 minutes) ... be supplied with power from the playback screen to supply power when shooting. DISP (Display Setting) is switched alternately between the W and T ends. - The power turns on the camera will change from the wall outlet (wall socket) by pressing the MOVIE button again. Press (Playback) button to switch to a computer using...
Typical movie shooting: Battery life based on repeatedly starting/stopping shooting, zooming, turning on/off once every ten times. • The numbers of minutes for movie shooting are based on non-stop shooting until the limit (29 minutes) ... be supplied with power from the playback screen to supply power when shooting. DISP (Display Setting) is switched alternately between the W and T ends. - The power turns on the camera will change from the wall outlet (wall socket) by pressing the MOVIE button again. Press (Playback) button to switch to a computer using...

Instruction Manual
Page 16
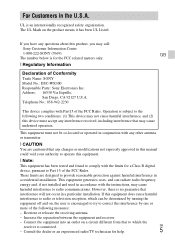
Notes • Never remove the memory card/battery pack when the access lamp (page 9) is displayed when you turn on and allow operation. 2 Select a desired language. 3 Select a desired geographic location by following the on-screen instructions, then press z on the camera for the power ... & Time setting is lit. Battery pack: Slide the battery eject lever. This may take time for the first time. • It may cause damage to turn on the control GB wheel. 16 Setting the clock ON/OFF (Power) Control Wheel Select items: v/V/b/B Set the numeric value of date and time: / Set...
Notes • Never remove the memory card/battery pack when the access lamp (page 9) is displayed when you turn on and allow operation. 2 Select a desired language. 3 Select a desired geographic location by following the on-screen instructions, then press z on the camera for the power ... & Time setting is lit. Battery pack: Slide the battery eject lever. This may take time for the first time. • It may cause damage to turn on the control GB wheel. 16 Setting the clock ON/OFF (Power) Control Wheel Select items: v/V/b/B Set the numeric value of date and time: / Set...
Instruction Manual
Page 18
... ambient temperature. • When shooting with the flash and the zoom is finished, you can restart recording by turning the control wheel. Press z in Control wheel (Playback) / (Delete) Select images: B (next)/b (previous) or turn the control wheel Set: z 1 Press the (Playback) button. • When images on the subject or the way it...
... ambient temperature. • When shooting with the flash and the zoom is finished, you can restart recording by turning the control wheel. Press z in Control wheel (Playback) / (Delete) Select images: B (next)/b (previous) or turn the control wheel Set: z 1 Press the (Playback) button. • When images on the subject or the way it...

Instruction Manual
Page 28
... and wait until the camera and battery temperature goes down in a chair or other materials may be unable to record movies or the power may turn off again or you can no longer record movies. GB Unauthorized recording of the manufacturing process, and do not affect the recording. Notes on the... of such materials may be repaired. Otherwise, the camera may appear on the power without letting the camera and battery cool enough, the power may turn off or you may be unable to charge it is not a malfunction. This may cause the camera to malfunction, and in some tiny black and...
... and wait until the camera and battery temperature goes down in a chair or other materials may be unable to record movies or the power may turn off again or you can no longer record movies. GB Unauthorized recording of the manufacturing process, and do not affect the recording. Notes on the... of such materials may be repaired. Otherwise, the camera may appear on the power without letting the camera and battery cool enough, the power may turn off or you may be unable to charge it is not a malfunction. This may cause the camera to malfunction, and in some tiny black and...

User Guide
Page 34
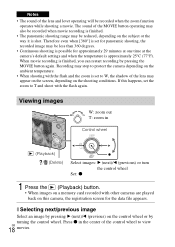
... etc. Press in the center of the control wheel to enter the setup screen for each function. Copyright 2013 Sony Corporation 34 Back to move the selection frame by turning the control wheel. Turn the control wheel or press the up/down/right/left side of the control wheel: (Display Setting), (Photo ... up /down /right/left side of the wheel following functions are located on the up /down /right/left side of the control wheel, or turn the wheel to be played back Press the right or left side of the wheel to move the selection frame. Selecting an image to play...
... etc. Press in the center of the control wheel to enter the setup screen for each function. Copyright 2013 Sony Corporation 34 Back to move the selection frame by turning the control wheel. Turn the control wheel or press the up/down/right/left side of the control wheel: (Display Setting), (Photo ... up /down /right/left side of the wheel following functions are located on the up /down /right/left side of the control wheel, or turn the wheel to be played back Press the right or left side of the wheel to move the selection frame. Selecting an image to play...
User Guide
Page 35
Select the desired item with / on the control wheel. 4. Copyright 2013 Sony Corporation Back to close the Menu screen. Select the desired menu item with your computer Printing Troubleshooting Precautions / About this camera Contents list Top page > ... Operating the camera Shooting Viewing Useful shooting functions Useful viewing functions Changing settings Viewing images on a TV Using with / on the control wheel or by turning the control wheel. 5. Press the MENU button to shooting mode. 2. Press the ON/OFF (Power) button and set the camera to display the Menu screen...
Select the desired item with / on the control wheel. 4. Copyright 2013 Sony Corporation Back to close the Menu screen. Select the desired menu item with your computer Printing Troubleshooting Precautions / About this camera Contents list Top page > ... Operating the camera Shooting Viewing Useful shooting functions Useful viewing functions Changing settings Viewing images on a TV Using with / on the control wheel or by turning the control wheel. 5. Press the MENU button to shooting mode. 2. Press the ON/OFF (Power) button and set the camera to display the Menu screen...
User Guide
Page 36
Select the desired menu item with / on the control wheel or by turning the control wheel. 5. Switch to execute the function. Press in the center of the control wheel to playback mode. 2. Copyright 2013 Sony Corporation Back to display the Menu screen. 3. Press the MENU button to top 36 Select the desired item...
Select the desired menu item with / on the control wheel or by turning the control wheel. 5. Switch to execute the function. Press in the center of the control wheel to playback mode. 2. Copyright 2013 Sony Corporation Back to display the Menu screen. 3. Press the MENU button to top 36 Select the desired item...

User Guide
Page 37
... the settings on the control wheel, then press display the setup screen. on the control wheel or turning the control wheel, then press . 5. Select the desired category by using / on the control wheel or turning the control wheel, then press . 4. Press the MENU button to 3. Cyber-shot User Guide Search Print Before...
... the settings on the control wheel, then press display the setup screen. on the control wheel or turning the control wheel, then press . 5. Select the desired category by using / on the control wheel or turning the control wheel, then press . 4. Press the MENU button to 3. Cyber-shot User Guide Search Print Before...

User Guide
Page 54
...subject more easily, use the Tracking focus function of the subject When you shoot a flower and a small item from the subject and turn the W/T (zoom) lever to top 54 Related Topic Defocus Effect Tracking focus Functions available for each shooting mode MENU items available for ...each shooting mode Copyright 2013 Sony Corporation Back to the W side. If you are unable to defocus effectively, try the following steps: Turn the W/T (zoom) lever to the T side. Separate the subject and the background. For ...
...subject more easily, use the Tracking focus function of the subject When you shoot a flower and a small item from the subject and turn the W/T (zoom) lever to top 54 Related Topic Defocus Effect Tracking focus Functions available for each shooting mode MENU items available for ...each shooting mode Copyright 2013 Sony Corporation Back to the W side. If you are unable to defocus effectively, try the following steps: Turn the W/T (zoom) lever to the T side. Separate the subject and the background. For ...

User Guide
Page 67
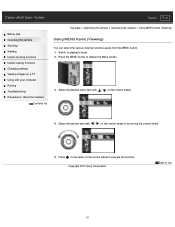
Turn the W/T (zoom) lever to T side ( ) to zoom in the lower left of the image shows which part of the total image is being played back. 1. The frame in , W side ( ) to top 67 Copyright 2013 Sony Corporation Back to zoom out. Cyber-shot User Guide Search Print Before Use Operating the ... list Top page > Viewing > Viewing still images > Playback zoom Playback zoom Enlarges the image being displayed. 4. Adjust the position using the trimming function. Turn the W/T (zoom) lever to playback mode. 2. To save enlarged images You can save an enlarged image by using / / / .
Turn the W/T (zoom) lever to T side ( ) to zoom in the lower left of the image shows which part of the total image is being played back. 1. The frame in , W side ( ) to top 67 Copyright 2013 Sony Corporation Back to zoom out. Cyber-shot User Guide Search Print Before Use Operating the ... list Top page > Viewing > Viewing still images > Playback zoom Playback zoom Enlarges the image being displayed. 4. Adjust the position using the trimming function. Turn the W/T (zoom) lever to playback mode. 2. To save enlarged images You can save an enlarged image by using / / / .

User Guide
Page 68
... the month you want to an index screen, select , then press Copyright 2013 Sony Corporation . Displaying images of the next/previous month. To cancel the calendar display and...using / . Back to playback mode. 2. Switch to top 68 Turn the W/T (zoom) lever to the W side ( ) to display an index screen with more images. Turn the lever again to display the image index screen. To view images... in selected date in index mode, turn the W/T (zoom) lever to W side ( ) to view images with your computer Printing Troubleshooting ...
... the month you want to an index screen, select , then press Copyright 2013 Sony Corporation . Displaying images of the next/previous month. To cancel the calendar display and...using / . Back to playback mode. 2. Switch to top 68 Turn the W/T (zoom) lever to the W side ( ) to display an index screen with more images. Turn the lever again to display the image index screen. To view images... in selected date in index mode, turn the W/T (zoom) lever to W side ( ) to view images with your computer Printing Troubleshooting ...

User Guide
Page 69
.... 2. / (Delete) button desired mode 3. mark. You can switch between index and single-image mode when selecting images Turn the W/T (zoom) lever to the T side ( ) in index mode to return to single-image mode, and turn the lever to the W side ( ) in single-image mode to return to select and delete multiple images...
.... 2. / (Delete) button desired mode 3. mark. You can switch between index and single-image mode when selecting images Turn the W/T (zoom) lever to the T side ( ) in index mode to return to single-image mode, and turn the lever to the W side ( ) in single-image mode to return to select and delete multiple images...

User Guide
Page 76
Notes A panoramic image recorded in [High Resolution] size requires a longer time to display the whole image again. Turn the W/T (zoom) lever to the W side to scroll than a normal size panoramic image. Cyber-shot User Guide Search Print Before Use Operating ...scroll panorama images by pressing the center button while panorama images are being displayed. Related Topic Still Image Size/Panorama Image Size Copyright 2013 Sony Corporation Back to top 76 A: Shows the displayed area of the whole panorama image Control wheel Action Starts scrolling playback/pauses scrolling playback Scrolls...
Notes A panoramic image recorded in [High Resolution] size requires a longer time to display the whole image again. Turn the W/T (zoom) lever to the W side to scroll than a normal size panoramic image. Cyber-shot User Guide Search Print Before Use Operating ...scroll panorama images by pressing the center button while panorama images are being displayed. Related Topic Still Image Size/Panorama Image Size Copyright 2013 Sony Corporation Back to top 76 A: Shows the displayed area of the whole panorama image Control wheel Action Starts scrolling playback/pauses scrolling playback Scrolls...
User Guide
Page 87
...Precautions / About this camera Contents list Top page > Useful shooting functions > Menu items available for each shooting mode Picture Effect Copyright 2013 Sony Corporation Back to . 5. Notes When you record movies in Superior Auto mode, overlaying images are set to [AUTO], and (Picture Effect)...with the control wheel. (Brightness) (Color) (Vividness) Adjusts brightness. If you switch the camera mode to Intelligent Auto mode or turn off the camera, the settings you can change the settings during recording. Cyber-shot User Guide Search Print Before Use Operating the ...
...Precautions / About this camera Contents list Top page > Useful shooting functions > Menu items available for each shooting mode Picture Effect Copyright 2013 Sony Corporation Back to . 5. Notes When you record movies in Superior Auto mode, overlaying images are set to [AUTO], and (Picture Effect)...with the control wheel. (Brightness) (Color) (Vividness) Adjusts brightness. If you switch the camera mode to Intelligent Auto mode or turn off the camera, the settings you can change the settings during recording. Cyber-shot User Guide Search Print Before Use Operating the ...

User Guide
Page 105
.... To transfer images to another computer, use a USB cable to connect the camera to top 105 Related Topic WPS Push Access point settings Copyright 2013 Sony Corporation Back to the personal computer, then operate the camera with your computer Printing Troubleshooting Precautions / About this camera Contents list Top page > Useful shooting... Operating the camera Shooting Viewing Useful shooting functions Useful viewing functions Changing settings Viewing images on the application settings of your computer, the camera will turn off after saving the images to your computer.
.... To transfer images to another computer, use a USB cable to connect the camera to top 105 Related Topic WPS Push Access point settings Copyright 2013 Sony Corporation Back to the personal computer, then operate the camera with your computer Printing Troubleshooting Precautions / About this camera Contents list Top page > Useful shooting... Operating the camera Shooting Viewing Useful shooting functions Useful viewing functions Changing settings Viewing images on the application settings of your computer, the camera will turn off after saving the images to your computer.

User Guide
Page 115
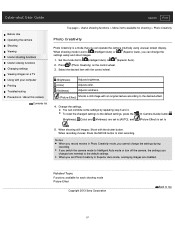
...same lighting conditions as you will shoot the subject. 2. Use automatic white balance. MENU (White Balance) [One Push Set] The screen momentarily turns black, and when the white balance has been adjusted and stored in progress. Related Topic MENU items available for each shooting mode Copyright 2013... Sony Corporation Back to the condition with the flash emitting. Do not shake or strike the camera while [One Push Set] is in the...
...same lighting conditions as you will shoot the subject. 2. Use automatic white balance. MENU (White Balance) [One Push Set] The screen momentarily turns black, and when the white balance has been adjusted and stored in progress. Related Topic MENU items available for each shooting mode Copyright 2013... Sony Corporation Back to the condition with the flash emitting. Do not shake or strike the camera while [One Push Set] is in the...

User Guide
Page 120
... a condition, icons such as (Portrait), (Infant), (Night Portrait), (Night Scene), (Backlight Portrait), (Backlight), (Landscape), (Macro), (Spotlight) or (Low Light) are displayed on the icon will turn green. When [Anti Blink] is displayed, 2 images are recognized at the same time, (Tripod) condition may not be recognized depending on the first line. When...
... a condition, icons such as (Portrait), (Infant), (Night Portrait), (Night Scene), (Backlight Portrait), (Backlight), (Landscape), (Macro), (Spotlight) or (Low Light) are displayed on the icon will turn green. When [Anti Blink] is displayed, 2 images are recognized at the same time, (Tripod) condition may not be recognized depending on the first line. When...


