Instruction Manual
Page 7
...Cyber-shot Handbook" and "Cyber-shot Step-up Guide" ....... 23 Indicators on the screen 24 Battery life and memory capacity 26 Battery life and number of images that can be recorded/viewed .......... 26 Number of still images and recording time of contents IMPORTANT SAFEGUARDS 2 Read this first 4 Notes on using your camera... 8 Getting started 9 Checking the accessories supplied 9 1 Preparing the battery pack 10 2 Inserting the battery pack/a "Memory Stick Duo" (not supplied) ........ 11 3 Turning the camera on/setting the clock 13 Shooting images...
...Cyber-shot Handbook" and "Cyber-shot Step-up Guide" ....... 23 Indicators on the screen 24 Battery life and memory capacity 26 Battery life and number of images that can be recorded/viewed .......... 26 Number of still images and recording time of contents IMPORTANT SAFEGUARDS 2 Read this first 4 Notes on using your camera... 8 Getting started 9 Checking the accessories supplied 9 1 Preparing the battery pack 10 2 Inserting the battery pack/a "Memory Stick Duo" (not supplied) ........ 11 3 Turning the camera on/setting the clock 13 Shooting images...

Instruction Manual
Page 10
... lights on, and charging starts. Charging may take longer under certain circumstances or conditions. • See page 26 for use with compatible Sony batteries. 10 When the CHARGE lamp turns off the power by . • Even if the CHARGE lamp is not lit, the battery charger is not disconnected from the AC... power source (mains) as long as it is fully charged), the charge will last slightly longer. [ Charging time Full charge time Approx. 330 min....
... lights on, and charging starts. Charging may take longer under certain circumstances or conditions. • See page 26 for use with compatible Sony batteries. 10 When the CHARGE lamp turns off the power by . • Even if the CHARGE lamp is not lit, the battery charger is not disconnected from the AC... power source (mains) as long as it is fully charged), the charge will last slightly longer. [ Charging time Full charge time Approx. 330 min....
Instruction Manual
Page 11
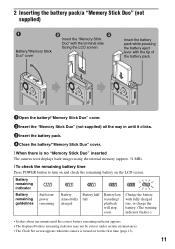
... under certain circumstances. • The Clock Set screen appears when the camera is no "Memory Stick Duo" inserted The camera records/plays back images using the internal memory (approx. 31 MB). [ To check the remaining battery time Press POWER button to turn on and check the remaining battery on for the first time (page...
... under certain circumstances. • The Clock Set screen appears when the camera is no "Memory Stick Duo" inserted The camera records/plays back images using the internal memory (approx. 31 MB). [ To check the remaining battery time Press POWER button to turn on and check the remaining battery on for the first time (page...
Instruction Manual
Page 13
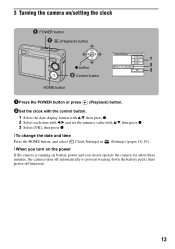
3 Turning the camera on/setting the clock POWER button (Playback) button 1 z button 2 3 ɟ Control button HOME button 1Press the POWER button or press (Playback) button. 2Set the clock with the control button. 1 Select the date display format with v/V, then press z. 2 Select ... date and time Press the HOME button, and select [ Clock Settings] in (Settings) (pages 18, 19). [ When you turn on the power If the camera is running on battery power and you do not operate the camera for about three minutes, the camera turns off automatically to prevent wearing down the battery pack (Auto...
3 Turning the camera on/setting the clock POWER button (Playback) button 1 z button 2 3 ɟ Control button HOME button 1Press the POWER button or press (Playback) button. 2Set the clock with the control button. 1 Select the date display format with v/V, then press z. 2 Select ... date and time Press the HOME button, and select [ Clock Settings] in (Settings) (pages 18, 19). [ When you turn on the power If the camera is running on battery power and you do not operate the camera for about three minutes, the camera turns off automatically to prevent wearing down the battery pack (Auto...
Instruction Manual
Page 16
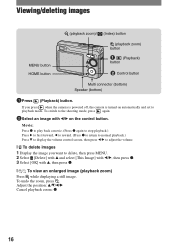
... Image] with b/B, then press z. 3 Select [OK] with b/B on automatically and set to adjust the volume. [ To delete images 1 Display the image you press when the camera is powered off, the camera is turned on the control button.
... Image] with b/B, then press z. 3 Select [OK] with b/B on automatically and set to adjust the volume. [ To delete images 1 Display the image you press when the camera is powered off, the camera is turned on the control button.
Instruction Manual
Page 26
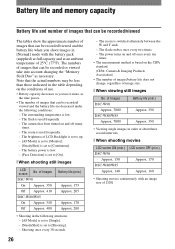
The power turns on and off once every ten times. • The measurement method is used frequently. - The flash is based on and off many times. - The camera has been turned on the CIPA standard. (CIPA: Camera & Imaging Products Association) • The number of images/battery life does not ...] The numbers of 25°C (77°F). The surrounding temperature is switched alternately between the W and T ends. - of Images DSC-W90 Approx. 7000 DSC-W80/W85 Approx. 7000 Battery life (min.) Approx. 350 Approx. 350 • Viewing single images in order at about three second ...
The power turns on and off once every ten times. • The measurement method is used frequently. - The flash is based on and off many times. - The camera has been turned on the CIPA standard. (CIPA: Camera & Imaging Products Association) • The number of images/battery life does not ...] The numbers of 25°C (77°F). The surrounding temperature is switched alternately between the W and T ends. - of Images DSC-W90 Approx. 7000 DSC-W80/W85 Approx. 7000 Battery life (min.) Approx. 350 Approx. 350 • Viewing single images in order at about three second ...
Instruction Manual
Page 28
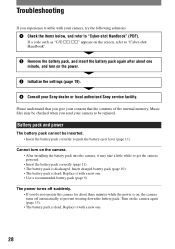
... power turns off automatically to "Cyber-shot Handbook" (PDF). Battery pack and power The battery pack cannot be inserted. • Insert the battery pack correctly to be checked when you do not operate the camera for about one . • Use a recommended battery pack (page 9). Replace it may be repaired. Troubleshooting If you experience trouble with your Sony...
... power turns off automatically to "Cyber-shot Handbook" (PDF). Battery pack and power The battery pack cannot be inserted. • Insert the battery pack correctly to be checked when you do not operate the camera for about one . • Use a recommended battery pack (page 9). Replace it may be repaired. Troubleshooting If you experience trouble with your Sony...
Instruction Manual
Page 30
...cause a malfunction of the internal rechargeable backup battery Insert charged battery pack in the camera, and then leave the camera for about an hour for maintaining the date and time and other place with the power off. 30 This rechargeable battery is designed for only short periods, it becomes ... cloth to a warm location, moisture may condense inside the lens, you do not record the date and time. If moisture condensation occurs Turn off the camera and wait about one month it discharges gradually, and if you will be sure to evaporate. Precautions [ Do not use/store the...
...cause a malfunction of the internal rechargeable backup battery Insert charged battery pack in the camera, and then leave the camera for about an hour for maintaining the date and time and other place with the power off. 30 This rechargeable battery is designed for only short periods, it becomes ... cloth to a warm location, moisture may condense inside the lens, you do not record the date and time. If moisture condensation occurs Turn off the camera and wait about one month it discharges gradually, and if you will be sure to evaporate. Precautions [ Do not use/store the...


