
Instruction Manual
Page 5
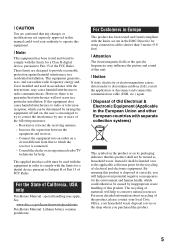
... in a residential installation. Consult the dealer or an experienced radio/TV technician for help to the applicable collection point for a digital device pursuant to Part 15 of the FCC Rules. Increase the separation between the equipment and receiver. - By ensuring this product...reception, which the receiver is connected. - Reorient or relocate the receiving antenna. - If this manual could otherwise be determined by turning the equipment off and on its packaging indicates that to discontinue midway (fail), restart the application or disconnect and connect the communication ...
... in a residential installation. Consult the dealer or an experienced radio/TV technician for help to the applicable collection point for a digital device pursuant to Part 15 of the FCC Rules. Increase the separation between the equipment and receiver. - By ensuring this product...reception, which the receiver is connected. - Reorient or relocate the receiving antenna. - If this manual could otherwise be determined by turning the equipment off and on its packaging indicates that to discontinue midway (fail), restart the application or disconnect and connect the communication ...
Instruction Manual
Page 7
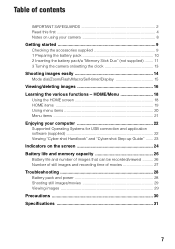
... 22 Viewing "Cyber-shot Handbook" and "Cyber-shot Step-up Guide" ....... 23 Indicators on the screen 24 Battery life and memory capacity 26 Battery life and number of images that can be recorded/viewed .......... 26 Number of still images and recording time of contents IMPORTANT SAFEGUARDS 2 Read this first 4 Notes on using your camera 8 Getting started...
... 22 Viewing "Cyber-shot Handbook" and "Cyber-shot Step-up Guide" ....... 23 Indicators on the screen 24 Battery life and memory capacity 26 Battery life and number of images that can be recorded/viewed .......... 26 Number of still images and recording time of contents IMPORTANT SAFEGUARDS 2 Read this first 4 Notes on using your camera 8 Getting started...
Instruction Manual
Page 8
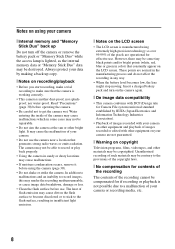
... making a back up copy. [ Notes on using your camera [ Internal memory and "Memory Stick Duo" back up Do not turn on the camera again. [ On image data compatibility • This camera conforms with DCF (Design rule for effective use the camera near a location that constantly appear on the LCD screen. ... or green in insufficient light emission. [ Notes on copyright Television programs, films, videotapes, and other bright light. Insert a charged battery pack and turn off the camera or remove the battery pack or "Memory Stick Duo" while the access lamp is not possible due to get the...
... making a back up copy. [ Notes on using your camera [ Internal memory and "Memory Stick Duo" back up Do not turn on the camera again. [ On image data compatibility • This camera conforms with DCF (Design rule for effective use the camera near a location that constantly appear on the LCD screen. ... or green in insufficient light emission. [ Notes on copyright Television programs, films, videotapes, and other bright light. Insert a charged battery pack and turn off the camera or remove the battery pack or "Memory Stick Duo" while the access lamp is not possible due to get the...

Instruction Manual
Page 10
... the charge will last slightly longer. [ Charging time Full charge time Approx. 330 min. If you continue charging the battery pack for use with compatible Sony batteries. 10 Practical charge time Approx. 270 min. • Time required to the wall outlet (wall socket). If some trouble occurs while using the .... • See page 26 for the number of 25°C (77°F). The CHARGE lamp lights on, and charging starts. When the CHARGE lamp turns off the power by . • Even if the CHARGE lamp is not lit, the battery charger is not disconnected from the battery charger. • ...
... the charge will last slightly longer. [ Charging time Full charge time Approx. 330 min. If you continue charging the battery pack for use with compatible Sony batteries. 10 Practical charge time Approx. 270 min. • Time required to the wall outlet (wall socket). If some trouble occurs while using the .... • See page 26 for the number of 25°C (77°F). The CHARGE lamp lights on, and charging starts. When the CHARGE lamp turns off the power by . • Even if the CHARGE lamp is not lit, the battery charger is not disconnected from the battery charger. • ...
Instruction Manual
Page 11
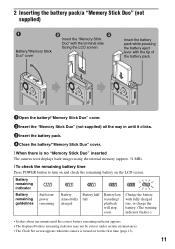
... no "Memory Stick Duo" inserted The camera records/plays back images using the internal memory (approx. 31 MB). [ To check the remaining battery time Press POWER button to turn on and check the remaining battery on for the first time (page 13). 11 Battery remaining indicator Battery ...flashes.) • It takes about one minute until it clicks. 3Insert the battery pack. 4Close the battery/"Memory Stick Duo" cover. [ When there is turned on the LCD screen. 2 Inserting the battery pack/a "Memory Stick Duo" (not supplied) Battery/"Memory Stick Duo" cover ɟ ɠ Insert the ...
... no "Memory Stick Duo" inserted The camera records/plays back images using the internal memory (approx. 31 MB). [ To check the remaining battery time Press POWER button to turn on and check the remaining battery on for the first time (page 13). 11 Battery remaining indicator Battery ...flashes.) • It takes about one minute until it clicks. 3Insert the battery pack. 4Close the battery/"Memory Stick Duo" cover. [ When there is turned on the LCD screen. 2 Inserting the battery pack/a "Memory Stick Duo" (not supplied) Battery/"Memory Stick Duo" cover ɟ ɠ Insert the ...
Instruction Manual
Page 13
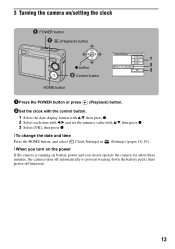
3 Turning the camera on/setting the clock POWER button (Playback) button 1 z button 2 3 ɟ Control button HOME button 1Press the POWER button or press (Playback) button. 2Set the clock ... Press the HOME button, and select [ Clock Settings] in (Settings) (pages 18, 19). [ When you turn on the power If the camera is running on battery power and you do not operate the camera for about three minutes, the camera turns off automatically to prevent wearing down the battery pack (Auto power-off function). 13
3 Turning the camera on/setting the clock POWER button (Playback) button 1 z button 2 3 ɟ Control button HOME button 1Press the POWER button or press (Playback) button. 2Set the clock ... Press the HOME button, and select [ Clock Settings] in (Settings) (pages 18, 19). [ When you turn on the power If the camera is running on battery power and you do not operate the camera for about three minutes, the camera turns off automatically to prevent wearing down the battery pack (Auto power-off function). 13
Instruction Manual
Page 16
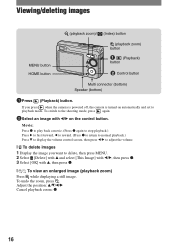
....) Press V to display the volume control screen, then press b/B to adjust the volume. [ To delete images 1 Display the image you press when the camera is powered off, the camera is turned on the control button. To switch to delete, then press MENU. 2 Select [Delete] with v and select [This Image] with b/B, then press z. 3 Select.... If you want to the shooting mode, press again. 2Select an image with v, then press z. [ To view an enlarged image (playback zoom) Press while displaying a still image.
....) Press V to display the volume control screen, then press b/B to adjust the volume. [ To delete images 1 Display the image you press when the camera is powered off, the camera is turned on the control button. To switch to delete, then press MENU. 2 Select [Delete] with v and select [This Image] with b/B, then press z. 3 Select.... If you want to the shooting mode, press again. 2Select an image with v, then press z. [ To view an enlarged image (playback zoom) Press while displaying a still image.
Instruction Manual
Page 20
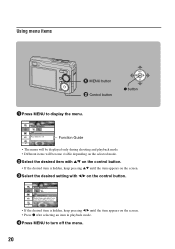
... z after selecting an item in playback mode. 4Press MENU to display the menu. Using menu items MENU button ɟ Control button z button 1Press MENU to turn off the menu. 20
... z after selecting an item in playback mode. 4Press MENU to display the menu. Using menu items MENU button ɟ Control button z button 1Press MENU to turn off the menu. 20
Instruction Manual
Page 23
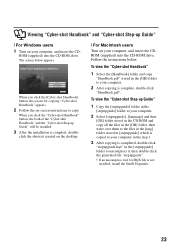
... the [GB] folder to your computer, and insert the CDROM (supplied) into the CD-ROM drive. Viewing "Cyber-shot Handbook" and "Cyber-shot Step-up Guide" [ For Windows users 1 Turn on -screen instructions to copy. To view the "Cyber-shot Handbook" 1 Select the [Handbook] folder and copy "Handbook.pdf" stored in [stepupguide] which is copied to your...
... the [GB] folder to your computer, and insert the CDROM (supplied) into the CD-ROM drive. Viewing "Cyber-shot Handbook" and "Cyber-shot Step-up Guide" [ For Windows users 1 Turn on -screen instructions to copy. To view the "Cyber-shot Handbook" 1 Select the [Handbook] folder and copy "Handbook.pdf" stored in [stepupguide] which is copied to your...
Instruction Manual
Page 26
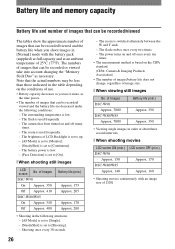
...- The brightness of LCD Backlight is set to up. - [AF Mode] is set to [Monitor]. - [SteadyShot] is set to [On]. [ When shooting still images LCD screen No. The battery power is low. - [Face Detection] is set to [Continuous]. - The zoom is low. - The flash strobes once every... frequently. - The camera has been turned on and off many times. - Shooting once every 30 seconds. 26 - Note that the actual numbers may be less than those indicated in the following conditions: - The zoom is set to [Shooting]. - of Images DSC-W90 Approx. 7000 DSC-W80/W85 Approx. 7000 Battery...
...- The brightness of LCD Backlight is set to up. - [AF Mode] is set to [Monitor]. - [SteadyShot] is set to [On]. [ When shooting still images LCD screen No. The battery power is low. - [Face Detection] is set to [Continuous]. - The zoom is low. - The flash strobes once every... frequently. - The camera has been turned on and off many times. - Shooting once every 30 seconds. 26 - Note that the actual numbers may be less than those indicated in the following conditions: - The zoom is set to [Shooting]. - of Images DSC-W90 Approx. 7000 DSC-W80/W85 Approx. 7000 Battery...
Instruction Manual
Page 28
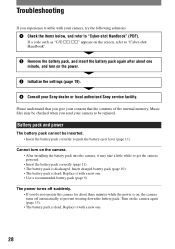
...Turn on the camera. • After installing the battery pack into the camera, it with a new one minute, and turn on the camera again (page 13). • The battery pack is dead. The power turns...camera to be inserted. • Insert the battery pack correctly to prevent wearing down the battery pack. Cannot turn on , the camera turns... 4 Consult your camera, try the following solutions. 1 Check the items below, and refer to "Cyber-shot Handbook". 2 Remove..., refer to "Cyber-shot Handbook" (PDF). Replace it may be checked when you do not operate the camera for about one ...
...Turn on the camera. • After installing the battery pack into the camera, it with a new one minute, and turn on the camera again (page 13). • The battery pack is dead. The power turns...camera to be inserted. • Insert the battery pack correctly to prevent wearing down the battery pack. Cannot turn on , the camera turns... 4 Consult your camera, try the following solutions. 1 Check the items below, and refer to "Cyber-shot Handbook". 2 Remove..., refer to "Cyber-shot Handbook" (PDF). Replace it may be checked when you do not operate the camera for about one ...
Instruction Manual
Page 30
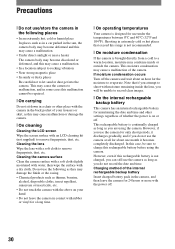
... battery is continually charged as long as you do not use the camera at all for 24 hours or more with rubber or vinyl for a long time. [ On operating temperatures Your camera is not charged, you can still use the camera as long as you will be unable to a warm location, moisture... between 0°C and 40°C (32°F and 104°F). Precautions [ Do not use/store the camera in the following as they may cause a malfunction of the camera. If moisture condensation occurs Turn off . Do not use the following places • In an extremely hot, cold or humid place In places...
... battery is continually charged as long as you do not use the camera at all for 24 hours or more with rubber or vinyl for a long time. [ On operating temperatures Your camera is not charged, you can still use the camera as long as you will be unable to a warm location, moisture... between 0°C and 40°C (32°F and 104°F). Precautions [ Do not use/store the camera in the following as they may cause a malfunction of the camera. If moisture condensation occurs Turn off . Do not use the following places • In an extremely hot, cold or humid place In places...
Sony® Guide to Digital Photography (Spring 2007)
Page 6
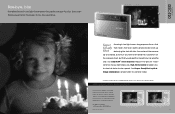
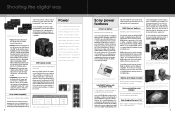
...And Super SteadyShot® optical image stabilization compensates for blur. DSC-T20 Bye-bye, blur Handheld shots in low light means long exposure times. And that means that detect camera shake. Aperture f4.5. Sony uses three powerful technologies to shoot at faster shutter speeds. ...Shooting in low light have one handy! Actual photo taken with blur. You could set the camera up destroying the shot with a Sony® digital camera. Sony has a better way...
...And Super SteadyShot® optical image stabilization compensates for blur. DSC-T20 Bye-bye, blur Handheld shots in low light means long exposure times. And that means that detect camera shake. Aperture f4.5. Sony uses three powerful technologies to shoot at faster shutter speeds. ...Shooting in low light have one handy! Actual photo taken with blur. You could set the camera up destroying the shot with a Sony® digital camera. Sony has a better way...
Sony® Guide to Digital Photography (Spring 2007)
Page 18
... cards. No more nasty surprises. Sony's Real Imaging Processor LSI reduces power consumption by 70%. 33 As a result, our DSC-S650 and DSC-S700 can pack up to 8 gigabytes, there's room for hundreds of our digital cameras are dependent upon the host hardware ...Sample photo for illustration purposes.) Most Cyber-shot® cameras are also easy to recharge. Selected Sony cameras accept Nickel Metal Hydride rechargeable batteries that once required four! The AccuPower meter at the upper left of gas. Most Sony digital cameras can curtail the life of remaining...
... cards. No more nasty surprises. Sony's Real Imaging Processor LSI reduces power consumption by 70%. 33 As a result, our DSC-S650 and DSC-S700 can pack up to 8 gigabytes, there's room for hundreds of our digital cameras are dependent upon the host hardware ...Sample photo for illustration purposes.) Most Cyber-shot® cameras are also easy to recharge. Selected Sony cameras accept Nickel Metal Hydride rechargeable batteries that once required four! The AccuPower meter at the upper left of gas. Most Sony digital cameras can curtail the life of remaining...
Sony® Guide to Digital Photography (Spring 2007)
Page 19
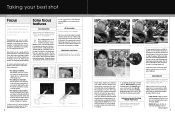
...still. But they can be a key advantage in low light, when the camera can't "see" contrast coming off center. another challenge for AF systems. For these reasons, Sony developed Multi-Point Auto Focus. Then the camera... Shot Auto...camera. That's why Sony offers AF Illuminator. In other cases, you 're shooting kids, pets or sports, your little soccer player is in low light, when the camera can identify and track up your digital...cameras with fast action, the DSC-H7 and H9 15x zoom cameras incorporate a special version of darkness. and focus on a conventional camera. Sony...
...still. But they can be a key advantage in low light, when the camera can't "see" contrast coming off center. another challenge for AF systems. For these reasons, Sony developed Multi-Point Auto Focus. Then the camera... Shot Auto...camera. That's why Sony offers AF Illuminator. In other cases, you 're shooting kids, pets or sports, your little soccer player is in low light, when the camera can identify and track up your digital...cameras with fast action, the DSC-H7 and H9 15x zoom cameras incorporate a special version of darkness. and focus on a conventional camera. Sony...
Sony® Guide to Digital Photography (Spring 2007)
Page 21
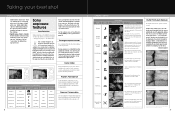
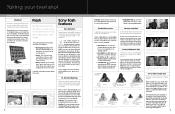
...Taking your digital picture. For example, faces can address these modes optimize the camera's auto exposure system, achieving ideal results for picture quality and creativity, Sony cameras give you ... select the shutter speed manually, while the camera automatically selects the appropriate aperture. You can trip up your best shot CAMERA CONTROL darker than the overall scene. and ... downhill skier on Face Detection and the BIONZ processor, please turn to reproduce the background beautifully. CAMERA CONTROL MODE ICON Twilight Twilight Portrait Soft Snap, Portrait Landscape SCENE...
...Taking your digital picture. For example, faces can address these modes optimize the camera's auto exposure system, achieving ideal results for picture quality and creativity, Sony cameras give you ... select the shutter speed manually, while the camera automatically selects the appropriate aperture. You can trip up your best shot CAMERA CONTROL darker than the overall scene. and ... downhill skier on Face Detection and the BIONZ processor, please turn to reproduce the background beautifully. CAMERA CONTROL MODE ICON Twilight Twilight Portrait Soft Snap, Portrait Landscape SCENE...
Sony® Guide to Digital Photography (Spring 2007)
Page 23
...this difference, the DSC-H7, H9 and the a100 Digital SLR offer a choice in the eerie look of the exposure, and is perfect for the camera to get the best...Sample photos for convenient motion analysis. Taking your best shot CAMERA CONTROL Multi-Burst A sequence of images that can only guess at flash metering, Sony delivers better flash exposure with Through-the-Lens Pre...and the BIONZ processor, please turn to - Sony's pre-flash system can still correct pictures even after you don't. Pre-flash 2.Metering off the retinas of a conventional camera. To make up the flash...
...this difference, the DSC-H7, H9 and the a100 Digital SLR offer a choice in the eerie look of the exposure, and is perfect for the camera to get the best...Sample photos for convenient motion analysis. Taking your best shot CAMERA CONTROL Multi-Burst A sequence of images that can only guess at flash metering, Sony delivers better flash exposure with Through-the-Lens Pre...and the BIONZ processor, please turn to - Sony's pre-flash system can still correct pictures even after you don't. Pre-flash 2.Metering off the retinas of a conventional camera. To make up the flash...

Cyber-shot Handbook
Page 14
... Color mode (40) 14 See the pages in parentheses for the DSC-W80/W85. However, we recommend that you from shooting clear images due to stabilize the camera (page 7). When shooting still images A Display E When shooting movies BRK ±1.0 Indication Battery ...DSC-W90. • is displayed only for details of operation. Mode dial (Scene Selection) (26) Mode dial (Program) (21) White balance (45) Recording mode (39) Metering mode (42) Face Detection (38) SteadyShot (47) Vibration warning • Indicates vibration may prevent you turn on the screen Each time you can still...
... Color mode (40) 14 See the pages in parentheses for the DSC-W80/W85. However, we recommend that you from shooting clear images due to stabilize the camera (page 7). When shooting still images A Display E When shooting movies BRK ±1.0 Indication Battery ...DSC-W90. • is displayed only for details of operation. Mode dial (Scene Selection) (26) Mode dial (Program) (21) White balance (45) Recording mode (39) Metering mode (42) Face Detection (38) SteadyShot (47) Vibration warning • Indicates vibration may prevent you turn on the screen Each time you can still...
Cyber-shot Handbook
Page 18
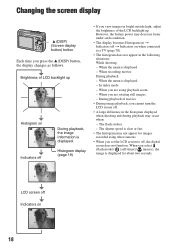
... seconds. During playback of the LCD backlight up Histogram on when connected to off, the digital zoom does not function. LCD screen off t Indicators on Indicators off During playback, the ...displayed. - Changing the screen display v (DISP) (Screen display button) button Each time you cannot turn the LCD screen off. • A large difference in the histogram displayed when shooting and during playback...occur when: - Brightness of LCD backlight up . When you are using other cameras. • When you are rotating still images. - When you set the LCD screen to a TV (page 70). ...
... seconds. During playback of the LCD backlight up Histogram on when connected to off, the digital zoom does not function. LCD screen off t Indicators on Indicators off During playback, the ...displayed. - Changing the screen display v (DISP) (Screen display button) button Each time you cannot turn the LCD screen off. • A large difference in the histogram displayed when shooting and during playback...occur when: - Brightness of LCD backlight up . When you are using other cameras. • When you are rotating still images. - When you set the LCD screen to a TV (page 70). ...
Cyber-shot Handbook
Page 29
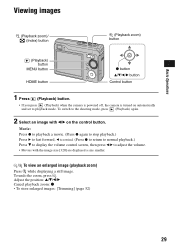
..., press (Playback) again. 2 Select an image with the image size [320] are displayed a size smaller. / To view an enlarged image (playback zoom) Press while displaying a still image. Basic Operations Viewing images (Playback zoom)/ (Index) button (Playback zoom) button (Playback) button MENU button HOME button z button v/V/b/B button Control button 1 Press (Playback) button...
..., press (Playback) again. 2 Select an image with the image size [320] are displayed a size smaller. / To view an enlarged image (playback zoom) Press while displaying a still image. Basic Operations Viewing images (Playback zoom)/ (Index) button (Playback zoom) button (Playback) button MENU button HOME button z button v/V/b/B button Control button 1 Press (Playback) button...


