
Handycam® Handbook
Page 85
Table of contents Operation Search MENU/Settings Search Index Download Music You can use "Music Transfer" in the CD-ROM (supplied) to change background music tracks. 1 MENU t (Settings) t (Main Settings) t [Download Music] t z on the control button The message "Connect to PC" appears. 2 Make a USB connection between the camera and a computer, then start "Music Transfer". 3 Follow the instructions on the screen to change music files. 85GB
Table of contents Operation Search MENU/Settings Search Index Download Music You can use "Music Transfer" in the CD-ROM (supplied) to change background music tracks. 1 MENU t (Settings) t (Main Settings) t [Download Music] t z on the control button The message "Connect to PC" appears. 2 Make a USB connection between the camera and a computer, then start "Music Transfer". 3 Follow the instructions on the screen to change music files. 85GB

Handycam® Handbook
Page 96
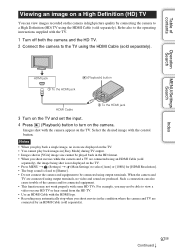
... audio/video input jacks Dedicated A/V cable 2 To the (USB)/A/V OUT jack 3 Turn on the TV and set the input. 4 Press (Playback) button to the operating instructions supplied with the TV. Notes • When using the camera abroad, it may be necessary to switch the video signal output to match that of the... camera and TV connected. • When output to a TV. The connection varies according to the type of TV the camera is shot under the condition of your TV system (page 82). • The shooting image will not ...
... audio/video input jacks Dedicated A/V cable 2 To the (USB)/A/V OUT jack 3 Turn on the TV and set the input. 4 Press (Playback) button to the operating instructions supplied with the TV. Notes • When using the camera abroad, it may be necessary to switch the video signal output to match that of the... camera and TV connected. • When output to a TV. The connection varies according to the type of TV the camera is shot under the condition of your TV system (page 82). • The shooting image will not ...
Handycam® Handbook
Page 97
Refer also to the operating instructions supplied with the control button. Index 97GB Continued r Select the desired image with the TV. 1 Turn off both the camera and the HD TV. 2 Connect the camera to turn on the TV. HDMI jack 1 To the HDMI jack (Playback) button HDMI Cable 2 To the HDMI jack 3 ... be played back in the HD format. • When you shoot movies while the camera and a TV are connected using an HDMI Cable (sold separately), the image being shot is fixed to [Shutter]. • Do not connect the camera and equipment to be able to view a video on the TV. • Press...
Refer also to the operating instructions supplied with the control button. Index 97GB Continued r Select the desired image with the TV. 1 Turn off both the camera and the HD TV. 2 Connect the camera to turn on the TV. HDMI jack 1 To the HDMI jack (Playback) button HDMI Cable 2 To the HDMI jack 3 ... be played back in the HD format. • When you shoot movies while the camera and a TV are connected using an HDMI Cable (sold separately), the image being shot is fixed to [Shutter]. • Do not connect the camera and equipment to be able to view a video on the TV. • Press...
Handycam® Handbook
Page 98
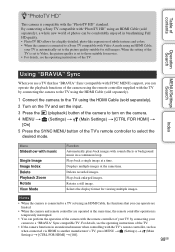
... recorded images. Selects the display format for still images. By connecting a Sony TV compatible with "PhotoTV HD" using an HDMI Cable, the functions that has "BRAVIA" Sync (compatible with SYNC MENU) support, you can operate are limited. • When the camera and remote controller are operated at the same... is set to Video, the picture quality is set to those suitable for movies. • For details, see the operating instructions of contents z"PhotoTV HD" This camera is connected to a TV set using an HDMI Cable (sold separately). 2 Turn on the TV and set to the picture...
... recorded images. Selects the display format for still images. By connecting a Sony TV compatible with "PhotoTV HD" using an HDMI Cable, the functions that has "BRAVIA" Sync (compatible with SYNC MENU) support, you can operate are limited. • When the camera and remote controller are operated at the same... is set to Video, the picture quality is set to those suitable for movies. • For details, see the operating instructions of contents z"PhotoTV HD" This camera is connected to a TV set using an HDMI Cable (sold separately). 2 Turn on the TV and set to the picture...
Handycam® Handbook
Page 101
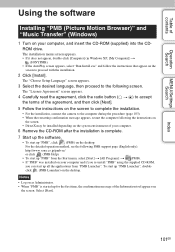
The "Choose Setup Language" screen appears. 3 Select the desired language, then proceed to the following PMB support page (English only): http://www.sony.co.jp/pmb-se/ or click (PMB Help). • To start up "PMB" from "PMB Launcher". The "License Agreement" screen appears... the radio button ( t ) to accept the terms of the agreement, and then click [Next]. 5 Follow the instructions on the screen to complete the installation. • For the installation, connect the camera to proceed with the installation. 2 Click [Install]. Notes • Log on as Administrator. • When "PMB...
The "Choose Setup Language" screen appears. 3 Select the desired language, then proceed to the following PMB support page (English only): http://www.sony.co.jp/pmb-se/ or click (PMB Help). • To start up "PMB" from "PMB Launcher". The "License Agreement" screen appears... the radio button ( t ) to accept the terms of the agreement, and then click [Next]. 5 Follow the instructions on the screen to complete the installation. • For the installation, connect the camera to proceed with the installation. 2 Click [Install]. Notes • Log on as Administrator. • When "PMB...
Handycam® Handbook
Page 107
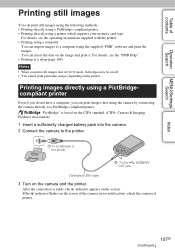
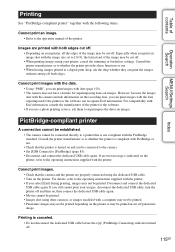
... the date on the screen. Printing images directly using a PictBridgecompliant printer Even if you do not have a computer, you print still images shot in [16:9] mode, both edges may be cut off. • You cannot print panoramic images depending on the printer. After...camera (error notification), check the connected printer. For details, see the operating instructions supplied with the printer. • Printing using a computer You can import images to a computer using the supplied "PMB" software and print the images. Table of contents Operation Search MENU/Settings Search Printing still...
... the date on the screen. Printing images directly using a PictBridgecompliant printer Even if you do not have a computer, you print still images shot in [16:9] mode, both edges may be cut off. • You cannot print panoramic images depending on the printer. After...camera (error notification), check the connected printer. For details, see the operating instructions supplied with the printer. • Printing using a computer You can import images to a computer using the supplied "PMB" software and print the images. Table of contents Operation Search MENU/Settings Search Printing still...
Handycam® Handbook
Page 115
... printer A connection cannot be established. • The camera cannot be printed. If you still cannot print your images, disconnect the dedicated USB cable,...shot with the camera include information on the recording date, you can print images with the date superimposed if the printer or the software can print images with the printer. Cannot print images. • Check that the printer is indicated on the printer, refer to the operating instructions...these functions or not. • When having images printed at a digital print shop, ask the shop whether they can be cut off ...
... printer A connection cannot be established. • The camera cannot be printed. If you still cannot print your images, disconnect the dedicated USB cable,...shot with the camera include information on the recording date, you can print images with the date superimposed if the printer or the software can print images with the printer. Cannot print images. • Check that the printer is indicated on the printer, refer to the operating instructions...these functions or not. • When having images printed at a digital print shop, ask the shop whether they can be cut off ...
Handycam® Handbook
Page 117
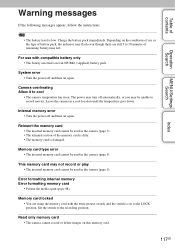
...battery inserted is set to 10 minutes of contents Operation Search MENU/Settings Search Index Warning messages If the following messages appear, follow the instructions. • The battery level is damaged. Error formatting internal memory Error formatting memory card • Format the media again (page 88)....may be used in a cool location until the temperature goes down. Memory card locked • You are still 5 to the LOCK position. Read only memory card • The camera cannot record or delete images on again. Internal memory error • Turn the power off and then on...
...battery inserted is set to 10 minutes of contents Operation Search MENU/Settings Search Index Warning messages If the following messages appear, follow the instructions. • The battery level is damaged. Error formatting internal memory Error formatting memory card • Format the media again (page 88)....may be used in a cool location until the temperature goes down. Memory card locked • You are still 5 to the LOCK position. Read only memory card • The camera cannot record or delete images on again. Internal memory error • Turn the power off and then on...

Instruction Manual
Page 3
GB For Customers in the instructions. [ Battery charger Even if the CHARGE lamp is not lit, ...children. • Keep the battery pack dry. • Replace only with the same or equivalent type recommended by Sony. • Dispose of the FCC Rules. GB 3 For more information regarding recycling of rechargeable batteries, call toll free...damaged or leaking Lithium-Ion batteries. [ Battery pack This device complies with Canadian ICES-003. This Class B digital apparatus complies with Part 15 of used rechargeable batteries to the collection and recycling location nearest you. Operation is ...
GB For Customers in the instructions. [ Battery charger Even if the CHARGE lamp is not lit, ...children. • Keep the battery pack dry. • Replace only with the same or equivalent type recommended by Sony. • Dispose of the FCC Rules. GB 3 For more information regarding recycling of rechargeable batteries, call toll free...damaged or leaking Lithium-Ion batteries. [ Battery pack This device complies with Canadian ICES-003. This Class B digital apparatus complies with Part 15 of used rechargeable batteries to the collection and recycling location nearest you. Operation is ...

Instruction Manual
Page 5
...a particular installation. [ Note: This equipment has been tested and found compliant with the limits set out in accordance with the instructions, may influence the picture and sound of this unit. [ Notice If static electricity or electromagnetism causes data transfer to correct the... for help. If this product is connected. - However, there is Sony Deutschland GmbH, Hedelfinger Strasse 61, 70327 Stuttgart, Germany. Consult the dealer or an experienced radio/TV technician for a Class B digital device, pursuant to the addresses given in separate service or guarantee documents....
...a particular installation. [ Note: This equipment has been tested and found compliant with the limits set out in accordance with the instructions, may influence the picture and sound of this unit. [ Notice If static electricity or electromagnetism causes data transfer to correct the... for help. If this product is connected. - However, there is Sony Deutschland GmbH, Hedelfinger Strasse 61, 70327 Stuttgart, Germany. Consult the dealer or an experienced radio/TV technician for a Class B digital device, pursuant to the addresses given in separate service or guarantee documents....
Instruction Manual
Page 8
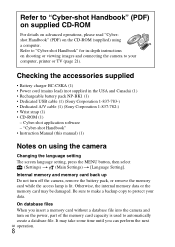
... Canada) (1) • Rechargeable battery pack NP-BK1 (1) • Dedicated USB cable (1) (Sony Corporation 1-837-783-) • Dedicated A/V cable (1) (Sony Corporation 1-837-782-) • Wrist strap (1) • CD-ROM (1) - "Cyber-shot Handbook" • Instruction Manual (this manual) (1) Notes on the CD-ROM (supplied) using the camera Changing the language setting The screen language setting, press the MENU...
... Canada) (1) • Rechargeable battery pack NP-BK1 (1) • Dedicated USB cable (1) (Sony Corporation 1-837-783-) • Dedicated A/V cable (1) (Sony Corporation 1-837-782-) • Wrist strap (1) • CD-ROM (1) - "Cyber-shot Handbook" • Instruction Manual (this manual) (1) Notes on the CD-ROM (supplied) using the camera Changing the language setting The screen language setting, press the MENU...

Instruction Manual
Page 17
.../OFF (Power) button 2 Select a setting item with v/V on the control button, then press z. 5 Select [OK], then press z. The camera is indicated as 12:00 AM, and noon as 12:00 PM. 4 Follow the instructions on and allow operation. x Setting the date and time again Press the MENU button, then select (Settings) t (Clock...
.../OFF (Power) button 2 Select a setting item with v/V on the control button, then press z. 5 Select [OK], then press z. The camera is indicated as 12:00 AM, and noon as 12:00 PM. 4 Follow the instructions on and allow operation. x Setting the date and time again Press the MENU button, then select (Settings) t (Clock...
Instruction Manual
Page 21
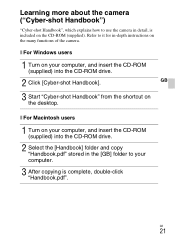
... of the camera. Learning more about the camera ("Cyber-shot Handbook") "Cyber-shot Handbook", which explains how to your computer, and insert the CD-ROM (supplied) into the CD-ROM drive. 2 Click [Cyber-shot Handbook]. x... For Windows users 1 Turn on your computer, and insert the CD-ROM (supplied) into the CD-ROM drive. 2 Select the [Handbook] folder and copy "Handbook.pdf" stored in -depth instructions...
... of the camera. Learning more about the camera ("Cyber-shot Handbook") "Cyber-shot Handbook", which explains how to your computer, and insert the CD-ROM (supplied) into the CD-ROM drive. 2 Click [Cyber-shot Handbook]. x... For Windows users 1 Turn on your computer, and insert the CD-ROM (supplied) into the CD-ROM drive. 2 Select the [Handbook] folder and copy "Handbook.pdf" stored in -depth instructions...


