Handycam® Handbook
Page 3
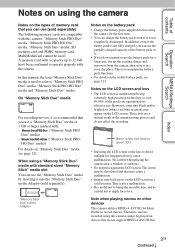
... confirmed to operate properly with standard sized "Memory Stick" media slot You can use (sold separately). Note when playing movies on other devices This camera utilizes MPEG-4 AVC/H.264 Main Profile to bump the movable lens, and be played on devices that may cause a malfunction. • Images may... the battery pack functions. • For details on the usable battery pack, see page 121. However, some tiny black and/or bright dots (white, red, blue or green) may trail across on the LCD screen in a cool, dry place. On "Memory Stick Duo" media For recording movies, it in...
... confirmed to operate properly with standard sized "Memory Stick" media slot You can use (sold separately). Note when playing movies on other devices This camera utilizes MPEG-4 AVC/H.264 Main Profile to bump the movable lens, and be played on devices that may cause a malfunction. • Images may... the battery pack functions. • For details on the usable battery pack, see page 121. However, some tiny black and/or bright dots (white, red, blue or green) may trail across on the LCD screen in a cool, dry place. On "Memory Stick Duo" media For recording movies, it in...
Handycam® Handbook
Page 8
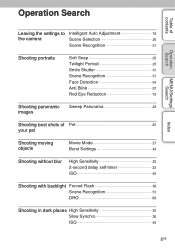
...Search Index Leaving the settings to the camera Intelligent Auto Adjustment 19 Scene Selection 25 Scene Recognition 51 Shooting portraits Soft Snap 25 Twilight Portrait 25 Smile Shutter 31 Scene Recognition 51 Face Detection 54 Anti Blink 57 Red Eye Reduction 73 Shooting panoramic images Sweep... Panorama 23 Shooting best shots of Pet 25 your pet Shooting moving objects Movie Mode 27 Burst Settings 43 Shooting without ...
...Search Index Leaving the settings to the camera Intelligent Auto Adjustment 19 Scene Selection 25 Scene Recognition 51 Shooting portraits Soft Snap 25 Twilight Portrait 25 Smile Shutter 31 Scene Recognition 51 Face Detection 54 Anti Blink 57 Red Eye Reduction 73 Shooting panoramic images Sweep... Panorama 23 Shooting best shots of Pet 25 your pet Shooting moving objects Movie Mode 27 Burst Settings 43 Shooting without ...
Handycam® Handbook
Page 12
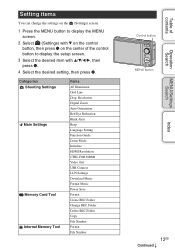
... button to display the setup screen. 3 Select the desired item with V on the control button, then press z on the center of contents Resolution Digital Zoom Auto Orientation Red Eye Reduction Blink Alert Beep Language Setting Function Guide Demo Mode Initialize HDMI Resolution CTRL FOR HDMI Video Out USB Connect LUN Settings Download...
... button to display the setup screen. 3 Select the desired item with V on the control button, then press z on the center of contents Resolution Digital Zoom Auto Orientation Red Eye Reduction Blink Alert Beep Language Setting Function Guide Demo Mode Initialize HDMI Resolution CTRL FOR HDMI Video Out USB Connect LUN Settings Download...

Handycam® Handbook
Page 16
... images Image number/Number of images recorded in date range, selected folder Recordable time Recording/Playback Media (Memory card, internal memory) Changing folder AF Illuminator Red-eye reduction Metering Mode Flash mode Flash charging White Balance D Display Indication Self-timer Destination Overheating warning Face Detection Database file full/Database file error...
... images Image number/Number of images recorded in date range, selected folder Recordable time Recording/Playback Media (Memory card, internal memory) Changing folder AF Illuminator Red-eye reduction Metering Mode Flash mode Flash charging White Balance D Display Indication Self-timer Destination Overheating warning Face Detection Database file full/Database file error...

Handycam® Handbook
Page 62
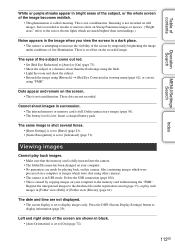
... t MENU. 2 [OK] t z • Depending on the image, sufficient correction may not be able to correct the red-eye phenomenon depending on the image. Corrects the red-eye phenomenon caused by flash. 1 Select [OK] with the control button. 3 MENU t select an image size to zoom out...playback mode. 2 MENU t (Retouch) t desired mode t z on the control button 3 Perform retouching according to the operation method in each mode. (Trimming (Resize)) (Red Eye Correction) (Unsharp masking) Records the zoomed playback image. 1 Press the button (T) to zoom in and press W to save t z 4 [OK] t z •...
... t MENU. 2 [OK] t z • Depending on the image, sufficient correction may not be able to correct the red-eye phenomenon depending on the image. Corrects the red-eye phenomenon caused by flash. 1 Select [OK] with the control button. 3 MENU t select an image size to zoom out...playback mode. 2 MENU t (Retouch) t desired mode t z on the control button 3 Perform retouching according to the operation method in each mode. (Trimming (Resize)) (Red Eye Correction) (Unsharp masking) Records the zoomed playback image. 1 Press the button (T) to zoom in and press W to save t z 4 [OK] t z •...
Handycam® Handbook
Page 68
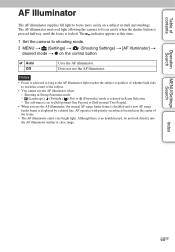
Notes • Focus is locked. The AF illuminator emits red light allowing the camera to focus easily when the shutter button is pressed halfway, until the focus is achieved as long as the AF illuminator light reaches the subject, ... illuminator emits very bright light. Although there is no health hazard, do not look directly into the AF illuminator emitter at this time. 1 Set the camera to shooting mode. 2 MENU t (Settings) t (Shooting Settings) t [AF Illuminator] t desired mode t z on the control button Auto Off Uses the AF illuminator. Does not use the...
Notes • Focus is locked. The AF illuminator emits red light allowing the camera to focus easily when the shutter button is pressed halfway, until the focus is achieved as long as the AF illuminator light reaches the subject, ... illuminator emits very bright light. Although there is no health hazard, do not look directly into the AF illuminator emitter at this time. 1 Set the camera to shooting mode. 2 MENU t (Settings) t (Shooting Settings) t [AF Illuminator] t desired mode t z on the control button Auto Off Uses the AF illuminator. Does not use the...
Handycam® Handbook
Page 73
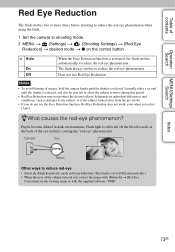
... two or more times before shooting to reduce the red-eye phenomenon when using the flash. 1 Set the camera to shooting mode. 2 MENU t (Settings) t (Shooting Settings) t [Red Eye Reduction] t desired mode t z on the viewing menu or with [Retouch] t [Red Eye Correction] on the control button Auto On Off... at the back of the subject turn out red, correct the image with the supplied software "PMB". Camera Eye Retina Other ways to reduce red-eye • Select (High Sensitivity) mode in dark environments. Table of images, hold the camera firmly until the shutter is released, and also...
... two or more times before shooting to reduce the red-eye phenomenon when using the flash. 1 Set the camera to shooting mode. 2 MENU t (Settings) t (Shooting Settings) t [Red Eye Reduction] t desired mode t z on the viewing menu or with [Retouch] t [Red Eye Correction] on the control button Auto On Off... at the back of the subject turn out red, correct the image with the supplied software "PMB". Camera Eye Retina Other ways to reduce red-eye • Select (High Sensitivity) mode in dark environments. Table of images, hold the camera firmly until the shutter is released, and also...
Handycam® Handbook
Page 102
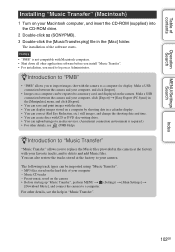
...Help). zIntroduction to "PMB" • "PMB" allows you to import images shot with Macintosh computers. • Shut down all other details, see the help in the camera at the factory to your computer - Preset-music saved on the camera • Before starting up "Music Transfer", perform MENU t (Settings) t ...ROM drive. 2 Double-click (SONYPMB). 3 Double-click the [MusicTransfer.pkg] file in a calendar display. • You can correct (Red Eye Reduction, etc.) still images, and change the shooting date and time. • You can create discs with CD or DVD disc-writing drive. • You...
...Help). zIntroduction to "PMB" • "PMB" allows you to import images shot with Macintosh computers. • Shut down all other details, see the help in the camera at the factory to your computer - Preset-music saved on the camera • Before starting up "Music Transfer", perform MENU t (Settings) t ...ROM drive. 2 Double-click (SONYPMB). 3 Double-click the [MusicTransfer.pkg] file in a calendar display. • You can correct (Red Eye Reduction, etc.) still images, and change the shooting date and time. • You can create discs with CD or DVD disc-writing drive. • You...
Handycam® Handbook
Page 112
...flash. • Light the room and shoot the subject. • Retouch the image using [Retouch] t [Red Eye Correction] in viewing menu (page 62), or correct using other cameras. • The camera is in black. • [Auto Orientation] is set to increase the visibility of the screen by copying ... charged battery pack. The same image is shot several times. • [Burst Settings] is set to [Auto] or [On] (page 73). • Shoot the subject at a distance closer than surroundings.) Noise appears in the image when you view the screen in [Folder view (Still)] or [Folder view (Movie)] (page...
...flash. • Light the room and shoot the subject. • Retouch the image using [Retouch] t [Red Eye Correction] in viewing menu (page 62), or correct using other cameras. • The camera is in black. • [Auto Orientation] is set to increase the visibility of the screen by copying ... charged battery pack. The same image is shot several times. • [Burst Settings] is set to [Auto] or [On] (page 73). • Shoot the subject at a distance closer than surroundings.) Noise appears in the image when you view the screen in [Folder view (Still)] or [Folder view (Movie)] (page...

Handycam® Handbook
Page 126
...Playback 33 Playback zoom 34 PMB 101 PMB Portable 105 Power Save 87 Precision digital zoom 71 Print 65, 107 Print order mark 65, 108 Program Auto 22 Protect 64 PTP 83 R Red Eye Correction 62 Red Eye Reduction 73 Retouch 62 Rotate 66 S Scene Recognition 51 Scene Selection 25... Screen 29 Select Folder 67 Self-Portrait 32 Self-Timer 32 Settings 12 Shooting Movie 27 Still Image 19 Shooting Direction 39 Slideshow 58 Slideshow ...
...Playback 33 Playback zoom 34 PMB 101 PMB Portable 105 Power Save 87 Precision digital zoom 71 Print 65, 107 Print order mark 65, 108 Program Auto 22 Protect 64 PTP 83 R Red Eye Correction 62 Red Eye Reduction 73 Retouch 62 Rotate 66 S Scene Recognition 51 Scene Selection 25... Screen 29 Select Folder 67 Self-Portrait 32 Self-Timer 32 Settings 12 Shooting Movie 27 Still Image 19 Shooting Direction 39 Slideshow 58 Slideshow ...
Instruction Manual
Page 9
... that generates strong radio waves or emits radiation. This data cannot be damaged. • Clean the flash surface before operating the camera. • Avoid exposing the camera to the flash surface, resulting in sandy or dusty locations may be restored. Be sure to become unusable or image data may ... GB 9 In some tiny black and/or bright dots (white, red, blue or green) may cause dirt on the flash surface to back-up any memory card being used with this camera for effective use. Notes on the camera again. It may not properly record or play back images. •...
... that generates strong radio waves or emits radiation. This data cannot be damaged. • Clean the flash surface before operating the camera. • Avoid exposing the camera to the flash surface, resulting in sandy or dusty locations may be restored. Be sure to become unusable or image data may ... GB 9 In some tiny black and/or bright dots (white, red, blue or green) may cause dirt on the flash surface to back-up any memory card being used with this camera for effective use. Notes on the camera again. It may not properly record or play back images. •...
Marketing Specifications (Camera Only)
Page 1
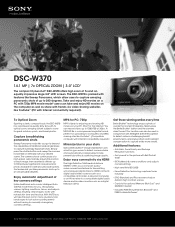
...1.800.222.7669 | www.sony.com The camera shoots continuously at 30fps. Enjoy easy connectivity via HDMI The High-Definition Multimedia Interface (HDMI™) offers you a compact audio/ video connector interface for transmitting uncompressed digital streams. HDMI connects digital audio/video sources such as ...lets you go far beyond the capabilities of a smile the moment it happens. DSC-W370 14.1 MP | 7x OPTICAL ZOOM | 3.0" LCD1 The compact Cyber-shot® DSC-W370 offers high zoom of key camera settings Unlike traditional auto mode, Intelligent Auto (iAUTO) mode thinks for you, ...
...1.800.222.7669 | www.sony.com The camera shoots continuously at 30fps. Enjoy easy connectivity via HDMI The High-Definition Multimedia Interface (HDMI™) offers you a compact audio/ video connector interface for transmitting uncompressed digital streams. HDMI connects digital audio/video sources such as ...lets you go far beyond the capabilities of a smile the moment it happens. DSC-W370 14.1 MP | 7x OPTICAL ZOOM | 3.0" LCD1 The compact Cyber-shot® DSC-W370 offers high zoom of key camera settings Unlike traditional auto mode, Intelligent Auto (iAUTO) mode thinks for you, ...
Marketing Specifications (Camera Only)
Page 2
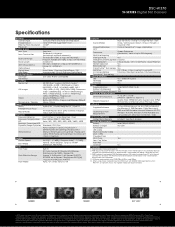
... Duo™ with Macintosh OS X(v10.4 - 10.6). GREEN RED SILVER 3.0" LCD1 © 2010 Sony Electronics Inc. Panorama Sweep Panorama (Horizontal / Veritcal up to ...Still shots: 34-238mm / Movie 16:9 37-259mm / Movie 4:3 : 34-238mm 7x Smart Zoom / Precision Digital Zoom / Off Approximately 14x with internet connectivity. DSC-W370 W-SERIES Digital Still Camera Specifications General Camera... ) Weights (Approx.) Approx. 5.6oz. (159g) body only; Sony, Cyber-shot, Optical SteadyShot, BIONZ, Xtra Fine LCD, Clear Photo, Clear Photo LCD Plus, SteadyShot, Memory Stick PRO...
... Duo™ with Macintosh OS X(v10.4 - 10.6). GREEN RED SILVER 3.0" LCD1 © 2010 Sony Electronics Inc. Panorama Sweep Panorama (Horizontal / Veritcal up to ...Still shots: 34-238mm / Movie 16:9 37-259mm / Movie 4:3 : 34-238mm 7x Smart Zoom / Precision Digital Zoom / Off Approximately 14x with internet connectivity. DSC-W370 W-SERIES Digital Still Camera Specifications General Camera... ) Weights (Approx.) Approx. 5.6oz. (159g) body only; Sony, Cyber-shot, Optical SteadyShot, BIONZ, Xtra Fine LCD, Clear Photo, Clear Photo LCD Plus, SteadyShot, Memory Stick PRO...


