Handycam® Handbook
Page 3
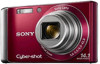
... Duo" media of 1 GB or larger marked with this camera: "Memory Stick PRO Duo" media, "Memory Stick PRO-HG Duo" media, "Memory Stick Duo" media, SD memory card and SDHC memory card. When using a "Memory Stick Duo" media with the camera. The screen may appear on the LCD screen. "Memory Stick Duo" media Adaptor Notes on the battery pack • Charge...
... Duo" media of 1 GB or larger marked with this camera: "Memory Stick PRO Duo" media, "Memory Stick PRO-HG Duo" media, "Memory Stick Duo" media, SD memory card and SDHC memory card. When using a "Memory Stick Duo" media with the camera. The screen may appear on the LCD screen. "Memory Stick Duo" media Adaptor Notes on the battery pack • Charge...

Handycam® Handbook
Page 11
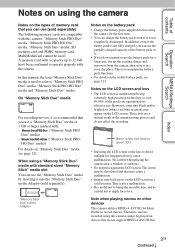
View Mode Memory card Internal Memory Menu items (Slideshow) (View Mode) (Retouch) (Delete) (Protect) DPOF (Print) (Rotate) (Select Folder) (Settings) Date View Folder view Folder view Folder View (Still) (Movie) - - - - - - - - You can select the various viewing functions easily from the MENU button. 1 Press the (Playback) button to switch to playback mode. 2 Press the MENU ...
View Mode Memory card Internal Memory Menu items (Slideshow) (View Mode) (Retouch) (Delete) (Protect) DPOF (Print) (Rotate) (Select Folder) (Settings) Date View Folder view Folder view Folder View (Still) (Movie) - - - - - - - - You can select the various viewing functions easily from the MENU button. 1 Press the (Playback) button to switch to playback mode. 2 Press the MENU ...
Handycam® Handbook
Page 12
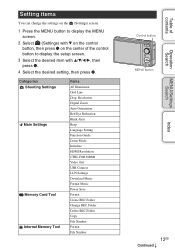
...) screen. 1 Press the MENU button to display the MENU screen. 2 Select (Settings) with V on the control button, then press z on the center of contents Resolution Digital Zoom Auto Orientation Red Eye Reduction Blink Alert Beep Language Setting Function Guide Demo Mode Initialize HDMI Resolution CTRL FOR HDMI Video Out USB Connect... control button to display the setup screen. 3 Select the desired item with v/V/b/B, then press z. 4 Select the desired setting, then press z. Categories Shooting Settings Main Settings Memory Card Tool Internal Memory Tool Items AF Illuminator Grid Line Disp.
...) screen. 1 Press the MENU button to display the MENU screen. 2 Select (Settings) with V on the control button, then press z on the center of contents Resolution Digital Zoom Auto Orientation Red Eye Reduction Blink Alert Beep Language Setting Function Guide Demo Mode Initialize HDMI Resolution CTRL FOR HDMI Video Out USB Connect... control button to display the setup screen. 3 Select the desired item with v/V/b/B, then press z. 4 Select the desired setting, then press z. Categories Shooting Settings Main Settings Memory Card Tool Internal Memory Tool Items AF Illuminator Grid Line Disp.
Handycam® Handbook
Page 13
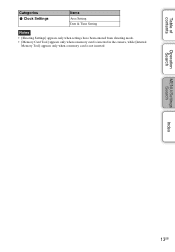
Table of contents Categories Clock Settings Items Area Setting Date & Time Setting Notes • [Shooting Settings] appears only when settings have been entered from shooting mode. • [Memory Card Tool] appears only when a memory card is inserted in the camera, while [Internal Memory Tool] appears only when a memory card is not inserted. Operation Search MENU/Settings Search Index 13GB
Table of contents Categories Clock Settings Items Area Setting Date & Time Setting Notes • [Shooting Settings] appears only when settings have been entered from shooting mode. • [Memory Card Tool] appears only when a memory card is inserted in the camera, while [Internal Memory Tool] appears only when a memory card is not inserted. Operation Search MENU/Settings Search Index 13GB
Handycam® Handbook
Page 14
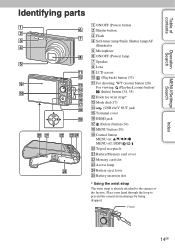
Hook 14GB Place your hand through the loop to the camera at the factory. Table of contents Operation Search MENU/Settings Search Index Identifying parts A ON/OFF (Power) button B Shutter button C Flash D Self-timer lamp/Smile ... dial (17) N (USB)/A/V OUT jack O Terminal cover P HDMI jack Q (Delete) button (36) R MENU button (10) S Control button MENU on: v/V/b/B/z MENU off: DISP/ / / T Tripod receptacle U Battery/Memory card cover V Memory card slot W Access lamp X Battery eject lever Y Battery insertion slot * Using the wrist strap The wrist strap is already attached to prevent the...
Hook 14GB Place your hand through the loop to the camera at the factory. Table of contents Operation Search MENU/Settings Search Index Identifying parts A ON/OFF (Power) button B Shutter button C Flash D Self-timer lamp/Smile ... dial (17) N (USB)/A/V OUT jack O Terminal cover P HDMI jack Q (Delete) button (36) R MENU button (10) S Control button MENU on: v/V/b/B/z MENU off: DISP/ / / T Tripod receptacle U Battery/Memory card cover V Memory card slot W Access lamp X Battery eject lever Y Battery insertion slot * Using the wrist strap The wrist strap is already attached to prevent the...

Handycam® Handbook
Page 16
... Indication Recording folder Playback folder Number of recordable images Image number/Number of images recorded in date range, selected folder Recordable time Recording/Playback Media (Memory card, internal memory) Changing folder AF Illuminator Red-eye reduction Metering Mode Flash mode Flash charging White Balance D Display Indication Self-timer Destination Overheating warning Face Detection...
... Indication Recording folder Playback folder Number of recordable images Image number/Number of images recorded in date range, selected folder Recordable time Recording/Playback Media (Memory card, internal memory) Changing folder AF Illuminator Red-eye reduction Metering Mode Flash mode Flash charging White Balance D Display Indication Self-timer Destination Overheating warning Face Detection...
Handycam® Handbook
Page 18
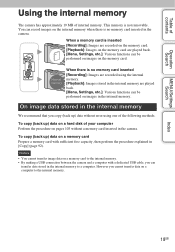
... can transfer data stored in [Copy] (page 92). However you can record images on the memory card. When there is no memory card inserted [Recording]: Images are recorded on the internal memory when there is no memory card inserted in the camera. Notes • You cannot transfer image data on pages 103 without error using the internal B Internal...
... can transfer data stored in [Copy] (page 92). However you can record images on the memory card. When there is no memory card inserted [Recording]: Images are recorded on the internal memory when there is no memory card inserted in the camera. Notes • You cannot transfer image data on pages 103 without error using the internal B Internal...

Handycam® Handbook
Page 21
...) button MENU button You can delete the currently displayed image with [Delete Single Image] and delete all images in the selected date range or internal memory (if selected) with the mode dial set to see. Table of contents zOn Easy Viewing mode When you press the (Playback) button with [Delete All...
...) button MENU button You can delete the currently displayed image with [Delete Single Image] and delete all images in the selected date range or internal memory (if selected) with the mode dial set to see. Table of contents zOn Easy Viewing mode When you press the (Playback) button with [Delete All...

Handycam® Handbook
Page 31
... You cannot use the Smile Shutter function. If you cannot use the digital zoom function. • If Sweep Panorama or Movie Mode is selected, you press the shutter button during Smile Shutter, the camera shoots the image, then returns to orient the face in setting menu...press (Smile) again. Face Detection frame Smile Detection Sensitivity indicator Notes • Shooting using the Smile Shutter ends automatically when either the memory card or internal memory becomes full. • Smiles may not be detected correctly depending on the control button (page 54). • If a smile ...
... You cannot use the Smile Shutter function. If you cannot use the digital zoom function. • If Sweep Panorama or Movie Mode is selected, you press the shutter button during Smile Shutter, the camera shoots the image, then returns to orient the face in setting menu...press (Smile) again. Face Detection frame Smile Detection Sensitivity indicator Notes • Shooting using the Smile Shutter ends automatically when either the memory card or internal memory becomes full. • Smiles may not be detected correctly depending on the control button (page 54). • If a smile ...
Handycam® Handbook
Page 33
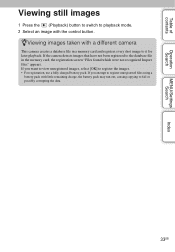
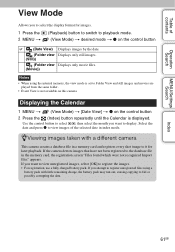
... battery pack. Table of contents Operation Search MENU/Settings Search Index Viewing still images 1 Press the (Playback) button to switch to fail or possibly corrupting the data. 33GB If the camera detects images that have not been registered to it for later playback. ... battery pack may run out, causing copying to playback mode. 2 Select an image with a different camera This camera creates a database file in a memory card and registers every shot image to the database file in the memory card, the registration screen "Files found which were not recognized Import files" appears.
... battery pack. Table of contents Operation Search MENU/Settings Search Index Viewing still images 1 Press the (Playback) button to switch to fail or possibly corrupting the data. 33GB If the camera detects images that have not been registered to it for later playback. ... battery pack may run out, causing copying to playback mode. 2 Select an image with a different camera This camera creates a database file in a memory card and registers every shot image to the database file in the memory card, the registration screen "Files found which were not recognized Import files" appears.
Handycam® Handbook
Page 43
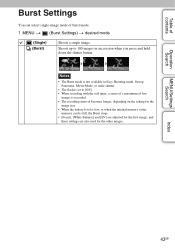
...; The recording interval becomes longer, depending on the setting for the image size. • When the battery level is low, or when the internal memory or the memory card is set to 100 images in Easy Shooting mode, Sweep Panorama, Movie Mode, or smile shutter. • The flash is full, the Burst stops...
...; The recording interval becomes longer, depending on the setting for the image size. • When the battery level is low, or when the internal memory or the memory card is set to 100 images in Easy Shooting mode, Sweep Panorama, Movie Mode, or smile shutter. • The flash is full, the Burst stops...
Handycam® Handbook
Page 61
If the camera detects images that have not been registered to the database file in a memory card and registers every shot image to it for images. 1 Press the 2 MENU t (Playback) button to switch to display. Table of the selected date in...corrupting the data. Notes • When using a battery pack with a different camera This camera creates a database file in the memory card, the registration screen "Files found which were not recognized Import files" appears. Displays only still images. zViewing images taken with little remaining charge, the battery pack may run out...
If the camera detects images that have not been registered to the database file in a memory card and registers every shot image to it for images. 1 Press the 2 MENU t (Playback) button to switch to display. Table of the selected date in...corrupting the data. Notes • When using a battery pack with a different camera This camera creates a database file in the memory card, the registration screen "Files found which were not recognized Import files" appears. Displays only still images. zViewing images taken with little remaining charge, the battery pack may run out...

Handycam® Handbook
Page 65
... and the DPOF registration is a function that allows you to specify the images of contents Operation Search DPOF DPOF (Digital Print Order Format) is cleared. MENU/Settings Search Index 65GB Table of the memory card that you want to print out later. t desired mode t z on the control button in the same procedure as... switch to clear the DPOF registration, then press z on the control button (This Image) (Multiple Images) Orders printing the currently displayed image in the internal memory. • You can select and order printing multiple images.
... and the DPOF registration is a function that allows you to specify the images of contents Operation Search DPOF DPOF (Digital Print Order Format) is cleared. MENU/Settings Search Index 65GB Table of the memory card that you want to print out later. t desired mode t z on the control button in the same procedure as... switch to clear the DPOF registration, then press z on the control button (This Image) (Multiple Images) Orders printing the currently displayed image in the internal memory. • You can select and order printing multiple images.

Handycam® Handbook
Page 67
zViewing images across multiple folders When multiple folders are created in a memory card, this selects the folder containing the image you want to play back. 1 Press the (Playback) button to switch to playback mode. 2 MENU t (View Mode) t [Folder view (Still)] or [Folder view (Movie)] t z on the first and last images in the folder. : Moves... following indicators appear on the control button 3 MENU t (Select Folder) t z 4 Select the folder with b/B. 5 [OK] t z Note • This item is not displayed when the internal memory is used to either the previous or next folders 67GB
zViewing images across multiple folders When multiple folders are created in a memory card, this selects the folder containing the image you want to play back. 1 Press the (Playback) button to switch to playback mode. 2 MENU t (View Mode) t [Folder view (Still)] or [Folder view (Movie)] t z on the first and last images in the folder. : Moves... following indicators appear on the control button 3 MENU t (Select Folder) t z 4 Select the folder with b/B. 5 [OK] t z Note • This item is not displayed when the internal memory is used to either the previous or next folders 67GB
Handycam® Handbook
Page 84
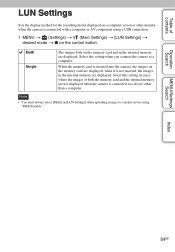
Table of both the memory card and the internal memory are not displayed when the camera is connected to a device other monitor when the camera is connected with a computer or AV component using "PMB Portable". When the memory card is not inserted, the images in cases ...Settings) t [LUN Settings] t desired mode t z on the control button Multi Single The images both on the memory card are displayed. when it is inserted into the camera, the images on the memory card and in the internal memory are displayed. MENU/Settings Search Index 84GB Select this setting in the internal...
Table of both the memory card and the internal memory are not displayed when the camera is connected to a device other monitor when the camera is connected with a computer or AV component using "PMB Portable". When the memory card is not inserted, the images in cases ...Settings) t [LUN Settings] t desired mode t z on the control button Multi Single The images both on the memory card are displayed. when it is inserted into the camera, the images on the memory card and in the internal memory are displayed. MENU/Settings Search Index 84GB Select this setting in the internal...

Handycam® Handbook
Page 88
... contents Operation Search MENU/Settings Search Index Format Formats the memory card or the internal memory. When you use a memory card with this camera for the first time, it is unrecoverable. Table of the memory card before shooting. Save precious data on a computer, etc. 1 MENU t (Settings) t (Memory Card Tool) or (Internal Memory Tool) t [Format] t [OK] t z on the control button Note •...
... contents Operation Search MENU/Settings Search Index Format Formats the memory card or the internal memory. When you use a memory card with this camera for the first time, it is unrecoverable. Table of the memory card before shooting. Save precious data on a computer, etc. 1 MENU t (Settings) t (Memory Card Tool) or (Internal Memory Tool) t [Format] t [OK] t z on the control button Note •...

Handycam® Handbook
Page 89
When the folder capacity is exceeded, a new folder is created, you insert a memory card that was used with other equipment into the camera and shoot images, a new folder may be automatically created. • Up to 9,999 images can change the storage destination folder (page 90)... and select the folder for recording images. zOn the folders After a new folder is automatically created. Images are recorded in the memory card for ...
When the folder capacity is exceeded, a new folder is created, you insert a memory card that was used with other equipment into the camera and shoot images, a new folder may be automatically created. • Up to 9,999 images can change the storage destination folder (page 90)... and select the folder for recording images. zOn the folders After a new folder is automatically created. Images are recorded in the memory card for ...

Handycam® Handbook
Page 90
... • This item is not displayed when the internal memory is used to another folder. "100" folder - Operation Search MENU/Settings Search Index 90GB Table of contents Change REC.Folder Changes the folder in the memory card that is currently used for recording images. 1 MENU t... (Settings) t REC.Folder] (Memory Card Tool) t [Change 2 Select a folder with a number that has only either "sssMSDCF" or...
... • This item is not displayed when the internal memory is used to another folder. "100" folder - Operation Search MENU/Settings Search Index 90GB Table of contents Change REC.Folder Changes the folder in the memory card that is currently used for recording images. 1 MENU t... (Settings) t REC.Folder] (Memory Card Tool) t [Change 2 Select a folder with a number that has only either "sssMSDCF" or...

Handycam® Handbook
Page 91
... recording images in the memory card. 1 MENU t (Settings) t REC.Folder] (Memory Card Tool) t [Delete 2 Select a folder with b/B on the control button. 3 [OK] t z Notes • This item is not displayed when the internal memory is selected as the recording folder using [Delete REC.Folder], the folder that cannot be played back by the camera, first delete these...
... recording images in the memory card. 1 MENU t (Settings) t REC.Folder] (Memory Card Tool) t [Delete 2 Select a folder with b/B on the control button. 3 [OK] t z Notes • This item is not displayed when the internal memory is selected as the recording folder using [Delete REC.Folder], the folder that cannot be played back by the camera, first delete these...
Handycam® Handbook
Page 92
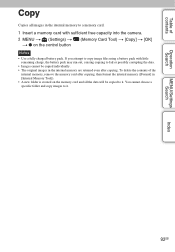
... to copy image files using a battery pack with sufficient free capacity into the camera. 2 MENU t (Settings) t t z on the memory card and all images in the internal memory to a memory card. 1 Insert a memory card with little remaining charge, the battery pack may run out, causing copying to fail...will be copied individually. • The original images in the internal memory are retained even after copying, then format the internal memory ([Format] in [Internal Memory Tool]). • A new folder is created on the control button (Memory Card Tool) t [Copy] t [OK] Notes • Use ...
... to copy image files using a battery pack with sufficient free capacity into the camera. 2 MENU t (Settings) t t z on the memory card and all images in the internal memory to a memory card. 1 Insert a memory card with little remaining charge, the battery pack may run out, causing copying to fail...will be copied individually. • The original images in the internal memory are retained even after copying, then format the internal memory ([Format] in [Internal Memory Tool]). • A new folder is created on the control button (Memory Card Tool) t [Copy] t [OK] Notes • Use ...


