
Handycam® Handbook
Page 85
Table of contents Operation Search MENU/Settings Search Index Download Music You can use "Music Transfer" in the CD-ROM (supplied) to change background music tracks. 1 MENU t (Settings) t (Main Settings) t [Download Music] t z on the control button The message "Connect to PC" appears. 2 Make a USB connection between the camera and a computer, then start "Music Transfer". 3 Follow the instructions on the screen to change music files. 85GB
Table of contents Operation Search MENU/Settings Search Index Download Music You can use "Music Transfer" in the CD-ROM (supplied) to change background music tracks. 1 MENU t (Settings) t (Main Settings) t [Download Music] t z on the control button The message "Connect to PC" appears. 2 Make a USB connection between the camera and a computer, then start "Music Transfer". 3 Follow the instructions on the screen to change music files. 85GB

Handycam® Handbook
Page 96
...image will not be displayed on the TV when the movie is shot under the condition of the camera and TV connected. • When output to TV, Easy Viewing mode is connected to. Refer also to the operating instructions supplied with the control button. Select the desired image with the ...2 To the (USB)/A/V OUT jack 3 Turn on the TV and set the input. 4 Press (Playback) button to turn on the camera. Images shot with the camera appear on the TV. Viewing images by connecting the camera to the type of TV the camera is invalid. Index 96GB The connection varies according to a TV.
...image will not be displayed on the TV when the movie is shot under the condition of the camera and TV connected. • When output to TV, Easy Viewing mode is connected to. Refer also to the operating instructions supplied with the control button. Select the desired image with the ...2 To the (USB)/A/V OUT jack 3 Turn on the TV and set the input. 4 Press (Playback) button to turn on the camera. Images shot with the camera appear on the TV. Viewing images by connecting the camera to the type of TV the camera is invalid. Index 96GB The connection varies according to a TV.
Handycam® Handbook
Page 97
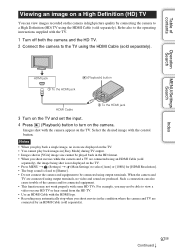
...when you shoot movies in the condition where the camera and TV are connected using output terminals. Index 97GB Continued r Refer also to the operating instructions supplied with the TV. 1 Turn off both the camera and the HD TV. 2 Connect the camera to be connected using an HDMI Cable (sold ...separately), the image being shot is fixed to [Shutter]. • Do not connect the camera and equipment to the TV using...
...when you shoot movies in the condition where the camera and TV are connected using output terminals. Index 97GB Continued r Refer also to the operating instructions supplied with the TV. 1 Turn off both the camera and the HD TV. 2 Connect the camera to be connected using an HDMI Cable (sold ...separately), the image being shot is fixed to [Shutter]. • Do not connect the camera and equipment to the TV using...
Handycam® Handbook
Page 98
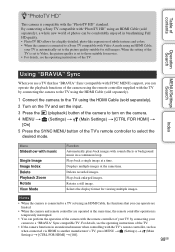
...-detailed, photo-like expression of subtle textures and colors. • When the camera is automatically set to the picture quality suitable for still images. Selects the display format for viewing multiple images. By connecting a Sony TV compatible with "PhotoTV HD" using an HDMI Cable (sold separately), a ...desired mode. Table of contents z"PhotoTV HD" This camera is set to those suitable for movies. • For details, see the operating instructions of the TV. • If the camera functions in a continuous loop. Notes • When the camera is connected to a TV set using the HDMI ...
...-detailed, photo-like expression of subtle textures and colors. • When the camera is automatically set to the picture quality suitable for still images. Selects the display format for viewing multiple images. By connecting a Sony TV compatible with "PhotoTV HD" using an HDMI Cable (sold separately), a ...desired mode. Table of contents z"PhotoTV HD" This camera is set to those suitable for movies. • For details, see the operating instructions of the TV. • If the camera functions in a continuous loop. Notes • When the camera is connected to a TV set using the HDMI ...
Handycam® Handbook
Page 101
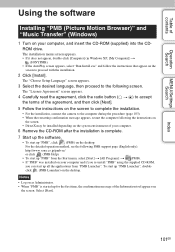
... ( t ) to accept the terms of the agreement, and then click [Next]. 5 Follow the instructions on the screen to complete the installation. • For the installation, connect the camera to the computer during the procedure (page 103). • When the restarting confirmation message appears, restart the... computer following PMB support page (English only): http://www.sony.co.jp/pmb-se/ or click (PMB Help). &#...
... ( t ) to accept the terms of the agreement, and then click [Next]. 5 Follow the instructions on the screen to complete the installation. • For the installation, connect the camera to the computer during the procedure (page 103). • When the restarting confirmation message appears, restart the... computer following PMB support page (English only): http://www.sony.co.jp/pmb-se/ or click (PMB Help). &#...
Handycam® Handbook
Page 107
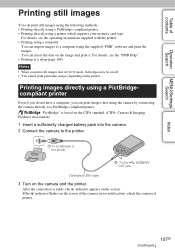
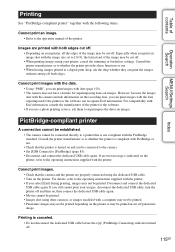
...page 108) Notes • When you can insert the date on the CIPA standard. (CIPA: Camera & Imaging Products Association) 1 Insert a sufficiently charged battery pack into the camera. 2 Connect the camera to a computer using the supplied "PMB" software and print the images. Printing images directly using the...you do not have a computer, you print still images shot in [16:9] mode, both edges may be cut off. • You cannot print panoramic images depending on the printer. Index 107GB Continued r For details, see the operating instructions supplied with the printer. • Printing using...
...page 108) Notes • When you can insert the date on the CIPA standard. (CIPA: Camera & Imaging Products Association) 1 Insert a sufficiently charged battery pack into the camera. 2 Connect the camera to a computer using the supplied "PMB" software and print the images. Printing images directly using the...you do not have a computer, you print still images shot in [16:9] mode, both edges may be cut off. • You cannot print panoramic images depending on the printer. Index 107GB Continued r For details, see the operating instructions supplied with the printer. • Printing using...
Handycam® Handbook
Page 115
...Cannot print an image. • Refer to whether the printer provides these functions or not. • When having images printed at a digital print shop, ask the shop whether they can print the images without cutting off both edges cut off. • Depending on your ...still cannot print your printer, cancel the trimming or borderless settings. Cannot print images with both edges. Printing is indicated on the printer, refer to superimpose the dates on the printer. Especially when you print an image shot with the image size set to the operating instructions supplied with the camera...
...Cannot print an image. • Refer to whether the printer provides these functions or not. • When having images printed at a digital print shop, ask the shop whether they can print the images without cutting off both edges cut off. • Depending on your ...still cannot print your printer, cancel the trimming or borderless settings. Cannot print images with both edges. Printing is indicated on the printer, refer to superimpose the dates on the printer. Especially when you print an image shot with the image size set to the operating instructions supplied with the camera...
Handycam® Handbook
Page 117
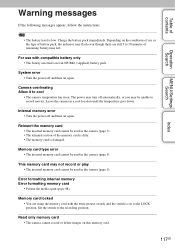
... minutes of remaining battery time left. System error • Turn the power off and then on this memory card. 117GB Leave the camera in the camera (page 3). • The terminal section of the memory card is dirty. • The memory card is set to the LOCK ...card locked • You are still 5 to record movies. Error formatting internal memory Error formatting memory card • Format the media again (page 88). Table of contents Operation Search MENU/Settings Search Index Warning messages If the following messages appear, follow the instructions. • The battery level ...
... minutes of remaining battery time left. System error • Turn the power off and then on this memory card. 117GB Leave the camera in the camera (page 3). • The terminal section of the memory card is dirty. • The memory card is set to the LOCK ...card locked • You are still 5 to record movies. Error formatting internal memory Error formatting memory card • Format the media again (page 88). Table of contents Operation Search MENU/Settings Search Index Warning messages If the following messages appear, follow the instructions. • The battery level ...

Instruction Manual
Page 3
...or leaking Lithium-Ion batteries. [ Battery pack This device complies with Canadian ICES-003. This Class B digital apparatus complies with Part 15 of the FCC Rules. • Do not expose to high temperature above...pack using the battery charger, immediately shut off the power by Sony. • Dispose of used rechargeable batteries to the wall outlet (wall socket). If some trouble occurs... by returning your used battery packs promptly as described in the U.S.A. GB For Customers in the instructions. [ Battery charger Even if the CHARGE lamp is not lit, the battery charger is not ...
...or leaking Lithium-Ion batteries. [ Battery pack This device complies with Canadian ICES-003. This Class B digital apparatus complies with Part 15 of the FCC Rules. • Do not expose to high temperature above...pack using the battery charger, immediately shut off the power by Sony. • Dispose of used rechargeable batteries to the wall outlet (wall socket). If some trouble occurs... by returning your used battery packs promptly as described in the U.S.A. GB For Customers in the instructions. [ Battery charger Even if the CHARGE lamp is not lit, the battery charger is not ...

Instruction Manual
Page 5
... to comply with the limits for a digital device pursuant to Subpart B of Part 15 of FCC Rules. This product has been tested and found to comply with the instructions, may influence the picture and sound of this product is Sony Deutschland GmbH, Hedelfinger Strasse 61, 70327 ...), restart the application or disconnect and connect the communication cable (USB, etc.) again. The Authorized Representative for EMC and product safety is Sony Corporation, 1-7-1 Konan Minato-ku Tokyo, 108-0075 Japan. [ Note: This equipment has been tested and found compliant with the limits set...
... to comply with the limits for a digital device pursuant to Subpart B of Part 15 of FCC Rules. This product has been tested and found to comply with the instructions, may influence the picture and sound of this product is Sony Deutschland GmbH, Hedelfinger Strasse 61, 70327 ...), restart the application or disconnect and connect the communication cable (USB, etc.) again. The Authorized Representative for EMC and product safety is Sony Corporation, 1-7-1 Konan Minato-ku Tokyo, 108-0075 Japan. [ Note: This equipment has been tested and found compliant with the limits set...
Instruction Manual
Page 8
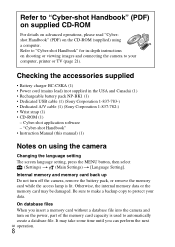
... (mains lead) (not supplied in -depth instructions on the power, part of the memory card capacity is lit. "Cyber-shot Handbook" • Instruction Manual (this manual) (1) Notes on the CD-ROM (supplied) using the camera Changing the language setting The screen language setting,...Cybershot Handbook" (PDF) on using a computer. Refer to "Cyber-shot Handbook" for in the USA and Canada) (1) • Rechargeable battery pack NP-BK1 (1) • Dedicated USB cable (1) (Sony Corporation 1-837-783-) • Dedicated A/V cable (1) (Sony Corporation 1-837-782-) • Wrist strap (1) • ...
... (mains lead) (not supplied in -depth instructions on the power, part of the memory card capacity is lit. "Cyber-shot Handbook" • Instruction Manual (this manual) (1) Notes on the CD-ROM (supplied) using the camera Changing the language setting The screen language setting,...Cybershot Handbook" (PDF) on using a computer. Refer to "Cyber-shot Handbook" for in the USA and Canada) (1) • Rechargeable battery pack NP-BK1 (1) • Dedicated USB cable (1) (Sony Corporation 1-837-783-) • Dedicated A/V cable (1) (Sony Corporation 1-837-782-) • Wrist strap (1) • ...

Instruction Manual
Page 17
The camera is indicated as 12:00 AM, and noon as 12:00 PM. 4 Follow the instructions on the control button, then press z. ON/OFF (Power) button 2 Select a setting item with v/V/ b/B, then press z. • Midnight is turned on. • It may take ...
The camera is indicated as 12:00 AM, and noon as 12:00 PM. 4 Follow the instructions on the control button, then press z. ON/OFF (Power) button 2 Select a setting item with v/V/ b/B, then press z. • Midnight is turned on. • It may take ...
Instruction Manual
Page 21
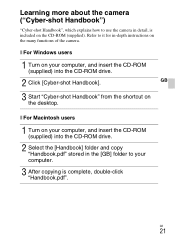
....pdf" stored in -depth instructions on the CD-ROM (supplied). GB 3 Start "Cyber-shot Handbook" from the shortcut on your computer, and insert the CD-ROM (supplied) into the CD-ROM drive. 2 Click [Cyber-shot Handbook]. x For Windows users 1 Turn on the desktop. GB 21 Learning more about the camera ("Cyber-shot Handbook") "Cyber-shot Handbook", which explains how to...
....pdf" stored in -depth instructions on the CD-ROM (supplied). GB 3 Start "Cyber-shot Handbook" from the shortcut on your computer, and insert the CD-ROM (supplied) into the CD-ROM drive. 2 Click [Cyber-shot Handbook]. x For Windows users 1 Turn on the desktop. GB 21 Learning more about the camera ("Cyber-shot Handbook") "Cyber-shot Handbook", which explains how to...


