Instruction Manual
Page 5
... installed and used with the equipment in accordance with the instructions, may influence the picture and sound of this unit. [ Notice If static electricity or electromagnetism causes data transfer to provide reasonable protection against harmful interference in separate service or guarantee documents. These limits are designed to discontinue midway (fail), restart the application or disconnect and connect the communication cable (USB, etc.) again. Connect...
... installed and used with the equipment in accordance with the instructions, may influence the picture and sound of this unit. [ Notice If static electricity or electromagnetism causes data transfer to provide reasonable protection against harmful interference in separate service or guarantee documents. These limits are designed to discontinue midway (fail), restart the application or disconnect and connect the communication cable (USB, etc.) again. Connect...

Instruction Manual
Page 9
... (white, red, blue or green) may not properly record or play back images. • Using the camera in insufficient light emission. The heat of the manufacturing process, and do not affect the recording. • When the battery level becomes low, the lens might stop moving. These dots are operational for the first time, it is not a malfunction. Insert a charged battery pack and turn on the LCD screen. On camera's temperature...
... (white, red, blue or green) may not properly record or play back images. • Using the camera in insufficient light emission. The heat of the manufacturing process, and do not affect the recording. • When the battery level becomes low, the lens might stop moving. These dots are operational for the first time, it is not a malfunction. Insert a charged battery pack and turn on the LCD screen. On camera's temperature...

Instruction Manual
Page 11
... zoom) button/ (Index) button I Mode switch J Hook for wrist strap K (Playback) button L (Delete) button M MENU button N Control button Menu on: v/V/b/B/z GB Menu off: DISP/ / / O Terminal cover P (USB)/A/V OUT jack Q Speaker R Tripod receptacle • Use a tripod with a screw less than 5.5 mm (7/32 inches) long. Otherwise, you cannot firmly secure the camera, and damage to the camera may occur. S Access lamp T Memory card slot U Battery eject lever V Battery insertion slot W Battery/memory card cover A ON/OFF (Power) button B Shutter button C Flash D Self-timer...
... zoom) button/ (Index) button I Mode switch J Hook for wrist strap K (Playback) button L (Delete) button M MENU button N Control button Menu on: v/V/b/B/z GB Menu off: DISP/ / / O Terminal cover P (USB)/A/V OUT jack Q Speaker R Tripod receptacle • Use a tripod with a screw less than 5.5 mm (7/32 inches) long. Otherwise, you cannot firmly secure the camera, and damage to the camera may occur. S Access lamp T Memory card slot U Battery eject lever V Battery insertion slot W Battery/memory card cover A ON/OFF (Power) button B Shutter button C Flash D Self-timer...

Operating Instructions
Page 5
Table of contents Table of contents Operation Search MENU/Settings Search Index Notes on using the camera How to use this handbook 2 Notes on using the camera 3 Operation Search 8 MENU/Settings Search 10 Identifying parts 13 List of icons displayed on the screen 14 Using the mode switch 16 Using the internal memory 17 Shooting Zoom 18 DISP (Screen Display Settings 19 Flash 20 Smile Shutter 21 Self-Timer 22 Viewing Viewing still images 23 Playback zoom 24 Image Index 25 Delete 26 Viewing movies 27 MENU (Shooting) MENU items (Shooting 10 5GB
Table of contents Table of contents Operation Search MENU/Settings Search Index Notes on using the camera How to use this handbook 2 Notes on using the camera 3 Operation Search 8 MENU/Settings Search 10 Identifying parts 13 List of icons displayed on the screen 14 Using the mode switch 16 Using the internal memory 17 Shooting Zoom 18 DISP (Screen Display Settings 19 Flash 20 Smile Shutter 21 Self-Timer 22 Viewing Viewing still images 23 Playback zoom 24 Image Index 25 Delete 26 Viewing movies 27 MENU (Shooting) MENU items (Shooting 10 5GB

Operating Instructions
Page 6
Table of contents MENU (Viewing) MENU items (Viewing 11 Settings Setting items 12 Operation Search TV Viewing images on a TV 77 MENU/Settings Search Computer Using with your computer 79 Using the software 80 Connecting the camera to the computer 82 Uploading images to a media service 84 Index Printing Printing still images 86 Troubleshooting Troubleshooting 88 Warning indicators and messages 96 Others "Memory Stick Duo" media 99 Battery pack 101 Battery charger 102 6GB
Table of contents MENU (Viewing) MENU items (Viewing 11 Settings Setting items 12 Operation Search TV Viewing images on a TV 77 MENU/Settings Search Computer Using with your computer 79 Using the software 80 Connecting the camera to the computer 82 Uploading images to a media service 84 Index Printing Printing still images 86 Troubleshooting Troubleshooting 88 Warning indicators and messages 96 Others "Memory Stick Duo" media 99 Battery pack 101 Battery charger 102 6GB

Operating Instructions
Page 9
... Search MENU/Settings Search Changing focus position Focus 42 Face Detection 48 Changing image size Image Size 35 Deleting images Delete 26, 54 Format 70 Displaying enlarged images Playback zoom 24 Trimming 53 Editing images Retouch 53 Playing back a series of Slideshow 52 images in order Shooting/Viewing with Easy Mode 34, 51 easy-to-see indicators Printing images with the date Using the "PMB (Picture Motion Browser)" 80 Changing clock settings Date & Time Setting 76 Initializing settings Initialize 66 Printing images Print 86 Viewing on TVs Viewing images...
... Search MENU/Settings Search Changing focus position Focus 42 Face Detection 48 Changing image size Image Size 35 Deleting images Delete 26, 54 Format 70 Displaying enlarged images Playback zoom 24 Trimming 53 Editing images Retouch 53 Playing back a series of Slideshow 52 images in order Shooting/Viewing with Easy Mode 34, 51 easy-to-see indicators Printing images with the date Using the "PMB (Picture Motion Browser)" 80 Changing clock settings Date & Time Setting 76 Initializing settings Initialize 66 Printing images Print 86 Viewing on TVs Viewing images...

Operating Instructions
Page 10
... of contents Operation Search MENU/Settings Search Index MENU items (Shooting) You can select the various shooting functions easily from the MENU button. 1 Press the ON/OFF (Power) button and set the camera to shooting mode. 2 Press the MENU button to turn off the Menu screen. EV ISO - - - Easy Mode - MENU/Settings Search Table of each mode are available for each item. DRO - - - - (Settings) Note • Only the items that are displayed on the recording mode, function settings may be fixed or limited...
... of contents Operation Search MENU/Settings Search Index MENU items (Shooting) You can select the various shooting functions easily from the MENU button. 1 Press the ON/OFF (Power) button and set the camera to shooting mode. 2 Press the MENU button to turn off the Menu screen. EV ISO - - - Easy Mode - MENU/Settings Search Table of each mode are available for each item. DRO - - - - (Settings) Note • Only the items that are displayed on the recording mode, function settings may be fixed or limited...
Operating Instructions
Page 12
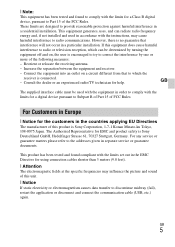
... z. Control button MENU button Categories Shooting Settings Main Settings Memory Card Tool Internal Memory Tool Clock Settings Items Grid Line Digital Zoom Red Eye Reduction Beep Language Setting Function Guide Power Save Initialize Video Out USB Connect LUN Settings Format Create REC.Folder Change REC.Folder Delete REC.Folder Copy File Number Format File Number Date & Time Setting Notes • [Shooting Settings] appears only when settings have been entered from shooting mode. • [Memory Card Tool] appears only when a memory card is inserted in the camera, while [Internal Memory...
... z. Control button MENU button Categories Shooting Settings Main Settings Memory Card Tool Internal Memory Tool Clock Settings Items Grid Line Digital Zoom Red Eye Reduction Beep Language Setting Function Guide Power Save Initialize Video Out USB Connect LUN Settings Format Create REC.Folder Change REC.Folder Delete REC.Folder Copy File Number Format File Number Date & Time Setting Notes • [Shooting Settings] appears only when settings have been entered from shooting mode. • [Memory Card Tool] appears only when a memory card is inserted in the camera, while [Internal Memory...

Operating Instructions
Page 15
...Standby Recording a movie/Movie standby 0:12 Recording time (m:s) 101-0012 Folder-file number 2010 1 1 9:30 AM Recorded date/time of the playback image z STOP z PLAY Function guide for playing image bB BACK/NEXT Selecting images V VOLUME Adjusting volume C Display 96 12/12 100Min Indication Recording folder Playback folder Number of recordable images Image number/Number of images recorded in selected folder Recordable time Recording/Playback Media (memory card, internal memory) Changing folder Red-eye reduction Metering mode Flash mode Flash charging White balance D Display C:32...
...Standby Recording a movie/Movie standby 0:12 Recording time (m:s) 101-0012 Folder-file number 2010 1 1 9:30 AM Recorded date/time of the playback image z STOP z PLAY Function guide for playing image bB BACK/NEXT Selecting images V VOLUME Adjusting volume C Display 96 12/12 100Min Indication Recording folder Playback folder Number of recordable images Image number/Number of images recorded in selected folder Recordable time Recording/Playback Media (memory card, internal memory) Changing folder Red-eye reduction Metering mode Flash mode Flash charging White balance D Display C:32...

Operating Instructions
Page 25
... images of contents Operation Search MENU/Settings Search Index Image Index Displays multiple images at the same time. 1 Press the (Playback) button to switch to playback mode. 2 Press the (Index) button to Easy Mode during Easy Mode. Note • When the camera is set to display the image index screen. image screen. You cannot view images in index mode during image index display, the LCD screen changes to the single-image screen, select an image with the control button, then press z. Press the button again to display an index screen with more images...
... images of contents Operation Search MENU/Settings Search Index Image Index Displays multiple images at the same time. 1 Press the (Playback) button to switch to playback mode. 2 Press the (Index) button to Easy Mode during Easy Mode. Note • When the camera is set to display the image index screen. image screen. You cannot view images in index mode during image index display, the LCD screen changes to the single-image screen, select an image with the control button, then press z. Press the button again to display an index screen with more images...
Operating Instructions
Page 37
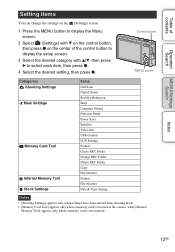
... image size. • When the battery level is low, or when the internal memory or memory card is full, the Burst stops. • [Focus], [White Balance] and [EV] are adjusted for the first image, and these settings are also used for the other images. Shoots up to [Off]. • When recording with the self timer, a series of a maximum of contents Operation Search Burst Settings You can select single shooting or burst mode. 1 MENU t (Burst Settings...
... image size. • When the battery level is low, or when the internal memory or memory card is full, the Burst stops. • [Focus], [White Balance] and [EV] are adjusted for the first image, and these settings are also used for the other images. Shoots up to [Off]. • When recording with the self timer, a series of a maximum of contents Operation Search Burst Settings You can select single shooting or burst mode. 1 MENU t (Burst Settings...

Operating Instructions
Page 80
... the instructions on the screen. • DirectX may be installed depending on the desktop. Notes • Log on as Administrator. • When "PMB" is started up for the first time, the confirmation message of contents Operation Search MENU/Settings Search Index Using the software Installing "PMB (Picture Motion Browser)" (Windows) 1 Turn on your computer. 6 Remove the CD-ROM after the installation is complete. 7 Start up the software. • To start...
... the instructions on the screen. • DirectX may be installed depending on the desktop. Notes • Log on as Administrator. • When "PMB" is started up for the first time, the confirmation message of contents Operation Search MENU/Settings Search Index Using the software Installing "PMB (Picture Motion Browser)" (Windows) 1 Turn on your computer. 6 Remove the CD-ROM after the installation is complete. 7 Start up the software. • To start...

Operating Instructions
Page 87
... size of contents Operation Search MENU/Settings Search 4 MENU t (Print) t desired mode t z on the control button This Image Multiple Images Prints the currently displayed image in single-image mode. Printing at a shop You can take image data to a shop, always copy (back up) your photo printing service shop. Selects the number of memory card they handle. • A memory card adaptor (sold separately) may be available depending on images in advance in the internal memory at the shop. Selects [Date] or [Day&Time] to insert the date...
... size of contents Operation Search MENU/Settings Search 4 MENU t (Print) t desired mode t z on the control button This Image Multiple Images Prints the currently displayed image in single-image mode. Printing at a shop You can take image data to a shop, always copy (back up) your photo printing service shop. Selects the number of memory card they handle. • A memory card adaptor (sold separately) may be available depending on images in advance in the internal memory at the shop. Selects [Date] or [Day&Time] to insert the date...

Operating Instructions
Page 91
... display images only. Cannot shoot images in USB mode. Viewing images Cannot play back images. • Make sure that the memory card is fully inserted into the camera. • The folder/file name has been changed on your TV (page 67). • Check whether the connection is set to the camera, disconnect it. The image appears rough right after playback starts. • This may happen due to Easy Mode. Cannot display images in viewing menu (page 53), or correct using...
... display images only. Cannot shoot images in USB mode. Viewing images Cannot play back images. • Make sure that the memory card is fully inserted into the camera. • The folder/file name has been changed on your TV (page 67). • Check whether the connection is set to the camera, disconnect it. The image appears rough right after playback starts. • This may happen due to Easy Mode. Cannot display images in viewing menu (page 53), or correct using...

Operating Instructions
Page 92
... recognizes the "Memory Stick PRO Duo" media. Operation Search MENU/Settings Search Index Computers "Memory Stick PRO Duo" media is not supported, connect the camera to [Auto] or [Mass Storage] (page 68). • Use the dedicated USB cable (supplied). • Disconnect the dedicated USB cable from the internal memory or the memory card. Import the movie to your computer using a memory card formatted by noise when you may not be viewed on the camera. • Export...
... recognizes the "Memory Stick PRO Duo" media. Operation Search MENU/Settings Search Index Computers "Memory Stick PRO Duo" media is not supported, connect the camera to [Auto] or [Mass Storage] (page 68). • Use the dedicated USB cable (supplied). • Disconnect the dedicated USB cable from the internal memory or the memory card. Import the movie to your computer using a memory card formatted by noise when you may not be viewed on the camera. • Export...

Operating Instructions
Page 94
Cannot print images. • Check that you have the recording data so the date cannot be inserted. For details, refer to the operating instructions supplied with a computer may not be printed. If you still cannot print your images, disconnect the dedicated USB cable, turn the printer off and then on, then connect the dedicated USB cable again. • Movies cannot be printed. • Images shot using the dedicated USB cable. • Turn on the printer. Change the setting of...
Cannot print images. • Check that you have the recording data so the date cannot be inserted. For details, refer to the operating instructions supplied with a computer may not be printed. If you still cannot print your images, disconnect the dedicated USB cable, turn the printer off and then on, then connect the dedicated USB cable again. • Movies cannot be printed. • Images shot using the dedicated USB cable. • Turn on the printer. Change the setting of...

Operating Instructions
Page 96
... flash even though there are still 5 to 10 minutes of remaining battery time left. Format the internal memory or the memory card (page 70). • The inserted memory card cannot be used with the camera's hardware. Depending on the conditions of use with a letter of the alphabet appears, the self-diagnosis function on again. Table of contents Operation Search MENU/Settings Search Index Warning indicators and messages Self-diagnosis display If a code starting with compatible battery...
... flash even though there are still 5 to 10 minutes of remaining battery time left. Format the internal memory or the memory card (page 70). • The inserted memory card cannot be used with the camera's hardware. Depending on the conditions of use with a letter of the alphabet appears, the self-diagnosis function on again. Table of contents Operation Search MENU/Settings Search Index Warning indicators and messages Self-diagnosis display If a code starting with compatible battery...

Operating Instructions
Page 97
Internal memory error • Turn the power off automatically, or you may turn off and then on the memory card. MENU/Settings Search Error formatting internal memory Error formatting memory card • Format the media again (page 70). File error • An error occurred while the image was playing back. Operation Search Reinsert the memory card • The inserted memory card cannot be played back have been recorded in the internal memory. • No images that cannot be used in this is damaged. Memory card locked • You are...
Internal memory error • Turn the power off automatically, or you may turn off and then on the memory card. MENU/Settings Search Error formatting internal memory Error formatting memory card • Format the media again (page 70). File error • An error occurred while the image was playing back. Operation Search Reinsert the memory card • The inserted memory card cannot be played back have been recorded in the internal memory. • No images that cannot be used in this is damaged. Memory card locked • You are...

Operating Instructions
Page 98
...] and delete unwanted images. 98GB Turn the power off and on the printer. Operation cannot be performed on the camera. No internal memory space remaining Delete images? • The internal memory is canceling the current print job. VGA is not supported with size that you use a memory card of contents Operation Search MENU/Settings Search Index File protected • Release the protection (page 55). Image size over limit • You are playing back an image with this memory card • For recording movies...
...] and delete unwanted images. 98GB Turn the power off and on the printer. Operation cannot be performed on the camera. No internal memory space remaining Delete images? • The internal memory is canceling the current print job. VGA is not supported with size that you use a memory card of contents Operation Search MENU/Settings Search Index File protected • Release the protection (page 55). Image size over limit • You are playing back an image with this memory card • For recording movies...
Operating Instructions
Page 103
... 44 Change REC.Folder 72 Changing the display 19 Clock Settings 76 Computer 79 Importing images 82 Connecting Computer 82 Printer 86 TV 77 Control button 13 Copy 74 Create REC.Folder 71 D Date & Time Setting 76 Delete 26, 54 Delete REC.Folder 73 Digital Zoom 60 DISP 19 DPOF 56 DRO 50 E Easy Mode Shooting 34 Viewing 51 EV 38 Exposure 38 F Face Detection 48 File Number 75 Flash 20 Focus 42 Folder Changing 72 Creating 71 Deleting 73 Selecting 58 Format 70 Function Guide...
... 44 Change REC.Folder 72 Changing the display 19 Clock Settings 76 Computer 79 Importing images 82 Connecting Computer 82 Printer 86 TV 77 Control button 13 Copy 74 Create REC.Folder 71 D Date & Time Setting 76 Delete 26, 54 Delete REC.Folder 73 Digital Zoom 60 DISP 19 DPOF 56 DRO 50 E Easy Mode Shooting 34 Viewing 51 EV 38 Exposure 38 F Face Detection 48 File Number 75 Flash 20 Focus 42 Folder Changing 72 Creating 71 Deleting 73 Selecting 58 Format 70 Function Guide...


