Instruction Manual
Page 4
... on the product or on its packaging indicates that this product shall not be determined by turning the equipment off and on a circuit different from that interference will not occur in Europe ...connected. - The Authorized Representative for help. For more of FCC Rules. However, there is Sony Deutschland GmbH, Hedelfinger Strasse 61, 70327 Stuttgart, Germany. Consult the dealer or an experienced radio... the shop where you will help prevent potential negative consequences for a digital device pursuant to conserve natural resources. The recycling of Old Electrical & Electronic Equipment (Applicable...
... on the product or on its packaging indicates that this product shall not be determined by turning the equipment off and on a circuit different from that interference will not occur in Europe ...connected. - The Authorized Representative for help. For more of FCC Rules. However, there is Sony Deutschland GmbH, Hedelfinger Strasse 61, 70327 Stuttgart, Germany. Consult the dealer or an experienced radio... the shop where you will help prevent potential negative consequences for a digital device pursuant to conserve natural resources. The recycling of Old Electrical & Electronic Equipment (Applicable...
Instruction Manual
Page 8
...before operating the camera. • Avoid exposing the camera to automatically create a management file. These dots are operational for Camera File system) universal standard established by JEITA (Japan Electronics and Information Technology Industries Association). • Sony does not guarantee that the camera will play back ...use . Notes on recording/playback • Before you insert a "Memory Stick Duo" media without a management file into the camera and turn on the power, part of the manufacturing process, and do not affect the recording. • When the battery level becomes ...
...before operating the camera. • Avoid exposing the camera to automatically create a management file. These dots are operational for Camera File system) universal standard established by JEITA (Japan Electronics and Information Technology Industries Association). • Sony does not guarantee that the camera will play back ...use . Notes on recording/playback • Before you insert a "Memory Stick Duo" media without a management file into the camera and turn on the power, part of the manufacturing process, and do not affect the recording. • When the battery level becomes ...

Instruction Manual
Page 12
... the battery charger to the wall outlet (wall socket). If you continue charging the battery pack for about one more hour after the CHARGE lamp turns off, the charge will last slightly longer (full charge). Getting started Charging the battery pack 1 Insert the battery pack into the battery charger. • You...
... the battery charger to the wall outlet (wall socket). If you continue charging the battery pack for about one more hour after the CHARGE lamp turns off, the charge will last slightly longer (full charge). Getting started Charging the battery pack 1 Insert the battery pack into the battery charger. • You...
Instruction Manual
Page 15
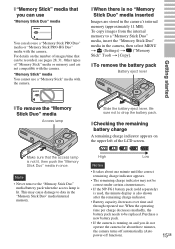
... "Memory Stick Duo" media in the "Memory Stick Duo" media/internal memory. High Low Notes • It takes about three minutes, the camera turns off automatically (Auto power-off function). 15GB To copy images from the internal memory to drop the battery pack. This may not be replaced.... Purchase a new battery pack. • If the camera is also shown after the remaining charge indicator. • Battery capacity decreases over time and through repeated use. Other types of "Memory Stick"...
... "Memory Stick Duo" media in the "Memory Stick Duo" media/internal memory. High Low Notes • It takes about three minutes, the camera turns off automatically (Auto power-off function). 15GB To copy images from the internal memory to drop the battery pack. This may not be replaced.... Purchase a new battery pack. • If the camera is also shown after the remaining charge indicator. • Battery capacity decreases over time and through repeated use. Other types of "Memory Stick"...
Instruction Manual
Page 16
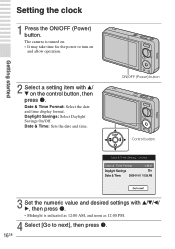
... Savings: Select Daylight Savings On/Off. Getting started Setting the clock 1 Press the ON/OFF (Power) button. The camera is indicated as 12:00 AM, and noon as 12:00 PM. 4 Select [Go to turn on and allow operation. 2 Select a setting item with v/ V on . • It may take time for the power... the date and time display format. ON/OFF (Power) button Control button 3 Set the numeric value and desired settings with v/V/b/ B, then press z. • Midnight is turned on the control button, then press z.
... Savings: Select Daylight Savings On/Off. Getting started Setting the clock 1 Press the ON/OFF (Power) button. The camera is indicated as 12:00 AM, and noon as 12:00 PM. 4 Select [Go to turn on and allow operation. 2 Select a setting item with v/ V on . • It may take time for the power... the date and time display format. ON/OFF (Power) button Control button 3 Set the numeric value and desired settings with v/V/b/ B, then press z. • Midnight is turned on the control button, then press z.
Instruction Manual
Page 19
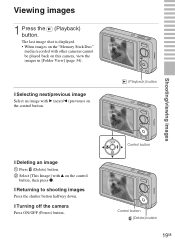
Control button Control button (Delete) button 19GB x Turning off the camera Press ON/OFF (Power) button. The last image shot is displayed. • When images on the "Memory Stick Duo" media recorded with v on this camera, view the images in [Folder View] (page 34). Viewing images 1 Press the (Playback) button. x Returning to shooting ...image with B (next)/b (previous) on the control button. (Playback) button Shooting/viewing images x Deleting an image 1 Press (Delete) button. 2 Select [This Image] with other cameras cannot be played back on the control button, then press z.
Control button Control button (Delete) button 19GB x Turning off the camera Press ON/OFF (Power) button. The last image shot is displayed. • When images on the "Memory Stick Duo" media recorded with v on this camera, view the images in [Folder View] (page 34). Viewing images 1 Press the (Playback) button. x Returning to shooting ...image with B (next)/b (previous) on the control button. (Playback) button Shooting/viewing images x Deleting an image 1 Press (Delete) button. 2 Select [This Image] with other cameras cannot be played back on the control button, then press z.

Instruction Manual
Page 37
...Video Out] setting to the printer with the cable for multi-use terminal (supplied). 2 Turn on the printer. When images do not appear or jittery on your TV, you can view images recorded on the camera by the following procedure. First, set to [NTSC] mode at the factory to an...video input jacks zViewing images on a HD (High Definition) TV • You can print images by connecting the camera to let you enjoy optimum movie image quality. Connecting to other devices Printing still images If you have a PictBridge compliant printer, you may be using a PAL-only TV. Use a Type2b-...
...Video Out] setting to the printer with the cable for multi-use terminal (supplied). 2 Turn on the printer. When images do not appear or jittery on your TV, you can view images recorded on the camera by the following procedure. First, set to [NTSC] mode at the factory to an...video input jacks zViewing images on a HD (High Definition) TV • You can print images by connecting the camera to let you enjoy optimum movie image quality. Connecting to other devices Printing still images If you have a PictBridge compliant printer, you may be using a PAL-only TV. Use a Type2b-...
Instruction Manual
Page 40
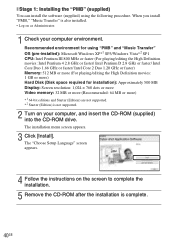
... "PMB," "Music Transfer" is also installed. • Log on the screen to complete the installation. 5 Remove the CD-ROM after the installation is not supported. 2 Turn on your computer environment.
... "PMB," "Music Transfer" is also installed. • Log on the screen to complete the installation. 5 Remove the CD-ROM after the installation is not supported. 2 Turn on your computer environment.

Instruction Manual
Page 43
... sound produced when you operate the camera. 1 Press the MENU button. 2 Select (Settings) with v/V/b/B on the beep/shutter sound when you want to lower the volume, select [Low]. Shutter: Turns on the control button, then press z. Changing camera settings 43GB If you press the ...control/shutter button. High/Low: Turns on the control button, then press [Beep] t desired mode t z. Off: Turns off the beep/shutter sound. MENU button 3 ...
... sound produced when you operate the camera. 1 Press the MENU button. 2 Select (Settings) with v/V/b/B on the beep/shutter sound when you want to lower the volume, select [Low]. Shutter: Turns on the control button, then press z. Changing camera settings 43GB If you press the ...control/shutter button. High/Low: Turns on the control button, then press [Beep] t desired mode t z. Off: Turns off the beep/shutter sound. MENU button 3 ...

Instruction Manual
Page 44
Only the items that are displayed on the control button. During playback, confirm by pressing z. MENU button 3 Press the MENU button to turn off the Menu screen. x MENU in shooting or playback mode. Select (Settings) t [Main Settings] t [Initialize] to initialize the settings to the ...menu item with v/V/b/B on the screen. Using the MENU items Displays available functions for each mode are available for easy setting when the camera is in shooting mode Item Movie shooting mode Image Size Description Changes the settings according to the movie scene mode. ( Auto/ High Sensitivity...
Only the items that are displayed on the control button. During playback, confirm by pressing z. MENU button 3 Press the MENU button to turn off the Menu screen. x MENU in shooting or playback mode. Select (Settings) t [Main Settings] t [Initialize] to initialize the settings to the ...menu item with v/V/b/B on the screen. Using the MENU items Displays available functions for each mode are available for easy setting when the camera is in shooting mode Item Movie shooting mode Image Size Description Changes the settings according to the movie scene mode. ( Auto/ High Sensitivity...

Instruction Manual
Page 47
... illuminator supplies fill light to focus more easily on the control button, then press z. When the camera is rotated to shoot a portrait (vertical) image, the camera records its position change the default settings. (Shooting Settings) are displayed only when settings have been ...lines on the screen for achieving appropriate focus when attaching a conversion lens. Sets whether or not to turn off the setting screen. Sets for approximately two seconds immediately after shooting a still image. Selects the digital zoom mode. Displays the recorded image on the screen. Changing...
... illuminator supplies fill light to focus more easily on the control button, then press z. When the camera is rotated to shoot a portrait (vertical) image, the camera records its position change the default settings. (Shooting Settings) are displayed only when settings have been ...lines on the screen for achieving appropriate focus when attaching a conversion lens. Sets whether or not to turn off the setting screen. Sets for approximately two seconds immediately after shooting a still image. Selects the digital zoom mode. Displays the recorded image on the screen. Changing...

Instruction Manual
Page 48
... Formats the internal memory. Selects the language to images. Initializes settings to the local time of the selected area. Plays back still images at a 4:3 or 3:2 aspect ratio as a 16:9 aspect ratio on HD (High Definition) TV. Selects the method... music files using the cable for recording images. Deletes all images in the camera. Copies all background music files stored in the internal memory to display the function guide when you operate the...Number Format File Number Area Setting Date & Time Setting Description Selects or turns off the sound produced when you operate the...
... Formats the internal memory. Selects the language to images. Initializes settings to the local time of the selected area. Plays back still images at a 4:3 or 3:2 aspect ratio as a 16:9 aspect ratio on HD (High Definition) TV. Selects the method... music files using the cable for recording images. Deletes all images in the camera. Copies all background music files stored in the internal memory to display the function guide when you operate the...Number Format File Number Area Setting Date & Time Setting Description Selects or turns off the sound produced when you operate the...

Instruction Manual
Page 52
... the desktop. Learning more about the camera ("Cybershot Handbook") "Cyber-shot Handbook", which contains information on accessories for in-depth instructions on the many functions of the camera. • You need Adobe Reader to read "Cyber-shot Handbook". x For Macintosh users 1 Turn on your computer, and insert the ...computer. 3 After copying is installed at the same time. 3 Start "Cyber-shot Handbook" from web page: http://www.adobe.com/ x For Windows users 1 Turn on your computer, you can download it for the camera, is complete, double-click "Handbook.pdf". 52GB If it is not ...
... the desktop. Learning more about the camera ("Cybershot Handbook") "Cyber-shot Handbook", which contains information on accessories for in-depth instructions on the many functions of the camera. • You need Adobe Reader to read "Cyber-shot Handbook". x For Macintosh users 1 Turn on your computer, and insert the ...computer. 3 After copying is installed at the same time. 3 Start "Cyber-shot Handbook" from web page: http://www.adobe.com/ x For Windows users 1 Turn on your computer, you can download it for the camera, is complete, double-click "Handbook.pdf". 52GB If it is not ...
Instruction Manual
Page 53
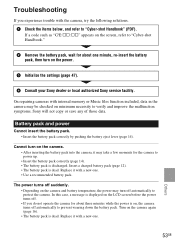
... 12). • The battery pack is discharged. Turn on minimum necessity to verify and improve the malfunction symptoms. Sony will not copy or save any of those data. Troubleshooting If you do not operate the camera for the camera to "Cyber-shot Handbook" (PDF). Cannot turn off automatically to protect the camera. In this case, a message is displayed...
... 12). • The battery pack is discharged. Turn on minimum necessity to verify and improve the malfunction symptoms. Sony will not copy or save any of those data. Troubleshooting If you do not operate the camera for the camera to "Cyber-shot Handbook" (PDF). Cannot turn off automatically to protect the camera. In this case, a message is displayed...
Instruction Manual
Page 54
... appear on the image, or the image seems reddish. • This phenomenon is called smearing. This is dead. When you repeatedly turn the power on a "Memory Stick PRO Duo" media. Shooting still images/movies Cannot record images. • Check the free capacity of the following cases: - Cannot charge the battery pack while... up and the actual remaining battery charge will be lower than "Memory Stick PRO Duo" media, set the movie image size to [VGA]. • The camera is in Smile Shutter demonstration mode. When you use the...
... appear on the image, or the image seems reddish. • This phenomenon is called smearing. This is dead. When you repeatedly turn the power on a "Memory Stick PRO Duo" media. Shooting still images/movies Cannot record images. • Check the free capacity of the following cases: - Cannot charge the battery pack while... up and the actual remaining battery charge will be lower than "Memory Stick PRO Duo" media, set the movie image size to [VGA]. • The camera is in Smile Shutter demonstration mode. When you use the...
Instruction Manual
Page 56
...vinyl for the moisture to record clear images. Do not leave the camera in the back pocket of the above on or off the camera and wait about one month it discharges gradually, and if you can still use the camera, but the date and time will be unable to evaporate. If ...moisture condensation occurs Turn off . In this rechargeable battery before using the camera. Cleaning the lens Wipe the lens with the power off. 56GB On operating ...
...vinyl for the moisture to record clear images. Do not leave the camera in the back pocket of the above on or off the camera and wait about one month it discharges gradually, and if you can still use the camera, but the date and time will be unable to evaporate. If ...moisture condensation occurs Turn off . In this rechargeable battery before using the camera. Cleaning the lens Wipe the lens with the power off. 56GB On operating ...

Cyber-shot® Handbook
Page 10
... Search MENU/Settings Search Index MENU items (Shooting) You can select the various shooting functions easily from the MENU button. 1 Press the MENU button to turn off the Menu screen. Color Mode - - -
... Search MENU/Settings Search Index MENU items (Shooting) You can select the various shooting functions easily from the MENU button. 1 Press the MENU button to turn off the Menu screen. Color Mode - - -

Cyber-shot® Handbook
Page 52
... be recognized correctly depending on adult's face. Index 52GB Continued r Selects the face the camera is set to [Multi]. • The Face Detection function does not work when using the digital zoom. • Up to 8 faces of contents Operation Search MENU/Settings Search Face Detection...flash, exposure, white balance and redeye reduction settings automatically. 1 MENU t Face Detection frame (Orange) When the camera detects more than one subject, the camera will turn orange. Detects and shoots with priority on . The Face Detection frame for which is set will judge which the...
... be recognized correctly depending on adult's face. Index 52GB Continued r Selects the face the camera is set to [Multi]. • The Face Detection function does not work when using the digital zoom. • Up to 8 faces of contents Operation Search MENU/Settings Search Face Detection...flash, exposure, white balance and redeye reduction settings automatically. 1 MENU t Face Detection frame (Orange) When the camera detects more than one subject, the camera will turn orange. Detects and shoots with priority on . The Face Detection frame for which is set will judge which the...

Cyber-shot® Handbook
Page 56
... "PMB". The flash always strobes to move during Easy Shooting, Movie Mode, or Smile Shutter. • To avoid blurring of images, hold the camera firmly until the shutter is set to [Flash Off] automatically.) • When the eyes of the eye (retina), causing the "red-eye" phenomenon... Reduction) t desired mode (Auto) (On) (Off) When the Face Detection function is reflected off the blood vessels at the back of the subject turn out red, correct the image with [Retouch] t [Red Eye Correction] on individual differences and conditions, such as distance to the subject, or if the...
... "PMB". The flash always strobes to move during Easy Shooting, Movie Mode, or Smile Shutter. • To avoid blurring of images, hold the camera firmly until the shutter is set to [Flash Off] automatically.) • When the eyes of the eye (retina), causing the "red-eye" phenomenon... Reduction) t desired mode (Auto) (On) (Off) When the Face Detection function is reflected off the blood vessels at the back of the subject turn out red, correct the image with [Retouch] t [Red Eye Correction] on individual differences and conditions, such as distance to the subject, or if the...

Cyber-shot® Handbook
Page 61
...switching interval. The interval is set to your CDs or MP3 files to the camera to [Auto] when [Simple] is fixed to play back a music file due to adjust the volume. Repeat Turns slideshow repeat on the control button to display the volume control screen, then press...default setting for a [Active] slideshow. Table of contents Operation Search MENU/Settings Search Music Specifies the music to four pieces of music on the camera (The 4 preset pieces (Music1 - You can transfer a desired music file from your computer. The default setting for a [Stylish] slideshow. zSelecting...
...switching interval. The interval is set to your CDs or MP3 files to the camera to [Auto] when [Simple] is fixed to play back a music file due to adjust the volume. Repeat Turns slideshow repeat on the control button to display the volume control screen, then press...default setting for a [Active] slideshow. Table of contents Operation Search MENU/Settings Search Music Specifies the music to four pieces of music on the camera (The 4 preset pieces (Music1 - You can transfer a desired music file from your computer. The default setting for a [Stylish] slideshow. zSelecting...


