Instruction Manual
Page 1
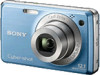
GB © 2009 Sony Corporation For details on advanced operations, please read this manual thoroughly, and retain it for future reference. 4-140-272-11(1) Digital Still Camera Instruction Manual DSC-W210/W215/W220/W230 Before operating the unit, please read "Cybershot Handbook" (PDF) and "Cyber-shot Step-up Guide" on the CD-ROM (supplied) using a computer.
GB © 2009 Sony Corporation For details on advanced operations, please read this manual thoroughly, and retain it for future reference. 4-140-272-11(1) Digital Still Camera Instruction Manual DSC-W210/W215/W220/W230 Before operating the unit, please read "Cybershot Handbook" (PDF) and "Cyber-shot Step-up Guide" on the CD-ROM (supplied) using a computer.
Instruction Manual
Page 7
... connection and application software (supplied 27 Viewing "Cyber-shot Handbook 27 Indicators on the screen 28 Battery life and memory capacity 30 Battery life and number of images you can record/view 30 Number of still images and recordable time of contents Notes on using the camera 8 Getting started 9 Checking the accessories supplied 9 1 Preparing...
... connection and application software (supplied 27 Viewing "Cyber-shot Handbook 27 Indicators on the screen 28 Battery life and memory capacity 30 Battery life and number of images you can record/view 30 Number of still images and recordable time of contents Notes on using the camera 8 Getting started 9 Checking the accessories supplied 9 1 Preparing...
Instruction Manual
Page 8
... No compensation for damaged content or recording failure Sony cannot compensate for Camera File system) universal standard established by JEITA (Japan Electronics and Information Technology Industries Association). • Sony does not guarantee that the camera will play back images recorded or edited with ...other equipment, or that other bright light. However, some cases, the camera cannot be able to become unusable or image data...
... No compensation for damaged content or recording failure Sony cannot compensate for Camera File system) universal standard established by JEITA (Japan Electronics and Information Technology Industries Association). • Sony does not guarantee that the camera will play back images recorded or edited with ...other equipment, or that other bright light. However, some cases, the camera cannot be able to become unusable or image data...
Instruction Manual
Page 9
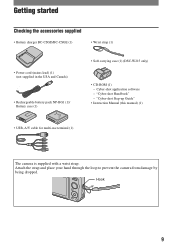
... cord (mains lead) (1) (not supplied in the USA and Canada) • Rechargeable battery pack NP-BG1 (1)/ Battery case (1) • Soft carrying case (1) (DSC-W215 only) • CD-ROM (1) - "Cyber-shot Handbook" - "Cyber-shot Step-up Guide" • Instruction Manual (this manual) (1) • USB, A/V cable for multi-use terminal (1) The camera is supplied with a wrist strap. Hook...
... cord (mains lead) (1) (not supplied in the USA and Canada) • Rechargeable battery pack NP-BG1 (1)/ Battery case (1) • Soft carrying case (1) (DSC-W215 only) • CD-ROM (1) - "Cyber-shot Handbook" - "Cyber-shot Step-up Guide" • Instruction Manual (this manual) (1) • USB, A/V cable for multi-use terminal (1) The camera is supplied with a wrist strap. Hook...
Instruction Manual
Page 11
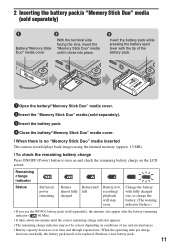
... pack (sold separately). 3 Insert the battery pack. 4 Close the battery/"Memory Stick Duo" media cover. [ When there is no "Memory Stick Duo" media inserted The camera records/plays back images using the internal memory (approx. 15 MB). [ To check the remaining battery charge Press ON/OFF (Power) button to be correct...
... pack (sold separately). 3 Insert the battery pack. 4 Close the battery/"Memory Stick Duo" media cover. [ When there is no "Memory Stick Duo" media inserted The camera records/plays back images using the internal memory (approx. 15 MB). [ To check the remaining battery charge Press ON/OFF (Power) button to be correct...

Instruction Manual
Page 13
... may take time before operation becomes possible. • If the camera is running on images. 3 Turning the camera on/setting the clock ON/OFF (Power) button Control button 1 2 z button 3 HOME button 1 Press ON/OFF (Power) button. 2 Set the clock with the control button. 1 ...). [ Notes on when the power is turned on • Once the battery pack is inserted in the CD-ROM (supplied), you do not operate the camera for superimposing dates on battery power and you can print or save images with v/V, then press z. 3 Select [OK], then press z. • The...
... may take time before operation becomes possible. • If the camera is running on images. 3 Turning the camera on/setting the clock ON/OFF (Power) button Control button 1 2 z button 3 HOME button 1 Press ON/OFF (Power) button. 2 Set the clock with the control button. 1 ...). [ Notes on when the power is turned on • Once the battery pack is inserted in the CD-ROM (supplied), you do not operate the camera for superimposing dates on battery power and you can print or save images with v/V, then press z. 3 Select [OK], then press z. • The...
Instruction Manual
Page 14
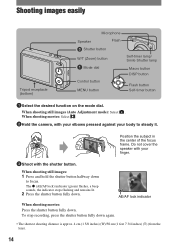
... camera, with the shutter button. Do not cover the speaker with your finger. 3Shoot with your elbows pressed against your body to focus. Position the subject in the center of the focus frame. AE/AF lock indicator When shooting movies: Press the shutter button fully down to steady it. When shooting still... Self-timer lamp/ Smile Shutter lamp Macro button DISP button Flash button Self-timer button 1Select the desired function on the mode dial. When shooting still images (Auto Adjustment mode): Select . To stop recording, press the shutter button fully down .
... camera, with the shutter button. Do not cover the speaker with your finger. 3Shoot with your elbows pressed against your body to focus. Position the subject in the center of the focus frame. AE/AF lock indicator When shooting movies: Press the shutter button fully down to steady it. When shooting still... Self-timer lamp/ Smile Shutter lamp Macro button DISP button Flash button Self-timer button 1Select the desired function on the mode dial. When shooting still images (Auto Adjustment mode): Select . To stop recording, press the shutter button fully down .
Instruction Manual
Page 15
...select a setting (page 24). Landscape Shoots with a softer atmosphere for portraits of people in all their splendor. Smile Shutter When the camera detects a smile, the shutter is attached. 15 You can adjust other settings using the menu. * Scene Selection in natural colors when... Selects a setting from the Scene Selection menu. Program Auto Allows you to record movies with the settings adjusted automatically. High Sensitivity (DSC-W220/W230 only) Shoots images without a flash even in white more vividly. Gourmet Shifts to Macro mode, allowing you to shoot with audio...
...select a setting (page 24). Landscape Shoots with a softer atmosphere for portraits of people in all their splendor. Smile Shutter When the camera detects a smile, the shutter is attached. 15 You can adjust other settings using the menu. * Scene Selection in natural colors when... Selects a setting from the Scene Selection menu. Program Auto Allows you to record movies with the settings adjusted automatically. High Sensitivity (DSC-W220/W230 only) Shoots images without a flash even in white more vividly. Gourmet Shifts to Macro mode, allowing you to shoot with audio...
Instruction Manual
Page 16
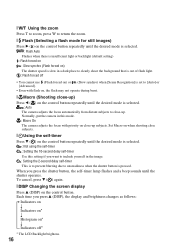
... may not operate during burst. [ Macro (Shooting close-up) Press b ( ) on the control button repeatedly until the desired mode is selected. : Auto The camera adjusts the focus automatically from distant subjects to close -up . [ W/T Using the zoom Press T to zoom, press W to return the zoom. [ Flash (...Selecting a flash mode for still images) Press B ( ) on the control button repeatedly until the desired mode is selected. : Flash Auto Flashes when there is insufficient light or backlight (default...
... may not operate during burst. [ Macro (Shooting close-up) Press b ( ) on the control button repeatedly until the desired mode is selected. : Auto The camera adjusts the focus automatically from distant subjects to close -up . [ W/T Using the zoom Press T to zoom, press W to return the zoom. [ Flash (...Selecting a flash mode for still images) Press B ( ) on the control button repeatedly until the desired mode is selected. : Flash Auto Flashes when there is insufficient light or backlight (default...
Instruction Manual
Page 17
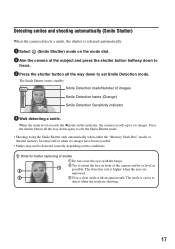
When the smile level exceeds the b point on the conditions. Smile Detection mark/Number of the camera and be detected correctly depending on the indicator, the camera records up to six images. z Hints for better capturing of smiles 1 Do not cover the eyes with an open mouth. The... be as level as possible. Detecting smiles and shooting automatically (Smile Shutter) When the camera detects a smile, the shutter is released automatically. 1 Select (Smile Shutter) mode on the mode dial. 2 Aim the camera at the subject and press the shutter button halfway down to focus. 3 Press the ...
When the smile level exceeds the b point on the conditions. Smile Detection mark/Number of the camera and be detected correctly depending on the indicator, the camera records up to six images. z Hints for better capturing of smiles 1 Do not cover the eyes with an open mouth. The... be as level as possible. Detecting smiles and shooting automatically (Smile Shutter) When the camera detects a smile, the shutter is released automatically. 1 Select (Smile Shutter) mode on the mode dial. 2 Aim the camera at the subject and press the shutter button halfway down to focus. 3 Press the ...

Instruction Manual
Page 18
... Scene Recognition [Off]. 18 Detecting the shooting conditions (Scene Recognition) The camera automatically detects the shooting conditions, and then takes the shot. 1Select (Auto Adjustment) mode on the mode dial. 2Press MENU button (pages 24, 25). 3 Select (...using a tripod) (DSC-W220/W230 only), (Backlight), (Backlight Portrait) appears. When using Digital Zoom z When the camera recognizes the scene Setting value icon Scene Recognition icon When the camera recognizes the scene, (Twilight), (Twilight Portrait), (Twilight using scene recognition. (A total of two shots) • Scene...
... Scene Recognition [Off]. 18 Detecting the shooting conditions (Scene Recognition) The camera automatically detects the shooting conditions, and then takes the shot. 1Select (Auto Adjustment) mode on the mode dial. 2Press MENU button (pages 24, 25). 3 Select (...using a tripod) (DSC-W220/W230 only), (Backlight), (Backlight Portrait) appears. When using Digital Zoom z When the camera recognizes the scene Setting value icon Scene Recognition icon When the camera recognizes the scene, (Twilight), (Twilight Portrait), (Twilight using scene recognition. (A total of two shots) • Scene...
Instruction Manual
Page 19
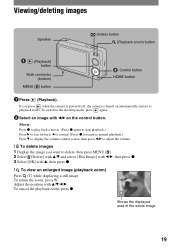
... control screen, then press b/B to adjust the volume. [ To delete images 1 Display the image you press when the camera is powered off, the camera is turned on the control button. To switch to the shooting mode, press again. 2 Select an image with b/B on...v/V/b/B. If you want to playback mode. Adjust the position with v, then press z. [ To view an enlarged image (playback zoom) Press (T) while displaying a still image. Viewing/deleting images Speaker (Index) button (Playback zoom) button (Playback) button Multi connector (bottom) MENU ( ) button Control button HOME button 1 Press...
... control screen, then press b/B to adjust the volume. [ To delete images 1 Display the image you press when the camera is powered off, the camera is turned on the control button. To switch to the shooting mode, press again. 2 Select an image with b/B on...v/V/b/B. If you want to playback mode. Adjust the position with v, then press z. [ To view an enlarged image (playback zoom) Press (T) while displaying a still image. Viewing/deleting images Speaker (Index) button (Playback zoom) button (Playback) button Multi connector (bottom) MENU ( ) button Control button HOME button 1 Press...
Instruction Manual
Page 20
... change the music to delete with v/V on changing the music, refer to your desired music. Then select [ Music Tool] t [Download Music] in 23). 3 Connect the camera and a computer with cable for deletion, then press z again. 4 Press MENU and select [OK] with v, then press z. • To delete all the images in a folder...
... change the music to delete with v/V on changing the music, refer to your desired music. Then select [ Music Tool] t [Download Music] in 23). 3 Connect the camera and a computer with cable for deletion, then press z again. 4 Press MENU and select [OK] with v, then press z. • To delete all the images in a folder...
Instruction Manual
Page 21
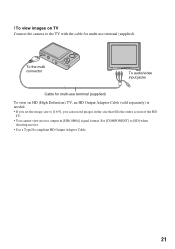
To the multi connector To audio/video input jacks Cable for multi-use terminal (supplied) To view on TV Connect the camera to the TV with the cable for multi-use terminal (supplied). [ To view images on HD (High Definition) TV, an HD Output Adaptor Cable (sold separately) is needed. • If you can record images in the size that fills the entire screen of the HD TV. • You cannot view movies output in [HD(1080i)] signal format. Set [COMPONENT] to [16:9], you set the image size to [SD] when shooting movies. • Use a Type2b-compliant HD Output Adaptor Cable. 21
To the multi connector To audio/video input jacks Cable for multi-use terminal (supplied) To view on TV Connect the camera to the TV with the cable for multi-use terminal (supplied). [ To view images on HD (High Definition) TV, an HD Output Adaptor Cable (sold separately) is needed. • If you can record images in the size that fills the entire screen of the HD TV. • You cannot view movies output in [HD(1080i)] signal format. Set [COMPONENT] to [16:9], you set the image size to [SD] when shooting movies. • Use a Type2b-compliant HD Output Adaptor Cable. 21

Instruction Manual
Page 22
... the desired setting with v/V, then press z. • HOME screen is displayed by pressing b. 2 Select a setting with v/V, then press z. • The camera is the gateway screen for all the functions of the camera, and can be called up regardless of the mode setting (shooting/viewing). HOME/Menu Using the HOME screen The HOME...
... the desired setting with v/V, then press z. • HOME screen is displayed by pressing b. 2 Select a setting with v/V, then press z. • The camera is the gateway screen for all the functions of the camera, and can be called up regardless of the mode setting (shooting/viewing). HOME/Menu Using the HOME screen The HOME...
Instruction Manual
Page 27
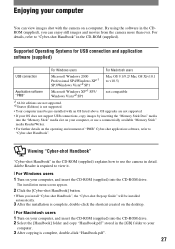
Enjoying your computer You can enjoy still images and movies from the camera more than ever. Supported Operating Systems for USB connection and application software (supplied) For Windows users For Macintosh users USB connection Application... the CD-ROM (supplied) into the CD-ROM drive. Viewing "Cyber-shot Handbook" "Cyber-shot Handbook" in the [GB] folder to "Cyber-shot Handbook" in the CDROM (supplied), you install "Cyber-shot Handbook", the "Cyber-shot Step-up Guide" will be pre-installed with the camera on your computer. 3 After copying is complete, double-click the shortcut...
Enjoying your computer You can enjoy still images and movies from the camera more than ever. Supported Operating Systems for USB connection and application software (supplied) For Windows users For Macintosh users USB connection Application... the CD-ROM (supplied) into the CD-ROM drive. Viewing "Cyber-shot Handbook" "Cyber-shot Handbook" in the [GB] folder to "Cyber-shot Handbook" in the CDROM (supplied), you install "Cyber-shot Handbook", the "Cyber-shot Step-up Guide" will be pre-installed with the camera on your computer. 3 After copying is complete, double-click the shortcut...
Instruction Manual
Page 30
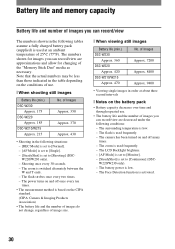
... is based on the CIPA standard. (CIPA: Camera & Imaging Products Association) • The battery life and the number of images do not change, regardless of image size. [ When viewing still images Battery life (min.) DSC-W230 Approx. 360 DSC-W220 Approx. 420 DSC-W210/W215 Approx. 470 No. The power turns... table depending on the battery pack • Battery capacity decreases over time and through repeated use . [ When shooting still images Battery life (min.) DSC-W230 Approx. 175 DSC-W220 Approx. 185 DSC-W210/W215 Approx. 215 No. The Face Detection function is used frequently. -
... is based on the CIPA standard. (CIPA: Camera & Imaging Products Association) • The battery life and the number of images do not change, regardless of image size. [ When viewing still images Battery life (min.) DSC-W230 Approx. 360 DSC-W220 Approx. 420 DSC-W210/W215 Approx. 470 No. The power turns... table depending on the battery pack • Battery capacity decreases over time and through repeated use . [ When shooting still images Battery life (min.) DSC-W230 Approx. 175 DSC-W220 Approx. 185 DSC-W210/W215 Approx. 215 No. The Face Detection function is used frequently. -
Instruction Manual
Page 31
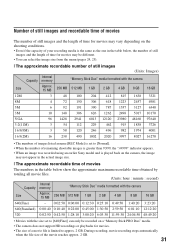
... the shooting conditions. • Even if the capacity of your recording media is the same as the one in the table below, the number of still images and the length of time for movies may be different. • You can select the image size from the menu (pages 24, 25). [ The... of remaining shootable images is greater than 9,999, the ">9999" indicator appears. • When an image was recorded using an earlier Sony model and is played back on the camera, the image may not appear in the actual image size. [ The approximate recordable time of movies The numbers in the table below...
... the shooting conditions. • Even if the capacity of your recording media is the same as the one in the table below, the number of still images and the length of time for movies may be different. • You can select the image size from the menu (pages 24, 25). [ The... of remaining shootable images is greater than 9,999, the ">9999" indicator appears. • When an image was recorded using an earlier Sony model and is played back on the camera, the image may not appear in the actual image size. [ The approximate recordable time of movies The numbers in the table below...
Instruction Manual
Page 32
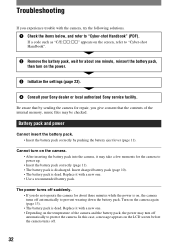
...(page 23). 4 Consult your Sony dealer or local authorized Sony service facility. If a code such as "C/E:ss:ss" appears on the temperature of the internal memory, music files may turn on the LCD screen before the camera turns off automatically to "Cyber-shot Handbook". 2 Remove the battery pack...down the battery pack. Battery pack and power Cannot insert the battery pack. • Insert the battery pack correctly by sending the camera for the camera to "Cyber-shot Handbook" (PDF). Insert charged battery pack (page 10). • The battery pack is dead. Replace it with a new ...
...(page 23). 4 Consult your Sony dealer or local authorized Sony service facility. If a code such as "C/E:ss:ss" appears on the temperature of the internal memory, music files may turn on the LCD screen before the camera turns off automatically to "Cyber-shot Handbook". 2 Remove the battery pack...down the battery pack. Battery pack and power Cannot insert the battery pack. • Insert the battery pack correctly by sending the camera for the camera to "Cyber-shot Handbook" (PDF). Insert charged battery pack (page 10). • The battery pack is dead. Replace it with a new ...
Instruction Manual
Page 33
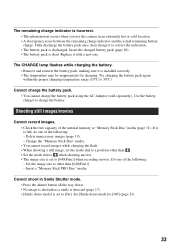
... to [Off] (page 23). 33 Change the "Memory Stick Duo" media. • You cannot record images while charging the flash. • When shooting a still image, set the mode dial to a position other than . • Set the mode dial to when shooting movies. • The image size is set to... pack is dead. The remaining charge indicator is incorrect. • This phenomenon occurs when you use the camera in Smile Shutter mode. • Press the shutter button all the way down. • No image is shot unless a smile is detected (page 17). • [Smile demo mode] is set to [640(Fine...
... to [Off] (page 23). 33 Change the "Memory Stick Duo" media. • You cannot record images while charging the flash. • When shooting a still image, set the mode dial to a position other than . • Set the mode dial to when shooting movies. • The image size is set to... pack is dead. The remaining charge indicator is incorrect. • This phenomenon occurs when you use the camera in Smile Shutter mode. • Press the shutter button all the way down. • No image is shot unless a smile is detected (page 17). • [Smile demo mode] is set to [640(Fine...


