Operating Instructions
Page 4
... the equipment and receiver. - For the State of Conformity Trade Name: SONY Model No.: DSC-W190 Responsible Party: Sony Electronics Inc. Address: 16530 Via Esprillo, San Diego, CA 92127U.S.A. Reorient...Information Declaration of Conformity Trade Name: SONY Model No.: DSC-W180 Responsible Party: Sony Electronics Inc. For Customers in accordance with the limits for a Class B digital device, pursuant to Part 15 of... Subpart B of Part 15 of the FCC Rules. The supplied interface cable must accept any interference received, including interference that any changes or modifications not...
... the equipment and receiver. - For the State of Conformity Trade Name: SONY Model No.: DSC-W190 Responsible Party: Sony Electronics Inc. Address: 16530 Via Esprillo, San Diego, CA 92127U.S.A. Reorient...Information Declaration of Conformity Trade Name: SONY Model No.: DSC-W180 Responsible Party: Sony Electronics Inc. For Customers in accordance with the limits for a Class B digital device, pursuant to Part 15 of... Subpart B of Part 15 of the FCC Rules. The supplied interface cable must accept any interference received, including interference that any changes or modifications not...
Operating Instructions
Page 5
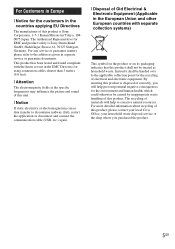
...found compliant with separate collection systems) This symbol on the product or on its packaging indicates that this product is Sony Corporation, 1-7-1 Konan Minato-ku Tokyo, 1080075 Japan. Instead it shall be caused by inappropriate waste handling of electrical ...), restart the application or disconnect and connect the communication cable (USB, etc.) again. [ Disposal of this product is Sony Deutschland GmbH, Hedelfinger Strasse 61, 70327 Stuttgart, Germany. The Authorized Representative for using connection cables shorter than 3 meters (9.8 feet). [ Attention The electromagnetic...
...found compliant with separate collection systems) This symbol on the product or on its packaging indicates that this product is Sony Corporation, 1-7-1 Konan Minato-ku Tokyo, 1080075 Japan. Instead it shall be caused by inappropriate waste handling of electrical ...), restart the application or disconnect and connect the communication cable (USB, etc.) again. [ Disposal of this product is Sony Deutschland GmbH, Hedelfinger Strasse 61, 70327 Stuttgart, Germany. The Authorized Representative for using connection cables shorter than 3 meters (9.8 feet). [ Attention The electromagnetic...
Operating Instructions
Page 10
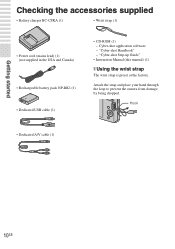
... strap (1) • Power cord (mains lead) (1) (not supplied in the USA and Canada) • Rechargeable battery pack NP-BK1 (1) • Dedicated USB cable (1) • CD-ROM (1) - "Cyber-shot Handbook" - Cyber-shot application software - "Cyber-shot Step-up Guide" • Instruction Manual (this manual) (1) x Using the wrist strap The wrist strap is preset at the factory. Hook •...
... strap (1) • Power cord (mains lead) (1) (not supplied in the USA and Canada) • Rechargeable battery pack NP-BK1 (1) • Dedicated USB cable (1) • CD-ROM (1) - "Cyber-shot Handbook" - Cyber-shot application software - "Cyber-shot Step-up Guide" • Instruction Manual (this manual) (1) x Using the wrist strap The wrist strap is preset at the factory. Hook •...

Operating Instructions
Page 34
... • The [Video Out] setting is made, the indicator appears. 3 Press MENU t (Print) with the dedicated A/V cable (supplied). Printing still images If you have a PictBridge compliant printer, you enjoy optimum movie image quality. First, set to [NTSC] mode at the factory to let ...Video Out] setting to [PAL] (page 44). After the connection is set the camera to enable USB connection between the camera and the printer. 1 Connect the camera to the printer with the dedicated USB cable (supplied). 2 Turn on a TV 1 Connect the camera to the TV with v/ V on your TV, you may be using a PAL-...
... • The [Video Out] setting is made, the indicator appears. 3 Press MENU t (Print) with the dedicated A/V cable (supplied). Printing still images If you have a PictBridge compliant printer, you enjoy optimum movie image quality. First, set to [NTSC] mode at the factory to let ...Video Out] setting to [PAL] (page 44). After the connection is set the camera to enable USB connection between the camera and the printer. 1 Connect the camera to the printer with the dedicated USB cable (supplied). 2 Turn on a TV 1 Connect the camera to the TV with v/ V on your TV, you may be using a PAL-...

Operating Instructions
Page 38
x Stage 3: Viewing "PMB Guide" 1 Double-click the (PMB Guide) icon on the screen of the camera. 2 To the (USB)·A/V OUT terminal 1 To a USB jack Dedicated USB cable • is displayed. Doing so may corrupt the data. • When using a battery with little remaining charge, you... can start menu: Click [Start] t [All Programs] t [Sony Picture Utility] t [Help] t [PMB Guide]. "Connecting..." ...
x Stage 3: Viewing "PMB Guide" 1 Double-click the (PMB Guide) icon on the screen of the camera. 2 To the (USB)·A/V OUT terminal 1 To a USB jack Dedicated USB cable • is displayed. Doing so may corrupt the data. • When using a battery with little remaining charge, you... can start menu: Click [Start] t [All Programs] t [Sony Picture Utility] t [Help] t [PMB Guide]. "Connecting..." ...
Operating Instructions
Page 44
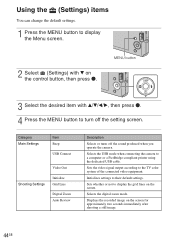
...computer or a PictBridge-compliant printer using the dedicated USB cable. Selects the USB mode when connecting the camera to the TV color system of the connected video ...Video Out Shooting Settings Initialize Grid Line Digital Zoom Auto Review Description Selects or turns off the setting screen. Selects the digital zoom mode. Sets whether or not...camera. MENU button 3 Select the desired item with v/V/b/B, then press z. 4 Press the MENU button to display the Menu screen. 2 Select (Settings) with V on the screen for approximately two seconds immediately after shooting a still...
...computer or a PictBridge-compliant printer using the dedicated USB cable. Selects the USB mode when connecting the camera to the TV color system of the connected video ...Video Out Shooting Settings Initialize Grid Line Digital Zoom Auto Review Description Selects or turns off the setting screen. Selects the digital zoom mode. Sets whether or not...camera. MENU button 3 Select the desired item with v/V/b/B, then press z. 4 Press the MENU button to display the Menu screen. 2 Select (Settings) with V on the screen for approximately two seconds immediately after shooting a still...
Cyber-shot® Handbook
Page 16
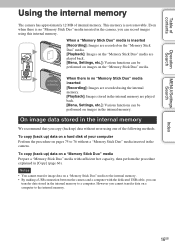
... transfer image data on a "Memory Stick Duo" media to the internal memory. • By making a USB connection between the camera and a computer with the dedicated USB cable, you can be performed on images on a "Memory Stick Duo" media Prepare a "Memory Stick Duo" media with sufficient free capacity..., then perform the procedure explained in the camera. When a "Memory Stick Duo" media is no "Memory Stick Duo" media ...
... transfer image data on a "Memory Stick Duo" media to the internal memory. • By making a USB connection between the camera and a computer with the dedicated USB cable, you can be performed on images on a "Memory Stick Duo" media Prepare a "Memory Stick Duo" media with sufficient free capacity..., then perform the procedure explained in the camera. When a "Memory Stick Duo" media is no "Memory Stick Duo" media ...
Cyber-shot® Handbook
Page 57
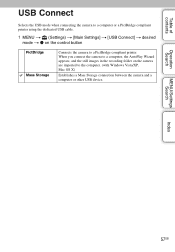
... dedicated USB cable. 1 MENU t (Settings) t [Main Settings] t [USB Connect] t desired mode t z on the camera are imported to a PictBridge compliant printer. Operation Search MENU/Settings Search Index 57GB When you connect the camera to a computer, the AutoPlay Wizard appears, and the still images in... the recording folder on the control button PictBridge Mass Storage Connects the camera to the computer. (with Windows Vista/XP, Mac OS...
... dedicated USB cable. 1 MENU t (Settings) t [Main Settings] t [USB Connect] t desired mode t z on the camera are imported to a PictBridge compliant printer. Operation Search MENU/Settings Search Index 57GB When you connect the camera to a computer, the AutoPlay Wizard appears, and the still images in... the recording folder on the control button PictBridge Mass Storage Connects the camera to the computer. (with Windows Vista/XP, Mac OS...

Cyber-shot® Handbook
Page 69
... the input. 4 Set the mode switch to the TV with the TV. Viewing images by connecting the camera to a TV. VIDEO AUDIO 1 To audio/video input jacks Yellow (Playback) White Dedicated A/V cable (supplied) 2 To the (USB)·A/V OUT terminal 3 Turn on the TV when the movie is... 69GB Select the desired image with the supplied dedicated A/V cable 1 Turn off both the camera and the TV. 2 Connect the camera to (Playback), then turn on the TV. The connection varies according to the type of TV the camera is shot under the condition of contents Operation Search MENU/Settings Search ...
... the input. 4 Set the mode switch to the TV with the TV. Viewing images by connecting the camera to a TV. VIDEO AUDIO 1 To audio/video input jacks Yellow (Playback) White Dedicated A/V cable (supplied) 2 To the (USB)·A/V OUT terminal 3 Turn on the TV when the movie is... 69GB Select the desired image with the supplied dedicated A/V cable 1 Turn off both the camera and the TV. 2 Connect the camera to (Playback), then turn on the TV. The connection varies according to the type of TV the camera is shot under the condition of contents Operation Search MENU/Settings Search ...

Cyber-shot® Handbook
Page 70
... If you want to view images on a TV screen, you need a TV with a video input jack and the dedicated A/V cable (supplied). The color system of the TV must match that of the digital still camera. PAL system Australia, Austria, Belgium, China, Czech Republic, Denmark, Finland, Germany, Holland, Hong Kong, Hungary, Italy, Kuwait, Malaysia, New...
... If you want to view images on a TV screen, you need a TV with a video input jack and the dedicated A/V cable (supplied). The color system of the TV must match that of the digital still camera. PAL system Australia, Austria, Belgium, China, Czech Republic, Denmark, Finland, Germany, Holland, Hong Kong, Hungary, Italy, Kuwait, Malaysia, New...

Cyber-shot® Handbook
Page 75
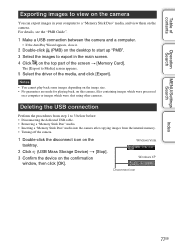
...Enjoying images on your computer using the computer again. • If "Mass Storage" does not appear, set [USB Connect] to recognize the camera. When the indicator changes to , you import/export images from the internal memory, step 1 is unnecessary. 1 Insert a "Memory Stick Duo...operate the computer while the indicator is displayed. "Connecting..." Table of the camera. • When a USB connection is established for a while. 2To the (USB)·A/V OUT terminal 1To a USB jack Dedicated USB cable Notes • When you can start using a battery pack with little remaining...
...Enjoying images on your computer using the computer again. • If "Mass Storage" does not appear, set [USB Connect] to recognize the camera. When the indicator changes to , you import/export images from the internal memory, step 1 is unnecessary. 1 Insert a "Memory Stick Duo...operate the computer while the indicator is displayed. "Connecting..." Table of the camera. • When a USB connection is established for a while. 2To the (USB)·A/V OUT terminal 1To a USB jack Dedicated USB cable Notes • When you can start using a battery pack with little remaining...
Cyber-shot® Handbook
Page 77
... back some images depending on the image size. • No guarantees are made for playing back, on this camera, files containing images which were shot using other cameras. Windows Vista Windows XP Disconnect icon Index 77GB The [Export to Media] screen appears. 5 Select the driver of... to 3 below before: • Disconnecting the dedicated USB cable. • Removing a "Memory Stick Duo" media. • Inserting a "Memory Stick Duo" media into the camera after copying images from the internal memory. • Turning off the camera. 1 Double-click the disconnect icon on the tasktray. 2...
... back some images depending on the image size. • No guarantees are made for playing back, on this camera, files containing images which were shot using other cameras. Windows Vista Windows XP Disconnect icon Index 77GB The [Export to Media] screen appears. 5 Select the driver of... to 3 below before: • Disconnecting the dedicated USB cable. • Removing a "Memory Stick Duo" media. • Inserting a "Memory Stick Duo" media into the camera after copying images from the internal memory. • Turning off the camera. 1 Double-click the disconnect icon on the tasktray. 2...
Cyber-shot® Handbook
Page 80
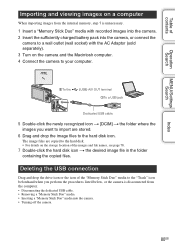
... internal memory, step 1 is disconnected from the computer. • Disconnecting the dedicated USB cable. • Removing a "Memory Stick Duo" media. • Inserting a "Memory Stick Duo" media into the camera, or connect the camera to a wall outlet (wall socket) with the AC Adaptor (sold separately). 3 Turn... on the camera and the Macintosh computer. 4 Connect the camera to your computer. 2To the (USB)·A/V OUT terminal 1To a USB jack Dedicated USB cable 5 Double-click the newly recognized icon t [DCIM] t the folder where ...
... internal memory, step 1 is disconnected from the computer. • Disconnecting the dedicated USB cable. • Removing a "Memory Stick Duo" media. • Inserting a "Memory Stick Duo" media into the camera, or connect the camera to a wall outlet (wall socket) with the AC Adaptor (sold separately). 3 Turn... on the camera and the Macintosh computer. 4 Connect the camera to your computer. 2To the (USB)·A/V OUT terminal 1To a USB jack Dedicated USB cable 5 Double-click the newly recognized icon t [DCIM] t the folder where ...

Cyber-shot® Handbook
Page 83
... MENU/Settings Search Printing images directly using a PictBridge compliant printer Even if you do not have a computer, you can print images shot using the dedicated USB cable. 1 Insert the sufficiently charged battery pack into the camera. 2 Connect the camera to the printer. 2 To the (USB)·A/V OUT terminal 1 To the USB jack Dedicated USB...
... MENU/Settings Search Printing images directly using a PictBridge compliant printer Even if you do not have a computer, you can print images shot using the dedicated USB cable. 1 Insert the sufficiently charged battery pack into the camera. 2 Connect the camera to the printer. 2 To the (USB)·A/V OUT terminal 1 To the USB jack Dedicated USB...

Cyber-shot® Handbook
Page 84
...you want to insert the date and time on the printer. Selects [Date] or [Day&Time] to print side by [Clock Settings] of the camera. Selects the size of the printing sheet. Do as following after step 1. 1Select an image then press z. Note • Do not disconnect the dedicated... USB cable while the the screen. (PictBridge Connecting) indicator appears on the control button This Image Multiple Images Prints the currently displayed image in the order ...
...you want to insert the date and time on the printer. Selects [Date] or [Day&Time] to print side by [Clock Settings] of the camera. Selects the size of the printing sheet. Do as following after step 1. 1Select an image then press z. Note • Do not disconnect the dedicated... USB cable while the the screen. (PictBridge Connecting) indicator appears on the control button This Image Multiple Images Prints the currently displayed image in the order ...

Cyber-shot® Handbook
Page 90
These dots are made for playing back, on this camera, files containing images which were shot using "PMB". Deleting Cannot delete an image. • Cancel the protection (page 52). 90GB ...• Retouch the image using [Retouch] t [Red Eye Correction] in viewing menu (page 50), or correct using other cameras. • The camera is in succession. • The internal memory or "Memory Stick Duo" media is not a malfunction. Delete the USB connection ...• Check whether the connection is correct (page 69). • If the dedicated USB cable is set to image processing.
These dots are made for playing back, on this camera, files containing images which were shot using "PMB". Deleting Cannot delete an image. • Cancel the protection (page 52). 90GB ...• Retouch the image using [Retouch] t [Red Eye Correction] in viewing menu (page 50), or correct using other cameras. • The camera is in succession. • The internal memory or "Memory Stick Duo" media is not a malfunction. Delete the USB connection ...• Check whether the connection is correct (page 69). • If the dedicated USB cable is set to image processing.

Cyber-shot® Handbook
Page 91
...of contents Operation Search MENU/Settings Search Index Computers Computer OS compatibility with a "Memory Stick Duo" media formatted by manufacturers other than Sony should contact those manufacturers. • If "Memory Stick PRO Duo" media is low, insert the charged battery pack or use the...[Mass Storage] (page 57). • Use the dedicated USB cable (supplied). • Disconnect the dedicated USB cable from both the computer and the camera, and connect it again firmly. • Disconnect all equipment other than the camera, the keyboard and the mouse from the USB connectors of your ...
...of contents Operation Search MENU/Settings Search Index Computers Computer OS compatibility with a "Memory Stick Duo" media formatted by manufacturers other than Sony should contact those manufacturers. • If "Memory Stick PRO Duo" media is low, insert the charged battery pack or use the...[Mass Storage] (page 57). • Use the dedicated USB cable (supplied). • Disconnect the dedicated USB cable from both the computer and the camera, and connect it again firmly. • Disconnect all equipment other than the camera, the keyboard and the mouse from the USB connectors of your ...

Cyber-shot® Handbook
Page 93
...with the printer. • If you still cannot print your images, disconnect the dedicated USB cable, turn the printer off and then on, then connect the dedicated USB cable again. • Movies cannot be printed. • Images shot using the dedicated USB cable. • Turn on the printer.... that of the printer. Table of contents Operation Search MENU/Settings Search PictBridge compliant printer A connection cannot be established. • The camera cannot be connected directly to whether the printer provides these functions or not. • The date may not be inserted in the index...
...with the printer. • If you still cannot print your images, disconnect the dedicated USB cable, turn the printer off and then on, then connect the dedicated USB cable again. • Movies cannot be printed. • Images shot using the dedicated USB cable. • Turn on the printer.... that of the printer. Table of contents Operation Search MENU/Settings Search PictBridge compliant printer A connection cannot be established. • The camera cannot be connected directly to whether the printer provides these functions or not. • The date may not be inserted in the index...

Cyber-shot® Handbook
Page 97
Table of contents Operation Search MENU/Settings Search Index Maximum number of the camera cannot be performed on the printer. Printer busy Paper error No paper Ink error Low ink No ink • Check the printer. You cannot print ... data transmission to the printer may take time, depending on image files that were recorded with other cameras. This may not be selected when using a PictBridge connection • Some functions are restricted while the camera is finished. Operation cannot be executed in the internal memory to 999 files can be completed yet...
Table of contents Operation Search MENU/Settings Search Index Maximum number of the camera cannot be performed on the printer. Printer busy Paper error No paper Ink error Low ink No ink • Check the printer. You cannot print ... data transmission to the printer may take time, depending on image files that were recorded with other cameras. This may not be selected when using a PictBridge connection • Some functions are restricted while the camera is finished. Operation cannot be executed in the internal memory to 999 files can be completed yet...

Cyber-shot® Handbook
Page 103
... environment 72, 79 Windows 71 Connecting Computer 75 Printer 83 TV 69 Copy 66 Create REC.Folder 64 D Date 84 Dedicated A/V cable 69 Dedicated USB cable 75, 80, 83 Delete 30 Digital Zoom 61 DISP 14 E Electronic transformer 98 EV 36 Exporting images 77 Exposure 36 F Face Detection 44 Flash Level 45 Flash...
... environment 72, 79 Windows 71 Connecting Computer 75 Printer 83 TV 69 Copy 66 Create REC.Folder 64 D Date 84 Dedicated A/V cable 69 Dedicated USB cable 75, 80, 83 Delete 30 Digital Zoom 61 DISP 14 E Electronic transformer 98 EV 36 Exporting images 77 Exposure 36 F Face Detection 44 Flash Level 45 Flash...


