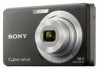
Operating Instructions
Page 5
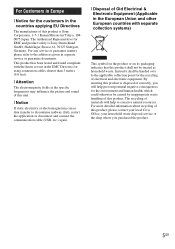
... electrical and electronic equipment. The recycling of materials will help to discontinue midway (fail), restart the application or disconnect and connect the communication cable (USB, etc.) again. [ Disposal of Old Electrical & Electronic Equipment (Applicable in separate service or guarantee documents. For Customers in Europe [ ...and other European countries with the limits set out in the EMC Directive for EMC and product safety is Sony Corporation, 1-7-1 Konan Minato-ku Tokyo, 1080075 Japan. Instead it shall be treated as household waste. The Authorized Representative for ...
... electrical and electronic equipment. The recycling of materials will help to discontinue midway (fail), restart the application or disconnect and connect the communication cable (USB, etc.) again. [ Disposal of Old Electrical & Electronic Equipment (Applicable in separate service or guarantee documents. For Customers in Europe [ ...and other European countries with the limits set out in the EMC Directive for EMC and product safety is Sony Corporation, 1-7-1 Konan Minato-ku Tokyo, 1080075 Japan. Instead it shall be treated as household waste. The Authorized Representative for ...
Operating Instructions
Page 10
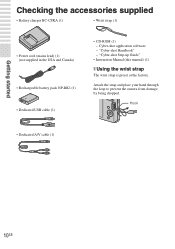
... supplied in the USA and Canada) • Rechargeable battery pack NP-BK1 (1) • Dedicated USB cable (1) • CD-ROM (1) - "Cyber-shot Handbook" - Attach the strap and place your hand through the loop to prevent the camera from damage by being dropped. "Cyber-shot Step-up Guide" • Instruction Manual (this manual) (1) x Using the wrist strap The wrist...
... supplied in the USA and Canada) • Rechargeable battery pack NP-BK1 (1) • Dedicated USB cable (1) • CD-ROM (1) - "Cyber-shot Handbook" - Attach the strap and place your hand through the loop to prevent the camera from damage by being dropped. "Cyber-shot Step-up Guide" • Instruction Manual (this manual) (1) x Using the wrist strap The wrist...

Operating Instructions
Page 34
...MENU t (Print) with v/ V on the control button t z. 34GB MENU button Try switching the [Video Out] setting to the TV with the dedicated USB cable (supplied). 2 Turn on the camera and the printer. First, set to [NTSC] mode at the factory to the printer with the dedicated... A/V cable (supplied). Printing still images If you have a PictBridge compliant printer, you may be using a PAL-only TV. After the connection is set the camera to enable USB connection between the camera and the printer. 1 Connect the camera to let you enjoy optimum movie image...
...MENU t (Print) with v/ V on the control button t z. 34GB MENU button Try switching the [Video Out] setting to the TV with the dedicated USB cable (supplied). 2 Turn on the camera and the printer. First, set to [NTSC] mode at the factory to the printer with the dedicated... A/V cable (supplied). Printing still images If you have a PictBridge compliant printer, you may be using a PAL-only TV. After the connection is set the camera to enable USB connection between the camera and the printer. 1 Connect the camera to let you enjoy optimum movie image...

Operating Instructions
Page 38
...on the screen of the camera. 2 To the (USB)·A/V OUT terminal 1 To a USB jack Dedicated USB cable • is displayed. "Connecting..." appears on the screen during the communication session. When the indicator changes to , you can start menu: Click [Start] t [All Programs] t [Sony Picture Utility] t [Help... while the indicator is displayed on the screen of the camera. Using the AC Adaptor (sold separately) is operating or while "Accessing..." Notes • Do not disconnect the dedicated USB cable from the start using a battery with little remaining charge,...
...on the screen of the camera. 2 To the (USB)·A/V OUT terminal 1 To a USB jack Dedicated USB cable • is displayed. "Connecting..." appears on the screen during the communication session. When the indicator changes to , you can start menu: Click [Start] t [All Programs] t [Sony Picture Utility] t [Help... while the indicator is displayed on the screen of the camera. Using the AC Adaptor (sold separately) is operating or while "Accessing..." Notes • Do not disconnect the dedicated USB cable from the start using a battery with little remaining charge,...
Operating Instructions
Page 44
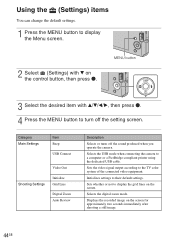
... the default settings. 1 Press the MENU button to a computer or a PictBridge-compliant printer using the dedicated USB cable. Selects the USB mode when connecting the camera to display the Menu screen. 2 Select (Settings) with v/V/b/B, then press z. 4 Press the MENU button to...USB Connect Video Out Shooting Settings Initialize Grid Line Digital Zoom Auto Review Description Selects or turns off the setting screen. Sets the video signal output according to their default settings. Sets whether or not to turn off the sound produced when you operate the camera. Selects the digital...
... the default settings. 1 Press the MENU button to a computer or a PictBridge-compliant printer using the dedicated USB cable. Selects the USB mode when connecting the camera to display the Menu screen. 2 Select (Settings) with v/V/b/B, then press z. 4 Press the MENU button to...USB Connect Video Out Shooting Settings Initialize Grid Line Digital Zoom Auto Review Description Selects or turns off the setting screen. Sets the video signal output according to their default settings. Sets whether or not to turn off the sound produced when you operate the camera. Selects the digital...


