Instruction Manual
Page 2
...the plug. For Customers in the literature accompanying the appliance. 2 IMPORTANT SAFEGUARDS For your Sony dealer regarding this product. If the plug should be of sufficient magnitude to persons. DSC-W150/W170 Serial No WARNING To reduce fire or shock hazard, do not expose the unit to ...provided below. For those sets designed to the presence of power source indicated on the set may be operated only from battery power, or other ). This symbol is a safety feature. Model No. Use [ Power Sources This set should still fail to have a suitable outlet installed. Do not ...
...the plug. For Customers in the literature accompanying the appliance. 2 IMPORTANT SAFEGUARDS For your Sony dealer regarding this product. If the plug should be of sufficient magnitude to persons. DSC-W150/W170 Serial No WARNING To reduce fire or shock hazard, do not expose the unit to ...provided below. For those sets designed to the presence of power source indicated on the set may be operated only from battery power, or other ). This symbol is a safety feature. Model No. Use [ Power Sources This set should still fail to have a suitable outlet installed. Do not ...
Instruction Manual
Page 3
... technician has used replacement parts specified by being dropped, or the cabinet has been damaged. - If the set is provided. - When the power cord or plug is exposed to direct sunlight. [ Lightning For added protection for this indicates a need for service. [ Servicing Do not attempt...it from the wall outlet and disconnect the antenna or cable system. Do not place the set near a swimming pool, etc. [ Power-Cord Protection Route the power cord so that are specified in cabinet, unless proper ventilation is in performance - If the set , and to normal operation. -...
... technician has used replacement parts specified by being dropped, or the cabinet has been damaged. - If the set is provided. - When the power cord or plug is exposed to direct sunlight. [ Lightning For added protection for this indicates a need for service. [ Servicing Do not attempt...it from the wall outlet and disconnect the antenna or cable system. Do not place the set near a swimming pool, etc. [ Power-Cord Protection Route the power cord so that are specified in cabinet, unless proper ventilation is in performance - If the set , and to normal operation. -...
Instruction Manual
Page 4
...free 1-800-822-8837, or visit http://www.rbrc.org/ Caution: Do not handle damaged or leaking Lithium-Ion batteries. Battery charger This power unit is subject to the following two conditions: (1) This device may cause undesired operation. 4 For Customers in a vertical or floor mount ...FCC Rules. Address: 16530 Via Esprillo, San Diego, CA 92127U.S.A. For more information regarding recycling of Conformity Trade Name: SONY Model No.: DSC-W170 Responsible Party: Sony Electronics Inc. Operation is intended to excessive heat such as sunshine, fire or the like. Read this product, you .
...free 1-800-822-8837, or visit http://www.rbrc.org/ Caution: Do not handle damaged or leaking Lithium-Ion batteries. Battery charger This power unit is subject to the following two conditions: (1) This device may cause undesired operation. 4 For Customers in a vertical or floor mount ...FCC Rules. Address: 16530 Via Esprillo, San Diego, CA 92127U.S.A. For more information regarding recycling of Conformity Trade Name: SONY Model No.: DSC-W170 Responsible Party: Sony Electronics Inc. Operation is intended to excessive heat such as sunshine, fire or the like. Read this product, you .
Instruction Manual
Page 7
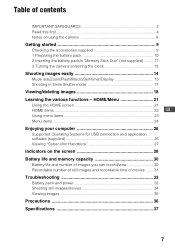
... items 23 Menu items 24 Enjoying your computer 26 Supported Operating Systems for USB connection and application software (supplied 26 Viewing "Cyber-shot Handbook 27 Indicators on /setting the clock 13 Shooting images easily 14 Mode dial/Zoom/Flash/Macro/Self-timer/Display 15 Shooting... 11 3 Turning the camera on the screen 28 Battery life and memory capacity 30 Battery life and number of images you can record/view 30 Recordable number of still images and recordable time of movies ...... 31 Troubleshooting 33 Battery pack and power 33 Shooting still images/movies 34 Viewing ...
... items 23 Menu items 24 Enjoying your computer 26 Supported Operating Systems for USB connection and application software (supplied 26 Viewing "Cyber-shot Handbook 27 Indicators on /setting the clock 13 Shooting images easily 14 Mode dial/Zoom/Flash/Macro/Self-timer/Display 15 Shooting... 11 3 Turning the camera on the screen 28 Battery life and memory capacity 30 Battery life and number of images you can record/view 30 Recordable number of still images and recordable time of movies ...... 31 Troubleshooting 33 Battery pack and power 33 Shooting still images/movies 34 Viewing ...
Instruction Manual
Page 9
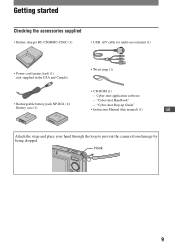
"Cyber-shot Handbook" • Rechargeable battery pack NP-BG1 (1)/ - Hook 9 "Cyber-shot Step-up Guide" Battery case (1) • Instruction Manual (this manual) (1) GB Attach the strap and place your hand through the loop to prevent the camera from damage by being dropped. Getting started Checking the accessories supplied • Battery charger BC-CSGB/BC-CSGC (1) • USB, A/V cable for multi-use terminal (1) • Power cord (mains lead) (1) (not supplied in the USA and Canada) • Wrist strap (1) • CD-ROM (1) - Cyber-shot application software -
"Cyber-shot Handbook" • Rechargeable battery pack NP-BG1 (1)/ - Hook 9 "Cyber-shot Step-up Guide" Battery case (1) • Instruction Manual (this manual) (1) GB Attach the strap and place your hand through the loop to prevent the camera from damage by being dropped. Getting started Checking the accessories supplied • Battery charger BC-CSGB/BC-CSGC (1) • USB, A/V cable for multi-use terminal (1) • Power cord (mains lead) (1) (not supplied in the USA and Canada) • Wrist strap (1) • CD-ROM (1) - Cyber-shot application software -
Instruction Manual
Page 10
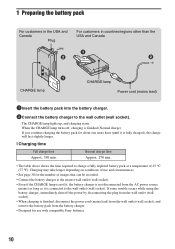
...customers in the USA and Canada Plug For customers in countries/regions other than the USA and Canada ɟ ɟ CHARGE lamp CHARGE lamp Power cord (mains lead) 1Insert the battery pack into the battery charger. 2Connect the battery charger to the wall outlet (wall socket). If some ...power source (mains) as long as it is connected to the wall outlet (wall socket). If you continue charging the battery pack for use and circumstances. • See page 30 for the number of 25 °C (77 °F). Charging may take longer depending on conditions of use with compatible Sony...
...customers in the USA and Canada Plug For customers in countries/regions other than the USA and Canada ɟ ɟ CHARGE lamp CHARGE lamp Power cord (mains lead) 1Insert the battery pack into the battery charger. 2Connect the battery charger to the wall outlet (wall socket). If some ...power source (mains) as long as it is connected to the wall outlet (wall socket). If you continue charging the battery pack for use and circumstances. • See page 30 for the number of 25 °C (77 °F). Charging may take longer depending on conditions of use with compatible Sony...
Instruction Manual
Page 11
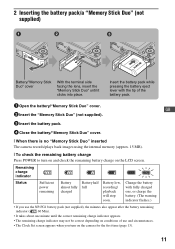
...flashes.) • If you use and circumstances. • The Clock Set screen appears when you turn on and check the remaining battery charge on the camera for the first time (page 13). 11 GB 2 Insert the "Memory Stick Duo" (not supplied). 3 Insert the battery pack. 4 Close the... battery/"Memory Stick Duo" cover. [ When there is no "Memory Stick Duo" inserted The camera records/plays back images using the internal memory (approx. 15 MB). [ To check the remaining battery charge Press POWER to turn on the LCD screen. 2 Inserting the battery pack/a "Memory Stick Duo" (not supplied...
...flashes.) • If you use and circumstances. • The Clock Set screen appears when you turn on and check the remaining battery charge on the camera for the first time (page 13). 11 GB 2 Insert the "Memory Stick Duo" (not supplied). 3 Insert the battery pack. 4 Close the... battery/"Memory Stick Duo" cover. [ When there is no "Memory Stick Duo" inserted The camera records/plays back images using the internal memory (approx. 15 MB). [ To check the remaining battery charge Press POWER to turn on the LCD screen. 2 Inserting the battery pack/a "Memory Stick Duo" (not supplied...
Instruction Manual
Page 13
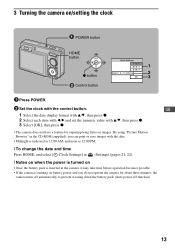
... the battery pack is inserted in the camera, it may take time before operation becomes possible. • If the camera is running on battery power and you do not operate the camera for superimposing dates on /setting the clock POWER button HOME button 1 2 z button 3 ɟ Control button 1 Press POWER. 2 Set the clock with v/V, then press z. 3 Select...
... the battery pack is inserted in the camera, it may take time before operation becomes possible. • If the camera is running on battery power and you do not operate the camera for superimposing dates on /setting the clock POWER button HOME button 1 2 z button 3 ɟ Control button 1 Press POWER. 2 Set the clock with v/V, then press z. 3 Select...
Instruction Manual
Page 18
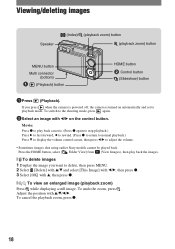
... and select [This Image] with b/B, then press z. 3 Select [OK] with v, then press z. [ To view an enlarged image (playback zoom) Press while displaying a still image. Press the HOME button, select [ Folder View] from (View Images), then play back a movie. (Press z again to stop playback.) Press B to fast forward... volume. • Sometimes images shot using earlier Sony models cannot be played back. To undo the zoom, press . Movie: Press z to play back the images. [ To delete images 1 Display the image you press when the camera is powered off, the camera is turned on the control button...
... and select [This Image] with b/B, then press z. 3 Select [OK] with v, then press z. [ To view an enlarged image (playback zoom) Press while displaying a still image. Press the HOME button, select [ Folder View] from (View Images), then play back a movie. (Press z again to stop playback.) Press B to fast forward... volume. • Sometimes images shot using earlier Sony models cannot be played back. To undo the zoom, press . Movie: Press z to play back the images. [ To delete images 1 Display the image you press when the camera is powered off, the camera is turned on the control button...
Instruction Manual
Page 30
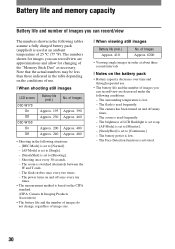
...; Battery capacity decreases over time and through repeated use . [ When shooting still images LCD screen DSC-W170 On Off DSC-W150 On Off Battery life (min.) Approx. 195 Approx. 230 Approx. ... 30 seconds. - The surrounding temperature is used frequently. - The zoom is low. - The camera has been turned on the conditions of use . • The battery life and the number of...set to [Continuous]. - The numbers shown for changing of the "Memory Stick Duo" as necessary. The power turns on and off many times. - The Face Detection function is switched alternately between the W and T ...
...; Battery capacity decreases over time and through repeated use . [ When shooting still images LCD screen DSC-W170 On Off DSC-W150 On Off Battery life (min.) Approx. 195 Approx. 230 Approx. ... 30 seconds. - The surrounding temperature is used frequently. - The zoom is low. - The camera has been turned on the conditions of use . • The battery life and the number of...set to [Continuous]. - The numbers shown for changing of the "Memory Stick Duo" as necessary. The power turns on and off many times. - The Face Detection function is switched alternately between the W and T ...
Instruction Manual
Page 33
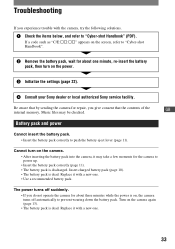
... Music files may take a few moments for the camera to power up. • Insert the battery pack correctly (page 11). • The battery pack is dead. If a code such as "C/E:ss:ss" appears on the screen, refer to "Cyber-shot Handbook". 2 Remove the battery pack, wait for ...about one minute, re-insert the battery pack, then turn on the power. 3 Initialize the settings (page 22). 4 Consult your Sony dealer or local authorized Sony service facility. Cannot turn on the camera. • After inserting the...
... Music files may take a few moments for the camera to power up. • Insert the battery pack correctly (page 11). • The battery pack is dead. If a code such as "C/E:ss:ss" appears on the screen, refer to "Cyber-shot Handbook". 2 Remove the battery pack, wait for ...about one minute, re-insert the battery pack, then turn on the power. 3 Initialize the settings (page 22). 4 Consult your Sony dealer or local authorized Sony service facility. Cannot turn on the camera. • After inserting the...
Instruction Manual
Page 36
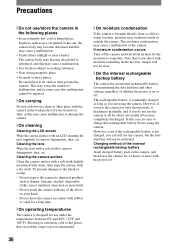
... Cleaning the LCD screen Wipe the screen surface with a soft cloth to let sand or dust get into the camera. Shooting in extremely cold or hot places that if you can still use the camera, but the date and time will not be sure to evaporate. Cleaning the lens Wipe the lens with... an LCD cleaning kit (not supplied) to malfunction, and in contact with the power off . Do not leave the camera in some cases this rechargeable battery...
... Cleaning the LCD screen Wipe the screen surface with a soft cloth to let sand or dust get into the camera. Shooting in extremely cold or hot places that if you can still use the camera, but the date and time will not be sure to evaporate. Cleaning the lens Wipe the lens with... an LCD cleaning kit (not supplied) to malfunction, and in contact with the power off . Do not leave the camera in some cases this rechargeable battery...
Instruction Manual
Page 37
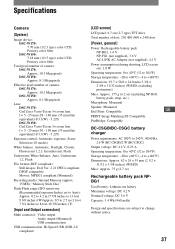
... of camera: DSC-W170: Approx. 10.3 Megapixels DSC-W150: Approx. 8.3 Megapixels Effective pixel number of camera: DSC-W170: Approx. 10.1 Megapixels DSC-W150: Approx. 8.1 Megapixels Lens: DSC-W170: Carl Zeiss Vario-Tessar 5× zoom lens f = 5 - 25 mm (28 - 140 mm (35 mm film equivalent)) F3.3(W) - 5.2(T) DSC-W150:...strap, etc.) Microphone: Monaural Speaker: Monaural Exif Print: Compatible GB PRINT Image Matching III: Compatible PictBridge: Compatible BC-CSGB/BC-CSGC battery charger Power requirements: AC 100 V to 240 V, 50/60 Hz, 2.6 W (BC-CSGB)/2 W (BC-CSGC) Output voltage: DC 4.2 V, 0....
... of camera: DSC-W170: Approx. 10.3 Megapixels DSC-W150: Approx. 8.3 Megapixels Effective pixel number of camera: DSC-W170: Approx. 10.1 Megapixels DSC-W150: Approx. 8.1 Megapixels Lens: DSC-W170: Carl Zeiss Vario-Tessar 5× zoom lens f = 5 - 25 mm (28 - 140 mm (35 mm film equivalent)) F3.3(W) - 5.2(T) DSC-W150:...strap, etc.) Microphone: Monaural Speaker: Monaural Exif Print: Compatible GB PRINT Image Matching III: Compatible PictBridge: Compatible BC-CSGB/BC-CSGC battery charger Power requirements: AC 100 V to 240 V, 50/60 Hz, 2.6 W (BC-CSGB)/2 W (BC-CSGC) Output voltage: DC 4.2 V, 0....
Instruction Manual
Page 38
... other countries. • Macintosh, Mac OS, iMac, iBook, PowerBook, Power Mac and eMac are trademarks or registered trademarks of Apple Inc. • Intel, MMX, and Pentium are trademarks or registered trademarks of their respective developers or manufacturers. Trademarks • , "Cyber-shot" are trademarks of Sony Corporation. • "Memory Stick", , "Memory Stick PRO", , "Memory Stick...
... other countries. • Macintosh, Mac OS, iMac, iBook, PowerBook, Power Mac and eMac are trademarks or registered trademarks of Apple Inc. • Intel, MMX, and Pentium are trademarks or registered trademarks of their respective developers or manufacturers. Trademarks • , "Cyber-shot" are trademarks of Sony Corporation. • "Memory Stick", , "Memory Stick PRO", , "Memory Stick...
Cyber-shot® Handbook
Page 6
Power sources 129 On the "Memory Stick Duo 130 On the battery pack 132 On the battery charger 133 Index Index ...134 6 Table of contents Printing still images How to print still images 108 Printing images directly using a PictBridge compliant printer 109 Printing at a shop 112 Troubleshooting Troubleshooting 114 Warning indicators and messages 125 Others Using the camera abroad -
Power sources 129 On the "Memory Stick Duo 130 On the battery pack 132 On the battery charger 133 Index Index ...134 6 Table of contents Printing still images How to print still images 108 Printing images directly using a PictBridge compliant printer 109 Printing at a shop 112 Troubleshooting Troubleshooting 114 Warning indicators and messages 125 Others Using the camera abroad -
Cyber-shot® Handbook
Page 15
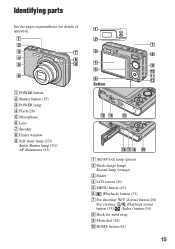
Identifying parts See the pages in parentheses for wrist strap I Self-timer lamp (27)/ Smile Shutter lamp (31)/ AF illuminator (83) Bottom A AE/AF lock lamp (green) B Flash charge lamp/ Record lamp (orange) C Finder D LCD screen (21) E MENU button (43) F (Playback) button (33) G For shooting: W/T (Zoom) button (26) For viewing: / (Playback zoom) button (33)/ (Index) button (34) H Hook for details of operation. A POWER button B Shutter button (25) C POWER lamp D Flash (26) E Microphone F Lens G Speaker H Finder window I Mode dial (24) J HOME button (41) 15
Identifying parts See the pages in parentheses for wrist strap I Self-timer lamp (27)/ Smile Shutter lamp (31)/ AF illuminator (83) Bottom A AE/AF lock lamp (green) B Flash charge lamp/ Record lamp (orange) C Finder D LCD screen (21) E MENU button (43) F (Playback) button (33) G For shooting: W/T (Zoom) button (26) For viewing: / (Playback zoom) button (33)/ (Index) button (34) H Hook for details of operation. A POWER button B Shutter button (25) C POWER lamp D Flash (26) E Microphone F Lens G Speaker H Finder window I Mode dial (24) J HOME button (41) 15
Cyber-shot® Handbook
Page 21
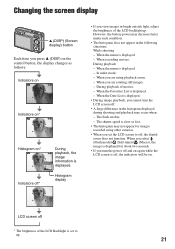
However, the battery power may occur when: - During playback of the LCD backlight up . 21 When you are using other cameras. • When you set to off . • A ... - When the menu is displayed. - When you are rotating still images. - When the Date List is displayed. • During image playback, you cannot turn the power off and on again while the LCD screen is off, the... histogram may not appear for about two seconds. • If you turn the LCD screen off , the digital zoom does not function. When you select (Flash mode)/ (Self-timer)/ (Macro), the image is displayed....
However, the battery power may occur when: - During playback of the LCD backlight up . 21 When you are using other cameras. • When you set to off . • A ... - When the menu is displayed. - When you are rotating still images. - When the Date List is displayed. • During image playback, you cannot turn the power off and on again while the LCD screen is off, the... histogram may not appear for about two seconds. • If you turn the LCD screen off , the digital zoom does not function. When you select (Flash mode)/ (Self-timer)/ (Macro), the image is displayed....

Cyber-shot® Handbook
Page 33
...zoom) button MENU button HOME button (Playback) button 1 Press the (Playback) button. • If you press the (Playback) button when the camera is powered off, the camera is enlarged. • To store enlarged images, see [Trimming] (page 66). 33 Press the HOME button, select [ Folder View] from ...; Movies of the whole image. Shows the displayed area of image size [320] are displayed in a smaller size. • Sometimes images shot using earlier Sony models cannot be played back. Movie: Press z to the shooting mode, press the (Playback) button again. 2 Select an image with v/V/b/B....
...zoom) button MENU button HOME button (Playback) button 1 Press the (Playback) button. • If you press the (Playback) button when the camera is powered off, the camera is enlarged. • To store enlarged images, see [Trimming] (page 66). 33 Press the HOME button, select [ Folder View] from ...; Movies of the whole image. Shows the displayed area of image size [320] are displayed in a smaller size. • Sometimes images shot using earlier Sony models cannot be played back. Movie: Press z to the shooting mode, press the (Playback) button again. 2 Select an image with v/V/b/B....
Cyber-shot® Handbook
Page 75
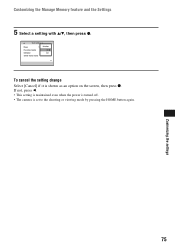
To cancel the setting change Select [Cancel] if it is set to the shooting or viewing mode by pressing the HOME button again. 75 Customizing the settings Customizing the Manage Memory feature and the Settings 5 Select a setting with v/V, then press z. If not, press b. • This setting is maintained even when the power is turned off. • The camera is shown as an option on the screen, then press z.
To cancel the setting change Select [Cancel] if it is set to the shooting or viewing mode by pressing the HOME button again. 75 Customizing the settings Customizing the Manage Memory feature and the Settings 5 Select a setting with v/V, then press z. If not, press b. • This setting is maintained even when the power is turned off. • The camera is shown as an option on the screen, then press z.
Cyber-shot® Handbook
Page 79
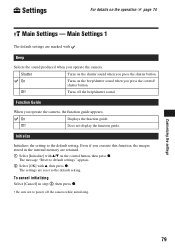
...Customizing the settings 79 Shutter Turns on the beep/shutter sound when you press the shutter button. Function Guide When you operate the camera. Main Settings 1 The default settings are reset to default settings" appears. 2 Select [OK] with v/V on the operation 1 ... Settings For details on the control button, then press z. Off Turns off the camera while initializing. Beep Selects the sound produced when you operate the camera, the function guide appears. Initialize Initializes the setting to power off the beep/shutter sound. The settings are marked with .
...Customizing the settings 79 Shutter Turns on the beep/shutter sound when you press the shutter button. Function Guide When you operate the camera. Main Settings 1 The default settings are reset to default settings" appears. 2 Select [OK] with v/V on the operation 1 ... Settings For details on the control button, then press z. Off Turns off the camera while initializing. Beep Selects the sound produced when you operate the camera, the function guide appears. Initialize Initializes the setting to power off the beep/shutter sound. The settings are marked with .


