Instruction Manual
Page 5
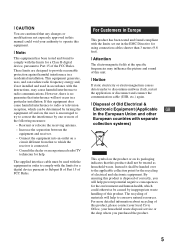
... fields at the specific frequencies may cause harmful interference to discontinue midway (fail), restart the application or disconnect and connect the communication cable (USB, etc.) again. [ Disposal of Old Electrical & Electronic Equipment (Applicable GB in the European Union and other European countries with the...conserve natural resources. Consult the dealer or an experienced radio/TV technician for help to the applicable collection point for a Class B digital device, pursuant to Subpart B of Part 15 of FCC Rules. Connect the equipment into an outlet on a circuit different from ...
... fields at the specific frequencies may cause harmful interference to discontinue midway (fail), restart the application or disconnect and connect the communication cable (USB, etc.) again. [ Disposal of Old Electrical & Electronic Equipment (Applicable GB in the European Union and other European countries with the...conserve natural resources. Consult the dealer or an experienced radio/TV technician for help to the applicable collection point for a Class B digital device, pursuant to Subpart B of Part 15 of FCC Rules. Connect the equipment into an outlet on a circuit different from ...
Instruction Manual
Page 9
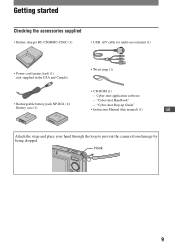
Hook 9 "Cyber-shot Handbook" • Rechargeable battery pack NP-BG1 (1)/ - "Cyber-shot Step-up Guide" Battery case (1) • Instruction Manual (this manual) (1) GB Attach the strap and place your hand through the loop to prevent the camera from damage by being dropped. Getting started Checking the accessories supplied • Battery charger BC-CSGB/BC-CSGC (1) • USB, A/V cable for multi-use terminal (1) • Power cord (mains lead) (1) (not supplied in the USA and Canada) • Wrist strap (1) • CD-ROM (1) - Cyber-shot application software -
Hook 9 "Cyber-shot Handbook" • Rechargeable battery pack NP-BG1 (1)/ - "Cyber-shot Step-up Guide" Battery case (1) • Instruction Manual (this manual) (1) GB Attach the strap and place your hand through the loop to prevent the camera from damage by being dropped. Getting started Checking the accessories supplied • Battery charger BC-CSGB/BC-CSGC (1) • USB, A/V cable for multi-use terminal (1) • Power cord (mains lead) (1) (not supplied in the USA and Canada) • Wrist strap (1) • CD-ROM (1) - Cyber-shot application software -
Instruction Manual
Page 19
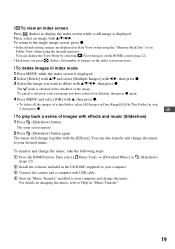
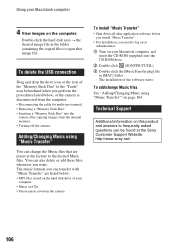
...change the music, take the following steps. 1 Press the HOME button. [ To view an index screen Press (Index) to display the index screen while a still image is displayed. 2 Select [Delete] with v/V and select [Multiple Images] with b/B, then press z. 3 Select the image you want to delete with v/V/b/B,.../folder, select [All Images in Date Range]/[All In This Folder] in the CD-ROM (supplied) to your computer. 3 Connect the camera and a computer with USB cable. 4 Start up "Music Transfer" installed to your desired music. For details on the index screen increases. [ To delete images in Folder...
...change the music, take the following steps. 1 Press the HOME button. [ To view an index screen Press (Index) to display the index screen while a still image is displayed. 2 Select [Delete] with v/V and select [Multiple Images] with b/B, then press z. 3 Select the image you want to delete with v/V/b/B,.../folder, select [All Images in Date Range]/[All In This Folder] in the CD-ROM (supplied) to your computer. 3 Connect the camera and a computer with USB cable. 4 Start up "Music Transfer" installed to your desired music. For details on the index screen increases. [ To delete images in Folder...
Cyber-shot® Handbook
Page 81
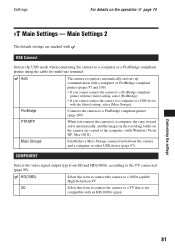
...page 109). SD Select this item to connect the camera to a computer or a PictBridge compliant printer using the cable for multi-use terminal. Customizing the settings 81 USB Connect Selects the USB mode when connecting the camera to a 1080i-capable High Definition TV. Settings ...For details on the camera are marked with the [Auto] setting, select...
...page 109). SD Select this item to connect the camera to a computer or a PictBridge compliant printer using the cable for multi-use terminal. Customizing the settings 81 USB Connect Selects the USB mode when connecting the camera to a 1080i-capable High Definition TV. Settings ...For details on the camera are marked with the [Auto] setting, select...

Cyber-shot® Handbook
Page 97
... in the internal memory, this step is unnecessary. 2 Insert the sufficiently charged battery pack into the camera, or connect the camera to a wall outlet (wall socket) with the AC Adaptor (not supplied) and the USB/AV/DC IN cable for multi-use terminal (not supplied). • When you can start using a battery pack with...
... in the internal memory, this step is unnecessary. 2 Insert the sufficiently charged battery pack into the camera, or connect the camera to a wall outlet (wall socket) with the AC Adaptor (not supplied) and the USB/AV/DC IN cable for multi-use terminal (not supplied). • When you can start using a battery pack with...
Cyber-shot® Handbook
Page 99
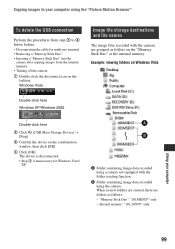
...To delete the USB connection Perform the procedures from step 1 to your computer 99 When no new folders are created, there are grouped as follows: - "Memory Stick Duo": "101MSDCF" only - A Folder containing image data recorded using a camera not equipped with the camera are folders as... click [OK]. 4 Click [OK]. Copying images to 4 below before: • Disconnecting the cable for Windows Vista/ XP. Internal memory: "101_SONY" only Using your computer using the camera. Example: viewing folders on Windows Vista Double-click here Windows XP/Windows 2000 Double-click here 2...
...To delete the USB connection Perform the procedures from step 1 to your computer 99 When no new folders are created, there are grouped as follows: - "Memory Stick Duo": "101MSDCF" only - A Folder containing image data recorded using a camera not equipped with the camera are folders as... click [OK]. 4 Click [OK]. Copying images to 4 below before: • Disconnecting the cable for Windows Vista/ XP. Internal memory: "101_SONY" only Using your computer using the camera. Example: viewing folders on Windows Vista Double-click here Windows XP/Windows 2000 Double-click here 2...
Cyber-shot® Handbook
Page 101
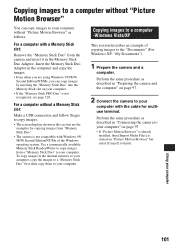
For a computer without a Memory Stick slot: Make a USB connection and follow Stages to copy images. • The screen... the same procedure as follows. Use a commercially available Memory Stick Reader/Writer to copy images from the camera and insert it in the Memory Stick Duo Adaptor. Copying images to a computer -Windows Vista/XP This...Perform the same procedure as described in "Preparing the camera and the computer" on page 97. 2 Connect the camera to your computer with the cable for copying images from "Memory Stick Duo". • The camera is not compatible with a Memory Stick slot: Remove...
For a computer without a Memory Stick slot: Make a USB connection and follow Stages to copy images. • The screen... the same procedure as follows. Use a commercially available Memory Stick Reader/Writer to copy images from the camera and insert it in the Memory Stick Duo Adaptor. Copying images to a computer -Windows Vista/XP This...Perform the same procedure as described in "Preparing the camera and the computer" on page 97. 2 Connect the camera to your computer with the cable for copying images from "Memory Stick Duo". • The camera is not compatible with a Memory Stick slot: Remove...
Cyber-shot® Handbook
Page 105
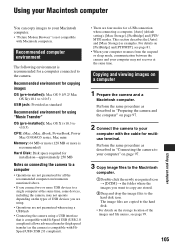
... newly recognized icon t [DCIM] t the folder where the images you are using. • Operations are not guaranteed when using a USB hub. • Connecting the camera using "Music Transfer" OS (pre-installed): Mac OS X (v10.3 to v10.5) CPU: iMac, eMac, iBook, PowerBook, Power Mac...camera to your computer" on [PictBridge] and [PTP/MTP], see page 99. 105 Using your computer The image files are four modes for multiuse terminal. This section describes the [Auto] and [Mass Storage] as standard Recommended environment for using a USB interface that is compatible with the cable for a USB...
... newly recognized icon t [DCIM] t the folder where the images you are using. • Operations are not guaranteed when using a USB hub. • Connecting the camera using "Music Transfer" OS (pre-installed): Mac OS X (v10.3 to v10.5) CPU: iMac, eMac, iBook, PowerBook, Power Mac...camera to your computer" on [PictBridge] and [PTP/MTP], see page 99. 105 Using your computer The image files are four modes for multiuse terminal. This section describes the [Auto] and [Mass Storage] as standard Recommended environment for using a USB interface that is compatible with the cable for a USB...
Cyber-shot® Handbook
Page 106
... you need to log on as Administrator. 1 Turn on your Macintosh computer, and insert the CD-ROM (supplied) into the camera after copying images from the computer. • Disconnecting the cable for multi-use terminal. • Removing a "Memory Stick Duo". • Inserting a "Memory Stick Duo" into the CD...of your Macintosh computer 4 View images on the computer. Adding/Changing Music using "Music Transfer"" on page 104. http://www.sony.net/ 106 To delete the USB connection Drag and drop the drive icon or the icon of the software starts. Using your computer • Music on CDs...
... you need to log on as Administrator. 1 Turn on your Macintosh computer, and insert the CD-ROM (supplied) into the camera after copying images from the computer. • Disconnecting the cable for multi-use terminal. • Removing a "Memory Stick Duo". • Inserting a "Memory Stick Duo" into the CD...of your Macintosh computer 4 View images on the computer. Adding/Changing Music using "Music Transfer"" on page 104. http://www.sony.net/ 106 To delete the USB connection Drag and drop the drive icon or the icon of the software starts. Using your computer • Music on CDs...
Cyber-shot® Handbook
Page 109
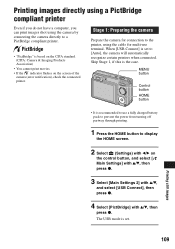
... USB mode is the case. Stage 1: Preparing the camera Prepare the camera for multi-use a fully charged battery pack to prevent the power from turning off partway through printing. 1 Press the HOME button to the printer, using the camera by connecting the camera directly to [Auto], the camera will automatically recognize certain printers when connected. Printing still...
... USB mode is the case. Stage 1: Preparing the camera Prepare the camera for multi-use a fully charged battery pack to prevent the power from turning off partway through printing. 1 Press the HOME button to the printer, using the camera by connecting the camera directly to [Auto], the camera will automatically recognize certain printers when connected. Printing still...
Cyber-shot® Handbook
Page 110
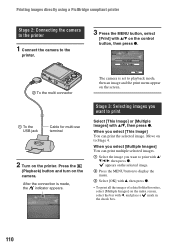
...the connection is set to playback mode, then an image and the print menu appear on the screen. 1 To the USB jack Cable for multi-use terminal 2 Turn on the camera. Stage 3: Selecting images you want to Stage 4. appears on to print with v/ V/b/B, then press z. Press the (...image you select [This Image] You can print the selected image. Printing images directly using a PictBridge compliant printer Stage 2: Connecting the camera to the printer 1 Connect the camera to the printer. 3 Press the MENU button, select [Print] with v/V on the control button, then press z. 2 To the...
...the connection is set to playback mode, then an image and the print menu appear on the screen. 1 To the USB jack Cable for multi-use terminal 2 Turn on the camera. Stage 3: Selecting images you want to Stage 4. appears on to print with v/ V/b/B, then press z. Press the (...image you select [This Image] You can print the selected image. Printing images directly using a PictBridge compliant printer Stage 2: Connecting the camera to the printer 1 Connect the camera to the printer. 3 Press the MENU button, select [Print] with v/V on the control button, then press z. 2 To the...
Cyber-shot® Handbook
Page 119
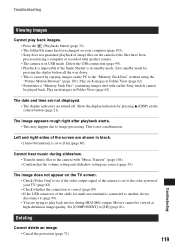
... connection is correct (page 89). • If the USB connector of the cable for multi-use terminal is set to the color system of your computer (page 103). • Sony does not guarantee playback of image files on the camera if the files have been processed using a computer or ... shot with "Music Transfer" (page 104). • Confirm that the volume setting and slideshow setting are turned off. Set [COMPONENT] to image processing. Movies cannot be played back. The image appears rough right after playback starts. • This may happen due to [SD] (page 81). Delete the USB...
... connection is correct (page 89). • If the USB connector of the cable for multi-use terminal is set to the color system of your computer (page 103). • Sony does not guarantee playback of image files on the camera if the files have been processed using a computer or ... shot with "Music Transfer" (page 104). • Confirm that the volume setting and slideshow setting are turned off. Set [COMPONENT] to image processing. Movies cannot be played back. The image appears rough right after playback starts. • This may happen due to [SD] (page 81). Delete the USB...

Cyber-shot® Handbook
Page 120
...recognized by a computer with a "Memory Stick Duo" formatted by a computer, you are using a "Memory Stick Duo" formatted by manufacturers other than Sony should contact those manufacturers. • If "Memory Stick PRO Duo" is low, insert the charged battery pack or use the AC adaptor (not supplied...) (page 97). • Set [USB Connect] to [Mass Storage] (page 81). • Use the cable for multi-use terminal (supplied) (page 97). • Disconnect the cable for multi-use terminal from both the computer and the camera, and connect it again firmly. • Disconnect all...
...recognized by a computer with a "Memory Stick Duo" formatted by a computer, you are using a "Memory Stick Duo" formatted by manufacturers other than Sony should contact those manufacturers. • If "Memory Stick PRO Duo" is low, insert the charged battery pack or use the AC adaptor (not supplied...) (page 97). • Set [USB Connect] to [Mass Storage] (page 81). • Use the cable for multi-use terminal (supplied) (page 97). • Disconnect the cable for multi-use terminal from both the computer and the camera, and connect it again firmly. • Disconnect all...

Cyber-shot® Handbook
Page 122
...connect the cable for multi-use terminal again. PictBridge compliant printer A connection cannot be established. • The camera cannot be connected to the camera. • Set [USB Connect] to whether the printer provides these functions or not. • When having images printed at a digital print ...] during printing, images may not be cut off. • When printing images using cameras other than the camera or images modified with a computer may not be printed. • Images shot using your printer, cancel the trimming or borderless settings. For further information, refer to ...
...connect the cable for multi-use terminal again. PictBridge compliant printer A connection cannot be established. • The camera cannot be connected to the camera. • Set [USB Connect] to whether the printer provides these functions or not. • When having images printed at a digital print ...] during printing, images may not be cut off. • When printing images using cameras other than the camera or images modified with a computer may not be printed. • Images shot using your printer, cancel the trimming or borderless settings. For further information, refer to ...


