Instruction Manual
Page 9
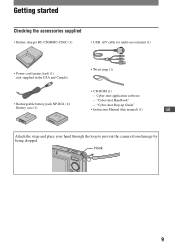
Cyber-shot application software - "Cyber-shot Handbook" • Rechargeable battery pack NP-BG1 (1)/ - Hook 9 "Cyber-shot Step-up Guide" Battery case (1) • Instruction Manual (this manual) (1) GB Attach the strap and place your hand through the loop to prevent the camera from damage by being dropped. Getting started Checking the accessories supplied • Battery charger BC-CSGB/BC-CSGC (1) • USB, A/V cable for multi-use terminal (1) • Power cord (mains lead) (1) (not supplied in the USA and Canada) • Wrist strap (1) • CD-ROM (1) -
Cyber-shot application software - "Cyber-shot Handbook" • Rechargeable battery pack NP-BG1 (1)/ - Hook 9 "Cyber-shot Step-up Guide" Battery case (1) • Instruction Manual (this manual) (1) GB Attach the strap and place your hand through the loop to prevent the camera from damage by being dropped. Getting started Checking the accessories supplied • Battery charger BC-CSGB/BC-CSGC (1) • USB, A/V cable for multi-use terminal (1) • Power cord (mains lead) (1) (not supplied in the USA and Canada) • Wrist strap (1) • CD-ROM (1) -
Instruction Manual
Page 21
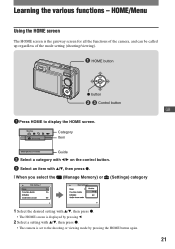
... 1 Press HOME to the shooting or viewing mode by pressing b. 2 Select a setting with v/V, then press z. • The camera is the gateway screen for all the functions of the camera, and can be called up regardless of the mode setting (shooting/viewing). HOME/Menu Using the HOME screen The HOME... screen is set to display the HOME screen. Shooting Shooting Category Item Shoot photos or movies Guide 2 Select a category with b/B on...
... 1 Press HOME to the shooting or viewing mode by pressing b. 2 Select a setting with v/V, then press z. • The camera is the gateway screen for all the functions of the camera, and can be called up regardless of the mode setting (shooting/viewing). HOME/Menu Using the HOME screen The HOME... screen is set to display the HOME screen. Shooting Shooting Category Item Shoot photos or movies Guide 2 Select a category with b/B on...
Instruction Manual
Page 22
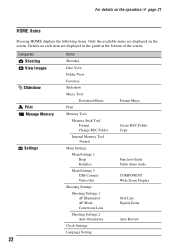
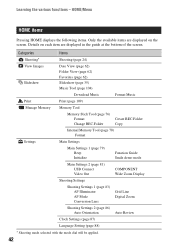
... are displayed on the operation 1 page 21 HOME items Pressing HOME displays the following items. Only the available items are displayed in the guide at the bottom of the screen. Categories Shooting View Images Slideshow Print Manage Memory Settings 22 Items Shooting Date View Folder View Favorites Slideshow... Settings 1 AF Illuminator AF Mode Conversion Lens Shooting Settings 2 Auto Orientation Clock Settings Language Setting Format Music Create REC.Folder Copy Function Guide Smile demo mode COMPONENT Wide Zoom Display Grid Line Digital Zoom Auto Review For details on the screen.
... are displayed on the operation 1 page 21 HOME items Pressing HOME displays the following items. Only the available items are displayed in the guide at the bottom of the screen. Categories Shooting View Images Slideshow Print Manage Memory Settings 22 Items Shooting Date View Folder View Favorites Slideshow... Settings 1 AF Illuminator AF Mode Conversion Lens Shooting Settings 2 Auto Orientation Clock Settings Language Setting Format Music Create REC.Folder Copy Function Guide Smile demo mode COMPONENT Wide Zoom Display Grid Line Digital Zoom Auto Review For details on the screen.

Instruction Manual
Page 23
Using menu items MENU button z button ɟ ɠ Control button GB 1 Press MENU to turn off the menu. 23 Function Guide • The menu will be displayed only during shooting and playback mode. • Different items will become visible depending on the selected mode. 2 Select a desired ...
Using menu items MENU button z button ɟ ɠ Control button GB 1 Press MENU to turn off the menu. 23 Function Guide • The menu will be displayed only during shooting and playback mode. • Different items will become visible depending on the selected mode. 2 Select a desired ...

Instruction Manual
Page 27
...insert the CD- GB When you install "Cyber-shot Handbook", the "Cyber-shot Step-up Guide" will be installed automatically. 3 After the installation is complete, double-click "Handbook.pdf". ROM (supplied) into the CD-ROM drive. Viewing "Cyber-shot Handbook" "Cyber-shot Handbook" in the CD-ROM (supplied) explains... computer, and insert the CD- Adobe Reader is required to use the camera in the [GB] folder to copy. • When you click the [Cyber-shot Handbook] button, the screen for copying "Cyber-shot Handbook" appears. 2 Follow the on-screen instructions to your computer. 3...
...insert the CD- GB When you install "Cyber-shot Handbook", the "Cyber-shot Step-up Guide" will be installed automatically. 3 After the installation is complete, double-click "Handbook.pdf". ROM (supplied) into the CD-ROM drive. Viewing "Cyber-shot Handbook" "Cyber-shot Handbook" in the CD-ROM (supplied) explains... computer, and insert the CD- Adobe Reader is required to use the camera in the [GB] folder to copy. • When you click the [Cyber-shot Handbook] button, the screen for copying "Cyber-shot Handbook" appears. 2 Follow the on-screen instructions to your computer. 3...
Instruction Manual
Page 29
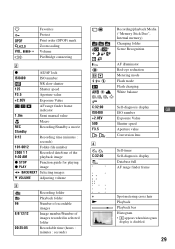
.../Standby a movie 0:12 Recording time (minutes : seconds) 101-0012 Folder-file number 2008 1 1 9:30 AM Recorded date/time of the playback image z STOP z PLAY Function guide for playing image BACK/NEXT Selecting images V VOLUME Adjusting volume C 96 8/8 12/12 00:25:05 Recording folder Playback folder Number of recordable images Image...
.../Standby a movie 0:12 Recording time (minutes : seconds) 101-0012 Folder-file number 2008 1 1 9:30 AM Recorded date/time of the playback image z STOP z PLAY Function guide for playing image BACK/NEXT Selecting images V VOLUME Adjusting volume C 96 8/8 12/12 00:25:05 Recording folder Playback folder Number of recordable images Image...
Cyber-shot® Handbook
Page 1
Digital Still Camera Cyber-shot Handbook DSC-W150/W170 Before operating the unit, please read this Handbook thoroughly together with the "Instruction Manual" and the "Cyber-shot Step-up Guide", and retain them for future reference. © 2008 Sony Corporation VCLICK! Table of contents Basic Operations Using the shooting functions Using the viewing functions Customizing the settings Viewing images on a TV Using your computer Printing still images Troubleshooting Others Index 3-294-896-12(1) GB
Digital Still Camera Cyber-shot Handbook DSC-W150/W170 Before operating the unit, please read this Handbook thoroughly together with the "Instruction Manual" and the "Cyber-shot Step-up Guide", and retain them for future reference. © 2008 Sony Corporation VCLICK! Table of contents Basic Operations Using the shooting functions Using the viewing functions Customizing the settings Viewing images on a TV Using your computer Printing still images Troubleshooting Others Index 3-294-896-12(1) GB
Cyber-shot® Handbook
Page 5
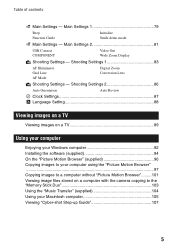
Main Settings 1 79 Beep Function Guide Initialize Smile demo mode Main Settings - Shooting Settings 1 83 AF Illuminator Grid Line AF Mode Digital Zoom Conversion Lens Shooting Settings - Table of contents Main Settings - Shooting Settings 2 86 Auto Orientation Auto ..."Picture Motion Browser".........101 Viewing image files stored on a computer with the camera copying to the "Memory Stick Duo 103 Using the "Music Transfer" (supplied 104 Using your Macintosh computer 105 Viewing "Cyber-shot Step-up Guide 107 5 Main Settings 2 81 USB Connect COMPONENT Video Out Wide Zoom ...
Main Settings 1 79 Beep Function Guide Initialize Smile demo mode Main Settings - Shooting Settings 1 83 AF Illuminator Grid Line AF Mode Digital Zoom Conversion Lens Shooting Settings - Table of contents Main Settings - Shooting Settings 2 86 Auto Orientation Auto ..."Picture Motion Browser".........101 Viewing image files stored on a computer with the camera copying to the "Memory Stick Duo 103 Using the "Music Transfer" (supplied 104 Using your Macintosh computer 105 Viewing "Cyber-shot Step-up Guide 107 5 Main Settings 2 81 USB Connect COMPONENT Video Out Wide Zoom ...
Cyber-shot® Handbook
Page 19
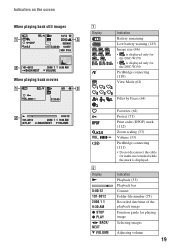
...the cable for multi-use terminal while the mark is displayed only for the DSC-W150. Indication Playback (33) Playback bar Counter Folder-file number (73) Recorded date/time of the playback image Function guide for playing image Selecting images Adjusting volume 19 PictBridge connecting (110) View ...Mode (62) Filter by Faces (64) VOL. Indicators on the screen When playing back still images When playing back movies A Display Indication Battery ...
...the cable for multi-use terminal while the mark is displayed only for the DSC-W150. Indication Playback (33) Playback bar Counter Folder-file number (73) Recorded date/time of the playback image Function guide for playing image Selecting images Adjusting volume 19 PictBridge connecting (110) View ...Mode (62) Filter by Faces (64) VOL. Indicators on the screen When playing back still images When playing back movies A Display Indication Battery ...

Cyber-shot® Handbook
Page 41
... Item Shoot photos or movies Guide 2 Select a category with b/B on the control button. 3 Select an item with v/V, then press z. • You cannot display the HOME screen when a PictBridge connection or a USB connection is made. • The camera is the gateway screen for all the functions of the camera, and can be called up...
... Item Shoot photos or movies Guide 2 Select a category with b/B on the control button. 3 Select an item with v/V, then press z. • You cannot display the HOME screen when a PictBridge connection or a USB connection is made. • The camera is the gateway screen for all the functions of the camera, and can be called up...
Cyber-shot® Handbook
Page 42
...Folder Create REC.Folder Copy Internal Memory Tool (page 78) Format Settings Main Settings Main Settings 1 (page 79) Beep Initialize Function Guide Smile demo mode Main Settings 2 (page 81) USB Connect Video Out COMPONENT Wide Zoom Display Shooting Settings Shooting Settings 1 (page ...83) AF Illuminator AF Mode Conversion Lens Grid Line Digital Zoom Shooting Settings 2 (page 86) Auto Orientation Auto Review Clock Settings (page 87) Language Setting (page 88) * Shooting mode selected...
...Folder Create REC.Folder Copy Internal Memory Tool (page 78) Format Settings Main Settings Main Settings 1 (page 79) Beep Initialize Function Guide Smile demo mode Main Settings 2 (page 81) USB Connect Video Out COMPONENT Wide Zoom Display Shooting Settings Shooting Settings 1 (page ...83) AF Illuminator AF Mode Conversion Lens Grid Line Digital Zoom Shooting Settings 2 (page 86) Auto Orientation Auto Review Clock Settings (page 87) Language Setting (page 88) * Shooting mode selected...

Cyber-shot® Handbook
Page 43
HOME/Menu Using the menu items Basic Operations MENU button 1 Press the MENU button to turn off the function guide (page 79). • The menu will be displayed only during shooting and playback mode. • Different items will become visible depending on the selected mode. 2 ... on the screen. • Select an item in playback mode, and press z. 4 Press the MENU button to display the menu. z button v/V/b/B button Control button Function Guide Setting [Function Guide] to [Off] turns off the menu. 43 Learning the various functions -
HOME/Menu Using the menu items Basic Operations MENU button 1 Press the MENU button to turn off the function guide (page 79). • The menu will be displayed only during shooting and playback mode. • Different items will become visible depending on the selected mode. 2 ... on the screen. • Select an item in playback mode, and press z. 4 Press the MENU button to display the menu. z button v/V/b/B button Control button Function Guide Setting [Function Guide] to [Off] turns off the menu. 43 Learning the various functions -
Cyber-shot® Handbook
Page 79
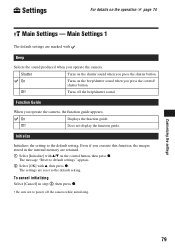
... Be sure not to default settings" appears. 2 Select [OK] with v/V on the beep/shutter sound when you operate the camera. On Displays the function guide. Customizing the settings 79 On Turns on the control button, then press z. Beep Selects the sound produced when you press the ...memory are retained. 1 Select [Initialize] with v, then press z. Settings For details on the shutter sound when you operate the camera, the function guide appears. Main Settings 1 The default settings are reset to the default setting. Shutter Turns on the operation 1 page 74 Main Settings...
... Be sure not to default settings" appears. 2 Select [OK] with v/V on the beep/shutter sound when you operate the camera. On Displays the function guide. Customizing the settings 79 On Turns on the control button, then press z. Beep Selects the sound produced when you press the ...memory are retained. 1 Select [Initialize] with v, then press z. Settings For details on the shutter sound when you operate the camera, the function guide appears. Main Settings 1 The default settings are reset to the default setting. Shutter Turns on the operation 1 page 74 Main Settings...

Cyber-shot® Handbook
Page 95
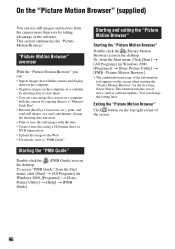
Double-click to start "Music Transfer". 95 Using your computer Double-click to start "Picture Motion Browser". Double-click to start "PMB Guide". Installing the software (supplied) After you install the software, the short cut icons for "Picture Motion Browser", "PMB Guide", "Music Transfer" are created on the desktop.
Double-click to start "Music Transfer". 95 Using your computer Double-click to start "Picture Motion Browser". Double-click to start "PMB Guide". Installing the software (supplied) After you install the software, the short cut icons for "Picture Motion Browser", "PMB Guide", "Music Transfer" are created on the desktop.
Cyber-shot® Handbook
Page 96
...camera more . • Print or save the still images with the date. • Create a data disc using a CD burner drive or DVD burner drive. • Upload the image to the Web. • For details, refer to "PMB Guide". To access "PMB Guide" from the Start menu: Click [Start] t [All Programs] (in Windows 2000, [Programs]) t [Sony...can: • Import images shot with the camera by taking advantage of the Information tool appears on the desktop. Exiting the "Picture Motion Browser" Click button on the desktop. Starting the "PMB Guide" Double-click the (PMB Guide) icon on the top right...
...camera more . • Print or save the still images with the date. • Create a data disc using a CD burner drive or DVD burner drive. • Upload the image to the Web. • For details, refer to "PMB Guide". To access "PMB Guide" from the Start menu: Click [Start] t [All Programs] (in Windows 2000, [Programs]) t [Sony...can: • Import images shot with the camera by taking advantage of the Information tool appears on the desktop. Exiting the "Picture Motion Browser" Click button on the desktop. Starting the "PMB Guide" Double-click the (PMB Guide) icon on the top right...

Cyber-shot® Handbook
Page 98
... the AutoPlay Wizard appears, close it. 2 Import the images. To start importing images, click the [Import] button. For details, see the "PMB Guide". • If you use the Memory Stick slot, refer to view them. After making a USB connection, the [Import Media Files] screen of importing... in "Pictures" (in "Viewed folders". Copying images to your computer using the "Picture Motion Browser" Copying images to a computer 1 Connects the camera to a computer as the default folder in Windows XP/2000, "My Pictures") that is complete, the "Picture Motion Browser" starts. Viewing images on...
... the AutoPlay Wizard appears, close it. 2 Import the images. To start importing images, click the [Import] button. For details, see the "PMB Guide". • If you use the Memory Stick slot, refer to view them. After making a USB connection, the [Import Media Files] screen of importing... in "Pictures" (in "Viewed folders". Copying images to your computer using the "Picture Motion Browser" Copying images to a computer 1 Connects the camera to a computer as the default folder in Windows XP/2000, "My Pictures") that is complete, the "Picture Motion Browser" starts. Viewing images on...
Cyber-shot® Handbook
Page 103
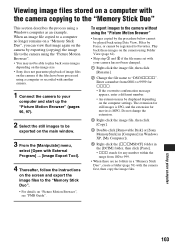
...still images is JPG, and the extension for ssss. • If the overwrite confirmation message appears, enter a different number. • An extension may not be able to play back some images depending on the image size. • Sony does not guarantee playback of image files on the camera... still images to be exported on the main window. 3 From the [Manipulate] menu, select [Open with External Program] t [Image Export Tool]. 4 Thereafter, follow the instructions on the screen and export the image files to the "Memory Stick Duo". • For details on "Picture Motion Browser", see "PMB Guide...
...still images is JPG, and the extension for ssss. • If the overwrite confirmation message appears, enter a different number. • An extension may not be able to play back some images depending on the image size. • Sony does not guarantee playback of image files on the camera... still images to be exported on the main window. 3 From the [Manipulate] menu, select [Open with External Program] t [Image Export Tool]. 4 Thereafter, follow the instructions on the screen and export the image files to the "Memory Stick Duo". • For details on "Picture Motion Browser", see "PMB Guide...
Cyber-shot® Handbook
Page 107
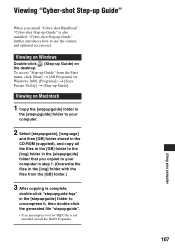
Viewing "Cyber-shot Step-up Guide" When you copied to use the camera and optional accessories. Viewing on Windows Double-click (Step-up Guide) on Macintosh 1 Copy the [stepupguide] ... folder to the [img] folder in the [stepupguide] folder that you install "Cyber-shot Handbook", "Cyber-shot Step-up Guide" is not installed, install the Stuffit Expander. 107 Using your computer in step ...also installed. Viewing on the desktop. To access "Step-up Guide" further introduces how to your computer "Cyber-shot Step-up Guide" from the [GB] folder.) 3 After copying is complete, double-...
Viewing "Cyber-shot Step-up Guide" When you copied to use the camera and optional accessories. Viewing on Windows Double-click (Step-up Guide) on Macintosh 1 Copy the [stepupguide] ... folder to the [img] folder in the [stepupguide] folder that you install "Cyber-shot Handbook", "Cyber-shot Step-up Guide" is not installed, install the Stuffit Expander. 107 Using your computer in step ...also installed. Viewing on the desktop. To access "Step-up Guide" further introduces how to your computer "Cyber-shot Step-up Guide" from the [GB] folder.) 3 After copying is complete, double-...

Cyber-shot® Handbook
Page 120
..., "Picture Motion Browser" does not start automatically. • Make the USB connection after the computer is not supported, connect the camera to "PMB Guide" (page 96). • Consult the computer or software manufacturer. 120 After making a USB connection (page 97). • Follow... the designated copy procedure for multi-use terminal from both the computer and the camera, and connect it again firmly. • Disconnect all equipment other than Sony...
..., "Picture Motion Browser" does not start automatically. • Make the USB connection after the computer is not supported, connect the camera to "PMB Guide" (page 96). • Consult the computer or software manufacturer. 120 After making a USB connection (page 97). • Follow... the designated copy procedure for multi-use terminal from both the computer and the camera, and connect it again firmly. • Disconnect all equipment other than Sony...

Cyber-shot® Handbook
Page 121
Cannot print an image. • Refer to "PMB Guide" (page 96). Internal memory Cannot playback or record images using "Picture ...Memory Stick Duo". • Insert it in Folder View mode. Cannot copy the data on the camera. • Copy them to a "Memory Stick Duo". • The "Memory Stick Duo" is a "Memory Stick Duo" inserted... in the camera. You have formatted a "Memory Stick Duo" by the camera, such as "101MSDCF" (page 99). • Follow the correct procedures (page 103). • When you ...
Cannot print an image. • Refer to "PMB Guide" (page 96). Internal memory Cannot playback or record images using "Picture ...Memory Stick Duo". • Insert it in Folder View mode. Cannot copy the data on the camera. • Copy them to a "Memory Stick Duo". • The "Memory Stick Duo" is a "Memory Stick Duo" inserted... in the camera. You have formatted a "Memory Stick Duo" by the camera, such as "101MSDCF" (page 99). • Follow the correct procedures (page 103). • When you ...


