Operating Instructions
Page 5
...tested and found compliant with the limits set out in the EMC Directive for a digital device pursuant to provide reasonable protection against harmful interference in a residential installation. Increase ...discontinue midway (fail), restart the application or disconnect and connect the communication cable (USB, etc.) again. [ Disposal of FCC Rules. For Customers in the European..., San Diego, CA 92127U.S.A. The recycling of Conformity Trade Name: SONY Model No.: DSC-W110, DSC-W115 Responsible Party: Sony Electronics Inc. Reorient or relocate the receiving antenna. - However, there...
...tested and found compliant with the limits set out in the EMC Directive for a digital device pursuant to provide reasonable protection against harmful interference in a residential installation. Increase ...discontinue midway (fail), restart the application or disconnect and connect the communication cable (USB, etc.) again. [ Disposal of FCC Rules. For Customers in the European..., San Diego, CA 92127U.S.A. The recycling of Conformity Trade Name: SONY Model No.: DSC-W110, DSC-W115 Responsible Party: Sony Electronics Inc. Reorient or relocate the receiving antenna. - However, there...
Operating Instructions
Page 7
...21 HOME items 22 GB Using menu items 23 Menu items 24 Enjoying your computer 26 Supported Operating Systems for USB connection and application software (supplied 26 Viewing "Cyber-shot Handbook 27 Indicators on /setting the clock 13 Shooting images easily 14 Mode dial/Zoom/Flash/Macro/Self-timer... pack/a "Memory Stick Duo" (not supplied) ........ 11 3 Turning the camera on the screen 28 Battery life and memory capacity 30 Battery life and number of images you can record/view 30 Number of still images and recording time of movies 31 Troubleshooting 33 Battery pack and power 33...
...21 HOME items 22 GB Using menu items 23 Menu items 24 Enjoying your computer 26 Supported Operating Systems for USB connection and application software (supplied 26 Viewing "Cyber-shot Handbook 27 Indicators on /setting the clock 13 Shooting images easily 14 Mode dial/Zoom/Flash/Macro/Self-timer... pack/a "Memory Stick Duo" (not supplied) ........ 11 3 Turning the camera on the screen 28 Battery life and memory capacity 30 Battery life and number of images you can record/view 30 Number of still images and recording time of movies 31 Troubleshooting 33 Battery pack and power 33...
Operating Instructions
Page 9
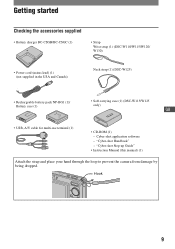
... (1) • Strap Wrist strap (1) (DSC-W110/W115/W120/ W130) • Power cord (mains lead) (1) (not supplied in the USA and Canada) Neck strap (1) (DSC-W125) • Rechargeable battery pack NP-BG1 (1)/ Battery case (1) • Soft carrying case (1) (DSC-W115/W125 only) GB • USB, A/V cable for multi-use terminal (1) • CD-ROM (1) - Cyber-shot application software - "Cyber-shot Handbook" -
... (1) • Strap Wrist strap (1) (DSC-W110/W115/W120/ W130) • Power cord (mains lead) (1) (not supplied in the USA and Canada) Neck strap (1) (DSC-W125) • Rechargeable battery pack NP-BG1 (1)/ Battery case (1) • Soft carrying case (1) (DSC-W115/W125 only) GB • USB, A/V cable for multi-use terminal (1) • CD-ROM (1) - Cyber-shot application software - "Cyber-shot Handbook" -
Operating Instructions
Page 19
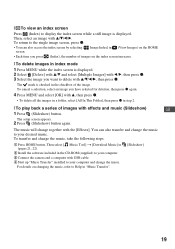
... select [ Music Tool] t [Download Music] in (pages 21, 22). 2 Install the software included in the CD-ROM (supplied) to your computer. 3 Connect the camera and a computer with USB cable. 4 Start up "Music Transfer" installed to your desired music. For details on the index screen increases. [ To delete images in index mode 1 Press... change the music to your computer and change together with v/V/b/B, then press z. [ To view an index screen Press (Index) to display the index screen while a still image is checked in the checkbox of the image. The mark is displayed.
... select [ Music Tool] t [Download Music] in (pages 21, 22). 2 Install the software included in the CD-ROM (supplied) to your computer. 3 Connect the camera and a computer with USB cable. 4 Start up "Music Transfer" installed to your desired music. For details on the index screen increases. [ To delete images in index mode 1 Press... change the music to your computer and change together with v/V/b/B, then press z. [ To view an index screen Press (Index) to display the index screen while a still image is checked in the checkbox of the image. The mark is displayed.

Operating Instructions
Page 22
... Main Settings 1 Beep Initialize Main Settings 2 USB Connect Video Out Shooting Settings Shooting Settings 1 AF Illuminator AF Mode Conversion Lens Shooting Settings 2 Auto Orientation* Clock Settings Language Setting Format Music Create REC. Folder Copy Function Guide COMPONENT Wide Zoom Display Grid Line Digital Zoom Auto Review * DSC-W120/W125/W130 only. 22 For details...
... Main Settings 1 Beep Initialize Main Settings 2 USB Connect Video Out Shooting Settings Shooting Settings 1 AF Illuminator AF Mode Conversion Lens Shooting Settings 2 Auto Orientation* Clock Settings Language Setting Format Music Create REC. Folder Copy Function Guide COMPONENT Wide Zoom Display Grid Line Digital Zoom Auto Review * DSC-W120/W125/W130 only. 22 For details...
Operating Instructions
Page 26
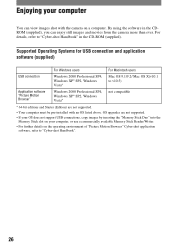
... enjoy still images and movies from the camera more than ever. By using the software in the CD-ROM (supplied). Supported Operating Systems for USB connection and application software (supplied) For Windows users For Macintosh users USB connection Windows 2000 Professional SP4, Windows XP* SP2, Windows Vista* Mac OS 9.1/9.2/ Mac OS X(v10.1 to "Cyber-shot Handbook...
... enjoy still images and movies from the camera more than ever. By using the software in the CD-ROM (supplied). Supported Operating Systems for USB connection and application software (supplied) For Windows users For Macintosh users USB connection Windows 2000 Professional SP4, Windows XP* SP2, Windows Vista* Mac OS 9.1/9.2/ Mac OS X(v10.1 to "Cyber-shot Handbook...
Operating Instructions
Page 34
...). • The folder/file name has been changed on your computer. • Sony does not guarantee playback of the following : - Cannot charge the battery pack. &#...• In (Smile Shutter) mode, no image is shot unless a smile is not a malfunction. Insert the charged battery pack (page 10)....USB mode. Change the "Memory Stick Duo". • You cannot record images while charging the flash. • When shooting a still image, set the mode dial to a position other than [640(Fine)]. - Fully discharge the battery pack once, then charge it with another camera. • The camera...
...). • The folder/file name has been changed on your computer. • Sony does not guarantee playback of the following : - Cannot charge the battery pack. &#...• In (Smile Shutter) mode, no image is shot unless a smile is not a malfunction. Insert the charged battery pack (page 10)....USB mode. Change the "Memory Stick Duo". • You cannot record images while charging the flash. • When shooting a still image, set the mode dial to a position other than [640(Fine)]. - Fully discharge the battery pack once, then charge it with another camera. • The camera...
Operating Instructions
Page 36
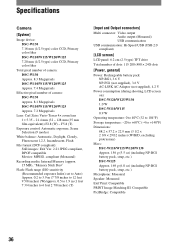
... Automatic, Daylight, Cloudy, Fluorescent 1,2,3, Incandescent, Flash File format (DCF compliant): Still images: Exif Ver. 2.21 JPEG compliant, DPOF compatible Movies: MPEG1 compliant (...DSC-W120/W125/W130 1.0 W DSC-W110/W115 0.9 W Operating temperature: 0 to 40°C (32 to 104°F) Storage temperature: -20 to +60°C (-4 to 6 feet 2 7/8 inches) (T) [Input and Output connectors] Multi connector: Video output Audio output (Monaural) USB communication USB communication: Hi-Speed USB (USB 2.0 compliant) [LCD screen] LCD panel: 6.2 cm (2.5 type) TFT drive Total number of camera: DSC...
... Automatic, Daylight, Cloudy, Fluorescent 1,2,3, Incandescent, Flash File format (DCF compliant): Still images: Exif Ver. 2.21 JPEG compliant, DPOF compatible Movies: MPEG1 compliant (...DSC-W120/W125/W130 1.0 W DSC-W110/W115 0.9 W Operating temperature: 0 to 40°C (32 to 104°F) Storage temperature: -20 to +60°C (-4 to 6 feet 2 7/8 inches) (T) [Input and Output connectors] Multi connector: Video output Audio output (Monaural) USB communication USB communication: Hi-Speed USB (USB 2.0 compliant) [LCD screen] LCD panel: 6.2 cm (2.5 type) TFT drive Total number of camera: DSC...

Cyber-shot® Handbook
Page 5
... AF Illuminator Grid Line AF Mode Digital Zoom Conversion Lens Shooting Settings - Internal Memory Tool 68 Format Settings 69 Main settings - Main Settings 2 70 USB Connect COMPONENT Video Out Wide Zoom Display Shooting Settings - Memory Stick Tool 66 Format Change REC. Shooting Settings 2 75 Auto Orientation (DSC-W120/W125/ W130 only) Auto Review Clock...
... AF Illuminator Grid Line AF Mode Digital Zoom Conversion Lens Shooting Settings - Internal Memory Tool 68 Format Settings 69 Main settings - Main Settings 2 70 USB Connect COMPONENT Video Out Wide Zoom Display Shooting Settings - Memory Stick Tool 66 Format Change REC. Shooting Settings 2 75 Auto Orientation (DSC-W120/W125/ W130 only) Auto Review Clock...

Cyber-shot® Handbook
Page 16
...) M Multi connector (bottom) Used in the following situations: • Making a USB connection between the camera and the computer. • Making a connection to audio/video input jacks on a TV. • Making a connection to the camera may occur. Otherwise, you cannot firmly secure the camera, and damage to a PictBridge compliant printer. N Tripod receptacle (bottom) • Use...
...) M Multi connector (bottom) Used in the following situations: • Making a USB connection between the camera and the computer. • Making a connection to audio/video input jacks on a TV. • Making a connection to the camera may occur. Otherwise, you cannot firmly secure the camera, and damage to a PictBridge compliant printer. N Tripod receptacle (bottom) • Use...

Cyber-shot® Handbook
Page 41
.... 3 Select an item with v/V, then press z. • You cannot display the HOME screen when a PictBridge connection or a USB connection is made. • The camera is the gateway screen for all the functions of the camera, and can be called up regardless of the mode setting (shooting/viewing). HOME button z button v/V/b/B button Control button...
.... 3 Select an item with v/V, then press z. • You cannot display the HOME screen when a PictBridge connection or a USB connection is made. • The camera is the gateway screen for all the functions of the camera, and can be called up regardless of the mode setting (shooting/viewing). HOME button z button v/V/b/B button Control button...

Cyber-shot® Handbook
Page 42
... 70) USB Connect Video Out COMPONENT Wide Zoom Display Shooting Settings Shooting Settings 1 (page 72) AF Illuminator AF Mode Conversion Lens Grid Line Digital Zoom Shooting Settings 2 (page 75) Auto Orientation*2 Auto Review Clock Settings (page 76) Language Setting (page 77) *1 Shooting mode selected with the mode dial will be applied. *2 DSC-W120/W125...
... 70) USB Connect Video Out COMPONENT Wide Zoom Display Shooting Settings Shooting Settings 1 (page 72) AF Illuminator AF Mode Conversion Lens Grid Line Digital Zoom Shooting Settings 2 (page 75) Auto Orientation*2 Auto Review Clock Settings (page 76) Language Setting (page 77) *1 Shooting mode selected with the mode dial will be applied. *2 DSC-W120/W125...

Cyber-shot® Handbook
Page 70
...), according to the computer. (with . PTP/MTP When you cannot connect the camera to a PictBridge compliant printer with an HD(1080i) signal. 70 USB Connect Selects the USB mode when connecting the camera to a computer or a PictBridge compliant printer using the cable for multi-use terminal.... Settings For details on the camera are marked with Windows Vista/ XP, Mac OS X) Mass Storage Establishes a Mass Storage connection between the camera and a computer or other USB device (page 87). Main Settings 2 The default settings are copied to...
...), according to the computer. (with . PTP/MTP When you cannot connect the camera to a PictBridge compliant printer with an HD(1080i) signal. 70 USB Connect Selects the USB mode when connecting the camera to a computer or a PictBridge compliant printer using the cable for multi-use terminal.... Settings For details on the camera are marked with Windows Vista/ XP, Mac OS X) Mass Storage Establishes a Mass Storage connection between the camera and a computer or other USB device (page 87). Main Settings 2 The default settings are copied to...

Cyber-shot® Handbook
Page 82
...XP* SP2, Windows Vista* • Operation is compatible with Hi-Speed USB (USB 2.0 compliant) allows advanced transfer (high speed transfer) as the camera is not assured in an environment based on connecting the camera to a computer • The computer environment must also satisfy the operating...multi-boot environment. Enjoying your computer may not operate, depending on the types of USB devices you are using. • Operations are not guaranteed when using a USB hub. • Connecting the camera using "Picture Motion Browser" and "Music Transfer" OS (pre-installed): Microsoft Windows...
...XP* SP2, Windows Vista* • Operation is compatible with Hi-Speed USB (USB 2.0 compliant) allows advanced transfer (high speed transfer) as the camera is not assured in an environment based on connecting the camera to a computer • The computer environment must also satisfy the operating...multi-boot environment. Enjoying your computer may not operate, depending on the types of USB devices you are using. • Operations are not guaranteed when using a USB hub. • Connecting the camera using "Picture Motion Browser" and "Music Transfer" OS (pre-installed): Microsoft Windows...

Cyber-shot® Handbook
Page 87
... 70). 87 Access indicators* Using your computer using the computer again. • If "Mass Storage" does not appear, set [USB Connect] to recognize the camera. When the indicator changes to , you copy images to your computer (Playback) button When a USB connection is established for a while. * is displayed. appears on the screen of the...
... 70). 87 Access indicators* Using your computer using the computer again. • If "Mass Storage" does not appear, set [USB Connect] to recognize the camera. When the indicator changes to , you copy images to your computer (Playback) button When a USB connection is established for a while. * is displayed. appears on the screen of the...

Cyber-shot® Handbook
Page 88
For details, see the "PMB Guide". After making a USB connection, the [Import Media Files] screen of importing. 88 To start importing images, click the [Import] button. • The "Pictures" (in Windows XP/2000, "My ... date to view them. Copying images to your computer using the "Picture Motion Browser" Copying images to a computer 1 Connects the camera to a computer as the default folder in "Connecting the camera to your computer When importing is set as described in "Viewed folders". Thumbnails of the imported images are imported into a folder...
For details, see the "PMB Guide". After making a USB connection, the [Import Media Files] screen of importing. 88 To start importing images, click the [Import] button. • The "Pictures" (in Windows XP/2000, "My ... date to view them. Copying images to your computer using the "Picture Motion Browser" Copying images to a computer 1 Connects the camera to a computer as the default folder in "Connecting the camera to your computer When importing is set as described in "Viewed folders". Thumbnails of the imported images are imported into a folder...

Cyber-shot® Handbook
Page 89
... and file names The image files recorded with the folder creating function. B Folder containing image data recorded using a camera not equipped with the camera are grouped as follows: - When no new folders are created, there are available only for viewing. • You...containing image data recorded using the camera. Internal memory: "101_SONY" only • You cannot record any images to 4 below before: • Disconnecting the cable for Windows Vista/ XP. Using your computer using the "Picture Motion Browser" To delete the USB connection Perform the procedures from ...
... and file names The image files recorded with the folder creating function. B Folder containing image data recorded using a camera not equipped with the camera are grouped as follows: - When no new folders are created, there are available only for viewing. • You...containing image data recorded using the camera. Internal memory: "101_SONY" only • You cannot record any images to 4 below before: • Disconnecting the cable for Windows Vista/ XP. Using your computer using the "Picture Motion Browser" To delete the USB connection Perform the procedures from ...

Cyber-shot® Handbook
Page 91
...computer with Windows 95/ 98/98 SecondEdition/NT/Me of copying images to your computer. For a computer without a Memory Stick slot: Make a USB connection and follow Stages to copy images. • The screen displays shown in this section are using Windows 95/98/ 98 SecondEdition/NT/Me...slot: Remove the "Memory Stick Duo" from a "Memory Stick Duo" to the "Documents" (For Windows XP: "My Documents"). 1 Prepare the camera and a computer. When you are the examples for multiuse terminal. Perform the same procedure as follows. Insert the Memory Stick Duo Adaptor in the computer...
...computer with Windows 95/ 98/98 SecondEdition/NT/Me of copying images to your computer. For a computer without a Memory Stick slot: Make a USB connection and follow Stages to copy images. • The screen displays shown in this section are using Windows 95/98/ 98 SecondEdition/NT/Me...slot: Remove the "Memory Stick Duo" from a "Memory Stick Duo" to the "Documents" (For Windows XP: "My Documents"). 1 Prepare the camera and a computer. When you are the examples for multiuse terminal. Perform the same procedure as follows. Insert the Memory Stick Duo Adaptor in the computer...

Cyber-shot® Handbook
Page 94
The message "Connect to PC" appears. 4 Make a USB connection between the camera and your computer. 5 Start "Music Transfer". 6 Follow the ... stored on the hard disk drive of your computer • Music on CDs • Preset-music saved on the camera 1 Press HOME button to display the HOME screen. 2 Select (Slideshow) with b/B on "Music Transfer". Using the... to [Off]. • You can change Music files. • To restore the music preset at the factory to the camera: 1 Perform [Format Music] in the CDROM (supplied). Adding/Changing Music using "Music Transfer" in step 3. 2 Execute ...
The message "Connect to PC" appears. 4 Make a USB connection between the camera and your computer. 5 Start "Music Transfer". 6 Follow the ... stored on the hard disk drive of your computer • Music on CDs • Preset-music saved on the camera 1 Press HOME button to display the HOME screen. 2 Select (Slideshow) with b/B on "Music Transfer". Using the... to [Off]. • You can change Music files. • To restore the music preset at the factory to the camera: 1 Perform [Format Music] in the CDROM (supplied). Adding/Changing Music using "Music Transfer" in step 3. 2 Execute ...

Cyber-shot® Handbook
Page 95
... 9.1/9.2/ Mac OS X(v10.1 to v10.5) USB jack: Provided as described in "Preparing the camera and the computer" on the storage location of USB devices you are using. • Operations are not guaranteed when using a USB hub. • Connecting the camera using "Music Transfer" OS (pre-installed):... at the same time, some devices, including the camera, may not recover at the same time. Perform the same procedure as standard Recommended environment for using a USB interface that is compatible with Hi-Speed USB (USB 2.0 compliant) allows advanced transfer (high speed transfer)...
... 9.1/9.2/ Mac OS X(v10.1 to v10.5) USB jack: Provided as described in "Preparing the camera and the computer" on the storage location of USB devices you are using. • Operations are not guaranteed when using a USB hub. • Connecting the camera using "Music Transfer" OS (pre-installed):... at the same time, some devices, including the camera, may not recover at the same time. Perform the same procedure as standard Recommended environment for using a USB interface that is compatible with Hi-Speed USB (USB 2.0 compliant) allows advanced transfer (high speed transfer)...


