
Operating Instructions
Page 1
... _______ Troubleshooting Additional information Index DSC-V3 Serial No DSC-V3 © 2004 Sony Corporation 2-318-592-12 (1) Getting started Shooting still images Viewing still images Deleting still images Before advanced operations Advanced still image shooting Advanced still image viewing Still image printing Enjoying movies Enjoying images on the bottom. Digital Still Camera Operating Instructions Before operating...
... _______ Troubleshooting Additional information Index DSC-V3 Serial No DSC-V3 © 2004 Sony Corporation 2-318-592-12 (1) Getting started Shooting still images Viewing still images Deleting still images Before advanced operations Advanced still image shooting Advanced still image viewing Still image printing Enjoying movies Enjoying images on the bottom. Digital Still Camera Operating Instructions Before operating...

Operating Instructions
Page 3
... data transfer to attach the fuse cover after you . If the plug supplied with your nearest Sony service station. Attention The electromagnetic field at the specific frequencies may regulate disposal of this camera. Notice Certain countries and regions may in the EMC Directive for using connection cables shorter than 3 meters...
... data transfer to attach the fuse cover after you . If the plug supplied with your nearest Sony service station. Attention The electromagnetic field at the specific frequencies may regulate disposal of this camera. Notice Certain countries and regions may in the EMC Directive for using connection cables shorter than 3 meters...
Operating Instructions
Page 4
...Notes on the flash surface to become discolored or to stick to a disk. LCD screen, LCD finder (only models with your camera on other equipment on the LCD screen in insufficient light emission. Be careful not to record or play back properly. However, there may... flash emission may not be contrary to direct sunlight for if recording or playback is equipped with other equipment and playback of your camera are normal in the manufacturing process and do not affect the recording in the rain or under similar conditions, be copyrighted. Notes on how...
...Notes on the flash surface to become discolored or to stick to a disk. LCD screen, LCD finder (only models with your camera on other equipment on the LCD screen in insufficient light emission. Be careful not to record or play back properly. However, there may... flash emission may not be contrary to direct sunlight for if recording or playback is equipped with other equipment and playback of your camera are normal in the manufacturing process and do not affect the recording in the rain or under similar conditions, be copyrighted. Notes on how...

Operating Instructions
Page 5
... addition, system and product names used as examples of their respective developers or manufacturers. The lens for this camera uses the MTF* measurement system for cameras developed jointly by Carl Zeiss, in Germany, and Sony Corporation, and offers the same quality as other countries. • Intel, MMX, and Pentium are trademarks or registered...
... addition, system and product names used as examples of their respective developers or manufacturers. The lens for this camera uses the MTF* measurement system for cameras developed jointly by Carl Zeiss, in Germany, and Sony Corporation, and offers the same quality as other countries. • Intel, MMX, and Pentium are trademarks or registered...
Operating Instructions
Page 6
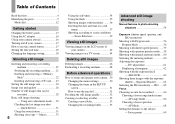
... a "Memory Stick 22 Inserting and removing a CF card ...... 23 Setting the still image size 24 Image size and quality 26 Number of your camera 42 Viewing images on a TV screen 44 Deleting still images Deleting images 46 Formatting a recording medium 48 Before advanced operations How to setup and operate... your camera... 50 Changing the menu settings 50 Changing the items in the SET UP screen 51 How to use the jog dial 51 Deciding the still...
... a "Memory Stick 22 Inserting and removing a CF card ...... 23 Setting the still image size 24 Image size and quality 26 Number of your camera 42 Viewing images on a TV screen 44 Deleting still images Deleting images 46 Formatting a recording medium 48 Before advanced operations How to setup and operate... your camera... 50 Changing the menu settings 50 Changing the items in the SET UP screen 51 How to use the jog dial 51 Deciding the still...

Operating Instructions
Page 7
... Protecting images - For Windows users 102 Installing the USB driver 103 Connecting the camera to your computer 104 Copying images 105 Viewing the images on your computer Copying ...Resize 88 Still image printing Printing still images 89 Direct printing 90 Preparing the camera 90 Connecting the camera to a computer with special effects - Slide Show 84 Rotating still images 85...on the LCD screen ....... 98 Deleting movies 99 Cutting movies 100 Enjoying images on your camera.......... 109 Installing "Picture Package" and "ImageMixer VCD2 109 Copying images using "Picture Package...
... Protecting images - For Windows users 102 Installing the USB driver 103 Connecting the camera to your computer 104 Copying images 105 Viewing the images on your computer Copying ...Resize 88 Still image printing Printing still images 89 Direct printing 90 Preparing the camera 90 Connecting the camera to a computer with special effects - Slide Show 84 Rotating still images 85...on the LCD screen ....... 98 Deleting movies 99 Cutting movies 100 Enjoying images on your camera.......... 109 Installing "Picture Package" and "ImageMixer VCD2 109 Copying images using "Picture Package...
Operating Instructions
Page 11
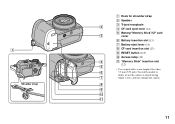
qa 11 You will be unable to firmly secure the camera to tripods having 7 longer screws, and may damage the camera. 8 9 q; 1 Shoulder strap Hook for shoulder strap Speaker Tripod receptacle 2 CF card eject lever (24) Battery/"Memory Stick"/CF card 3 cover &#...
qa 11 You will be unable to firmly secure the camera to tripods having 7 longer screws, and may damage the camera. 8 9 q; 1 Shoulder strap Hook for shoulder strap Speaker Tripod receptacle 2 CF card eject lever (24) Battery/"Memory Stick"/CF card 3 cover &#...
Operating Instructions
Page 12
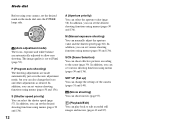
... using menus (pages 50 and 136). P (Program auto shooting) The shooting adjustments are automatically adjusted to allow easy shooting. Mode dial Before using your camera, set to [Fine] (page 52). SET UP (Set up) You can change the focus and other adjustments as in the auto adjustment mode, but...adjustment mode) The focus, exposure and white balance are made automatically just as desired. In addition, you can also change the settings of the camera (pages 51 and 140). (Movie shooting) You can shoot movies (page 97). (Playback/Edit) You can select the shutter speed (page 57).
... using menus (pages 50 and 136). P (Program auto shooting) The shooting adjustments are automatically adjusted to allow easy shooting. Mode dial Before using your camera, set to [Fine] (page 52). SET UP (Set up) You can change the focus and other adjustments as in the auto adjustment mode, but...adjustment mode) The focus, exposure and white balance are made automatically just as desired. In addition, you can also change the settings of the camera (pages 51 and 140). (Movie shooting) You can shoot movies (page 97). (Playback/Edit) You can select the shutter speed (page 57).
Operating Instructions
Page 13
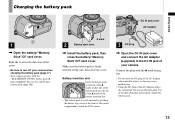
... battery compartment toward the LCD screen. 3 DC plug Open the DC IN jack cover and connect the AC Adaptor (supplied) to turn off your camera. Do not use only R type battery pack (page 146). Charging the battery pack Getting started 1 2 1 Open the battery/"Memory Stick"/CF ...) (supplied). Connect the plug with the mark facing left. • Do not short the DC plug of your camera when charging the battery pack (page 17). • Your camera operates with a metallic object, as this may not properly charge the battery pack. 13 You can use the dirty plug.
... battery compartment toward the LCD screen. 3 DC plug Open the DC IN jack cover and connect the AC Adaptor (supplied) to turn off your camera. Do not use only R type battery pack (page 146). Charging the battery pack Getting started 1 2 1 Open the battery/"Memory Stick"/CF ...) (supplied). Connect the plug with the mark facing left. • Do not short the DC plug of your camera when charging the battery pack (page 17). • Your camera operates with a metallic object, as this may not properly charge the battery pack. 13 You can use the dirty plug.
Operating Instructions
Page 14
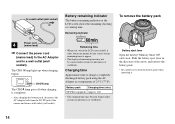
... indicator on /off when charging is completed. • After charging the battery pack, disconnect the AC Adaptor both from the DC IN jack of the camera and from a wall outlet (wall socket). Battery pack Charging time (min.) NP-FR1 (supplied) Approx. 180 • The charging time may not be correct under...
... indicator on /off when charging is completed. • After charging the battery pack, disconnect the AC Adaptor both from the DC IN jack of the camera and from a wall outlet (wall socket). Battery pack Charging time (min.) NP-FR1 (supplied) Approx. 180 • The charging time may not be correct under...
Operating Instructions
Page 15
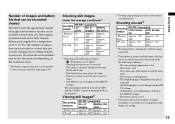
...or viewed take into account changing the recording medium as the number of images recordable or viewable does not depend on CIPA standard. (CIPA: Camera & Imaging Products Association) Viewing still images2) Recording medium NP-FR1 (supplied) No. of Battery screen images life (min.) "Memory On Approx... - Approx. 400 200 CF card On Approx. The zoom is low - Approx. 400 200 1) Shooting in the following conditions: - The camera has been turned on and off many times - Number of images and battery life that can be recorded/ viewed The tables show the approximate number...
...or viewed take into account changing the recording medium as the number of images recordable or viewable does not depend on CIPA standard. (CIPA: Camera & Imaging Products Association) Viewing still images2) Recording medium NP-FR1 (supplied) No. of Battery screen images life (min.) "Memory On Approx... - Approx. 400 200 CF card On Approx. The zoom is low - Approx. 400 200 1) Shooting in the following conditions: - The camera has been turned on and off many times - Number of images and battery life that can be recorded/ viewed The tables show the approximate number...

Operating Instructions
Page 16
...not disconnected from the AC power source (mains) as long as this may cause a malfunction. 16 AC-LS5/LS5B • Do not use your camera abroad Power sources You can use an electronic transformer (travel converter), as it is connected to the wall outlet (wall socket) even if the set... itself has been turned off the power by . Using your camera in any trouble occurs while using the adaptor, immediately shut off . Use a commercially available AC plug adaptor [a], if necessary, depending on the design of...
...not disconnected from the AC power source (mains) as long as this may cause a malfunction. 16 AC-LS5/LS5B • Do not use your camera abroad Power sources You can use an electronic transformer (travel converter), as it is connected to the wall outlet (wall socket) even if the set... itself has been turned off the power by . Using your camera in any trouble occurs while using the adaptor, immediately shut off . Use a commercially available AC plug adaptor [a], if necessary, depending on the design of...

Operating Instructions
Page 17
... set a SET UP item, press on the control button to select the desired item and setting, then press to use the control button Camera 1 1 AF Mode: 2 Digital Zoom: Date/Time: Red Eye Reduction: 1 Hologram AF: 2 Auto Review: Single Smart Off Off Auto Off SELECT Setup 2 1 File Number: USB Connect: 2 Video Out...
... set a SET UP item, press on the control button to select the desired item and setting, then press to use the control button Camera 1 1 AF Mode: 2 Digital Zoom: Date/Time: Red Eye Reduction: 1 Hologram AF: 2 Auto Review: Single Smart Off Off Auto Off SELECT Setup 2 1 File Number: USB Connect: 2 Video Out...

Operating Instructions
Page 21
... Select the recording medium with CompactFlash Type II. CF : When recording images onto a CF card or playing back images from a "Memory Stick". This camera is not compliant with the /CF switch. : When recording images onto a "Memory Stick" or playing back images from a CF card. 21 Shooting ...guarantee proper operation of all CF cards. • Copying between media cannot be done with this camera. • For more information about the "Memory Stick", see page 144. • Before using this camera. Otherwise, satisfactory performance may not be sure to format it using a CF card, be ...
... Select the recording medium with CompactFlash Type II. CF : When recording images onto a CF card or playing back images from a "Memory Stick". This camera is not compliant with the /CF switch. : When recording images onto a "Memory Stick" or playing back images from a CF card. 21 Shooting ...guarantee proper operation of all CF cards. • Copying between media cannot be done with this camera. • For more information about the "Memory Stick", see page 144. • Before using this camera. Otherwise, satisfactory performance may not be sure to format it using a CF card, be ...
Operating Instructions
Page 22
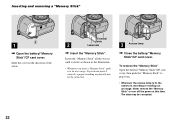
... at this time. Slide the cover in the illustration. • Whenever you do not insert it out. • Whenever the access lamp is lit, the camera is recording or reading out an image. Inserting and removing a "Memory Stick" 1 2 1 Open the battery/"Memory Stick"/CF card cover. Terminal side 2 Label side...
... at this time. Slide the cover in the illustration. • Whenever you do not insert it out. • Whenever the access lamp is lit, the camera is recording or reading out an image. Inserting and removing a "Memory Stick" 1 2 1 Open the battery/"Memory Stick"/CF card cover. Terminal side 2 Label side...
Operating Instructions
Page 23
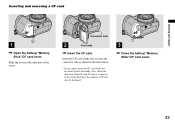
... CF card all the way in, do not push it in the direction of the CF card. Slide the cover in the wrong direction, the camera or CF card may be damaged. 2 1 3 Close the battery/"Memory Stick"/CF card cover. 23 If you cannot insert the CF card all the...
... CF card all the way in, do not push it in the direction of the CF card. Slide the cover in the wrong direction, the camera or CF card may be damaged. 2 1 3 Close the battery/"Memory Stick"/CF card cover. 23 If you cannot insert the CF card all the...

Operating Instructions
Page 24
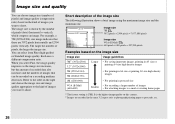
... the still image size 7M 7M 3:2 5M 3M 1M Image Size CF card eject lever Access lamp • Whenever the access lamp is lit, the camera is ejected. The data may be corrupted or the CF card may become unusable. 1 Set the mode dial to , and turn off the power...
... the still image size 7M 7M 3:2 5M 3M 1M Image Size CF card eject lever Access lamp • Whenever the access lamp is lit, the camera is ejected. The data may be corrupted or the CF card may become unusable. 1 Set the mode dial to , and turn off the power...
Operating Instructions
Page 26
... of pixels) and image quality (compression ratio) based on the kind of images you want to shoot. It is the highest image quality on this camera. 2) Images are 3072 pixels horizontally and 2304 pixels vertically.
... of pixels) and image quality (compression ratio) based on the kind of images you want to shoot. It is the highest image quality on this camera. 2) Images are 3072 pixels horizontally and 2304 pixels vertically.

Operating Instructions
Page 28
...the number of remaining shooting images is greater than 9,999, the ">9999" indicator appears on a recording medium that has been formatted by this camera, the display may differ from the actual image size. • When the images are shown below. • The table below shows the ... see page 135. 2) For more information about the image quality (compression ratio), see page 52. • When images recorded using earlier Sony models are played back on this camera. "Memory Stick" (Units: number of images) Capacity Image size 1GB 7M 294 (578) 3:2 294 (578) 5M 406 (762) ...
...the number of remaining shooting images is greater than 9,999, the ">9999" indicator appears on a recording medium that has been formatted by this camera, the display may differ from the actual image size. • When the images are shown below. • The table below shows the ... see page 135. 2) For more information about the image quality (compression ratio), see page 52. • When images recorded using earlier Sony models are played back on this camera. "Memory Stick" (Units: number of images) Capacity Image size 1GB 7M 294 (578) 3:2 294 (578) 5M 406 (762) ...
Operating Instructions
Page 29
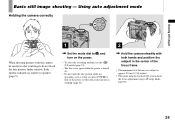
Using auto adjustment mode Holding the camera correctly When shooting pictures with the camera, be careful so that your fingers do not block the lens portion, finder window, flash emitter, infrared ray emitter or speaker (page 9). 1 &#... is operating, such as when you press POWER to turn on the power or when the zoom function is working (page 31). 2 Hold the camera steadily with both hands and position the subject in the center of the focus frame. • The minimum focal distance to a subject is approx. 50...
Using auto adjustment mode Holding the camera correctly When shooting pictures with the camera, be careful so that your fingers do not block the lens portion, finder window, flash emitter, infrared ray emitter or speaker (page 9). 1 &#... is operating, such as when you press POWER to turn on the power or when the zoom function is working (page 31). 2 Hold the camera steadily with both hands and position the subject in the center of the focus frame. • The minimum focal distance to a subject is approx. 50...


