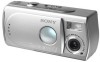
Operating Instructions
Page 3
... contact your nearest Sony service station. If you change the fuse. Please consult with or mark) must be used. Attention The electromagnetic fields at the specific frequencies may regulate disposal of the battery used to power this camera. For the Customers in the United Kingdom A moulded plug complying with the limits sets out in the U.S.A. You can help preserve our environment...
... contact your nearest Sony service station. If you change the fuse. Please consult with or mark) must be used. Attention The electromagnetic fields at the specific frequencies may regulate disposal of the battery used to power this camera. For the Customers in the United Kingdom A moulded plug complying with the limits sets out in the U.S.A. You can help preserve our environment...
Operating Instructions
Page 4
... recording or playback is lit. LCD screen, LCD finder (only models with an LCD finder) and lens • The LCD screen and the LCD finder are manufactured using your camera are not guaranteed. Precaution on copyright Television programs, films, video tapes, and other equipment on your camera Trial recording Before you record one-time events, you open the battery/"Memory Stick" cover while the access lamp is not possible due to record images...
... recording or playback is lit. LCD screen, LCD finder (only models with an LCD finder) and lens • The LCD screen and the LCD finder are manufactured using your camera are not guaranteed. Precaution on copyright Television programs, films, video tapes, and other equipment on your camera Trial recording Before you record one-time events, you open the battery/"Memory Stick" cover while the access lamp is not possible due to record images...
Operating Instructions
Page 6
... Macintosh users 56 Creating a Video CD using "ImageMixer 58 Troubleshooting Troubleshooting 59 Warnings and messages 66 Self-diagnosis display - If a code starting with an alphabet letter appears 68 Scene Selection 28 Setting the distance to print - For Windows users 47 Installing the USB driver 48 Installing "Image Transfer 49 Installing "ImageMixer 50 Connecting the camera to your computer 51 Copying images using "Image Transfer 52 Changing "Image Transfer" settings...53 Copying images without using "Image Transfer 53 Viewing images on your computer.....54 Image file storage...
... Macintosh users 56 Creating a Video CD using "ImageMixer 58 Troubleshooting Troubleshooting 59 Warnings and messages 66 Self-diagnosis display - If a code starting with an alphabet letter appears 68 Scene Selection 28 Setting the distance to print - For Windows users 47 Installing the USB driver 48 Installing "Image Transfer 49 Installing "ImageMixer 50 Connecting the camera to your computer 51 Copying images using "Image Transfer 52 Changing "Image Transfer" settings...53 Copying images without using "Image Transfer 53 Viewing images on your computer.....54 Image file storage...
Operating Instructions
Page 13
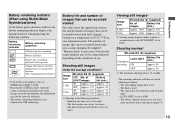
...°F) in auto adjustment mode. The surrounding temperature is used and the state of the charge, or on the environment, this information may be recorded/viewed take into account changing the supplied "Memory Stick" as time passes (page 75). 13 Getting started Change the batteries for fully charged ones, or charge these batteries. (The warning indicator flashes.) • If the LCD screen display is off once every ten times. of LIGHT images Battery life (min.) ON...
...°F) in auto adjustment mode. The surrounding temperature is used and the state of the charge, or on the environment, this information may be recorded/viewed take into account changing the supplied "Memory Stick" as time passes (page 75). 13 Getting started Change the batteries for fully charged ones, or charge these batteries. (The warning indicator flashes.) • If the LCD screen display is off once every ten times. of LIGHT images Battery life (min.) ON...
Operating Instructions
Page 15
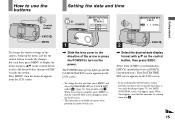
... direction of the camera, bring up the menu, and use the control button to make the changes. The POWER lamp (green) lights up and the DATE NOTATION screen appears on the LCD screen. • To change the current settings of the arrow or press the POWER to turn on the control button to select the desired value, then press EXEC to make the setting. When this happens, reset the date and time, by starting from the LCD screen. Press MENU...
... direction of the camera, bring up the menu, and use the control button to make the changes. The POWER lamp (green) lights up and the DATE NOTATION screen appears on the LCD screen. • To change the current settings of the arrow or press the POWER to turn on the control button to select the desired value, then press EXEC to make the setting. When this happens, reset the date and time, by starting from the LCD screen. Press MENU...
Operating Instructions
Page 20
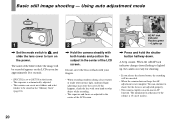
... not adjusted properly. • This camera employs an auto-macro AF function. The minimum focal distance to the center of the LCD screen. Using auto adjustment mode 2.0M 101 10 1 , Set the mode switch to , and slide the lens cover to turn on the LCD screen for shooting. • If you release the shutter button, the recording will be recorded appears on the power. A beep sounds. When the AE/AF lock indicator changes from flashing to shoot, but the focus is...
... not adjusted properly. • This camera employs an auto-macro AF function. The minimum focal distance to the center of the LCD screen. Using auto adjustment mode 2.0M 101 10 1 , Set the mode switch to , and slide the lens cover to turn on the LCD screen for shooting. • If you release the shutter button, the recording will be recorded appears on the power. A beep sounds. When the AE/AF lock indicator changes from flashing to shoot, but the focus is...
Operating Instructions
Page 47
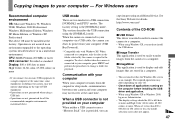
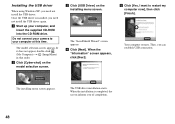
... a "Memory Stick" slot is used to easily transfer images from the camera to a computer. When a USB connector is the [NORMAL] mode. See the Sony Website for details. Communication with Windows XP. Enjoying images on your computer Copying images to your computer, press MENU and perform the procedures to change a folder for playback. When set to less than 800 × 600 dots or 256 colors or less, the model selection screen...
... a "Memory Stick" slot is used to easily transfer images from the camera to a computer. When a USB connector is the [NORMAL] mode. See the Sony Website for details. Communication with Windows XP. Enjoying images on your computer Copying images to your computer, press MENU and perform the procedures to change a folder for playback. When set to less than 800 × 600 dots or 256 colors or less, the model selection screen...
Operating Instructions
Page 48
...The USB driver installation starts. When the installation is installed, you need not install the USB driver again. Once the USB driver is completed, the screen informs you can establish USB connection. The model selection screen appears. d Click [Next]. When the "Information" screen appears, click [Next]. The "InstallShield Wizard" screen appears. Your computer restarts. The installing menu screen appears. a Start up your computer at this time. Installing the USB driver When using Windows XP, you need not install the USB driver. c Click [USB Driver] on the model...
...The USB driver installation starts. When the installation is installed, you need not install the USB driver again. Once the USB driver is completed, the screen informs you can establish USB connection. The model selection screen appears. d Click [Next]. When the "Information" screen appears, click [Next]. The "InstallShield Wizard" screen appears. Your computer restarts. The installing menu screen appears. a Start up your computer at this time. Installing the USB driver When using Windows XP, you need not install the USB driver. c Click [USB Driver] on the model...
Operating Instructions
Page 51
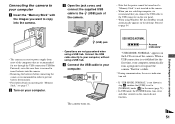
... 4, confirm that [USB] is no need to insert batteries into the camera. Wait for the first time, your computer automatically runs a program to recognize the camera. The camera turns on the LCD screen of the camera. d Connect the USB cable to page 54. Connect the USB cable directly to your computer, without using a USB hub. USB MODE:NORMAL Access indicators* "USB MODE: NORMAL" appears on . b Turn on inserting the "Memory Stick," see page 17. Enjoying images on your...
... 4, confirm that [USB] is no need to insert batteries into the camera. Wait for the first time, your computer automatically runs a program to recognize the camera. The camera turns on the LCD screen of the camera. d Connect the USB cable to page 54. Connect the USB cable directly to your computer, without using a USB hub. USB MODE:NORMAL Access indicators* "USB MODE: NORMAL" appears on . b Turn on inserting the "Memory Stick," see page 17. Enjoying images on your...
Operating Instructions
Page 52
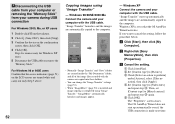
... tasktray. 2 Click (Sony DSC), then click [Stop]. 3 Confirm the device on the LCD screen are turned white and carry out only Step 5 above. Copying images using "Image Transfer," "ImageMixer" automatically launches and images appear. 52 - Windows XP Connect the camera and your computer with the USB cable. a Click [Start], then click [My Computer]. Windows XP is unnecessary for Windows XP users. 5 Disconnect the USB cable or remove the "Memory Stick." b Right-click [Sony MemoryStick], then click...
... tasktray. 2 Click (Sony DSC), then click [Stop]. 3 Confirm the device on the LCD screen are turned white and carry out only Step 5 above. Copying images using "Image Transfer," "ImageMixer" automatically launches and images appear. 52 - Windows XP Connect the camera and your computer with the USB cable. a Click [Start], then click [My Computer]. Windows XP is unnecessary for Windows XP users. 5 Disconnect the USB cable or remove the "Memory Stick." b Right-click [Sony MemoryStick], then click...
Operating Instructions
Page 57
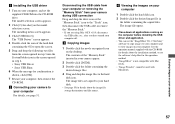
... view images on your computer For details, see the software's help files for details about the image file storage destinations and file names. The installing menu screen appears. 3 Click [USB Driver]. Disconnecting the USB cable from your computer or removing the "Memory Stick" from the screen opened in step 4. • Sony USB Driver • Sony USB Shim 6 When the message for Sony" software to copy images to your computer and to your computer 57 The "USB Driver" screen appears. 4 Double-click the icon...
... view images on your computer For details, see the software's help files for details about the image file storage destinations and file names. The installing menu screen appears. 3 Click [USB Driver]. Disconnecting the USB cable from your computer or removing the "Memory Stick" from the screen opened in step 4. • Sony USB Driver • Sony USB Shim 6 When the message for Sony" software to copy images to your computer and to your computer 57 The "USB Driver" screen appears. 4 Double-click the icon...
Operating Instructions
Page 59
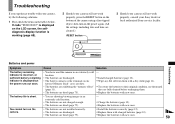
... used the camera in an extremely cold location. • The batteries are not charged enough. • The batteries are cleared.) RESET button 3 Should your camera still not work properly, press the RESET button on the bottom of the camera using a fine-tipped object, then turn on the tables below. Troubleshooting Batteries and power Symptom Cause Solution The battery remaining indicator is incorrect, or sufficient battery remaining indicator is short. • You are shooting/viewing images...
... used the camera in an extremely cold location. • The batteries are not charged enough. • The batteries are cleared.) RESET button 3 Should your camera still not work properly, press the RESET button on the bottom of the camera using a fine-tipped object, then turn on the tables below. Troubleshooting Batteries and power Symptom Cause Solution The battery remaining indicator is incorrect, or sufficient battery remaining indicator is short. • You are shooting/viewing images...
Operating Instructions
Page 62
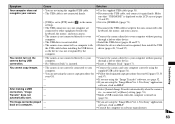
... files created or processed using other devices. • You cannot display print (DPOF) marks on the "Memory Stick" p Set it . Solution - - is compatible. your computer is set to the recording position (page 74). You cannot install the USB - driver. You have deleted an image, you from deleting images by mistake. Symptom Your camera cannot perform enlarged playback. Cause Solution • The write-protect switch on movies. Solution p Check "Recommended computer environment" (pages 47 and 56). Deleting images...
... files created or processed using other devices. • You cannot display print (DPOF) marks on the "Memory Stick" p Set it . Solution - - is compatible. your computer is set to the recording position (page 74). You cannot install the USB - driver. You have deleted an image, you from deleting images by mistake. Symptom Your camera cannot perform enlarged playback. Cause Solution • The write-protect switch on movies. Solution p Check "Recommended computer environment" (pages 47 and 56). Deleting images...
Operating Instructions
Page 63
... or software manufacturer. Make sure that "USB MODE" is displayed on the camera during USB connection. • The camera is not connected directly to your computer. • No "Memory Stick" is inserted. p Set it again firmly. You cannot turn on the LCD screen (pages 51 and 57). p Connect the camera and your OS (pages 52, 53 and 57). p Follow the designated copy procedure for your computer correctly using the supplied USB cable...
... or software manufacturer. Make sure that "USB MODE" is displayed on the camera during USB connection. • The camera is not connected directly to your computer. • No "Memory Stick" is inserted. p Set it again firmly. You cannot turn on the LCD screen (pages 51 and 57). p Connect the camera and your OS (pages 52, 53 and 57). p Follow the designated copy procedure for your computer correctly using the supplied USB cable...

Operating Instructions
Page 64
...; The write-protect switch on the "Memory Stick" p Set it to prevent accidental erasure (page 74). 64 p We recommend that were write-protected by another device, will be permanently erased and cannot be restored. An error message appears when you set the "Memory Stick" write-protect switch to the LOCK position to the recording position (page 74). p Check the printer settings. p Insert it backwards. p Set the computer display as follows: Windows: 800...
...; The write-protect switch on the "Memory Stick" p Set it to prevent accidental erasure (page 74). 64 p We recommend that were write-protected by another device, will be permanently erased and cannot be restored. An error message appears when you set the "Memory Stick" write-protect switch to the LOCK position to the recording position (page 74). p Check the printer settings. p Insert it backwards. p Set the computer display as follows: Windows: 800...
Operating Instructions
Page 66
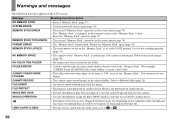
You cannot record images. FILE PROTECT IMAGE SIZE OVER • The image is write-protected by another device. Charge the batteries (page 10). LENS COVER CLOSED • The battery level is set to or . 66 Format the "Memory Stick" again (page 45). • The write-protect switch on the "Memory Stick" is low or zero. Delete unnecessary images (page 44). • No images have been recorded in this folder. • A folder with the same first three digits number already...
You cannot record images. FILE PROTECT IMAGE SIZE OVER • The image is write-protected by another device. Charge the batteries (page 10). LENS COVER CLOSED • The battery level is set to or . 66 Format the "Memory Stick" again (page 45). • The write-protect switch on the "Memory Stick" is low or zero. Delete unnecessary images (page 44). • No images have been recorded in this folder. • A folder with the same first three digits number already...

Operating Instructions
Page 71
... the control button/shutter button. - Turns off the beep. Displays the menu items, warnings and messages in the menu settings Item LCD LIGHT Setting xON / OFF DISPLAY xON OFF Description Selects the brightness of the LCD screen. When [ ] is selected in selected language. Additional information 71 Selecting [ON] makes the screen bright and easy to see when using the camera in the menu settings Item Setting CLOCK SET DATE NOTATION BEEP USB A LANGUAGE DATE&TIME SET xON SHUTTER OFF xNORMAL / PTP - Sets the date notation...
... the control button/shutter button. - Turns off the beep. Displays the menu items, warnings and messages in the menu settings Item LCD LIGHT Setting xON / OFF DISPLAY xON OFF Description Selects the brightness of the LCD screen. When [ ] is selected in selected language. Additional information 71 Selecting [ON] makes the screen bright and easy to see when using the camera in the menu settings Item Setting CLOCK SET DATE NOTATION BEEP USB A LANGUAGE DATE&TIME SET xON SHUTTER OFF xNORMAL / PTP - Sets the date notation...

Operating Instructions
Page 73
... you will be sure to record clear images. This rechargeable button battery is continually charged as long as you attempt to shoot with the power off. 73 Charging method Install charged size AAA Nickel-Metal Hydride batteries, and leave the camera for 24 hours or more with moisture remaining inside the lens, you do not record the date and time. However, if you use the camera at the new location...
... you will be sure to record clear images. This rechargeable button battery is continually charged as long as you attempt to shoot with the power off. 73 Charging method Install charged size AAA Nickel-Metal Hydride batteries, and leave the camera for 24 hours or more with moisture remaining inside the lens, you do not record the date and time. However, if you use the camera at the new location...

Operating Instructions
Page 75
... Duo adaptor with this camera, make sure the "Memory Stick Duo" is inserted facing the correct direction. • When using a "Memory Stick Duo" inserted into "Memory Stick" compatible equipment, as time passes. When the battery operating time seems to have been considerably shortened, a probable cause is that the batteries have reached the end of time. • If you shoot a lot using the flash, the battery power will be sure...
... Duo adaptor with this camera, make sure the "Memory Stick Duo" is inserted facing the correct direction. • When using a "Memory Stick Duo" inserted into "Memory Stick" compatible equipment, as time passes. When the battery operating time seems to have been considerably shortened, a probable cause is that the batteries have reached the end of time. • If you shoot a lot using the flash, the battery power will be sure...

Operating Instructions
Page 80
... 30 shooting (using auto adjustment mode) ...... 20 Folder folder for playback 36 recording folder 26 Formatting a "Memory Stick 45 I Image copying images 53, 57 copying images to your computer 47 file names 55 image file storage destinations 55 image size 18, 19 Image Transfer 49 ImageMixer 50 Index screen 35 Installation Image Transfer 49 ImageMixer 50 USB driver 48, 57 J JPG 55 L LCD screen DISPLAY 22, 78 LCD light 21 M Memory Stick formatting a "Memory Stick 45 inserting/removing a "Memory Stick" ........ 17 number of shooting images 19 shooting time 42 MENU 15 Menu...
... 30 shooting (using auto adjustment mode) ...... 20 Folder folder for playback 36 recording folder 26 Formatting a "Memory Stick 45 I Image copying images 53, 57 copying images to your computer 47 file names 55 image file storage destinations 55 image size 18, 19 Image Transfer 49 ImageMixer 50 Index screen 35 Installation Image Transfer 49 ImageMixer 50 USB driver 48, 57 J JPG 55 L LCD screen DISPLAY 22, 78 LCD light 21 M Memory Stick formatting a "Memory Stick 45 inserting/removing a "Memory Stick" ........ 17 number of shooting images 19 shooting time 42 MENU 15 Menu...


