

Operating Instructions (primary manual)
Page 6
...the potential risk of the copyright laws. 6 Do not shake or strike the camera In addition to malfunctions and inability to a malfunction of your camera or recording media, etc. Exposing the LCD screen, the LCD finder or the lens to direct sunlight for if recording or playback is working ...Stick" cover while the access lamp is on other equipment on the LCD screen and the LCD finder. These points are operational for effective use. Back up ) data to get the camera wet. Before using your camera Trial recording Before you record one-time events, you remove the batteries...
...the potential risk of the copyright laws. 6 Do not shake or strike the camera In addition to malfunctions and inability to a malfunction of your camera or recording media, etc. Exposing the LCD screen, the LCD finder or the lens to direct sunlight for if recording or playback is working ...Stick" cover while the access lamp is on other equipment on the LCD screen and the LCD finder. These points are operational for effective use. Back up ) data to get the camera wet. Before using your camera Trial recording Before you record one-time events, you remove the batteries...
Operating Instructions (primary manual)
Page 8
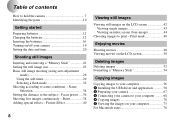
... 48 Viewing movies on the LCD screen 50 Deleting images Deleting images 52 Formatting a "Memory Stick 54 Copying images Copying images to your computer 56 1 Installing the USB driver and application .......... 58 2 Preparing your camera 67 3 Connecting your camera to your computer ........ 68 ...Selecting a flash mode 32 Shooting according to scene conditions - Picture Effect 40 8 Viewing still images Viewing still images on the LCD screen 42 Viewing single images 43 Viewing an index screen (four-image 44 Choosing images to the subject - Scene Selection 34 Setting the distance...
... 48 Viewing movies on the LCD screen 50 Deleting images Deleting images 52 Formatting a "Memory Stick 54 Copying images Copying images to your computer 56 1 Installing the USB driver and application .......... 58 2 Preparing your camera 67 3 Connecting your camera to your computer ........ 68 ...Selecting a flash mode 32 Shooting according to scene conditions - Picture Effect 40 8 Viewing still images Viewing still images on the LCD screen 42 Viewing single images 43 Viewing an index screen (four-image 44 Choosing images to the subject - Scene Selection 34 Setting the distance...

Operating Instructions (primary manual)
Page 9
Troubleshooting Troubleshooting 78 Warnings and messages 85 Self-diagnostics display 86 Additional information Menu items 87 Using your camera abroad 90 Precautions 90 On "Memory Stick 92 On Nickel Metal Hydride batteries 93 Specifications 94 LCD screen displays 96 Index 99 9
Troubleshooting Troubleshooting 78 Warnings and messages 85 Self-diagnostics display 86 Additional information Menu items 87 Using your camera abroad 90 Precautions 90 On "Memory Stick 92 On Nickel Metal Hydride batteries 93 Specifications 94 LCD screen displays 96 Index 99 9

Operating Instructions (primary manual)
Page 11
Attaching the neck strap A LCD screen B Flash charge lamp (orange) (33) C MENU button D Control button Menu on: v/V Menu off: /SCENE (32, 35) E EXEC button 6 F Hook for neck strap G Battery/"Memory Stick" ... settings of the camera, 4 qa bring up the menu, and use the control button to make the changes. 5 qs For each item, press MENU and press v/V on the control button to select the desired value, then press EXEC to make the setting. Press MENU, then the menu disappears from the LCD screen. 11
Attaching the neck strap A LCD screen B Flash charge lamp (orange) (33) C MENU button D Control button Menu on: v/V Menu off: /SCENE (32, 35) E EXEC button 6 F Hook for neck strap G Battery/"Memory Stick" ... settings of the camera, 4 qa bring up the menu, and use the control button to make the changes. 5 qs For each item, press MENU and press v/V on the control button to select the desired value, then press EXEC to make the setting. Press MENU, then the menu disappears from the LCD screen. 11

Operating Instructions (primary manual)
Page 15
..., this is not a malfunction. • Do not remove the batteries while charging is still in progress. Change the batteries for fully charged ones, or charge these batteries. (Battery remaining indicator flashes.) • If the LCD screen display is off, set [DISPLAY] in [ ] to completely charge the batteries. Battery ...beginning. • If you use , the battery remaining indicator displays the amount of the charge, or on the conditions under which the camera is being used and the state of power remaining using the following symbols. The CHARGE lamp may remain lit longer than 13 hours, ...
..., this is not a malfunction. • Do not remove the batteries while charging is still in progress. Change the batteries for fully charged ones, or charge these batteries. (Battery remaining indicator flashes.) • If the LCD screen display is off, set [DISPLAY] in [ ] to completely charge the batteries. Battery ...beginning. • If you use , the battery remaining indicator displays the amount of the charge, or on the conditions under which the camera is being used and the state of power remaining using the following symbols. The CHARGE lamp may remain lit longer than 13 hours, ...

Operating Instructions (primary manual)
Page 19
... viewing or when performing setup, the camera turns off the power Slide the lens cover in the direction of the arrow or press the POWER button again. When you do not operate the camera for the first time, the DATE NOTATION screen appears on the LCD screen (page 20). The POWER lamp goes... out, and the camera turns off function also will not operate when a connector is automatically on your...
... viewing or when performing setup, the camera turns off the power Slide the lens cover in the direction of the arrow or press the POWER button again. When you do not operate the camera for the first time, the DATE NOTATION screen appears on the LCD screen (page 20). The POWER lamp goes... out, and the camera turns off function also will not operate when a connector is automatically on your...

Operating Instructions (primary manual)
Page 20
...day), [M/D/Y] (month/day/year) or [D/M/Y] (day/month/year). Select from step 2. 20 Then DATE&TIME SET screen appears on the power. Setting the date and time POWER POWER button DATE NOTATION 2002 1 1 12:00:00 ...the lens cover in the direction of the arrow or press the POWER button to turn on the LCD screen. • If the rechargeable button battery, which provides the power for saving the time data, ...step 3. EXEC 2 , Select the desired date display format with v/V on the LCD screen. • This operation is available no matter what position the mode switch is ever fully discharged (page...
...day), [M/D/Y] (month/day/year) or [D/M/Y] (day/month/year). Select from step 2. 20 Then DATE&TIME SET screen appears on the power. Setting the date and time POWER POWER button DATE NOTATION 2002 1 1 12:00:00 ...the lens cover in the direction of the arrow or press the POWER button to turn on the LCD screen. • If the rechargeable button battery, which provides the power for saving the time data, ...step 3. EXEC 2 , Select the desired date display format with v/V on the LCD screen. • This operation is available no matter what position the mode switch is ever fully discharged (page...

Operating Instructions (primary manual)
Page 23
Never remove the "Memory Stick" or turn on the LCD screen. 23 Shooting still images Setting the still image size STILL MENU RETURN SIZE•BURST 1280 FOCUS AUTO SELFTIMER OFF P.EFFECT OFF 3 Access lamp , Close the battery/"Memory Stick" cover. The menu appears on the ...power, then press MENU. To remove a "Memory Stick" Open the battery/"Memory Stick" cover, then push the "Memory Stick" to STILL, and turn off the power at this time, as the data may be damaged. 1 , Set the mode switch to pop it out. • When the...
Never remove the "Memory Stick" or turn on the LCD screen. 23 Shooting still images Setting the still image size STILL MENU RETURN SIZE•BURST 1280 FOCUS AUTO SELFTIMER OFF P.EFFECT OFF 3 Access lamp , Close the battery/"Memory Stick" cover. The menu appears on the ...power, then press MENU. To remove a "Memory Stick" Open the battery/"Memory Stick" cover, then push the "Memory Stick" to STILL, and turn off the power at this time, as the data may be damaged. 1 , Set the mode switch to pop it out. • When the...

Operating Instructions (primary manual)
Page 24
EXEC 3 , Select the desired image size with v/V on the control button, then press EXEC. The image size is turned off. 24 Select [SIZE·BURST] with v/V on the control button, then press EXEC. RETURN SIZE•BURST 1280 FOCUS AUTO SELFTIMER OFF P.EFFECT OFF SIZE • BURST 1280 1280×960 640 640×480 640 BURST EXEC 2 , Select [ ] with v/V on the control button, then press EXEC. When the setting is complete, press MENU so that the menu disappears from the LCD screen. • The image size selected here is maintained even when the power is set.
EXEC 3 , Select the desired image size with v/V on the control button, then press EXEC. The image size is turned off. 24 Select [SIZE·BURST] with v/V on the control button, then press EXEC. RETURN SIZE•BURST 1280 FOCUS AUTO SELFTIMER OFF P.EFFECT OFF SIZE • BURST 1280 1280×960 640 640×480 640 BURST EXEC 2 , Select [ ] with v/V on the control button, then press EXEC. When the setting is complete, press MENU so that the menu disappears from the LCD screen. • The image size selected here is maintained even when the power is set.

Operating Instructions (primary manual)
Page 25
Shooting still images Image size You can choose the image size (number of pixels) according to the kind of images you want to shoot. Choose an image ... that you want to shoot. Image size Usage 1280×960 Printing in a "Memory Stick" (Units: number of pixels. 25 Images viewed on the LCD screen of the camera all appear the same size. • The actual number of images may differ depending on the shooting conditions. • The image size value (e.g., 1280...
Shooting still images Image size You can choose the image size (number of pixels) according to the kind of images you want to shoot. Choose an image ... that you want to shoot. Image size Usage 1280×960 Printing in a "Memory Stick" (Units: number of pixels. 25 Images viewed on the LCD screen of the camera all appear the same size. • The actual number of images may differ depending on the shooting conditions. • The image size value (e.g., 1280...

Operating Instructions (primary manual)
Page 26
... adjusted to the center of the LCD screen. Basic still image shooting (using auto adjustment mode) STILL 1 , Set the mode switch to STILL, and slide the lens cover to turn on the power. • Still images are recorded in the center of the LCD screen. 26 If this happens, shade ...the lens with your hand or other object while recording. • The exposure and focus are adjusted automatically at the factory setting. • Clean the lens with a soft cloth if it is dirty (page 90). 2 , Hold the camera...
... adjusted to the center of the LCD screen. Basic still image shooting (using auto adjustment mode) STILL 1 , Set the mode switch to STILL, and slide the lens cover to turn on the power. • Still images are recorded in the center of the LCD screen. 26 If this happens, shade ...the lens with your hand or other object while recording. • The exposure and focus are adjusted automatically at the factory setting. • Clean the lens with a soft cloth if it is dirty (page 90). 2 , Hold the camera...

Operating Instructions (primary manual)
Page 27
...LCD screen, and the image will be recorded in the "Memory Stick." The beep sounds. When the AE/AF lock indicator changes from flashing to lighted up 3 , Press and hold the shutter button halfway down the batteries (page 19). 27 Shooting still images 1280 23 1280 RECORDING Flashes green t Lights up , the camera... is ready for shooting. • If you do not operate the camera for about 3 minutes during recording or playback, the camera turns off automatically to the subject...
...LCD screen, and the image will be recorded in the "Memory Stick." The beep sounds. When the AE/AF lock indicator changes from flashing to lighted up 3 , Press and hold the shutter button halfway down the batteries (page 19). 27 Shooting still images 1280 23 1280 RECORDING Flashes green t Lights up , the camera... is ready for shooting. • If you do not operate the camera for about 3 minutes during recording or playback, the camera turns off automatically to the subject...

Operating Instructions (primary manual)
Page 28
...and off. LCD light You can still not bring the subject into focus, use [LCD LIGHT] under the following conditions. In such cases, release the shutter button, then recompose the shot and focus again. The Auto Focus function may have difficulty working under [ ] with a reflective-type LCD screen that is...is some ambient illumination. • Even if the LCD light setting is "off," the LCD light will turn the LCD light on when menu operations are being performed. This is useful for extending the battery life. • This camera is equipped with MENU and v/V on the control button...
...and off. LCD light You can still not bring the subject into focus, use [LCD LIGHT] under the following conditions. In such cases, release the shutter button, then recompose the shot and focus again. The Auto Focus function may have difficulty working under [ ] with a reflective-type LCD screen that is...is some ambient illumination. • Even if the LCD light setting is "off," the LCD light will turn the LCD light on when menu operations are being performed. This is useful for extending the battery life. • This camera is equipped with MENU and v/V on the control button...

Operating Instructions (primary manual)
Page 29
... OFF P.EFFECT OFF 1 , Set the mode switch to MOVIE. 29 The menu appears on the LCD screen. • You can also carry out this operation when the mode switch is set to STILL, and press MENU. Shooting still images LCD screen display during shooting You can use [DISPLAY] under conditions where it is difficult to turn...
... OFF P.EFFECT OFF 1 , Set the mode switch to MOVIE. 29 The menu appears on the LCD screen. • You can also carry out this operation when the mode switch is set to STILL, and press MENU. Shooting still images LCD screen display during shooting You can use [DISPLAY] under conditions where it is difficult to turn...

Operating Instructions (primary manual)
Page 30
RETURN SIZE•BURST 1280 FOCUS AUTO SELFTIMER OFF P.EFFECT OFF SELFTIMER ON OFF 1280 23 EXEC 2 , Select [ ] with v/V on the control button, then press EXEC. When you press MENU, the menu disappears. The (self-timer) indicator appears on the control button, then press EXEC. Select [SELFTIMER] with v/V on the control button, then press EXEC. 3 EXEC , Select [ON] with v/V on the LCD screen. 30
RETURN SIZE•BURST 1280 FOCUS AUTO SELFTIMER OFF P.EFFECT OFF SELFTIMER ON OFF 1280 23 EXEC 2 , Select [ ] with v/V on the control button, then press EXEC. When you press MENU, the menu disappears. The (self-timer) indicator appears on the control button, then press EXEC. Select [SELFTIMER] with v/V on the control button, then press EXEC. 3 EXEC , Select [ON] with v/V on the LCD screen. 30

Operating Instructions (primary manual)
Page 31
The self-timer lamp (page 10) flashes in front of the operation Close the lens cover and turn off the power. • If you press the shutter button while standing in red and the beep sounds. The image will be correctly set. 31 To cancel the self-timer in the middle of the camera, the focus and the exposure may not be shot after approximately 10 seconds. 1280 23 1280 23 Shooting still images 4 , Center the subject in the LCD screen, and press and hold the shutter button halfway down. 5 Self-timer lamp , Press the shutter button fully down.
The self-timer lamp (page 10) flashes in front of the operation Close the lens cover and turn off the power. • If you press the shutter button while standing in red and the beep sounds. The image will be correctly set. 31 To cancel the self-timer in the middle of the camera, the focus and the exposure may not be shot after approximately 10 seconds. 1280 23 1280 23 Shooting still images 4 , Center the subject in the LCD screen, and press and hold the shutter button halfway down. 5 Self-timer lamp , Press the shutter button fully down.

Operating Instructions (primary manual)
Page 33
...the charging is complete, the lamp goes out. • When you look at the LCD screen in the image when you press the shutter button halfway down while the flash is selected, indicator appears on the LCD screen, and the flash pre-strobes before shooting to reduce the red-eye phenomenon. • ...phenomenon when shooting live subjects When the red-eye reduction is strobing, the flash charge lamp turns on the shot image. • While charging the flash, the flash charge lamp flashes. Shooting still images • You cannot use the flash in the Burst mode. • If the menu is currently...
...the charging is complete, the lamp goes out. • When you look at the LCD screen in the image when you press the shutter button halfway down while the flash is selected, indicator appears on the LCD screen, and the flash pre-strobes before shooting to reduce the red-eye phenomenon. • ...phenomenon when shooting live subjects When the red-eye reduction is strobing, the flash charge lamp turns on the shot image. • While charging the flash, the flash charge lamp flashes. Shooting still images • You cannot use the flash in the Burst mode. • If the menu is currently...

Operating Instructions (primary manual)
Page 36
Focus preset 0.5 m 0.2m MENU RETURN SIZE•BURST 1280 FOCUS AUTO SELFTIMER OFF P.EFFECT OFF When shooting an image using the auto focus function. The menu appears on the LCD screen. • You can also carry out this operation when the mode switch is difficult to achieve a proper focus using a preset distance to the subject, or when shooting a subject through a net or window glass, it is set to [MOVIE]. 36 The Focus preset function is useful in these cases. 1 , Set the mode switch to the subject - Setting the distance to STILL, and press MENU.
Focus preset 0.5 m 0.2m MENU RETURN SIZE•BURST 1280 FOCUS AUTO SELFTIMER OFF P.EFFECT OFF When shooting an image using the auto focus function. The menu appears on the LCD screen. • You can also carry out this operation when the mode switch is difficult to achieve a proper focus using a preset distance to the subject, or when shooting a subject through a net or window glass, it is set to [MOVIE]. 36 The Focus preset function is useful in these cases. 1 , Set the mode switch to the subject - Setting the distance to STILL, and press MENU.

Operating Instructions (primary manual)
Page 38
Shooting five images continuously - If you release the shutter button before all five frames are shot, the camera stops shooting as soon as you release the button. Select [SIZE·BURST] with v/V on the control button, then press EXEC. 38 RETURN SIZE•... AUTO SELFTIMER OFF P.EFFECT OFF 1 , Set the mode switch to five frames in succession by holding down the shutter button. The menu appears on the LCD screen. • You can shoot up to STILL, and press MENU.
Shooting five images continuously - If you release the shutter button before all five frames are shot, the camera stops shooting as soon as you release the button. Select [SIZE·BURST] with v/V on the control button, then press EXEC. 38 RETURN SIZE•... AUTO SELFTIMER OFF P.EFFECT OFF 1 , Set the mode switch to five frames in succession by holding down the shutter button. The menu appears on the LCD screen. • You can shoot up to STILL, and press MENU.

Operating Instructions (primary manual)
Page 39
Press MENU so that were shot while the shutter button was held down are recorded. • The recording interval is approximately 0.5 seconds. 39 Up to five images are recorded in 640&#...;480 640 BURST 640 23 Shooting still images EXEC 3 , Select [BURST] with v/V on the control button, then press EXEC. The images are recorded as long as you release the shutter button before the camera records five images, only the images that the menu disappears from the LCD screen. 4 , Press the shutter button halfway down...
Press MENU so that were shot while the shutter button was held down are recorded. • The recording interval is approximately 0.5 seconds. 39 Up to five images are recorded in 640&#...;480 640 BURST 640 23 Shooting still images EXEC 3 , Select [BURST] with v/V on the control button, then press EXEC. The images are recorded as long as you release the shutter button before the camera records five images, only the images that the menu disappears from the LCD screen. 4 , Press the shutter button halfway down...


