Cyber-shot® Handbook
Page 5
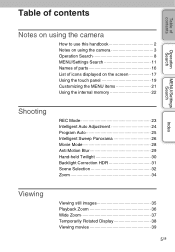
... handbook 2 Notes on using the camera 3 Operation Search 8 MENU/Settings Search 11 Names of parts 16 List of icons displayed on the screen 17 Using the touch panel 19 Customizing the MENU items 21 Using the internal memory 22 Shooting REC Mode 23 Intelligent Auto Adjustment 24 Program Auto 25 Intelligent Sweep Panorama 26 Movie Mode 28 Anti Motion Blur 29 Hand-held Twilight 30 Backlight Correction HDR 31 Scene Selection 32 Zoom 34 Viewing Viewing still images...
... handbook 2 Notes on using the camera 3 Operation Search 8 MENU/Settings Search 11 Names of parts 16 List of icons displayed on the screen 17 Using the touch panel 19 Customizing the MENU items 21 Using the internal memory 22 Shooting REC Mode 23 Intelligent Auto Adjustment 24 Program Auto 25 Intelligent Sweep Panorama 26 Movie Mode 28 Anti Motion Blur 29 Hand-held Twilight 30 Backlight Correction HDR 31 Scene Selection 32 Zoom 34 Viewing Viewing still images...
Cyber-shot® Handbook
Page 11
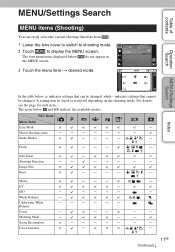
... the various shooting functions from . 1 Lower the lens cover to switch to shooting mode. 2 Touch to display the MENU screen. Table of contents MENU/Settings Search MENU items (Shooting) You can be changed . For details, see the page for each item. Macro EV ISO White Balance Underwater White Balance Focus Metering Mode Scene Recognition Face Detection - - - - - - - - - - - - - - - - - - - - - - - - - - - - - - - - - - - 11GB Continued r Self-Timer Shooting Direction Image Size Burst - - - - - - - - - - - - - Movie shooting scene...
... the various shooting functions from . 1 Lower the lens cover to switch to shooting mode. 2 Touch to display the MENU screen. Table of contents MENU/Settings Search MENU items (Shooting) You can be changed . For details, see the page for each item. Macro EV ISO White Balance Underwater White Balance Focus Metering Mode Scene Recognition Face Detection - - - - - - - - - - - - - - - - - - - - - - - - - - - - - - - - - - - 11GB Continued r Self-Timer Shooting Direction Image Size Burst - - - - - - - - - - - - - Movie shooting scene...
Cyber-shot® Handbook
Page 16
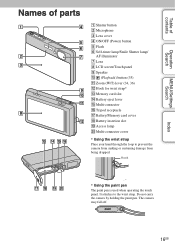
... the camera from sinking or sustaining damage from being dropped. Hook * Using the paint pen The paint pen is used when operating the touch panel. Table of contents Operation Search MENU/Settings Search Names of parts A Shutter button B Microphone C Lens cover D ON/OFF (Power) button E Flash F Self-timer lamp/Smile Shutter lamp/ AF illuminator G Lens H LCD screen/Touch panel I Speaker J (Playback) button (35) K Zoom (W/T) lever (34, 36) L Hook for wrist strap* M Memory card slot N Battery eject...
... the camera from sinking or sustaining damage from being dropped. Hook * Using the paint pen The paint pen is used when operating the touch panel. Table of contents Operation Search MENU/Settings Search Names of parts A Shutter button B Microphone C Lens cover D ON/OFF (Power) button E Flash F Self-timer lamp/Smile Shutter lamp/ AF illuminator G Lens H LCD screen/Touch panel I Speaker J (Playback) button (35) K Zoom (W/T) lever (34, 36) L Hook for wrist strap* M Memory card slot N Battery eject...
Cyber-shot® Handbook
Page 52
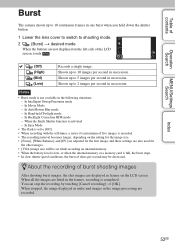
... displayed on internal memory. • When the battery level is low, or when the internal memory or a memory card is completed. In Hand-held Twilight mode - Table of contents Operation Search MENU/Settings Search Burst The camera shoots up to 10 images per second in succession. Shoots up to 10 continuous frames in one burst when you hold down the shutter button. 1 Lower the lens cover to switch to shooting mode. 2 (Burst) t desired mode...
... displayed on internal memory. • When the battery level is low, or when the internal memory or a memory card is completed. In Hand-held Twilight mode - Table of contents Operation Search MENU/Settings Search Burst The camera shoots up to 10 images per second in succession. Shoots up to 10 continuous frames in one burst when you hold down the shutter button. 1 Lower the lens cover to switch to shooting mode. 2 (Burst) t desired mode...
Cyber-shot® Handbook
Page 57
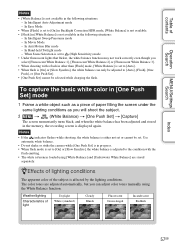
... than [Flash] mode, [White Balance] is set to [Auto]. • When flash is [On] or [Slow Synchro], the white balance can adjust color tones manually using [White Balance] and [Underwater White Balance] are stored separately. In Movie Mode - The color tones are adjusted automatically, but you will shoot the subject. 2 t (White Balance) t [One Push Set] t [Capture] The screen momentarily turns black, and when the white balance has been adjusted and stored in the memory, the recording screen is displayed again. Table of contents Operation Search MENU/Settings Search...
... than [Flash] mode, [White Balance] is set to [Auto]. • When flash is [On] or [Slow Synchro], the white balance can adjust color tones manually using [White Balance] and [Underwater White Balance] are stored separately. In Movie Mode - The color tones are adjusted automatically, but you will shoot the subject. 2 t (White Balance) t [One Push Set] t [Capture] The screen momentarily turns black, and when the white balance has been adjusted and stored in the memory, the recording screen is displayed again. Table of contents Operation Search MENU/Settings Search...
Cyber-shot® Handbook
Page 66
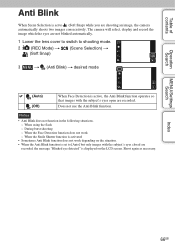
... work depending on the situation. • When the Anti Blink function is set to [Auto] but only images with the subject's eyes closed are recorded, the message "Blinked eye detected" is active, the Anti Blink function operates so that images with the subject's eyes open are not blinked automatically. 1 Lower the lens cover to switch to shooting mode. 2 (REC Mode) t (Scene Selection) t (Soft Snap) 3 t (Anti Blink) t desired mode (Auto) (Off) When Face Detection is displayed on the LCD screen...
... work depending on the situation. • When the Anti Blink function is set to [Auto] but only images with the subject's eyes closed are recorded, the message "Blinked eye detected" is active, the Anti Blink function operates so that images with the subject's eyes open are not blinked automatically. 1 Lower the lens cover to switch to shooting mode. 2 (REC Mode) t (Scene Selection) t (Soft Snap) 3 t (Anti Blink) t desired mode (Auto) (Off) When Face Detection is displayed on the LCD screen...

Cyber-shot® Handbook
Page 78
... by the date. zViewing images taken with a different camera This camera creates an Image Database File on the memory card for viewing images. 1 Press the (Playback) button to switch to playback mode. 2 t (View Mode) t desired mode (Date View) (Folder view (Still)) (Folder view (Movie)) Displays images by selecting [OK]. • Use a sufficiently charged battery to register images. Index 78GB Table of contents Operation Search MENU/Settings Search View Mode Allows you to select the display format for recording and playing images. If a battery with a low charge is not...
... by the date. zViewing images taken with a different camera This camera creates an Image Database File on the memory card for viewing images. 1 Press the (Playback) button to switch to playback mode. 2 t (View Mode) t desired mode (Date View) (Folder view (Still)) (Folder view (Movie)) Displays images by selecting [OK]. • Use a sufficiently charged battery to register images. Index 78GB Table of contents Operation Search MENU/Settings Search View Mode Allows you to select the display format for recording and playing images. If a battery with a low charge is not...

Cyber-shot® Handbook
Page 104
... the memory card and in the internal memory are displayed. Select this setting when you connect the camera to a media service using a USB connection. 1 t (Settings) t (Main Settings) t [LUN Settings] t desired mode Multi Single The images both the memory card and the internal memory are not displayed when the camera is connected to a device other monitor when the camera is connected with a computer or AV component using "PMB Portable". When the memory card is not inserted, the images in the internal memory are displayed; MENU/Settings...
... the memory card and in the internal memory are displayed. Select this setting when you connect the camera to a media service using a USB connection. 1 t (Settings) t (Main Settings) t [LUN Settings] t desired mode Multi Single The images both the memory card and the internal memory are not displayed when the camera is connected to a device other monitor when the camera is connected with a computer or AV component using "PMB Portable". When the memory card is not inserted, the images in the internal memory are displayed; MENU/Settings...
Cyber-shot® Handbook
Page 112
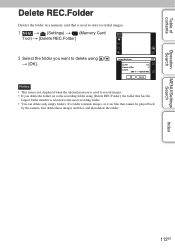
... not displayed when the internal memory is used to store recorded images. 1 t (Settings) t (Memory Card Tool) t [Delete REC.Folder] 2 Select the folder you want to record images. • If you delete the folder set as the next recording folder. • You can delete only empty folders. If a folder contains images, or even files that has the largest folder number is used to delete using [Delete REC.Folder], the folder that cannot be played back by the camera, first delete these images and files, and then delete the folder. Table...
... not displayed when the internal memory is used to store recorded images. 1 t (Settings) t (Memory Card Tool) t [Delete REC.Folder] 2 Select the folder you want to record images. • If you delete the folder set as the next recording folder. • You can delete only empty folders. If a folder contains images, or even files that has the largest folder number is used to delete using [Delete REC.Folder], the folder that cannot be played back by the camera, first delete these images and files, and then delete the folder. Table...

Cyber-shot® Handbook
Page 120
... are using. • Connecting the camera using the supplied software "Music Transfer" and "PMB Portable" or importing images via a USB connection. Recommended computer environment (Windows) The following computer environment is recommended when using a USB interface that is compatible with Hi-Speed USB (USB 2.0 compliant) allows advanced transfer (high speed transfer), as the camera is compatible with your computer may not operate, depending on the CD-ROM (supplied) to allow more versatile use the function for installation-
... are using. • Connecting the camera using the supplied software "Music Transfer" and "PMB Portable" or importing images via a USB connection. Recommended computer environment (Windows) The following computer environment is recommended when using a USB interface that is compatible with Hi-Speed USB (USB 2.0 compliant) allows advanced transfer (high speed transfer), as the camera is compatible with your computer may not operate, depending on the CD-ROM (supplied) to allow more versatile use the function for installation-

Cyber-shot® Handbook
Page 121
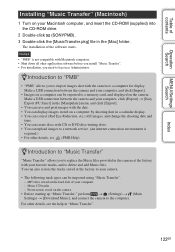
... started up for the first time, the confirmation message of your computer. 6 Remove the CD-ROM after the installation is complete. 7 Start up the software. • To start up "PMB," click (PMB) on the desktop. Select [Start]. 121GB " To start up "PMB Launcher," doubleclick (PMB Launcher) on the screen. Table of contents Operation Search MENU/Settings Search Index Using the software Installing "PMB (Picture Motion Browser)" and "Music Transfer" (Windows) 1 Turn...
... started up for the first time, the confirmation message of your computer. 6 Remove the CD-ROM after the installation is complete. 7 Start up the software. • To start up "PMB," click (PMB) on the desktop. Select [Start]. 121GB " To start up "PMB Launcher," doubleclick (PMB Launcher) on the screen. Table of contents Operation Search MENU/Settings Search Index Using the software Installing "PMB (Picture Motion Browser)" and "Music Transfer" (Windows) 1 Turn...
Cyber-shot® Handbook
Page 122
... (Red Eye Reduction, etc.) still images, and change the shooting date and time. • You can upload images to a network service. (An internet connection environment is not compatible with your favorite tracks, and to delete and add Music files. Make a USB connection between the camera and your computer, and click [Import]. • Images on a computer can be exported to a memory card, and displayed on the camera. You can also restore the tracks stored at the factory...
... (Red Eye Reduction, etc.) still images, and change the shooting date and time. • You can upload images to a network service. (An internet connection environment is not compatible with your favorite tracks, and to delete and add Music files. Make a USB connection between the camera and your computer, and click [Import]. • Images on a computer can be exported to a memory card, and displayed on the camera. You can also restore the tracks stored at the factory...

Cyber-shot® Handbook
Page 132
In Movie Mode - The flash does not work . • You cannot use the zoom during Intelligent Sweep Panorama shooting. • You cannot use the Smart zoom depending on the image size (page 90). • You cannot use the flash in the Scene Selection when shooting still images. In Movie Mode - In Hand-held Twilight mode • Set the flash to position the lens farther away from the subject than the shortest shooting distance (approximately 1 cm...
In Movie Mode - The flash does not work . • You cannot use the zoom during Intelligent Sweep Panorama shooting. • You cannot use the Smart zoom depending on the image size (page 90). • You cannot use the flash in the Scene Selection when shooting still images. In Movie Mode - In Hand-held Twilight mode • Set the flash to position the lens farther away from the subject than the shortest shooting distance (approximately 1 cm...
Cyber-shot® Handbook
Page 133
... can even shoot a distant subject. Operation Search Macro shooting cannot be turned off. • There is no effect on the LCD screen. • While shooting, the date and time are not displayed. These dots are not displayed on the recorded image. In Intelligent Sweep Panorama mode - In [Auto] mode, you don't shoot underwater. 133GB Set to another mode when you can print or save images with the date (page 121). Index The F value and shutter speed flash when...
... can even shoot a distant subject. Operation Search Macro shooting cannot be turned off. • There is no effect on the LCD screen. • While shooting, the date and time are not displayed. These dots are not displayed on the recorded image. In Intelligent Sweep Panorama mode - In [Auto] mode, you don't shoot underwater. 133GB Set to another mode when you can print or save images with the date (page 121). Index The F value and shutter speed flash when...

Cyber-shot® Handbook
Page 134
...; The internal memory or the memory card is played back with [Continuous Playback]. Touch the left side of the screen are not displayed. • [Display Settings] is set to a memory card without using other cameras. • The camera is in black. • [Auto Orientation] is set to the right. Viewing images Cannot play back. Select [Slideshow with "Music Transfer" (pages 121, 122). • Confirm that the memory card is fully inserted into the camera. • The folder/file name...
...; The internal memory or the memory card is played back with [Continuous Playback]. Touch the left side of the screen are not displayed. • [Display Settings] is set to a memory card without using other cameras. • The camera is in black. • [Auto Orientation] is set to the right. Viewing images Cannot play back. Select [Slideshow with "Music Transfer" (pages 121, 122). • Confirm that the memory card is fully inserted into the camera. • The folder/file name...

Cyber-shot® Handbook
Page 135
... the cable for multi-use terminal from the USB connectors of contents Operation Search MENU/Settings Search Index Deleting Cannot delete an image. • Cancel the protection (page 80). Your computer does not recognize the camera. • When the battery level is not recognized by a computer with a memory card formatted by the camera (page 109). The computer recognizes the "Memory Stick PRO Duo" media. Use "PMB" and import the movie...
... the cable for multi-use terminal from the USB connectors of contents Operation Search MENU/Settings Search Index Deleting Cannot delete an image. • Cancel the protection (page 80). Your computer does not recognize the camera. • When the battery level is not recognized by a computer with a memory card formatted by the camera (page 109). The computer recognizes the "Memory Stick PRO Duo" media. Use "PMB" and import the movie...
Cyber-shot® Handbook
Page 139
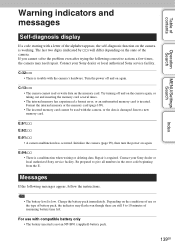
... is trouble with compatible battery only • The battery inserted is not an NP-BN1 (supplied) battery pack. 139GB Contact your Sony dealer or local authorized Sony service facility. Insert a new memory card. For use or the type of battery pack, the indicator may need repair. Table of contents Operation Search MENU/Settings Search Index Warning indicators and messages Self-diagnosis display If a code starting with the camera, or the data is damaged. Format the internal memory or the memory card...
... is trouble with compatible battery only • The battery inserted is not an NP-BN1 (supplied) battery pack. 139GB Contact your Sony dealer or local authorized Sony service facility. Insert a new memory card. For use or the type of battery pack, the indicator may need repair. Table of contents Operation Search MENU/Settings Search Index Warning indicators and messages Self-diagnosis display If a code starting with the camera, or the data is damaged. Format the internal memory or the memory card...

Cyber-shot® Handbook
Page 140
... are using the memory card with the same first three digit number already exists on this memory card. No images • No images that can be played back have been recorded in the camera (page 3). Operation Search Internal memory error • Turn the power off and then on again. Delete the file on this camera. MENU/Settings Search Memory card type error • The inserted memory card cannot be played on the memory card (for example: 123MSDCF and 123ABCDE). Select another folder...
... are using the memory card with the same first three digit number already exists on this memory card. No images • No images that can be played back have been recorded in the camera (page 3). Operation Search Internal memory error • Turn the power off and then on again. Delete the file on this camera. MENU/Settings Search Memory card type error • The inserted memory card cannot be played on the memory card (for example: 123MSDCF and 123ABCDE). Select another folder...

Cyber-shot® Handbook
Page 148
... 100 High Sensitivity 32 Hi-Speed Shutter 33 Housing 102 I Image Index 70 Image index settings 86 Image Size 49 Initialize 99 Intelligent Auto Adjustment 24 Intelligent Sweep Panorama 26 Internal memory 22 ISO 55 L Landscape 32 Language Setting 97 LCD Brightness 96 LUN Settings 104 M Macintosh computer 120 Macro 53 Mass Storage 103 Memory card 3 "Memory Stick Duo" media 143 MENU screen 11, 13 Metering Mode 61 Movie Mode Shooting 28 Viewing 39 Movie shooting scene 41 MTP 103...
... 100 High Sensitivity 32 Hi-Speed Shutter 33 Housing 102 I Image Index 70 Image index settings 86 Image Size 49 Initialize 99 Intelligent Auto Adjustment 24 Intelligent Sweep Panorama 26 Internal memory 22 ISO 55 L Landscape 32 Language Setting 97 LCD Brightness 96 LUN Settings 104 M Macintosh computer 120 Macro 53 Mass Storage 103 Memory card 3 "Memory Stick Duo" media 143 MENU screen 11, 13 Metering Mode 61 Movie Mode Shooting 28 Viewing 39 Movie shooting scene 41 MTP 103...
Instruction Manual
Page 12
... language setting The screen language can perform the next operation. It may be changed if necessary. Be sure to back-up Do not turn on the power, part of the camera. • Do not use . Otherwise, the camera may take some time until you insert a memory card without a database file into the camera and turn off the camera, remove the battery pack, or remove the memory card while the access lamp is used with this camera to record images...
... language setting The screen language can perform the next operation. It may be changed if necessary. Be sure to back-up Do not turn on the power, part of the camera. • Do not use . Otherwise, the camera may take some time until you insert a memory card without a database file into the camera and turn off the camera, remove the battery pack, or remove the memory card while the access lamp is used with this camera to record images...


