
Instruction Manual
Page 8
... off automatically to record images. Read "Precautions" (page 57) before using the camera (page 57). 8GB • Do not shake or strike the camera. However, some time until you may become discolored or to stick to automatically create a database file. ...Sony, this could cause a power supply trouble. The heat of flash emission may occur. To change the language setting, touch , then select (Settings) t (Main Settings) t [Language Setting]. Please use Sony genuine accessories If you use , but it before operating the camera. • Avoid exposing the camera...
... off automatically to record images. Read "Precautions" (page 57) before using the camera (page 57). 8GB • Do not shake or strike the camera. However, some time until you may become discolored or to stick to automatically create a database file. ...Sony, this could cause a power supply trouble. The heat of flash emission may occur. To change the language setting, touch , then select (Settings) t (Main Settings) t [Language Setting]. Please use Sony genuine accessories If you use , but it before operating the camera. • Avoid exposing the camera...

Instruction Manual
Page 13
... battery charger to the nearest wall outlet (wall socket). • When charging is within 100 V to [Normal]. - zUsing the camera abroad You can use an electronic transformer (travel converter). This may take longer depending on and off once every ten... still images Viewing still images Battery life (min.) Approx. 125 Approx. 240 No. x Battery life and number of 25°C (77°F). - Getting started x Charging time Full charge time Approx. 220 min. Charging may cause a malfunction. 13GB Using Sony "Memory Stick PRO Duo" media (sold separately). Normal charge time Approx...
... battery charger to the nearest wall outlet (wall socket). • When charging is within 100 V to [Normal]. - zUsing the camera abroad You can use an electronic transformer (travel converter). This may take longer depending on and off once every ten... still images Viewing still images Battery life (min.) Approx. 125 Approx. 240 No. x Battery life and number of 25°C (77°F). - Getting started x Charging time Full charge time Approx. 220 min. Charging may cause a malfunction. 13GB Using Sony "Memory Stick PRO Duo" media (sold separately). Normal charge time Approx...
Instruction Manual
Page 15
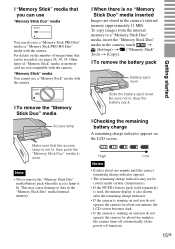
Other types of images/time that can also use a "Memory Stick PRO Duo" media or "Memory Stick PRO-HG Duo" media with the camera. High Low Notes • It takes about one minute, the LCD screen becomes dark. • If the camera is not lit, then push the "Memory Stick Duo" media in ... • If the NP-FD1 battery pack (sold separately) is used, the minute display is also shown after the remaining charge indicator. • If the camera is running on the LCD screen. To copy images from the internal memory to drop the battery pack. x To remove the battery pack Battery eject...
Other types of images/time that can also use a "Memory Stick PRO Duo" media or "Memory Stick PRO-HG Duo" media with the camera. High Low Notes • It takes about one minute, the LCD screen becomes dark. • If the camera is not lit, then push the "Memory Stick Duo" media in ... • If the NP-FD1 battery pack (sold separately) is used, the minute display is also shown after the remaining charge indicator. • If the camera is running on the LCD screen. To copy images from the internal memory to drop the battery pack. x To remove the battery pack Battery eject...
Instruction Manual
Page 16
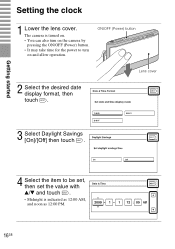
Getting started Setting the clock 1 Lower the lens cover. The camera is indicated as 12:00 AM, and noon as 12:00 PM. 16GB Lens cover 3 Select Daylight Savings [On]/[Off] then touch . 4 Select the item to be set, then set the value with v/V and touch . • Midnight is turned on. • You can also turn on the camera by pressing the ON/OFF (Power) button. • It may take time for the power to turn on and allow operation. ON/OFF (Power) button 2 Select the desired date display format, then touch .
Getting started Setting the clock 1 Lower the lens cover. The camera is indicated as 12:00 AM, and noon as 12:00 PM. 16GB Lens cover 3 Select Daylight Savings [On]/[Off] then touch . 4 Select the item to be set, then set the value with v/V and touch . • Midnight is turned on. • You can also turn on the camera by pressing the ON/OFF (Power) button. • It may take time for the power to turn on and allow operation. ON/OFF (Power) button 2 Select the desired date display format, then touch .

Instruction Manual
Page 17
By using "PMB" in the CD-ROM (supplied), you can print or save images with b/B, then touch . 6 Touch [OK]. Note • The camera does not have a feature for superimposing dates on images. Getting started 5 Select your desired area with the date. x Setting the date and time again Touch t (Settings) t (Clock Settings) (page 50). 17GB
By using "PMB" in the CD-ROM (supplied), you can print or save images with b/B, then touch . 6 Touch [OK]. Note • The camera does not have a feature for superimposing dates on images. Getting started 5 Select your desired area with the date. x Setting the date and time again Touch t (Settings) t (Clock Settings) (page 50). 17GB

Instruction Manual
Page 26
...) t desired mode. (When touched): Detects the face when an area with a face is touched on the screen. (Auto): Selects the face the camera is to register as the priority face. 3 To cancel the face registration, touch . 26GB The touch face is registered as the priority face, and ...the frame changes to an orange-colored . 2 Each time you want to automatically focus on. (Child Priority): Detects and shoots with priority on a child's face. (Adult Priority): Detects and shoots with ...
...) t desired mode. (When touched): Detects the face when an area with a face is touched on the screen. (Auto): Selects the face the camera is to register as the priority face. 3 To cancel the face registration, touch . 26GB The touch face is registered as the priority face, and ...the frame changes to an orange-colored . 2 Each time you want to automatically focus on. (Child Priority): Detects and shoots with priority on a child's face. (Adult Priority): Detects and shoots with ...

Instruction Manual
Page 28
Focusing on a specific point of the frame Simply touch the point of the frame you wish to focus on to change the focus position. 1 Point the camera at the subject, then touch the point of the frame you want to focus on. • You can change the focus point as many times as you wish before pressing the shutter button halfway down. • If you want the camera to choose a focus point automatically, touch . 28GB
Focusing on a specific point of the frame Simply touch the point of the frame you wish to focus on to change the focus position. 1 Point the camera at the subject, then touch the point of the frame you want to focus on. • You can change the focus point as many times as you wish before pressing the shutter button halfway down. • If you want the camera to choose a focus point automatically, touch . 28GB

Instruction Manual
Page 34
... for display on High Definition TV. The numbers in the table above are the total times for all movie files. x Image size The larger the image size, the higher the... only be recorded on the shooting conditions and the recording media. • The continuous shooting time differs according to [Normal]. • Movies with this camera Approx. 1 GB 2 GB 4 GB 8 GB 16 GB Size 11 MB 1280×...00:10 0:40:50 1:23:20 2:44:30 5:32:30 11:16:10 Notes • The recording time may vary depending on a "Memory Stick PRO Duo" media. 34GB Movie image size 1280×720(Fine...
... for display on High Definition TV. The numbers in the table above are the total times for all movie files. x Image size The larger the image size, the higher the... only be recorded on the shooting conditions and the recording media. • The continuous shooting time differs according to [Normal]. • Movies with this camera Approx. 1 GB 2 GB 4 GB 8 GB 16 GB Size 11 MB 1280×...00:10 0:40:50 1:23:20 2:44:30 5:32:30 11:16:10 Notes • The recording time may vary depending on a "Memory Stick PRO Duo" media. 34GB Movie image size 1280×720(Fine...

Instruction Manual
Page 36
The zoom scale increases each time you touched at twice the size, with the area you touch the screen. again to enlarge. Drag up/down/right/left: Changes the zoom position. : ... end the wide 36GB Shows the displayed area of the whole image Displaying images full-screen (Wide Zoom) 1 Press the (Playback) button to display the still image, then touch (Wide Zoom). • Touch zoom. The image is enlarged at the center. 2 Adjust the zoom scale and position.
The zoom scale increases each time you touched at twice the size, with the area you touch the screen. again to enlarge. Drag up/down/right/left: Changes the zoom position. : ... end the wide 36GB Shows the displayed area of the whole image Displaying images full-screen (Wide Zoom) 1 Press the (Playback) button to display the still image, then touch (Wide Zoom). • Touch zoom. The image is enlarged at the center. 2 Adjust the zoom scale and position.
Instruction Manual
Page 41
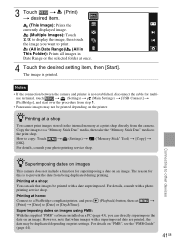
... details on the printer. Copy the images to a "Memory Stick Duo" media, then take the "Memory Stick Duo" media to prevent the date from the camera. 3 Touch t (Print) t desired item. (This Image): Prints the currently displayed image. (Multiple Images): Touch / to display the image, then touch the image you can ask... all images in the internal memory at home: Connect to a PictBridge-compliant printer, and press (Playback) button, then set t [Print] t [Date] to [Date] or [Day&Time].
... details on the printer. Copy the images to a "Memory Stick Duo" media, then take the "Memory Stick Duo" media to prevent the date from the camera. 3 Touch t (Print) t desired item. (This Image): Prints the currently displayed image. (Multiple Images): Touch / to display the image, then touch the image you can ask... all images in the internal memory at home: Connect to a PictBridge-compliant printer, and press (Playback) button, then set t [Print] t [Date] to [Date] or [Day&Time].

Instruction Manual
Page 49
... date to be played back on Calendar. (Image Index) Displays multiple images at the same time. (Slideshow) Plays back images in succession. ( Continuous Playback/ Slideshow with music) (Delete...PictBridge-compliant printer. ( This Image/ Multiple Images/ All in Date Range*) (Rotate) Rotates a still image. (Volume Settings) Adjusts the volume. (Playback Display Settings) Sets whether to display the ...12-up/ 28-up) (Select Folder) Selects the folder for viewing images. Changing camera settings * The displayed item differs according to display the shooting data (Exif data) of...
... date to be played back on Calendar. (Image Index) Displays multiple images at the same time. (Slideshow) Plays back images in succession. ( Continuous Playback/ Slideshow with music) (Delete...PictBridge-compliant printer. ( This Image/ Multiple Images/ All in Date Range*) (Rotate) Rotates a still image. (Volume Settings) Adjusts the volume. (Playback Display Settings) Sets whether to display the ...12-up/ 28-up) (Select Folder) Selects the folder for viewing images. Changing camera settings * The displayed item differs according to display the shooting data (Exif data) of...

Instruction Manual
Page 51
...Download Music Changes the slideshow music. Internal Memory Tool Format File Number Formats the internal memory. Date & Time Setting Sets the date and time. Changing camera settings 51GB Language Setting Selects the language to a connected TV terminal. COMPONENT Sets the video signal according to...Changes the folder used to assign file number to images. File Number Selects the method used when connecting the camera to the local time of the selected area. Calibration Corrects misalignment of the response positions of the LCD screen. Selects the method ...
...Download Music Changes the slideshow music. Internal Memory Tool Format File Number Formats the internal memory. Date & Time Setting Sets the date and time. Changing camera settings 51GB Language Setting Selects the language to a connected TV terminal. COMPONENT Sets the video signal according to...Changes the folder used to assign file number to images. File Number Selects the method used when connecting the camera to the local time of the selected area. Calibration Corrects misalignment of the response positions of the LCD screen. Selects the method ...

Instruction Manual
Page 53
... 100 Min C Display C:32:00 96 Indication Recording/Playback Media ("Memory Stick Duo" media, internal memory) Recordable time Zoom scaling Metering Mode Flash White balance Indication Burst mode Self-diagnosis display Temperature increase warning Self-timer Database file full...speed Aperture value ISO number Exposure Value Close focus Flash mode Flash charging Metering mode Recording a movie/Standby a movie Recording time (m:s) Folder-file number Recorded date/time of the playback image Spot metering cross hair Image size Others ISO400 +2.0EV 125 F3.5 ISO number Exposure Value Shutter speed...
... 100 Min C Display C:32:00 96 Indication Recording/Playback Media ("Memory Stick Duo" media, internal memory) Recordable time Zoom scaling Metering Mode Flash White balance Indication Burst mode Self-diagnosis display Temperature increase warning Self-timer Database file full...speed Aperture value ISO number Exposure Value Close focus Flash mode Flash charging Metering mode Recording a movie/Standby a movie Recording time (m:s) Folder-file number Recorded date/time of the playback image Spot metering cross hair Image size Others ISO400 +2.0EV 125 F3.5 ISO number Exposure Value Shutter speed...

Instruction Manual
Page 54
... on your computer, and insert the CD-ROM (supplied) into the CD-ROM drive. 2 Click [Cyber-shot Handbook]. "Cyber-shot Step-up Guide", which explains how to use the camera in detail, is not installed on your computer, you can download it from web page: http://www....Cyber-shot Handbook". If it for the camera, is complete, double-click "Handbook.pdf". 54GB Learning more about the camera ("Cybershot Handbook") "Cyber-shot Handbook", which contains information on accessories for in the [GB] folder to your computer. 3 After copying is installed at the same time. 3 Start "Cyber-shot...
... on your computer, and insert the CD-ROM (supplied) into the CD-ROM drive. 2 Click [Cyber-shot Handbook]. "Cyber-shot Step-up Guide", which explains how to use the camera in detail, is not installed on your computer, you can download it from web page: http://www....Cyber-shot Handbook". If it for the camera, is complete, double-click "Handbook.pdf". 54GB Learning more about the camera ("Cybershot Handbook") "Cyber-shot Handbook", which contains information on accessories for in the [GB] folder to your computer. 3 After copying is installed at the same time. 3 Start "Cyber-shot...

Instruction Manual
Page 56
... pack needs to correct the indication. • Battery capacity decreases over time and through repeated use the camera in USB mode. Change the "Memory Stick Duo" media. •...8226; You may be inappropriate for playing back, on this camera, files containing images which were processed on a computer or images which were shot using the "PMB". Play such images in Folder View (page...to be recorded on the "Memory Stick Duo" media shot using the AC Adaptor (sold separately). Use the battery charger to 86°F)). Shooting still images/movies Cannot record images. • Check the...
... pack needs to correct the indication. • Battery capacity decreases over time and through repeated use the camera in USB mode. Change the "Memory Stick Duo" media. •...8226; You may be inappropriate for playing back, on this camera, files containing images which were processed on a computer or images which were shot using the "PMB". Play such images in Folder View (page...to be recorded on the "Memory Stick Duo" media shot using the AC Adaptor (sold separately). Use the battery charger to 86°F)). Shooting still images/movies Cannot record images. • Check the...

Instruction Manual
Page 57
... not be indicated. Do not touch the camera with the power off . On the internal rechargeable backup battery This camera has an internal rechargeable battery for maintaining the date and time and other place with the camera in the camera, and then leave the camera for 24 hours or more with any of... whether the power is designed for a long time. On carrying Do not sit down in a chair or other settings regardless of the above on or off . On operating temperatures Your camera is on your trousers or skirt, as you can still use under the temperatures between 0°C and 40&#...
... not be indicated. Do not touch the camera with the power off . On the internal rechargeable backup battery This camera has an internal rechargeable battery for maintaining the date and time and other place with the camera in the camera, and then leave the camera for 24 hours or more with any of... whether the power is designed for a long time. On carrying Do not sit down in a chair or other settings regardless of the above on or off . On operating temperatures Your camera is on your trousers or skirt, as you can still use under the temperatures between 0°C and 40&#...

Cyber-shot® Handbook
Page 3
... bright dots (white, red, blue or green) may trail across on the battery pack • Charge the battery pack (supplied) before using the camera for the first time. • You can charge the battery pack even if it is . • If you can use the partially charged capacity of the battery pack... page 144. These dots are a normal result of the pixels are not actual images shot using this Handbook The images used . • For details on the LCD screen. Note that if you attempt to shoot with the camera. Leaving liquids on the LCD screen and lens • The LCD screen is not...
... bright dots (white, red, blue or green) may trail across on the battery pack • Charge the battery pack (supplied) before using the camera for the first time. • You can charge the battery pack even if it is . • If you can use the partially charged capacity of the battery pack... page 144. These dots are a normal result of the pixels are not actual images shot using this Handbook The images used . • For details on the LCD screen. Note that if you attempt to shoot with the camera. Leaving liquids on the LCD screen and lens • The LCD screen is not...

Cyber-shot® Handbook
Page 9
Table of contents Operation Search Printing images with the date "PMB (Picture Motion Browser 118 Changing date and time settings Area Setting 112 Date & Time Setting 113 Initializing settings Initialize 98 Printing images Print 124 Viewing on TVs Viewing an image on a SD TV 114 Viewing an image on an HD TV 115 Information about optional accessories "Cyber-shot Step-up Guide 123 Intelligent Pantilter 146 MENU/Settings Search Index 9GB
Table of contents Operation Search Printing images with the date "PMB (Picture Motion Browser 118 Changing date and time settings Area Setting 112 Date & Time Setting 113 Initializing settings Initialize 98 Printing images Print 124 Viewing on TVs Viewing an image on a SD TV 114 Viewing an image on an HD TV 115 Information about optional accessories "Cyber-shot Step-up Guide 123 Intelligent Pantilter 146 MENU/Settings Search Index 9GB

Cyber-shot® Handbook
Page 13
... Calibration Format Create REC.Folder Change REC.Folder Delete REC.Folder Copy File Number Format File Number Area Setting Date & Time Setting 13GB Continued r Index MENU/Settings Search Operation Search Table of contents Categories Shooting Settings Main Settings "Memory Stick" ...Tool Internal Memory Tool Clock Settings Items AF Illuminator Grid Line Digital Zoom Auto Orientation Scene Recog. Setting items You can change the settings on the (Settings) screen. 1 Touch to display the MENU...
... Calibration Format Create REC.Folder Change REC.Folder Delete REC.Folder Copy File Number Format File Number Area Setting Date & Time Setting 13GB Continued r Index MENU/Settings Search Operation Search Table of contents Categories Shooting Settings Main Settings "Memory Stick" ...Tool Internal Memory Tool Clock Settings Items AF Illuminator Grid Line Digital Zoom Auto Orientation Scene Recog. Setting items You can change the settings on the (Settings) screen. 1 Touch to display the MENU...

Cyber-shot® Handbook
Page 17
... Indication Battery remaining Low battery warning AF illuminator Recording folder Recording/Playback Media ("Memory Stick Duo" media, internal memory) Recordable time Zoom scaling Metering Mode Flash White balance 3 Display C:32:00 96 Indication Burst mode Self-diagnosis display Temperature increase warning Self... Flash mode Flash charging Metering mode REC Standby Recording a movie/Standby a movie 0:12 Recording time (m:s) 101-0012 Folder-file number 2009 1 1 9:30 AM Recorded date/time of the playback image Spot metering cross hair Image size Index ISO400 +2.0EV 125 F3.5 ISO...
... Indication Battery remaining Low battery warning AF illuminator Recording folder Recording/Playback Media ("Memory Stick Duo" media, internal memory) Recordable time Zoom scaling Metering Mode Flash White balance 3 Display C:32:00 96 Indication Burst mode Self-diagnosis display Temperature increase warning Self... Flash mode Flash charging Metering mode REC Standby Recording a movie/Standby a movie 0:12 Recording time (m:s) 101-0012 Folder-file number 2009 1 1 9:30 AM Recorded date/time of the playback image Spot metering cross hair Image size Index ISO400 +2.0EV 125 F3.5 ISO...


