Instruction Manual
Page 2
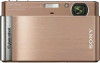
...in a fire or electric shock. DSC-T90 Serial No WARNING To reduce fire ...try reversing the plug. Refer to the operating instructions. [ Polarization This set should still fail to fit, contact your dealer or local power company. For those sets ...Customers in the operating instructions and adhere to have a suitable outlet installed. Use [ Power Sources This set may be of sufficient magnitude to constitute a risk of... any kind into the set . 2GB IMPORTANT SAFEGUARDS For your Sony dealer regarding this manual for future reference. If you call upon your protection...
...in a fire or electric shock. DSC-T90 Serial No WARNING To reduce fire ...try reversing the plug. Refer to the operating instructions. [ Polarization This set should still fail to fit, contact your dealer or local power company. For those sets ...Customers in the operating instructions and adhere to have a suitable outlet installed. Use [ Power Sources This set may be of sufficient magnitude to constitute a risk of... any kind into the set . 2GB IMPORTANT SAFEGUARDS For your Sony dealer regarding this manual for future reference. If you call upon your protection...
Instruction Manual
Page 3
...in safe operating condition. 3GB To ensure reliable operation of other hazards. [ Safety Check Upon completion of the set. [ Attachments Do not use attachments not recommended by the manufacturer, as they may result in damage and will prevent damage to the set due to rain or water. ... dropped, or the cabinet has been damaged. - When the power cord or plug is provided. - Installation [ Water and Moisture Do not use liquid cleaners or aerosol cleaners. Service [ Damage Requiring Service Unplug the set from the wall outlet before cleaning or polishing it is left unattended...
...in safe operating condition. 3GB To ensure reliable operation of other hazards. [ Safety Check Upon completion of the set. [ Attachments Do not use attachments not recommended by the manufacturer, as they may result in damage and will prevent damage to the set due to rain or water. ... dropped, or the cabinet has been damaged. - When the power cord or plug is provided. - Installation [ Water and Moisture Do not use liquid cleaners or aerosol cleaners. Service [ Damage Requiring Service Unplug the set from the wall outlet before cleaning or polishing it is left unattended...
Instruction Manual
Page 4
...or dispose of in fire. • Do not handle damaged or leaking lithium ion batteries. • Be sure to charge the battery pack using a genuine Sony battery charger or a device that can burst, cause a fire or even chemical burns. Do not expose the batteries to excessive heat such ... children. • Keep the battery pack dry. • Replace only with the specified type only. For more information regarding recycling of used rechargeable batteries to the collection and recycling location nearest you. Replace the battery with the same or equivalent type recommended by returning your...
...or dispose of in fire. • Do not handle damaged or leaking lithium ion batteries. • Be sure to charge the battery pack using a genuine Sony battery charger or a device that can burst, cause a fire or even chemical burns. Do not expose the batteries to excessive heat such ... children. • Keep the battery pack dry. • Replace only with the specified type only. For more information regarding recycling of used rechargeable batteries to the collection and recycling location nearest you. Replace the battery with the same or equivalent type recommended by returning your...
Instruction Manual
Page 5
... of Conformity Trade Name: SONY Model No.: DSC-T90 Responsible Party: Sony Electronics Inc. Consult the dealer or an experienced radio/TV technician for a Class B digital device, pursuant to provide... reasonable protection against harmful interference in the U.S.A. These limits are cautioned that any service or guarantee matters please refer to which can radiate radio frequency energy and, if not installed and used...
... of Conformity Trade Name: SONY Model No.: DSC-T90 Responsible Party: Sony Electronics Inc. Consult the dealer or an experienced radio/TV technician for a Class B digital device, pursuant to provide... reasonable protection against harmful interference in the U.S.A. These limits are cautioned that any service or guarantee matters please refer to which can radiate radio frequency energy and, if not installed and used...
Instruction Manual
Page 6
... permanent connection with separate collection systems) In case of the materials will help to this equipment has a detachable fuse cover, be used. If you change the fuse. Instead it shall be handed over to the applicable collection point for the recycling of the same ... For all other European countries with an incorporated battery, this product or battery, please contact your local Civic Office, your nearest Sony service station. Notice for your household waste disposal service or the shop where you will help prevent potential negative consequences for the environment...
... permanent connection with separate collection systems) In case of the materials will help to this equipment has a detachable fuse cover, be used. If you change the fuse. Instead it shall be handed over to the applicable collection point for the recycling of the same ... For all other European countries with an incorporated battery, this product or battery, please contact your local Civic Office, your nearest Sony service station. Notice for your household waste disposal service or the shop where you will help prevent potential negative consequences for the environment...
Instruction Manual
Page 7
Table of contents IMPORTANT SAFEGUARDS 2 Read this first 4 Notes on using the camera 9 Getting started 11 Checking the accessories supplied 11 Identifying parts 12 Charging the battery pack 13 Inserting the battery pack/a "Memory Stick Duo" ...mode that matches the scene (Scene Selection).... 30 Shooting movies 31 Using viewing functions 33 Viewing an enlarged image (Playback Zoom 33 Displaying images full-screen (Wide Zoom 33 Rotating a vertical orientation image (Temporarily rotated display) ....... 34 Viewing still images with music (Slideshow 34 Searching for an image (Image Index...
Table of contents IMPORTANT SAFEGUARDS 2 Read this first 4 Notes on using the camera 9 Getting started 11 Checking the accessories supplied 11 Identifying parts 12 Charging the battery pack 13 Inserting the battery pack/a "Memory Stick Duo" ...mode that matches the scene (Scene Selection).... 30 Shooting movies 31 Using viewing functions 33 Viewing an enlarged image (Playback Zoom 33 Displaying images full-screen (Wide Zoom 33 Rotating a vertical orientation image (Temporarily rotated display) ....... 34 Viewing still images with music (Slideshow 34 Searching for an image (Image Index...
Instruction Manual
Page 8
Deleting images 37 Deleting the currently displayed image 37 Deleting multiple images 37 Deleting all images (Format 38 Connecting to other devices 39 Viewing images on a TV 39 Printing still images 39 Using the camera with a computer 41 Changing camera settings 45 Changing the operation sounds 45 Using the HOME screen 45 Using the MENU items 48 Using functions in Program Auto mode 50 Others 51 List of icons displayed on the screen 51 Learning more about the camera ("Cyber-shot Handbook 53 Troubleshooting 54 Precautions 57 Specifications 58 8GB
Deleting images 37 Deleting the currently displayed image 37 Deleting multiple images 37 Deleting all images (Format 38 Connecting to other devices 39 Viewing images on a TV 39 Printing still images 39 Using the camera with a computer 41 Changing camera settings 45 Changing the operation sounds 45 Using the HOME screen 45 Using the MENU items 48 Using functions in Program Auto mode 50 Others 51 List of icons displayed on the screen 51 Learning more about the camera ("Cyber-shot Handbook 53 Troubleshooting 54 Precautions 57 Specifications 58 8GB
Instruction Manual
Page 9
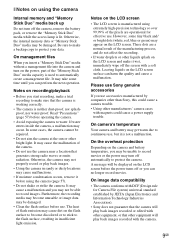
... supply trouble. Read "Precautions" (page 57) before the power turns off or you can harm the quality and cause a malfunction. Please use Sony genuine accessories If you insert a "Memory Stick Duo" media without a management file into the camera and turn on the power, part of the "Memory Stick Duo" media capacity is manufactured...
... supply trouble. Read "Precautions" (page 57) before the power turns off or you can harm the quality and cause a malfunction. Please use Sony genuine accessories If you insert a "Memory Stick Duo" media without a management file into the camera and turn on the power, part of the "Memory Stick Duo" media capacity is manufactured...
Instruction Manual
Page 11
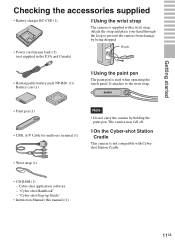
...• Rechargeable battery pack NP-BD1 (1)/ Battery case (1) x Using the paint pen The paint pen is not compatible with a wrist strap. It attaches to prevent the camera from damage by holding the paint pen. "Cyber-shot Handbook" - Getting started Getting started Checking the accessories supplied •...and place your hand through the loop to the wrist strap. • Paint pen (1) • USB, A/V Cable for multi-use terminal (1) Note • Do not carry the camera by being dropped. x On the Cyber-shot Station Cradle This camera is used when operating the touch panel.
...• Rechargeable battery pack NP-BD1 (1)/ Battery case (1) x Using the paint pen The paint pen is not compatible with a wrist strap. It attaches to prevent the camera from damage by holding the paint pen. "Cyber-shot Handbook" - Getting started Getting started Checking the accessories supplied •...and place your hand through the loop to the wrist strap. • Paint pen (1) • USB, A/V Cable for multi-use terminal (1) Note • Do not carry the camera by being dropped. x On the Cyber-shot Station Cradle This camera is used when operating the touch panel.
Instruction Manual
Page 12
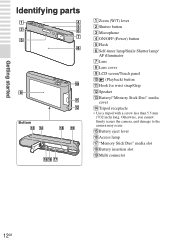
... slot R Battery insertion slot S Multi connector 12GB Otherwise, you cannot firmly secure the camera, and damage to the camera may occur. Getting started Identifying parts Bottom A Zoom (W/T) lever B Shutter button C ...Microphone D ON/OFF (Power) button E Flash F Self-timer lamp/Smile Shutter lamp/ AF illuminator G Lens H Lens cover I LCD screen/Touch panel J (Playback) button K Hook for wrist strap/Grip L Speaker M Battery/"Memory Stick Duo" media cover N Tripod receptacle • Use...
... slot R Battery insertion slot S Multi connector 12GB Otherwise, you cannot firmly secure the camera, and damage to the camera may occur. Getting started Identifying parts Bottom A Zoom (W/T) lever B Shutter button C ...Microphone D ON/OFF (Power) button E Flash F Self-timer lamp/Smile Shutter lamp/ AF illuminator G Lens H Lens cover I LCD screen/Touch panel J (Playback) button K Hook for wrist strap/Grip L Speaker M Battery/"Memory Stick Duo" media cover N Tripod receptacle • Use...
Instruction Manual
Page 14
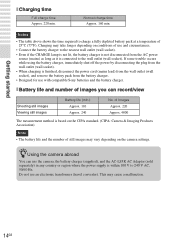
... charger is not disconnected from the battery charger. • Designed for use an electronic transformer (travel converter). Charging may take longer depending on the camera settings. If some trouble occurs while using the battery charger, immediately shut off the power by disconnecting the plug ...socket). Getting started x Charging time Full charge time Approx. 220 min. x Battery life and number of still images may cause a malfunction. 14GB Do not use with compatible Sony batteries and the battery charger. Normal charge time Approx. 160 min. of Images Approx. 220 Approx. 4800 ...
... charger is not disconnected from the battery charger. • Designed for use an electronic transformer (travel converter). Charging may take longer depending on the camera settings. If some trouble occurs while using the battery charger, immediately shut off the power by disconnecting the plug ...socket). Getting started x Charging time Full charge time Approx. 220 min. x Battery life and number of still images may cause a malfunction. 14GB Do not use with compatible Sony batteries and the battery charger. Normal charge time Approx. 160 min. of Images Approx. 220 Approx. 4800 ...
Instruction Manual
Page 16
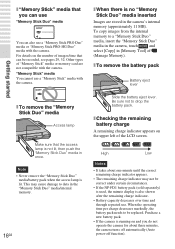
... to drop the battery pack. This may not be recorded, see pages 29, 32. Purchase a new battery pack. • If the camera is running on and you can use "Memory Stick Duo" media You can be correct under certain circumstances. • If the NP-FD1 battery pack (sold separately) is... minute display is lit. x "Memory Stick" media that can also use a "Memory Stick PRO Duo" media or "Memory Stick PRO-HG Duo" media with the camera. "Memory Stick" media You cannot use a "Memory Stick" media with the camera. To copy images from the internal memory to data in [Memory Tool] of ...
... to drop the battery pack. This may not be recorded, see pages 29, 32. Purchase a new battery pack. • If the camera is running on and you can use "Memory Stick Duo" media You can be correct under certain circumstances. • If the NP-FD1 battery pack (sold separately) is... minute display is lit. x "Memory Stick" media that can also use a "Memory Stick PRO Duo" media or "Memory Stick PRO-HG Duo" media with the camera. "Memory Stick" media You cannot use a "Memory Stick" media with the camera. To copy images from the internal memory to data in [Memory Tool] of ...

Instruction Manual
Page 17
... 2 Touch the desired date display format, then touch . Note • The camera does not have a feature for the power to set its numeric value. • Midnight is turned on. • You can print or save images with the date. By using "PMB" in the CD-ROM (supplied), you can also turn on... images. Lens cover Getting started 3 Touch each item, then touch v/V to turn on the camera by pressing the ON/OFF (Power) button. • It may take time...
... 2 Touch the desired date display format, then touch . Note • The camera does not have a feature for the power to set its numeric value. • Midnight is turned on. • You can print or save images with the date. By using "PMB" in the CD-ROM (supplied), you can also turn on... images. Lens cover Getting started 3 Touch each item, then touch v/V to turn on the camera by pressing the ON/OFF (Power) button. • It may take time...

Instruction Manual
Page 20
Using shooting functions Displaying minimum indicators (Easy Shooting) This mode reduces the minimum number of settings and enlarges the text size for better visibility. 1 Touch (REC Mode) t (Easy Shooting) t . Action Self-Timer Image Size Flash How to change (Self-Timer) t Select (Self-Timer Off) or t Select [Large] or [Small] in [Image Size] t Select [Auto] or [Off] in [Flash] x Returning to normal display Touch (REC Mode) t (Intelligent Auto Adjustment) t . (Self-Timer 10sec) 20GB
Using shooting functions Displaying minimum indicators (Easy Shooting) This mode reduces the minimum number of settings and enlarges the text size for better visibility. 1 Touch (REC Mode) t (Easy Shooting) t . Action Self-Timer Image Size Flash How to change (Self-Timer) t Select (Self-Timer Off) or t Select [Large] or [Small] in [Image Size] t Select [Auto] or [Off] in [Flash] x Returning to normal display Touch (REC Mode) t (Intelligent Auto Adjustment) t . (Self-Timer 10sec) 20GB

Instruction Manual
Page 21
...clear smile with the bangs. 2 Try to Smile Shutter mode. Using shooting functions Detecting smiles and shooting automatically (Smile Shutter) 1 Touch (Smile). 2 Wait detecting a smile. When the smile level exceeds the b point on the indicator, the camera shoots images automatically. Face Detection frame Smile Detection Sensitivity indicator zHints ... When you touch (Smile) again, Smile Shutter ends. • If you press the shutter button during Smile Shutter, the camera shoots the image then returns to orient the face in front of smiles 1 Do not cover the eyes with an open mouth.
...clear smile with the bangs. 2 Try to Smile Shutter mode. Using shooting functions Detecting smiles and shooting automatically (Smile Shutter) 1 Touch (Smile). 2 Wait detecting a smile. When the smile level exceeds the b point on the indicator, the camera shoots images automatically. Face Detection frame Smile Detection Sensitivity indicator zHints ... When you touch (Smile) again, Smile Shutter ends. • If you press the shutter button during Smile Shutter, the camera shoots the image then returns to orient the face in front of smiles 1 Do not cover the eyes with an open mouth.

Instruction Manual
Page 22
When the camera recognizes the scene, (Twilight), (Twilight Portrait), (Twilight using a tripod), (Backlight), (Backlight Portrait), (Landscape), (Macro) or (Portrait) appears. Scene Recognition icon When the camera does not recognize the scene, appears on the screen of the camera. 3 Press the shutter button halfway down to focus and then press the shutter button fully down to shoot the image. 22GB Detecting the shooting conditions automatically (Scene Recognition) 1 Touch (REC Mode) t (Intelligent Auto Adjustment) t or . 2 Point the camera at the subject.
When the camera recognizes the scene, (Twilight), (Twilight Portrait), (Twilight using a tripod), (Backlight), (Backlight Portrait), (Landscape), (Macro) or (Portrait) appears. Scene Recognition icon When the camera does not recognize the scene, appears on the screen of the camera. 3 Press the shutter button halfway down to focus and then press the shutter button fully down to shoot the image. 22GB Detecting the shooting conditions automatically (Scene Recognition) 1 Touch (REC Mode) t (Intelligent Auto Adjustment) t or . 2 Point the camera at the subject.
Instruction Manual
Page 23
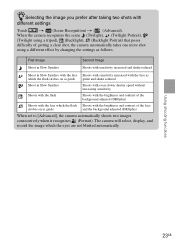
... flash Shoots with different settings Touch t (Scene Recognition) t (Advanced). zSelecting the image you prefer after taking two shots with the brightness and contrast of the face strobes on as guide guide and shake reduced Shoot in Slow Synchro with ... which the eyes are not blinked automatically. When the camera recognizes the scene (Twilight), (Twilight Portrait), (Twilight using a tripod), (Backlight), (Backlight Portrait) that poses difficulty of getting a clear shot, the camera automatically takes one more shot using a different effect by changing the settings as guide and...
... flash Shoots with different settings Touch t (Scene Recognition) t (Advanced). zSelecting the image you prefer after taking two shots with the brightness and contrast of the face strobes on as guide guide and shake reduced Shoot in Slow Synchro with ... which the eyes are not blinked automatically. When the camera recognizes the scene (Twilight), (Twilight Portrait), (Twilight using a tripod), (Backlight), (Backlight Portrait) that poses difficulty of getting a clear shot, the camera automatically takes one more shot using a different effect by changing the settings as guide and...

Instruction Manual
Page 24
...after a two-second delay. Set Macro On when shooting close subjects. (Close focus enabled): Use this setting if you want to unsteadiness when the shutter button is in the image. Use this mode to (Auto) when the camera is pressed. 2 Press the shutter button. Locked to the W side: Approximately 1 to... 20 cm (13/32 to 7 7/8 inches) Notes • You cannot select (Macro On) when the camera is in this mode. (Macro On): The camera adjusts the focus ...
...after a two-second delay. Set Macro On when shooting close subjects. (Close focus enabled): Use this setting if you want to unsteadiness when the shutter button is in the image. Use this mode to (Auto) when the camera is pressed. 2 Press the shutter button. Locked to the W side: Approximately 1 to... 20 cm (13/32 to 7 7/8 inches) Notes • You cannot select (Macro On) when the camera is in this mode. (Macro On): The camera adjusts the focus ...
Instruction Manual
Page 25
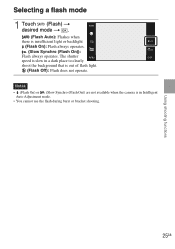
Notes • (Flash On) or (Slow Synchro (Flash On)) are not available when the camera is in a dark place to clearly shoot the background that is out of flash light. (Flash Off): Flash does not operate. The shutter speed is insufficient light or backlight (Flash On): Flash always operates. (Slow Synchro (Flash On)): Flash always operates. Using shooting functions Selecting a flash mode 1 Touch (Flash) t desired mode t . (Flash Auto): Flashes when there is slow in Intelligent Auto Adjustment mode. • You cannot use the flash during burst or bracket shooting. 25GB
Notes • (Flash On) or (Slow Synchro (Flash On)) are not available when the camera is in a dark place to clearly shoot the background that is out of flash light. (Flash Off): Flash does not operate. The shutter speed is insufficient light or backlight (Flash On): Flash always operates. (Slow Synchro (Flash On)): Flash always operates. Using shooting functions Selecting a flash mode 1 Touch (Flash) t desired mode t . (Flash Auto): Flashes when there is slow in Intelligent Auto Adjustment mode. • You cannot use the flash during burst or bracket shooting. 25GB

Instruction Manual
Page 27
... when an area with priority on an adult's face. 27GB Focusing on the face of the subject (Face Detection) The camera detects the face of the subject and focuses on it. Using shooting functions Focusing on a specific point of the frame Simply touch the point of the frame you wish to focus... on to change the focus point as many times as you wish before pressing the shutter button halfway down. • If you want the camera to automatically focus...
... when an area with priority on an adult's face. 27GB Focusing on the face of the subject (Face Detection) The camera detects the face of the subject and focuses on it. Using shooting functions Focusing on a specific point of the frame Simply touch the point of the frame you wish to focus... on to change the focus point as many times as you wish before pressing the shutter button halfway down. • If you want the camera to automatically focus...


