Instruction Manual
Page 7
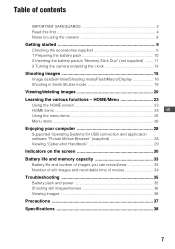
... items 26 Enjoying your computer 28 Supported Operating Systems for USB connection and application software "Picture Motion Browser" (supplied 28 Viewing "Cyber-shot Handbook 29 Indicators on /setting the clock 13 Shooting images 15 Image size/Self-timer/Shooting mode/Flash/Macro/Display 16 Shooting in...pack/a "Memory Stick Duo" (not supplied) ........ 11 3 Turning the camera on the screen 30 Battery life and memory capacity 33 Battery life and number of images you can record/view 33 Number of still images and recordable time of movies 34 Troubleshooting 35 Battery pack and power ...
... items 26 Enjoying your computer 28 Supported Operating Systems for USB connection and application software "Picture Motion Browser" (supplied 28 Viewing "Cyber-shot Handbook 29 Indicators on /setting the clock 13 Shooting images 15 Image size/Self-timer/Shooting mode/Flash/Macro/Display 16 Shooting in...pack/a "Memory Stick Duo" (not supplied) ........ 11 3 Turning the camera on the screen 30 Battery life and memory capacity 33 Battery life and number of images you can record/view 33 Number of still images and recordable time of movies 34 Troubleshooting 35 Battery pack and power ...

Instruction Manual
Page 8
...provisions of the copyright laws. [ No compensation for damaged content or recording failure Sony cannot compensate for effective use the camera near a location that the camera is working correctly. • The camera is lit. Leaving liquids on the LCD screen surface can harm the quality and ...universal standard established by JEITA (Japan Electronics and Information Technology Industries Association). • Sony does not guarantee that the camera will play back images recorded or edited with the camera. [ Warning on the LCD screen and make it before using extremely high-precision ...
...provisions of the copyright laws. [ No compensation for damaged content or recording failure Sony cannot compensate for effective use the camera near a location that the camera is working correctly. • The camera is lit. Leaving liquids on the LCD screen surface can harm the quality and ...universal standard established by JEITA (Japan Electronics and Information Technology Industries Association). • Sony does not guarantee that the camera will play back images recorded or edited with the camera. [ Warning on the LCD screen and make it before using extremely high-precision ...

Instruction Manual
Page 9
... (1) • Power cord (mains lead) (1) (not supplied in the USA and Canada) • Wrist strap (1) • CD-ROM (1) - The camera may fall off. 9 "Cyber-shot Step-up Guide" • Rechargeable battery pack NP-BD1 (1)/ Battery case (1) • Instruction Manual (this manual) (1) GB • Paint pen (1) About... the loop to the wrist strap (shown right). • Do not carry the camera by being dropped. "Cyber-shot Handbook" - Hook About the paint pen • You can paint or put stamps on still images with the paint pen. • Attach the paint pen to prevent the...
... (1) • Power cord (mains lead) (1) (not supplied in the USA and Canada) • Wrist strap (1) • CD-ROM (1) - The camera may fall off. 9 "Cyber-shot Step-up Guide" • Rechargeable battery pack NP-BD1 (1)/ Battery case (1) • Instruction Manual (this manual) (1) GB • Paint pen (1) About... the loop to the wrist strap (shown right). • Do not carry the camera by being dropped. "Cyber-shot Handbook" - Hook About the paint pen • You can paint or put stamps on still images with the paint pen. • Attach the paint pen to prevent the...

Instruction Manual
Page 11
... "Memory Stick Duo" (not supplied). 3 Insert the battery pack. 4 Close the battery/"Memory Stick Duo" cover. [ When there is no "Memory Stick Duo" inserted The camera records/plays back images using the internal memory (approx. 15 MB). 11 2 Inserting the battery pack/a "Memory Stick Duo" (not supplied) Battery/ "Memory Stick Duo...
... "Memory Stick Duo" (not supplied). 3 Insert the battery pack. 4 Close the battery/"Memory Stick Duo" cover. [ When there is no "Memory Stick Duo" inserted The camera records/plays back images using the internal memory (approx. 15 MB). 11 2 Inserting the battery pack/a "Memory Stick Duo" (not supplied) Battery/ "Memory Stick Duo...

Instruction Manual
Page 12
... be correct under certain circumstances. • The Clock Set screen appears when you turn on and check the remaining battery charge on the camera for the first time (page 13). [ To remove the battery pack/"Memory Stick Duo" Open the battery/"Memory Stick Duo" cover. ...Change the battery with this camera. 12 Remaining charge indicator Status Sufficient power remaining Battery almost fully charged Battery half full Battery low, recording/ playback will stop soon. Be ...
... be correct under certain circumstances. • The Clock Set screen appears when you turn on and check the remaining battery charge on the camera for the first time (page 13). [ To remove the battery pack/"Memory Stick Duo" Open the battery/"Memory Stick Duo" cover. ...Change the battery with this camera. 12 Remaining charge indicator Status Sufficient power remaining Battery almost fully charged Battery half full Battery low, recording/ playback will stop soon. Be ...

Instruction Manual
Page 13
By using "Picture Motion Browser" in the illustration and lower the lens cover. 3 Turning the camera on the inside cover. 1 Press the POWER button or slide the lens cover downward. Do not press on /setting the clock POWER button Lens Lens .... • Midnight is indicated as 12:00 AM, and noon as 12:00 PM. [ To set its numeric value by touching v/V. 3 Touch [OK]. • The camera does not have a feature for superimposing dates on images. GB • Be careful not to apply force to the lens cover when lowering it. 2 Set...
By using "Picture Motion Browser" in the illustration and lower the lens cover. 3 Turning the camera on the inside cover. 1 Press the POWER button or slide the lens cover downward. Do not press on /setting the clock POWER button Lens Lens .... • Midnight is indicated as 12:00 AM, and noon as 12:00 PM. [ To set its numeric value by touching v/V. 3 Touch [OK]. • The camera does not have a feature for superimposing dates on images. GB • Be careful not to apply force to the lens cover when lowering it. 2 Set...
Instruction Manual
Page 14
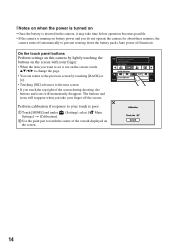
... [BACK] or [×]. • Touching [OK] advances to the next screen. • If you do not operate the camera for about three minutes, the camera turns off automatically to touch the center of the screen during shooting, the buttons and icons will reappear when you take time before operation... becomes possible. • If the camera is running on battery power and you touch the top right of the × mark displayed on the screen. 14 Perform calibration if response ...
... [BACK] or [×]. • Touching [OK] advances to the next screen. • If you do not operate the camera for about three minutes, the camera turns off automatically to touch the center of the screen during shooting, the buttons and icons will reappear when you take time before operation... becomes possible. • If the camera is running on battery power and you touch the top right of the × mark displayed on the screen. 14 Perform calibration if response ...

Instruction Manual
Page 15
... or is displayed if an object other than a person's face is detected. 3 Shoot with your elbows pressed against your body to return. 15 When shooting still images: 1 Press and hold the shutter button halfway down . Using the zoom: Slide the zoom (W/T) lever to the T side to zoom and slide to the...). Shooting images Microphone Flash Zoom (W/T) lever Shutter button Self-timer lamp/ Smile Shutter lamp Lens cover Tripod receptacle (bottom) 1 Open the lens cover. 2 Hold the camera, with the shutter button.
... or is displayed if an object other than a person's face is detected. 3 Shoot with your elbows pressed against your body to return. 15 When shooting still images: 1 Press and hold the shutter button halfway down . Using the zoom: Slide the zoom (W/T) lever to the T side to zoom and slide to the...). Shooting images Microphone Flash Zoom (W/T) lever Shutter button Self-timer lamp/ Smile Shutter lamp Lens cover Tripod receptacle (bottom) 1 Open the lens cover. 2 Hold the camera, with the shutter button.

Instruction Manual
Page 17
...Selection Easy Shooting Movie Mode The setting buttons for portraits of the water captured more clearly. Allows you to the scene. When the camera detects a smile, the shutter is attached. Shoots snow scenes in a dark place without losing the nighttime atmosphere. Auto Adjustment Program Auto... mode Touch the shooting mode setting button on the screen. Allows you to -see indicators. Allows easy shooting with easy-to shoot still images with the focus on the bottom of people in white more vividly. Scene Selection Touch , then select the desired mode. Shoots...
...Selection Easy Shooting Movie Mode The setting buttons for portraits of the water captured more clearly. Allows you to the scene. When the camera detects a smile, the shutter is attached. Shoots snow scenes in a dark place without losing the nighttime atmosphere. Auto Adjustment Program Auto... mode Touch the shooting mode setting button on the screen. Allows you to -see indicators. Allows easy shooting with easy-to shoot still images with the focus on the bottom of people in white more vividly. Scene Selection Touch , then select the desired mode. Shoots...

Instruction Manual
Page 18
...: This sets whether or not to display the histogram on the screen to change to the display selection screen. [ Flash (Selecting a flash mode for still images) Touch the flash mode setting button on the screen. : Flash Auto Flashes when there is insufficient light or backlight (default setting) : Flash forced... on : Slow synchro (Flash forced on) The shutter speed is slow in this mode. : Macro On The camera adjusts the focus with priority on close -up subjects. Display Setup: This sets whether or not to display the buttons and icons on the screen...
...: This sets whether or not to display the histogram on the screen to change to the display selection screen. [ Flash (Selecting a flash mode for still images) Touch the flash mode setting button on the screen. : Flash Auto Flashes when there is insufficient light or backlight (default setting) : Flash forced... on : Slow synchro (Flash forced on) The shutter speed is slow in this mode. : Macro On The camera adjusts the focus with priority on close -up subjects. Display Setup: This sets whether or not to display the buttons and icons on the screen...

Instruction Manual
Page 19
...lamp lights. 3 Press the shutter button all the way down to set Smile Detection mode. The subjects are partially hidden by b), the GB camera automatically operates the shutter and records up to exit the Smile Shutter mode. • Shooting using the Smile Shutter ends automatically when either the...shutter button all the way down. • The image may not be detected correctly depending on the conditions. • You cannot use the Digital Zoom function. • You cannot change the zoom ratio when the Smile Shutter is in standby. 19 Smile Detection mark/Number of images ...
...lamp lights. 3 Press the shutter button all the way down to set Smile Detection mode. The subjects are partially hidden by b), the GB camera automatically operates the shutter and records up to exit the Smile Shutter mode. • Shooting using the Smile Shutter ends automatically when either the...shutter button all the way down. • The image may not be detected correctly depending on the conditions. • You cannot use the Digital Zoom function. • You cannot change the zoom ratio when the Smile Shutter is in standby. 19 Smile Detection mark/Number of images ...

Instruction Manual
Page 20
...images. [ To delete images 1 Display the image you press (Playback) when the camera is displayed to return. 20 Touch [HOME], then select [ Folder View] from (View Images) to play back some images shot using an earlier Sony model. Stop: Touch x. • You may not be able to select an ... to return to playback a movie. If you want to delete, then touch 2 Touch [OK]. (Delete). [ To view an enlarged image (playback zoom) Touch a still image while it is powered off . [BACK]: Cancels playback zoom. • You can also enlarge the image by sliding the zoom (W/T) lever to turn off...
...images. [ To delete images 1 Display the image you press (Playback) when the camera is displayed to return. 20 Touch [HOME], then select [ Folder View] from (View Images) to play back some images shot using an earlier Sony model. Stop: Touch x. • You may not be able to select an ... to return to playback a movie. If you want to delete, then touch 2 Touch [OK]. (Delete). [ To view an enlarged image (playback zoom) Touch a still image while it is powered off . [BACK]: Cancels playback zoom. • You can also enlarge the image by sliding the zoom (W/T) lever to turn off...

Instruction Manual
Page 21
... the software included in index mode 1 Touch (Delete) while the index screen is displayed. 2 Touch the thumbnail images you want to your computer. 3 Connect the camera and a computer with the [Effects]. To transfer and change together with USB cable. 4 Start up "Music Transfer" installed to your computer and change the View...
... the software included in index mode 1 Touch (Delete) while the index screen is displayed. 2 Touch the thumbnail images you want to your computer. 3 Connect the camera and a computer with the [Effects]. To transfer and change together with USB cable. 4 Start up "Music Transfer" installed to your computer and change the View...

Instruction Manual
Page 22
Set [COMPONENT] to the TV with the cable for multi-use terminal To view on TV Connect the camera to [SD] when shooting movies. 22 [ To view images on HD (High Definition) TV, an HD Output Adaptor Cable (not supplied) is needed. • If you set the image size to [16:9], you can record images in the size that fills the entire screen of the HD TV. • You cannot view movies output in [HD(1080i)] signal format. To the multi connector To audio/video input jacks Cable for multi-use terminal (supplied).
Set [COMPONENT] to the TV with the cable for multi-use terminal To view on TV Connect the camera to [SD] when shooting movies. 22 [ To view images on HD (High Definition) TV, an HD Output Adaptor Cable (not supplied) is needed. • If you set the image size to [16:9], you can record images in the size that fills the entire screen of the HD TV. • You cannot view movies output in [HD(1080i)] signal format. To the multi connector To audio/video input jacks Cable for multi-use terminal (supplied).

Instruction Manual
Page 23
... the category you want to set . Guide 23 GB Function Guide If the function guide is the gateway screen for all the functions of the camera, and can be called up regardless of the mode setting (shooting/viewing). 1 Touch [HOME] to display the HOME screen. HOME/Menu Using the HOME screen...
... the category you want to set . Guide 23 GB Function Guide If the function guide is the gateway screen for all the functions of the camera, and can be called up regardless of the mode setting (shooting/viewing). 1 Touch [HOME] to display the HOME screen. HOME/Menu Using the HOME screen...

Instruction Manual
Page 28
... Stick slot on your computer You can enjoy still images and movies from the camera more than ever. OS upgrades are not supported. • Your computer must be pre-installed with the camera on the operating environment of "Picture Motion Browser" Cyber-shot application software, refer to "Cyber-shot Handbook." 28 Supported Operating Systems for USB connection...
... Stick slot on your computer You can enjoy still images and movies from the camera more than ever. OS upgrades are not supported. • Your computer must be pre-installed with the camera on the operating environment of "Picture Motion Browser" Cyber-shot application software, refer to "Cyber-shot Handbook." 28 Supported Operating Systems for USB connection...

Instruction Manual
Page 29
... is required to view it. [ For Windows users 1 Turn on -screen instructions to use the camera in the CD-ROM (supplied) explains how to copy. • When you click the [Cyber-shot Handbook] button, the screen for copying "Cyber-shot Handbook" appears. 2 Follow the on your computer, and insert the CD- click the shortcut created...
... is required to view it. [ For Windows users 1 Turn on -screen instructions to use the camera in the CD-ROM (supplied) explains how to copy. • When you click the [Cyber-shot Handbook] button, the screen for copying "Cyber-shot Handbook" appears. 2 Follow the on your computer, and insert the CD- click the shortcut created...
Instruction Manual
Page 33
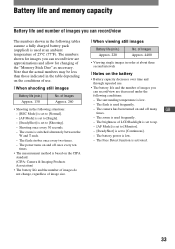
... at about three second intervals [ Notes on the battery • Battery capacity decreases over time and through repeated use . [ When shooting still images Battery life (min.) Approx. 130 No. Battery life and memory capacity Battery life and number of images you can record/view are ...Face Detect function is set to [Shooting]. - of Images Approx. 260 • Shooting in the table depending on the CIPA standard. (CIPA: Camera & Imaging Products Association) • The battery life and the number of images do not change, regardless of images you can record/view are approximations ...
... at about three second intervals [ Notes on the battery • Battery capacity decreases over time and through repeated use . [ When shooting still images Battery life (min.) Approx. 130 No. Battery life and memory capacity Battery life and number of images you can record/view are ...Face Detect function is set to [Shooting]. - of Images Approx. 260 • Shooting in the table depending on the CIPA standard. (CIPA: Camera & Imaging Products Association) • The battery life and the number of images do not change, regardless of images you can record/view are approximations ...

Instruction Manual
Page 34
...:10 • Movies with the size set to [640(Fine)] can only be different. [ The approximate recordable number of still images (Units: Images) Internal Capacity memory "Memory Stick Duo" formatted with this camera Size Approx. 15 MB 128 MB 256 MB 512 MB 1 GB 2 GB 4 GB 8 GB 10M 3 32 58... When the number of remaining shootable images is greater than 9,999, the ">9999" indicator appears. • When an image was recorded using an earlier Sony model and is the same as the one in the actual image size. [ The approximate recordable time of movies The table below , the number of...
...:10 • Movies with the size set to [640(Fine)] can only be different. [ The approximate recordable number of still images (Units: Images) Internal Capacity memory "Memory Stick Duo" formatted with this camera Size Approx. 15 MB 128 MB 256 MB 512 MB 1 GB 2 GB 4 GB 8 GB 10M 3 32 58... When the number of remaining shootable images is greater than 9,999, the ">9999" indicator appears. • When an image was recorded using an earlier Sony model and is the same as the one in the actual image size. [ The approximate recordable time of movies The table below , the number of...

Instruction Manual
Page 35
.... Turn on the power. 3 Initialize the settings (page 24). 4 Consult your Sony dealer or local authorized Sony service facility. Battery pack and power Cannot insert the battery pack. • Insert the battery pack correctly by sending the camera for the camera to "Cyber-shot Handbook" (PDF). Replace it with a new one. 35 The power turns off...
.... Turn on the power. 3 Initialize the settings (page 24). 4 Consult your Sony dealer or local authorized Sony service facility. Battery pack and power Cannot insert the battery pack. • Insert the battery pack correctly by sending the camera for the camera to "Cyber-shot Handbook" (PDF). Replace it with a new one. 35 The power turns off...


