Instruction Manual
Page 3
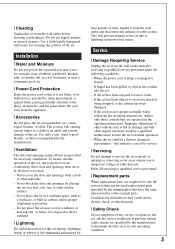
... wall outlet and refer servicing to the plugs, receptacles, and the point where the cord exits from the wall outlet and disconnect the antenna or cable system. Do not use power-line operated sets near or over a radiator or heat register, or where it from the appliance. [ Accessories Do not place...
... wall outlet and refer servicing to the plugs, receptacles, and the point where the cord exits from the wall outlet and disconnect the antenna or cable system. Do not use power-line operated sets near or over a radiator or heat register, or where it from the appliance. [ Accessories Do not place...
Instruction Manual
Page 4
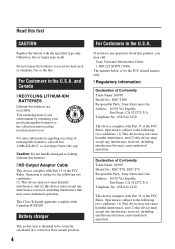
... received, including interference that may result. Declaration of Conformity Trade Name: SONY Model No.: DSC-T200 Responsible Party: Sony Electronics Inc. For Customers in the U.S.A. and Canada [ RECYCLING LITHIUM-ION... Do not handle damaged or leaking Lithium-Ion batteries. [ HD Output Adaptor Cable This device complies with Part 15 of the FCC Rules. Telephone No.: 858-...SONY (7669) The number below is intended to the collection and recycling location nearest you may cause undesired operation. Address: 16530 Via Esprillo, San Diego, CA 92127U.S.A. This Class B digital...
... received, including interference that may result. Declaration of Conformity Trade Name: SONY Model No.: DSC-T200 Responsible Party: Sony Electronics Inc. For Customers in the U.S.A. and Canada [ RECYCLING LITHIUM-ION... Do not handle damaged or leaking Lithium-Ion batteries. [ HD Output Adaptor Cable This device complies with Part 15 of the FCC Rules. Telephone No.: 858-...SONY (7669) The number below is intended to the collection and recycling location nearest you may cause undesired operation. Address: 16530 Via Esprillo, San Diego, CA 92127U.S.A. This Class B digital...
Instruction Manual
Page 5
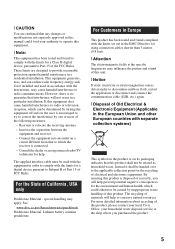
... CAUTION You are designed to provide reasonable protection against harmful interference in a residential installation. The supplied interface cable must be used in accordance with the limits for a digital device pursuant to Subpart B of Part 15 of this product, please contact your local Civic Office, your... this manual could otherwise be treated as household waste. Consult the dealer or an experienced radio/TV technician for a Class B digital device, pursuant to operate this product shall not be caused by turning the equipment off and on a circuit different from that ...
... CAUTION You are designed to provide reasonable protection against harmful interference in a residential installation. The supplied interface cable must be used in accordance with the limits for a digital device pursuant to Subpart B of Part 15 of this product, please contact your local Civic Office, your... this manual could otherwise be treated as household waste. Consult the dealer or an experienced radio/TV technician for a Class B digital device, pursuant to operate this product shall not be caused by turning the equipment off and on a circuit different from that ...
Instruction Manual
Page 9
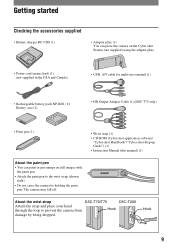
...Cable (1) (DSC-T75 only) • Paint pen (1) • Wrist strap (1) • CD-ROM (Cyber-shot application software/ "Cyber-shot Handbook"/"Cyber-shot Step-up Guide") (1) • Instruction Manual (this manual) (1) About the paint pen • You can paint or put stamps on still images with the paint pen. • Attach the paint pen to prevent the camera... from Hook damage by holding the paint pen. Hook 9 The camera may fall off. About the wrist strap DSC-T70/T75 DSC-T200 Attach ...
...Cable (1) (DSC-T75 only) • Paint pen (1) • Wrist strap (1) • CD-ROM (Cyber-shot application software/ "Cyber-shot Handbook"/"Cyber-shot Step-up Guide") (1) • Instruction Manual (this manual) (1) About the paint pen • You can paint or put stamps on still images with the paint pen. • Attach the paint pen to prevent the camera... from Hook damage by holding the paint pen. Hook 9 The camera may fall off. About the wrist strap DSC-T70/T75 DSC-T200 Attach ...

Instruction Manual
Page 20
... delete. If you can also access the index screen by selecting [ Image Index] in screen. (View Images) on a high definition TV, an HD output adaptor cable (DSC-T75 only) is checked in index mode, you shoot with the image size set the number of images (Slideshow) Touch . [ To view images on TV... screen Connect the camera to 16:9, the images will be played back during HD(1080i) output. 20 To return to the single image screen, touch the thumbnail image. •...
... delete. If you can also access the index screen by selecting [ Image Index] in screen. (View Images) on a high definition TV, an HD output adaptor cable (DSC-T75 only) is checked in index mode, you shoot with the image size set the number of images (Slideshow) Touch . [ To view images on TV... screen Connect the camera to 16:9, the images will be played back during HD(1080i) output. 20 To return to the single image screen, touch the thumbnail image. •...

Instruction Manual
Page 21
COMPONENT VIDEO IN AUDIO To the multi connector Green/Blue/Red White/Red HD Output Adaptor Cable (DSC-T75 only) • The cable for video jacks (Green/Blue/Red) is the same color as the respective jacks. 21 Connect the camera to the HDTV with the HD Output Adaptor Cable (DSC-T75 only).
COMPONENT VIDEO IN AUDIO To the multi connector Green/Blue/Red White/Red HD Output Adaptor Cable (DSC-T75 only) • The cable for video jacks (Green/Blue/Red) is the same color as the respective jacks. 21 Connect the camera to the HDTV with the HD Output Adaptor Cable (DSC-T75 only).

Cyber-shot® Handbook (Large File - 10.47 MB)
Page 6
... images by connecting your camera to a TV with the supplied cable for multi-use terminal 81 Viewing an image by connecting your camera to a HD TV 83...camera copying to the "Memory Stick Duo 96 Using the "Music Transfer" (supplied 97 Using your Macintosh computer 98 Viewing "Cyber-shot Step-up Guide 100 Printing still images How to print still... images 101 Printing images directly using a PictBridge compliant printer 102 Printing at a shop 105 6 Shooting Settings 1 75 AF Illuminator AF Mode Grid Line Digital...
... images by connecting your camera to a TV with the supplied cable for multi-use terminal 81 Viewing an image by connecting your camera to a HD TV 83...camera copying to the "Memory Stick Duo 96 Using the "Music Transfer" (supplied 97 Using your Macintosh computer 98 Viewing "Cyber-shot Step-up Guide 100 Printing still images How to print still... images 101 Printing images directly using a PictBridge compliant printer 102 Printing at a shop 105 6 Shooting Settings 1 75 AF Illuminator AF Mode Grid Line Digital...
Cyber-shot® Handbook (Large File - 10.47 MB)
Page 21
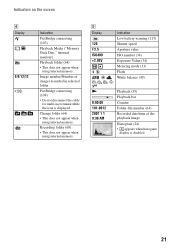
... (35) Playback bar Counter Folder-file number (64) Recorded date/time of images recorded in selected folder PictBridge connecting (104) • Do not disconnect the cable for multi-use terminal while the icon is disabled. 21 Image number/Number of the playback image Histogram (24) • appears when histogram display is...
... (35) Playback bar Counter Folder-file number (64) Recorded date/time of images recorded in selected folder PictBridge connecting (104) • Do not disconnect the cable for multi-use terminal while the icon is disabled. 21 Image number/Number of the playback image Histogram (24) • appears when histogram display is...

Cyber-shot® Handbook (Large File - 10.47 MB)
Page 25
... copy (back up ) data on a "Memory Stick Duo" Prepare a "Memory Stick Duo" with a cable for multi-use terminal, you copy (back up) data without a "Memory Stick Duo" inserted in the camera. • You cannot copy image data on images in the internal memory are recorded using one of... the image size set to [640(Fine)] cannot be performed on a "Memory Stick Duo" to the internal memory. • By connecting the camera and a computer with sufficient capacity, then perform the procedure explained in the internal memory We recommend that you can be recorded using the internal memory....
... copy (back up ) data on a "Memory Stick Duo" Prepare a "Memory Stick Duo" with a cable for multi-use terminal, you copy (back up) data without a "Memory Stick Duo" inserted in the camera. • You cannot copy image data on images in the internal memory are recorded using one of... the image size set to [640(Fine)] cannot be performed on a "Memory Stick Duo" to the internal memory. • By connecting the camera and a computer with sufficient capacity, then perform the procedure explained in the internal memory We recommend that you can be recorded using the internal memory....
Cyber-shot® Handbook (Large File - 10.47 MB)
Page 73
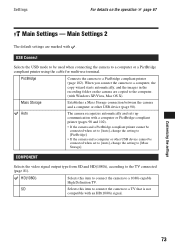
... 67 Main Settings - Customizing the settings 73 SD Selects this item to connect the camera to a computer or a PictBridge compliant printer using the cable for multi-use terminal. PictBridge Connects the camera to the TV connected (page 81). Auto The camera recognizes automatically and sets up communication with a computer or PictBridge compliant printer (pages...
... 67 Main Settings - Customizing the settings 73 SD Selects this item to connect the camera to a computer or a PictBridge compliant printer using the cable for multi-use terminal. PictBridge Connects the camera to the TV connected (page 81). Auto The camera recognizes automatically and sets up communication with a computer or PictBridge compliant printer (pages...

Cyber-shot® Handbook (Large File - 10.47 MB)
Page 81
VIDEO AUDIO 1 To audio/video input jacks Yellow Black (Playback) button Cable for multi-use terminal (supplied) 2 To the multi connector • If your camera and the TV before connecting the camera and the TV. 1 Connect the camera to the TV. Viewing images on the TV screen. The connection varies according... to the type of the cable for multi-use terminal Turn off both your TV has...
VIDEO AUDIO 1 To audio/video input jacks Yellow Black (Playback) button Cable for multi-use terminal (supplied) 2 To the multi connector • If your camera and the TV before connecting the camera and the TV. 1 Connect the camera to the TV. Viewing images on the TV screen. The connection varies according... to the type of the cable for multi-use terminal Turn off both your TV has...

Cyber-shot® Handbook (Large File - 10.47 MB)
Page 83
... a HD TV You can be converted to 16:9 for high definition viewing (page 60). 1 Connect the camera to an HD (High Definition) TV* with the HD Output Adaptor Cable (DSC-T75 only). Viewing images on the TV and switch the input. • For details, see the operating instructions supplied with ...; In [Wide Zoom Display], still images with an aspect of 4:3 or 3:2 can be displayed with an aspect of 16:9 (page 60). • In [Multi Resizing], the aspect can view an image recorded on the camera by connecting the camera to an HD (High Definition) TV with a HD Output Adaptor Cable (DSC-T75 only).
... a HD TV You can be converted to 16:9 for high definition viewing (page 60). 1 Connect the camera to an HD (High Definition) TV* with the HD Output Adaptor Cable (DSC-T75 only). Viewing images on the TV and switch the input. • For details, see the operating instructions supplied with ...; In [Wide Zoom Display], still images with an aspect of 4:3 or 3:2 can be displayed with an aspect of 16:9 (page 60). • In [Multi Resizing], the aspect can view an image recorded on the camera by connecting the camera to an HD (High Definition) TV with a HD Output Adaptor Cable (DSC-T75 only).
Cyber-shot® Handbook (Large File - 10.47 MB)
Page 84
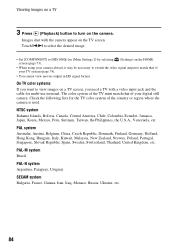
Images shot with a video input jack and the cable for the TV color system of the country or region where the camera is used. Touch / to select the desired image. • Set [COMPONENT] to [HD(1080i)] in [Main Settings 2] by selecting (Settings) on the TV screen. NTSC ..., etc. On TV color systems If you need a TV with the camera appear on the HOME screen (page 73). • When using your camera abroad, it may be necessary to switch the video signal output to match that of your digital still camera. Check the following lists for multi-use terminal. PAL-M system Brazil PAL...
Images shot with a video input jack and the cable for the TV color system of the country or region where the camera is used. Touch / to select the desired image. • Set [COMPONENT] to [HD(1080i)] in [Main Settings 2] by selecting (Settings) on the TV screen. NTSC ..., etc. On TV color systems If you need a TV with the camera appear on the HOME screen (page 73). • When using your camera abroad, it may be necessary to switch the video signal output to match that of your digital still camera. Check the following lists for multi-use terminal. PAL-M system Brazil PAL...

Cyber-shot® Handbook (Large File - 10.47 MB)
Page 90
...a while. * is unnecessary. 2 Insert the sufficiently charged battery pack in the internal memory, this step is displayed on the screen of the camera. Do not operate the computer while the indicator is established for the first time, your computer automatically runs a program to recognize the... pack shuts down too soon. 3 Press (Playback), then turn on the computer. (Playback) button 2 To the multi connector 1 To a USB jack Cable for multi-use terminal "Connecting to [Mass Storage] (page 73). 90 When the indicator changes to , you copy images to your computer using the computer...
...a while. * is unnecessary. 2 Insert the sufficiently charged battery pack in the internal memory, this step is displayed on the screen of the camera. Do not operate the computer while the indicator is established for the first time, your computer automatically runs a program to recognize the... pack shuts down too soon. 3 Press (Playback), then turn on the computer. (Playback) button 2 To the multi connector 1 To a USB jack Cable for multi-use terminal "Connecting to [Mass Storage] (page 73). 90 When the indicator changes to , you copy images to your computer using the computer...
Cyber-shot® Handbook (Large File - 10.47 MB)
Page 92
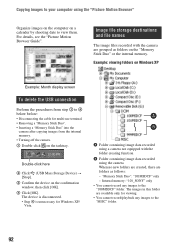
... step 1 to 4 below before: • Disconnecting the cable for multi-use terminal. • Removing a "Memory Stick Duo". • Inserting a "Memory Stick Duo" into the camera after copying images from the internal memory. • Turning off the camera. 1 Double-click on the "Memory Stick Duo" or ...- Image file storage destinations and file names The image files recorded with the folder creating function B Folder containing image data recorded using the camera When no new folders are created, there are available only for Windows XP/ Vista. The device is disconnected. • Step 4 is ...
... step 1 to 4 below before: • Disconnecting the cable for multi-use terminal. • Removing a "Memory Stick Duo". • Inserting a "Memory Stick Duo" into the camera after copying images from the internal memory. • Turning off the camera. 1 Double-click on the "Memory Stick Duo" or ...- Image file storage destinations and file names The image files recorded with the folder creating function B Folder containing image data recorded using the camera When no new folders are created, there are available only for Windows XP/ Vista. The device is disconnected. • Step 4 is ...
Cyber-shot® Handbook (Large File - 10.47 MB)
Page 94
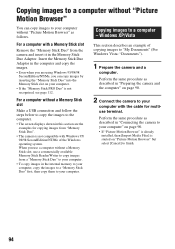
... 95/ 98/98 SecondEdition/NT/Me of copying images to a computer - Copying images to "My Documents" (For Windows Vista: "Documents"). 1 Prepare the camera and a computer. When you use a computer without a Memory Stick slot, use a commercially available Memory Stick Reader/Writer to copy images from a "Memory Stick...the "Memory Stick Duo" into the Memory Stick slot on your computer with the cable for copying images from the camera and insert it in "Preparing the camera and the computer" on page 90. 2 Connect the camera to your computer. • If the "Memory Stick PRO Duo" is not ...
... 95/ 98/98 SecondEdition/NT/Me of copying images to a computer - Copying images to "My Documents" (For Windows Vista: "Documents"). 1 Prepare the camera and a computer. When you use a computer without a Memory Stick slot, use a commercially available Memory Stick Reader/Writer to copy images from a "Memory Stick...the "Memory Stick Duo" into the Memory Stick slot on your computer with the cable for copying images from the camera and insert it in "Preparing the camera and the computer" on page 90. 2 Connect the camera to your computer. • If the "Memory Stick PRO Duo" is not ...
Cyber-shot® Handbook (Large File - 10.47 MB)
Page 98
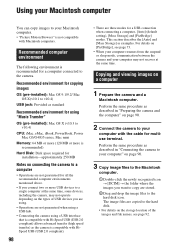
...computers. Recommended environment for copying images OS (pre-installed): Mac OS 9.1/9.2/ Mac OS X(v10.1 to v10.4) USB jack: Provided as the camera is recommended) Hard Disk: Disk space required for installation-approximately 250 MB Notes on page 90. 3 Copy image files to the Macintosh computer.... in "Preparing the camera and the computer" on a computer 1 Prepare the camera and a Macintosh computer. The image files are stored. 2Drag and drop the image files to the hard disk icon. Using your Macintosh computer You can copy images to your computer with the cable for multiuse terminal.
...computers. Recommended environment for copying images OS (pre-installed): Mac OS 9.1/9.2/ Mac OS X(v10.1 to v10.4) USB jack: Provided as the camera is recommended) Hard Disk: Disk space required for installation-approximately 250 MB Notes on page 90. 3 Copy image files to the Macintosh computer.... in "Preparing the camera and the computer" on a computer 1 Prepare the camera and a Macintosh computer. The image files are stored. 2Drag and drop the image files to the hard disk icon. Using your Macintosh computer You can copy images to your computer with the cable for multiuse terminal.

Cyber-shot® Handbook (Large File - 10.47 MB)
Page 99
... (SONYPICTUTIL). 3 Double-click the [MusicTransfer.pkg] file in the folder containing the copied files to open that the camera is disconnected from the computer. • Disconnecting the cable for multi-use terminal. • Removing a "Memory Stick Duo". • Inserting a "Memory Stick Duo" into the... using "Music Transfer" You can transfer with "Music Transfer" are preset at the Sony Customer Support Website. Using your computer Technical Support Additional information on page 97. http://www.sony.net/ 99 Using your Macintosh computer 4 View images on the hard disk drive of...
... (SONYPICTUTIL). 3 Double-click the [MusicTransfer.pkg] file in the folder containing the copied files to open that the camera is disconnected from the computer. • Disconnecting the cable for multi-use terminal. • Removing a "Memory Stick Duo". • Inserting a "Memory Stick Duo" into the... using "Music Transfer" You can transfer with "Music Transfer" are preset at the Sony Customer Support Website. Using your computer Technical Support Additional information on page 97. http://www.sony.net/ 99 Using your Macintosh computer 4 View images on the hard disk drive of...
Cyber-shot® Handbook (Large File - 10.47 MB)
Page 102
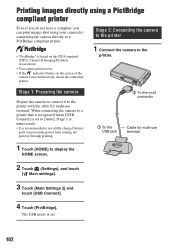
... connect it to the printer with the cable for multi-use terminal. Printing images directly using a PictBridge compliant printer Even if you do not have a computer, you can print images shot using your camera by connecting the camera directly to a PictBridge compliant printer. • "PictBridge" is set . 102 The USB mode is set to...
... connect it to the printer with the cable for multi-use terminal. Printing images directly using a PictBridge compliant printer Even if you do not have a computer, you can print images shot using your camera by connecting the camera directly to a PictBridge compliant printer. • "PictBridge" is set . 102 The USB mode is set to...

Cyber-shot® Handbook (Large File - 10.47 MB)
Page 104
indicator To print other images Select [Multiple Images], then perform the process again from the camera. 104 The image is printed. • Do not disconnect the cable for multi-use terminal while the (PictBridge Connecting) indicator appears on the printer. 2 Touch [OK]. Stage 5: Completing the printing Make sure the screen has returned ... will be provided depending on the screen. Printing images directly using a PictBridge compliant printer [Date] Select [Day & Time] or [Date] to stage 2, and disconnect the cable for multi-use terminal from stage 3.
indicator To print other images Select [Multiple Images], then perform the process again from the camera. 104 The image is printed. • Do not disconnect the cable for multi-use terminal while the (PictBridge Connecting) indicator appears on the printer. 2 Touch [OK]. Stage 5: Completing the printing Make sure the screen has returned ... will be provided depending on the screen. Printing images directly using a PictBridge compliant printer [Date] Select [Day & Time] or [Date] to stage 2, and disconnect the cable for multi-use terminal from stage 3.


