Instruction Manual
Page 3
... adjustment of time, unplug it is exposed to direct sunlight. [ Lightning For added protection for this indicates a need for service. [ Servicing Do not attempt to service the set may expose you to rain or water. - Use only a cart, stand, tripod, bracket, or table recommended by the manufacturer. [ Ventilation The slots and openings in the cabinet are specified in the operating instructions. Never place the set...
... adjustment of time, unplug it is exposed to direct sunlight. [ Lightning For added protection for this indicates a need for service. [ Servicing Do not attempt to service the set may expose you to rain or water. - Use only a cart, stand, tripod, bracket, or table recommended by the manufacturer. [ Ventilation The slots and openings in the cabinet are specified in the operating instructions. Never place the set...
Instruction Manual
Page 5
... found compliant with the limits set out in the EMC Directive for using connection cables shorter than 3 meters (9.8 feet). [ Attention The electromagnetic fields at the specific frequencies may influence the picture and sound of this unit. [ Notice If static electricity or electromagnetism causes data transfer to which the receiver is connected. - Instead it shall be used in a particular installation. By ensuring this product...
... found compliant with the limits set out in the EMC Directive for using connection cables shorter than 3 meters (9.8 feet). [ Attention The electromagnetic fields at the specific frequencies may influence the picture and sound of this unit. [ Notice If static electricity or electromagnetism causes data transfer to which the receiver is connected. - Instead it shall be used in a particular installation. By ensuring this product...
Instruction Manual
Page 7
... 11 3 Turning the camera on the screen 28 Battery life and memory capacity 32 Battery life and number of images that you can record/view 32 Number of still images and recording time of contents IMPORTANT SAFEGUARDS 2 Read this first 4 Notes on using your computer 26 Supported Operating Systems for USB connection and application software "Picture Motion Browser" (supplied 26 Viewing "Cyber-shot Handbook 27 Indicators on /setting the clock 13 Shooting images easily (Auto Adjustment mode 15 Image size/Self-timer/Shooting mode/Flash/Macro/Display 16 Viewing/deleting images 19...
... 11 3 Turning the camera on the screen 28 Battery life and memory capacity 32 Battery life and number of images that you can record/view 32 Number of still images and recording time of contents IMPORTANT SAFEGUARDS 2 Read this first 4 Notes on using your computer 26 Supported Operating Systems for USB connection and application software "Picture Motion Browser" (supplied 26 Viewing "Cyber-shot Handbook 27 Indicators on /setting the clock 13 Shooting images easily (Auto Adjustment mode 15 Image size/Self-timer/Shooting mode/Flash/Macro/Display 16 Viewing/deleting images 19...
Instruction Manual
Page 8
... occurs, remove it before using extremely high-precision technology so over 99.99% of the camera may cause malfunctions which in some tiny black points and/or bright points (white, red, blue or green in color) that constantly appear on recording/playback • Before you start recording, make a trial recording to make it wet, immediately wipe off the screen with a soft cloth. Always protect your data by JEITA...
... occurs, remove it before using extremely high-precision technology so over 99.99% of the camera may cause malfunctions which in some tiny black points and/or bright points (white, red, blue or green in color) that constantly appear on recording/playback • Before you start recording, make a trial recording to make it wet, immediately wipe off the screen with a soft cloth. Always protect your data by JEITA...
Instruction Manual
Page 12
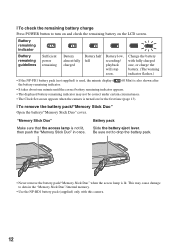
... remaining battery charge Press POWER button to turn on and check the remaining battery on for the first time (page 13). [ To remove the battery pack/"Memory Stick Duo" Open the battery/"Memory Stick Duo" cover. This may not be correct under certain circumstances. • The Clock Set screen appears when the camera is lit. Slide the battery eject lever. Change the battery with this camera. 12 "Memory Stick Duo" Battery pack Make...
... remaining battery charge Press POWER button to turn on and check the remaining battery on for the first time (page 13). [ To remove the battery pack/"Memory Stick Duo" Open the battery/"Memory Stick Duo" cover. This may not be correct under certain circumstances. • The Clock Set screen appears when the camera is lit. Slide the battery eject lever. Change the battery with this camera. 12 "Memory Stick Duo" Battery pack Make...

Instruction Manual
Page 20
... screen. (View Images) on TV screen Connect the camera to deselect the mark. 3 Touch [t], and then touch [OK]. • To delete all the images in a folder, select (All In This Folder) from (Delete) in a full-screen display. • Movies cannot be shown in the menu screen, then touch [OK]. [ To play back a series of the image. To cancel the deletion, touch the image again to the TV with the image size set the number...
... screen. (View Images) on TV screen Connect the camera to deselect the mark. 3 Touch [t], and then touch [OK]. • To delete all the images in a folder, select (All In This Folder) from (Delete) in a full-screen display. • Movies cannot be shown in the menu screen, then touch [OK]. [ To play back a series of the image. To cancel the deletion, touch the image again to the TV with the image size set the number...

Instruction Manual
Page 25
...-blur mode. Changes the image size according to reduce the red-eye phenomenon. Displays still images in 16:9. Flash Level Adjusts the amount of images. Paints on the screen. Setup Selects the shooting settings. Selects the folder for shooting REC Mode Selects the continuous shooting method. EV Adjusts Exposure. Menu for viewing (Retouch) (Paint) (Multi Resizing) (Wide Zoom Display) (Slideshow) (Delete) (Protect) (Print) (Rotate) (Select Folder) (Volume Settings) Retouches still images. Adds a Print order mark on the mode setting (shooting/viewing), and...
...-blur mode. Changes the image size according to reduce the red-eye phenomenon. Displays still images in 16:9. Flash Level Adjusts the amount of images. Paints on the screen. Setup Selects the shooting settings. Selects the folder for shooting REC Mode Selects the continuous shooting method. EV Adjusts Exposure. Menu for viewing (Retouch) (Paint) (Multi Resizing) (Wide Zoom Display) (Slideshow) (Delete) (Protect) (Print) (Rotate) (Select Folder) (Volume Settings) Retouches still images. Adds a Print order mark on the mode setting (shooting/viewing), and...

Instruction Manual
Page 30
...Check mark Print order (DPOF) mark Protect Playback zoom Self-diagnosis display 30 Fast forward/Rewind Changes the screen display. Changes to the previous screen. Screen indicators Screen indicators 3 to the single image screen from the index screen. Adjusts the volume. Stop Playback Playback zoom Turns v/V/b/B on/off. Screen operation You can change the settings by touching the following: 1, 2. Selects the playback folder. A Display HOME Indication Displays the HOME screen. Deletes the image. [ When playing back still images [ When playing back movies B Display BACK...
...Check mark Print order (DPOF) mark Protect Playback zoom Self-diagnosis display 30 Fast forward/Rewind Changes the screen display. Changes to the previous screen. Screen indicators Screen indicators 3 to the single image screen from the index screen. Adjusts the volume. Stop Playback Playback zoom Turns v/V/b/B on/off. Screen operation You can change the settings by touching the following: 1, 2. Selects the playback folder. A Display HOME Indication Displays the HOME screen. Deletes the image. [ When playing back still images [ When playing back movies B Display BACK...
Instruction Manual
Page 35
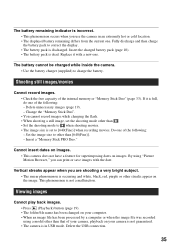
... and white, black, red, purple or other than [640(Fine)]. - Delete the USB connection. 35 The battery remaining indicator is incorrect. • This phenomenon occurs when you use the camera in USB mode. Replace it is full, do one . Do one . Viewing images Cannot play back images. • Press (Playback) button (page 19). • The folder/file name has been changed on the image. Fully discharge and then charge the battery pack to correct the display...
... and white, black, red, purple or other than [640(Fine)]. - Delete the USB connection. 35 The battery remaining indicator is incorrect. • This phenomenon occurs when you use the camera in USB mode. Replace it is full, do one . Do one . Viewing images Cannot play back images. • Press (Playback) button (page 19). • The folder/file name has been changed on the image. Fully discharge and then charge the battery pack to correct the display...
Cyber-shot® Handbook (Large File - 10.47 MB)
Page 1
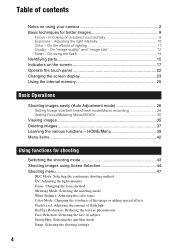
Digital Still Camera Cyber-shot Handbook DSC-T70/T75/T200 Before operating the unit, please read this Handbook thoroughly together with the "Instruction Manual" and the "Cyber-shot Step-up Guide", and retain them for viewing Customizing the settings Viewing images on a TV Using your computer Printing still images Troubleshooting Others Index 3-219-480-11(1) GB Table of contents Basic Operations Using functions for shooting Using functions for future reference. © 2007 Sony Corporation VCLICK!
Digital Still Camera Cyber-shot Handbook DSC-T70/T75/T200 Before operating the unit, please read this Handbook thoroughly together with the "Instruction Manual" and the "Cyber-shot Step-up Guide", and retain them for viewing Customizing the settings Viewing images on a TV Using your computer Printing still images Troubleshooting Others Index 3-219-480-11(1) GB Table of contents Basic Operations Using functions for shooting Using functions for future reference. © 2007 Sony Corporation VCLICK!
Cyber-shot® Handbook (Large File - 10.47 MB)
Page 4
...camera 2 Basic techniques for shooting Switching the shooting mode 43 Shooting images using the flash 14 Identifying parts 15 Indicators on the screen 17 Operate the touch panel 22 Changing the screen display 23 Using the internal memory 25 Basic Operations Shooting images easily (Auto Adjustment mode 26 Setting Image size/Self-timer/Flash mode/Macro recording 28 Setting Focus/Metering Mode/ISO/EV 30 Viewing images 35 Deleting images 37 Learning the various functions - Table of contents Notes on a subject successfully 8 Exposure - On "image quality" and "image size 12 Flash...
...camera 2 Basic techniques for shooting Switching the shooting mode 43 Shooting images using the flash 14 Identifying parts 15 Indicators on the screen 17 Operate the touch panel 22 Changing the screen display 23 Using the internal memory 25 Basic Operations Shooting images easily (Auto Adjustment mode 26 Setting Image size/Self-timer/Flash mode/Macro recording 28 Setting Focus/Metering Mode/ISO/EV 30 Viewing images 35 Deleting images 37 Learning the various functions - Table of contents Notes on a subject successfully 8 Exposure - On "image quality" and "image size 12 Flash...
Cyber-shot® Handbook (Large File - 10.47 MB)
Page 40
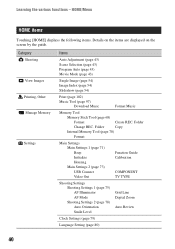
...Folder Copy Internal Memory Tool (page 70) Format Main Settings Main Settings 1 (page 71) Beep Initialize Housing Main Settings 2 (page 73) USB Connect Video Out Function Guide Calibration COMPONENT TV TYPE Shooting Settings Shooting Settings 1 (page 75) AF Illuminator AF Mode Shooting Settings 2 (page 78) Auto Orientation Smile Level Grid Line Digital Zoom Auto Review Clock Settings (page 79) Language Setting (page 80) 40 Category Shooting View Images Printing, Other Manage Memory Settings Items Auto Adjustment (page 43) Scene Selection (page 43) Program Auto (page 43) Movie Mode...
...Folder Copy Internal Memory Tool (page 70) Format Main Settings Main Settings 1 (page 71) Beep Initialize Housing Main Settings 2 (page 73) USB Connect Video Out Function Guide Calibration COMPONENT TV TYPE Shooting Settings Shooting Settings 1 (page 75) AF Illuminator AF Mode Shooting Settings 2 (page 78) Auto Orientation Smile Level Grid Line Digital Zoom Auto Review Clock Settings (page 79) Language Setting (page 80) 40 Category Shooting View Images Printing, Other Manage Memory Settings Items Auto Adjustment (page 43) Scene Selection (page 43) Program Auto (page 43) Movie Mode...

Cyber-shot® Handbook (Large File - 10.47 MB)
Page 55
Using functions for a [Active] slide show. Folder Plays back all the images in a "Memory Stick Duo" in the selected folder. A stylish slide show proceeding at a predetermined interval. • Only still images are marked with . Music The preset-Music differs depending on the volume control screen. Music4 The default setting for viewing Playing back images from the HOME screen To change the setup You can change the slide show . The following items can...
Using functions for a [Active] slide show. Folder Plays back all the images in a "Memory Stick Duo" in the selected folder. A stylish slide show proceeding at a predetermined interval. • Only still images are marked with . Music The preset-Music differs depending on the volume control screen. Music4 The default setting for viewing Playing back images from the HOME screen To change the setup You can change the slide show . The following items can...

Cyber-shot® Handbook (Large File - 10.47 MB)
Page 89
... Windows 2000, [Programs]) t [Sony Picture Utility] t [Help] t [Picture Motion Browser Guide]. On the "Picture Motion Browser" (supplied) You can use still images and movies from the camera more . • Still images can be printed or saved with the camera and display them . • Retouch (Red Eye Correction, etc.), print, and send still images as software updates. "Picture Motion Browser" overview With the "Picture Motion Browser" you of the Information tool appears on the desktop. Or, from the Start menu...
... Windows 2000, [Programs]) t [Sony Picture Utility] t [Help] t [Picture Motion Browser Guide]. On the "Picture Motion Browser" (supplied) You can use still images and movies from the camera more . • Still images can be printed or saved with the camera and display them . • Retouch (Red Eye Correction, etc.), print, and send still images as software updates. "Picture Motion Browser" overview With the "Picture Motion Browser" you of the Information tool appears on the desktop. Or, from the Start menu...
Cyber-shot® Handbook (Large File - 10.47 MB)
Page 96
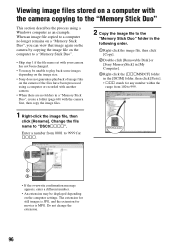
.... 1 Right-click the image file, then click [Rename]. The extension for still images is JPG, and the extension for movies is MPG. Change the file name to "DSC0ssss". Viewing image files stored on a computer with the camera first, then copy the image files. 2 Copy the image file to the "Memory Stick Duo" folder in the following order. 1Right-click the image file, then click [Copy]. 2Double-click [Removable Disk] or [Sony MemoryStick] in [My Computer...
.... 1 Right-click the image file, then click [Rename]. The extension for still images is JPG, and the extension for movies is MPG. Change the file name to "DSC0ssss". Viewing image files stored on a computer with the camera first, then copy the image files. 2 Copy the image file to the "Memory Stick Duo" folder in the following order. 1Right-click the image file, then click [Copy]. 2Double-click [Removable Disk] or [Sony MemoryStick] in [My Computer...

Cyber-shot® Handbook (Large File - 10.47 MB)
Page 99
... hard disk icon t the desired image file in [Mac] folder. Adding/Changing Music using "Music Transfer"" on page 97. The installation of your computer • Music on CDs • Preset-music saved on this product and answers to frequently asked questions can change the Music files that the camera is disconnected from the internal memory. • Turning off the camera. http://www.sony.net/ 99 Using your Macintosh computer 4 View images on...
... hard disk icon t the desired image file in [Mac] folder. Adding/Changing Music using "Music Transfer"" on page 97. The installation of your computer • Music on CDs • Preset-music saved on this product and answers to frequently asked questions can change the Music files that the camera is disconnected from the internal memory. • Turning off the camera. http://www.sony.net/ 99 Using your Macintosh computer 4 View images on...

Cyber-shot® Handbook (Large File - 10.47 MB)
Page 116
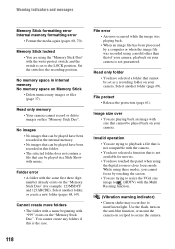
... printer. The Clock Set screen appears when you use it for multi-use terminal and reconnect it whenever you change the recording media, the file number cannot be reset in the camera. Turn off the camera and leave it . You want to the camera. • The print setting of the camera differs from that of either the camera (page 103) or the printer. Change the setting of the printer. It may take some time...
... printer. The Clock Set screen appears when you use it for multi-use terminal and reconnect it whenever you change the recording media, the file number cannot be reset in the camera. Turn off the camera and leave it . You want to the camera. • The print setting of the camera differs from that of either the camera (page 103) or the printer. Change the setting of the printer. It may take some time...
Cyber-shot® Handbook (Large File - 10.47 MB)
Page 118
... digit number already exists on Memory Stick • Delete unnecessary images or files (page 37). Read only folder • You have selected a function that cannot be played have touched the panel when using a model other than that of your camera, playback on your camera. Select another folder, or create a new folder (pages 68, 69). Use the flash, turn on the anti-blur function, or mount the camera on your camera is set as a recording folder...
... digit number already exists on Memory Stick • Delete unnecessary images or files (page 37). Read only folder • You have selected a function that cannot be played have touched the panel when using a model other than that of your camera, playback on your camera. Select another folder, or create a new folder (pages 68, 69). Use the flash, turn on the anti-blur function, or mount the camera on your camera is set as a recording folder...
Marketing Specifications (Red Model)
Page 1
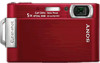
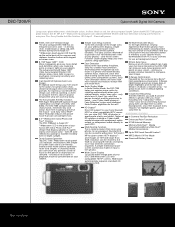
...; Battery Power Carl Zeiss® 5X Optical Zoom Lens Design. 5X Optical zoom brings you view DSC-T200 still photos in the palm of essential camera functions. Touch-Screen Operation The DSC-T200's Widescreen touch-panel LCD replaces small buttons with friends and family via e-mail (internet connection required). HD Output2 Direct HD output2 to your photos for giant-screen HDTV display2 -and images at highlight points, partial color filter to ADDITIONAL FEATURES In-Camera Red-Eye Reduction...
...; Battery Power Carl Zeiss® 5X Optical Zoom Lens Design. 5X Optical zoom brings you view DSC-T200 still photos in the palm of essential camera functions. Touch-Screen Operation The DSC-T200's Widescreen touch-panel LCD replaces small buttons with friends and family via e-mail (internet connection required). HD Output2 Direct HD output2 to your photos for giant-screen HDTV display2 -and images at highlight points, partial color filter to ADDITIONAL FEATURES In-Camera Red-Eye Reduction...

Marketing Specifications (Red Model)
Page 2
... at 16.6fps), Presentation Mode (320 x 240 at 8.3fps). DSC-T200/R Cyber-shot® Digital Still Camera Specifications Operating Conditions General Megapixel: 8.1 MP Imaging Device: 1/2.5" Super HAD™ CCD Recording Media: 31MB internal Flash Memory, optional Memory Stick™ DUO Media, optional Memory Stick DUO PRO™ Media Flash Effective Range: ISO Auto: 4" to 12' (0.1-3.7m)(W), ISO 3200: 4" to 24' (0.1-7.4m)(T) Flash Mode(s): Auto, Forced On, Forced Off, Slow Synch Optics/Lens Focal Length: 5.8 - 29mm 35mm...
... at 16.6fps), Presentation Mode (320 x 240 at 8.3fps). DSC-T200/R Cyber-shot® Digital Still Camera Specifications Operating Conditions General Megapixel: 8.1 MP Imaging Device: 1/2.5" Super HAD™ CCD Recording Media: 31MB internal Flash Memory, optional Memory Stick™ DUO Media, optional Memory Stick DUO PRO™ Media Flash Effective Range: ISO Auto: 4" to 12' (0.1-3.7m)(W), ISO 3200: 4" to 24' (0.1-7.4m)(T) Flash Mode(s): Auto, Forced On, Forced Off, Slow Synch Optics/Lens Focal Length: 5.8 - 29mm 35mm...


