

Instruction Manual
Page 1
Operating Instructions Before operating the unit, please read "Cybershot Handbook" (PDF) and "Cyber-shot Step-up Guide" on the CD-ROM (supplied) using a computer. Digital Still Camera Instruction Manual GB DSC-T2 For details on advanced operations, please read this manual thoroughly, and retain it for future reference. © 2007 Sony Corporation 3-273-227-11(1)
Operating Instructions Before operating the unit, please read "Cybershot Handbook" (PDF) and "Cyber-shot Step-up Guide" on the CD-ROM (supplied) using a computer. Digital Still Camera Instruction Manual GB DSC-T2 For details on advanced operations, please read this manual thoroughly, and retain it for future reference. © 2007 Sony Corporation 3-273-227-11(1)
Instruction Manual
Page 7
...16 Image size/Self-timer/Shooting mode/Flash/Macro/Display 17 Viewing/deleting images 19 Selecting how to your computer 28 Connecting the camera to play back images 20 Using the SCRAPBOOK 22 Learning the various functions - Table of contents IMPORTANT SAFEGUARDS 2 Read this first... 4 Notes on using the camera 8 Getting started 9 Checking the accessories supplied 9 1 Preparing the battery pack 11 2 Inserting the battery pack 12 3 Turning the camera on the screen 31 Battery life and memory capacity 34 Battery life and ...
...16 Image size/Self-timer/Shooting mode/Flash/Macro/Display 17 Viewing/deleting images 19 Selecting how to your computer 28 Connecting the camera to play back images 20 Using the SCRAPBOOK 22 Learning the various functions - Table of contents IMPORTANT SAFEGUARDS 2 Read this first... 4 Notes on using the camera 8 Getting started 9 Checking the accessories supplied 9 1 Preparing the battery pack 11 2 Inserting the battery pack 12 3 Turning the camera on the screen 31 Battery life and memory capacity 34 Battery life and ...

Instruction Manual
Page 8
...images. However, some cases, the camera cannot be copyrighted. These dots are operational for Camera File system) universal standard established by JEITA (Japan Electronics and Information Technology Industries Association). • Sony does not guarantee that the camera will play back images recorded or edited... with other equipment, or that other equipment will play back images. • Using the camera in insufficient light emission. [ Notes on ...
...images. However, some cases, the camera cannot be copyrighted. These dots are operational for Camera File system) universal standard established by JEITA (Japan Electronics and Information Technology Industries Association). • Sony does not guarantee that the camera will play back images recorded or edited... with other equipment, or that other equipment will play back images. • Using the camera in insufficient light emission. [ Notes on ...
Instruction Manual
Page 9
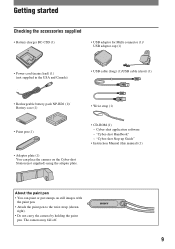
...You can paint or put stamps on the Cyber-shot Station (not supplied) using the adaptor plate. • CD-ROM (1) - Cyber-shot application software - The camera may fall off. 9 "Cyber-shot Handbook" - "Cyber-shot Step-up Guide" • Instruction Manual (this manual) (1) About the paint pen • ...You can place the camera on still images with the paint pen. • Attach the paint pen to the wrist strap (shown right). • Do not carry the camera by holding the paint pen.
...You can paint or put stamps on the Cyber-shot Station (not supplied) using the adaptor plate. • CD-ROM (1) - Cyber-shot application software - The camera may fall off. 9 "Cyber-shot Handbook" - "Cyber-shot Step-up Guide" • Instruction Manual (this manual) (1) About the paint pen • ...You can place the camera on still images with the paint pen. • Attach the paint pen to the wrist strap (shown right). • Do not carry the camera by holding the paint pen.
Instruction Manual
Page 10
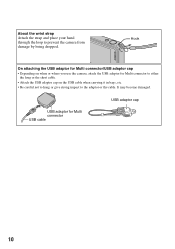
It may become damaged. USB adaptor for Multi connector to either the long or the short cable. • Attach the USB adaptor cap on the USB cable when carrying it in bags, etc. • Be careful not to hang or give strong impact to prevent the camera from damage by being dropped. About the wrist strap Attach the strap and place your hand through the loop to the adaptor or the cable. Hook On attaching the USB adaptor for Multi connector/USB adaptor cap • Depending on when or where you use the camera, attach the USB adaptor for Multi connector USB cable USB adaptor cap 10
It may become damaged. USB adaptor for Multi connector to either the long or the short cable. • Attach the USB adaptor cap on the USB cable when carrying it in bags, etc. • Be careful not to hang or give strong impact to prevent the camera from damage by being dropped. About the wrist strap Attach the strap and place your hand through the loop to the adaptor or the cable. Hook On attaching the USB adaptor for Multi connector/USB adaptor cap • Depending on when or where you use the camera, attach the USB adaptor for Multi connector USB cable USB adaptor cap 10
Instruction Manual
Page 12
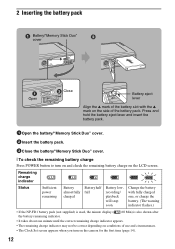
... on the side of use and circumstances. • The Clock Set screen appears when you turn on and check the remaining battery charge on the camera for the first time (page 14). 12 2 Inserting the battery pack Battery/"Memory Stick Duo" cover Open Close Battery eject lever Align the v mark of...
... on the side of use and circumstances. • The Clock Set screen appears when you turn on and check the remaining battery charge on the camera for the first time (page 14). 12 2 Inserting the battery pack Battery/"Memory Stick Duo" cover Open Close Battery eject lever Align the v mark of...

Instruction Manual
Page 13
Be sure not to insert a "Memory Stick Duo". This may cause damage to "Memory Stick Duo". 13 Insert the "Memory Stick Duo" with this camera. [ To insert a "Memory Stick Duo" (not supplied) Open the battery/"Memory Stick Duo" cover to drop the battery pack. • Never remove the battery pack ...) the images in the internal memory to data in the "Memory Stick Duo"/internal memory. • Even if "Memory Stick Duo" is inserted in the camera, images will not be saved in "Memory Stick Duo" until the capacity of the internal memory is lit. Slide the battery eject lever. Access lamp...
Be sure not to insert a "Memory Stick Duo". This may cause damage to "Memory Stick Duo". 13 Insert the "Memory Stick Duo" with this camera. [ To insert a "Memory Stick Duo" (not supplied) Open the battery/"Memory Stick Duo" cover to drop the battery pack. • Never remove the battery pack ...) the images in the internal memory to data in the "Memory Stick Duo"/internal memory. • Even if "Memory Stick Duo" is inserted in the camera, images will not be saved in "Memory Stick Duo" until the capacity of the internal memory is lit. Slide the battery eject lever. Access lamp...

Instruction Manual
Page 14
...numeric value by lightly touching the buttons or icons on the screen with your finger off the screen will momentarily disappear. 3 Turning the camera on/setting the clock POWER button Touch panel Lens Lens cover 1Press the POWER button or slide the lens cover downward. 2Set the clock...date display format, then touch . 2 Touch each item, then set is touched while shooting, the icons will make the icons reappear. 14 To hide this camera by touching v/V. 3 Touch [OK]. Taking your finger. • When the item you want to the previous screen by touching [BACK]. • Touching [?]...
...numeric value by lightly touching the buttons or icons on the screen with your finger off the screen will momentarily disappear. 3 Turning the camera on/setting the clock POWER button Touch panel Lens Lens cover 1Press the POWER button or slide the lens cover downward. 2Set the clock...date display format, then touch . 2 Touch each item, then set is touched while shooting, the icons will make the icons reappear. 14 To hide this camera by touching v/V. 3 Touch [OK]. Taking your finger. • When the item you want to the previous screen by touching [BACK]. • Touching [?]...

Instruction Manual
Page 15
... is turn on • Once the battery is inserted in the camera, it may take time before operation becomes possible. • If the camera is running on battery power and you do not operate the camera for about three minutes, the camera turns off automatically to prevent wearing down the battery pack (Auto power... upper edge of the lens cover as shown below. 2 Lightly press weight on the lens cover to slide it down. 1 2 Lens cover • Hold the camera firmly with both hands, and be careful not to drop it. 15
... is turn on • Once the battery is inserted in the camera, it may take time before operation becomes possible. • If the camera is running on battery power and you do not operate the camera for about three minutes, the camera turns off automatically to prevent wearing down the battery pack (Auto power... upper edge of the lens cover as shown below. 2 Lightly press weight on the lens cover to slide it down. 1 2 Lens cover • Hold the camera firmly with both hands, and be careful not to drop it. 15

Instruction Manual
Page 16
... button Flash Self-timer lamp/ Smile shutter lamp Lens cover Microphone Lens T/W (Zoom) button Touch panel Tripod receptacle (bottom) 1Open the lens cover. 2Hold the camera steady, keeping your arm at your side. When shooting still images: 1 Press and hold the shutter button halfway down . Touch to cancel this function. 3Shoot...
... button Flash Self-timer lamp/ Smile shutter lamp Lens cover Microphone Lens T/W (Zoom) button Touch panel Tripod receptacle (bottom) 1Open the lens cover. 2Hold the camera steady, keeping your arm at your side. When shooting still images: 1 Press and hold the shutter button halfway down . Touch to cancel this function. 3Shoot...

Instruction Manual
Page 17
.... 17 Scene Selection High Sensitivity: Allows you to record movies with the setting adjusted automatically. Smile Shutter: When the shutter button is pressed and the camera detects a smile, the shutter is released automatically to shoot with the exposure adjusted automatically (both the shutter speed and the aperture value). Touch the desired...
.... 17 Scene Selection High Sensitivity: Allows you to record movies with the setting adjusted automatically. Smile Shutter: When the shutter button is pressed and the camera detects a smile, the shutter is released automatically to shoot with the exposure adjusted automatically (both the shutter speed and the aperture value). Touch the desired...
Instruction Manual
Page 19
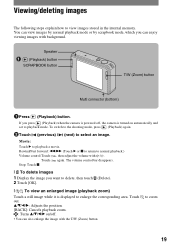
...:Touch , then adjust the volume with the T/W (Zoom) button. Stop: Touch x. [ To delete images 1 Display the image you press (Playback) when the camera is powered off . • You can enjoy viewing images with background. Touch out. If you want to delete, then touch 2 Touch [OK]. (Delete). [... To view an enlarged image (playback zoom) Touch a still image while it is turned on /off , the camera is displayed to playback mode. To switch to the shooting mode, press (Playback) again. 2Touch (previous) / (next) to zoom 19 The volume control bar...
...:Touch , then adjust the volume with the T/W (Zoom) button. Stop: Touch x. [ To delete images 1 Display the image you press (Playback) when the camera is powered off . • You can enjoy viewing images with background. Touch out. If you want to delete, then touch 2 Touch [OK]. (Delete). [... To view an enlarged image (playback zoom) Touch a still image while it is turned on /off , the camera is displayed to playback mode. To switch to the shooting mode, press (Playback) again. 2Touch (previous) / (next) to zoom 19 The volume control bar...
Instruction Manual
Page 20
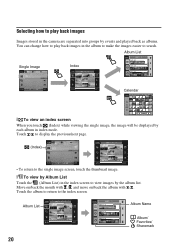
... how to play back images in the album to make the images easier to search. Selecting how to play back images Images stored in the camera are separated into groups by Album List Touch the (Album List) in index mode.
... how to play back images in the album to make the images easier to search. Selecting how to play back images Images stored in the camera are separated into groups by Album List Touch the (Album List) in index mode.
Instruction Manual
Page 21
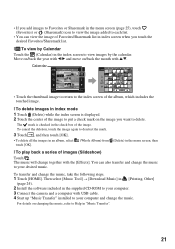
.... Then select [Music Tool] t [Download Music] in [Printing, Other] (page 24). 2 Install the software included in the supplied CD-ROM to your computer. 3 Connect the camera and a computer with v/V. The mark is displayed. 2 Touch the center of images (Slideshow) Touch . The music will change the music, take the following steps. 1 Touch...
.... Then select [Music Tool] t [Download Music] in [Printing, Other] (page 24). 2 Install the software included in the supplied CD-ROM to your computer. 3 Connect the camera and a computer with v/V. The mark is displayed. 2 Touch the center of images (Slideshow) Touch . The music will change the music, take the following steps. 1 Touch...
Instruction Manual
Page 22
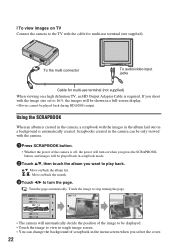
.... : Turn the page automatically. Touch the image to stop turning the page. • The camera will automatically decide the position of the camera is off, the power will be only viewed with the camera. 1Press SCRAPBOOK button. • Whether the power of the image to be played back during HD... a background is automatically created. Using the SCRAPBOOK When an album is created in the camera, a scrapbook with the images in the menu screen when you select the cover. 22 Scrapbooks created in the camera can change the background of scrapbook in the album laid out on a high definition TV...
.... : Turn the page automatically. Touch the image to stop turning the page. • The camera will automatically decide the position of the camera is off, the power will be only viewed with the camera. 1Press SCRAPBOOK button. • Whether the power of the image to be played back during HD... a background is automatically created. Using the SCRAPBOOK When an album is created in the camera, a scrapbook with the images in the menu screen when you select the cover. 22 Scrapbooks created in the camera can change the background of scrapbook in the album laid out on a high definition TV...
Instruction Manual
Page 23
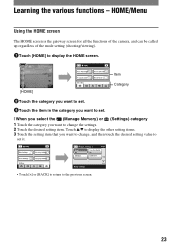
... return to display the HOME screen. HOME/Menu Using the HOME screen The HOME screen is the gateway screen for all the functions of the camera, and can be called up regardless of the mode setting (shooting/viewing). 1Touch [HOME] to the previous screen. 23 Learning the various functions - Touch v/V to...
... return to display the HOME screen. HOME/Menu Using the HOME screen The HOME screen is the gateway screen for all the functions of the camera, and can be called up regardless of the mode setting (shooting/viewing). 1Touch [HOME] to the previous screen. 23 Learning the various functions - Touch v/V to...
Instruction Manual
Page 28
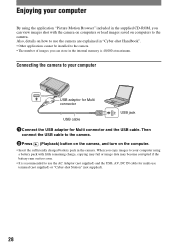
... connector USB cable USB jack 1Connect the USB adaptor for multi-use the camera are explained in the camera. Connecting the camera to the camera. Enjoying your computer By using a battery pack with the camera on computers or load images saved on computers to your computer using the ...on the computer. • Insert the sufficiently charged battery pack in "Cyber-shot Handbook". • Other applications cannot be installed to the camera. • The number of images you can view images shot with little remaining charge, copying may fail or image data may become corrupted...
... connector USB cable USB jack 1Connect the USB adaptor for multi-use the camera are explained in the camera. Connecting the camera to the camera. Enjoying your computer By using a battery pack with the camera on computers or load images saved on computers to your computer using the ...on the computer. • Insert the sufficiently charged battery pack in "Cyber-shot Handbook". • Other applications cannot be installed to the camera. • The number of images you can view images shot with little remaining charge, copying may fail or image data may become corrupted...

Instruction Manual
Page 29
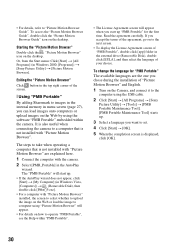
...the screen. Enjoying the supplied software [ Recommended environment for copying "Cyber-shot Handbook" appears. 2 Follow the on-screen instructions to use the camera. ROM (supplied) into the CD-ROM drive. The number of your computer, and insert the CD- Viewing "Cyber-shot Handbook" "Cyber-... Browser" 1 Place the supplied CD-ROM in factory setting. • "Picture Motion Browser" and "PMB Portable" are not compatible with the camera more efficiently. When you to install the software. 29 click the shortcut created on the operating environment, refer to "Cyber-shot Handbook" or ...
...the screen. Enjoying the supplied software [ Recommended environment for copying "Cyber-shot Handbook" appears. 2 Follow the on-screen instructions to use the camera. ROM (supplied) into the CD-ROM drive. The number of your computer, and insert the CD- Viewing "Cyber-shot Handbook" "Cyber-... Browser" 1 Place the supplied CD-ROM in factory setting. • "Picture Motion Browser" and "PMB Portable" are not compatible with the camera more efficiently. When you to install the software. 29 click the shortcut created on the operating environment, refer to "Cyber-shot Handbook" or ...
Instruction Manual
Page 30
... screen (page 27), you can load images onto computers or upload images on the Web by using the USB cable. 2 Click [Start] t [All Programs] t [Sony Picture Utility] t [Tools] t [PMB Portable Maintenance Tool]. [PMB Portable Maintenance Tool] starts up. 3 Select a language you start up "PMB Portable" for "PMB... next screen. • To display the License Agreement screen of your choice. The steps to operate "PMB Portable", see the Help within the camera. To change the language for the first time. The "PMB Portable" will appear when you want to "Picture Motion Browser Guide". Or, from...
... screen (page 27), you can load images onto computers or upload images on the Web by using the USB cable. 2 Click [Start] t [All Programs] t [Sony Picture Utility] t [Tools] t [PMB Portable Maintenance Tool]. [PMB Portable Maintenance Tool] starts up. 3 Select a language you start up "PMB Portable" for "PMB... next screen. • To display the License Agreement screen of your choice. The steps to operate "PMB Portable", see the Help within the camera. To change the language for the first time. The "PMB Portable" will appear when you want to "Picture Motion Browser Guide". Or, from...
Instruction Manual
Page 34
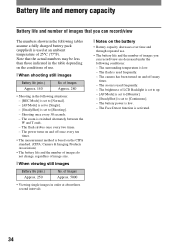
... over time and through repeated use . [ When shooting still images Battery life (min.) Approx. 140 No. The zoom is low. - The camera has been turned on the CIPA standard. (CIPA: Camera & Imaging Products Association) • The battery life and the number of images do not change, regardless of image size. [ When viewing...
... over time and through repeated use . [ When shooting still images Battery life (min.) Approx. 140 No. The zoom is low. - The camera has been turned on the CIPA standard. (CIPA: Camera & Imaging Products Association) • The battery life and the number of images do not change, regardless of image size. [ When viewing...


