
Instruction Manual
Page 4
...call : Sony Customer Information Center 1-800-222-SONY (7669) The number below is subject to provide reasonable protection against harmful interference in a residential installation. Operation is for a Class B digital device, ... This device may cause harmful interference to Part 15 of Conformity Trade Name: SONY Model No.: DSC-T2 Responsible Party: Sony Electronics Inc. and Canada [ RECYCLING LITHIUM-ION BATTERIES Lithium-Ion batteries are ... has been tested and found to be determined by turning the equipment off and on, the user is no guarantee that any interference received, ...
...call : Sony Customer Information Center 1-800-222-SONY (7669) The number below is subject to provide reasonable protection against harmful interference in a residential installation. Operation is for a Class B digital device, ... This device may cause harmful interference to Part 15 of Conformity Trade Name: SONY Model No.: DSC-T2 Responsible Party: Sony Electronics Inc. and Canada [ RECYCLING LITHIUM-ION BATTERIES Lithium-Ion batteries are ... has been tested and found to be determined by turning the equipment off and on, the user is no guarantee that any interference received, ...
Instruction Manual
Page 7
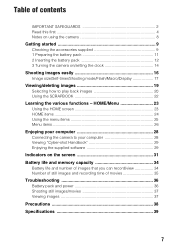
... 28 Connecting the camera to your computer 28 Viewing "Cyber-shot Handbook 29 Enjoying the supplied software 29 Indicators on the screen 31 Battery life and memory capacity 34 Battery life and number of images that you can record/view 34 Number of still images and recording ...time of contents IMPORTANT SAFEGUARDS 2 Read this first 4 Notes on using the camera 8 Getting started 9 Checking the accessories supplied 9 1 Preparing the battery pack 11 2 Inserting the battery pack 12 3 Turning the camera on/setting the clock 14 ...
... 28 Connecting the camera to your computer 28 Viewing "Cyber-shot Handbook 29 Enjoying the supplied software 29 Indicators on the screen 31 Battery life and memory capacity 34 Battery life and number of images that you can record/view 34 Number of still images and recording ...time of contents IMPORTANT SAFEGUARDS 2 Read this first 4 Notes on using the camera 8 Getting started 9 Checking the accessories supplied 9 1 Preparing the battery pack 11 2 Inserting the battery pack 12 3 Turning the camera on/setting the clock 14 ...

Instruction Manual
Page 8
... Leaving liquids on recording/playback • Before you may cause dirt on using the camera [ Internal memory and "Memory Stick Duo" back up Do not turn off the screen with the camera. [ Warning on copyright Television programs, films, videotapes, and other bright light. Otherwise,...system) universal standard established by JEITA (Japan Electronics and Information Technology Industries Association). • Sony does not guarantee that the camera will play back images. • Using the camera in insufficient light emission. [ Notes on the LCD screen. It may be damaged. ...
... Leaving liquids on recording/playback • Before you may cause dirt on using the camera [ Internal memory and "Memory Stick Duo" back up Do not turn off the screen with the camera. [ Warning on copyright Television programs, films, videotapes, and other bright light. Otherwise,...system) universal standard established by JEITA (Japan Electronics and Information Technology Industries Association). • Sony does not guarantee that the camera will play back images. • Using the camera in insufficient light emission. [ Notes on the LCD screen. It may be damaged. ...

Instruction Manual
Page 11
When the CHARGE lamp turns off the power by disconnecting the plug from the wall outlet (wall socket). • When charging is finished, disconnect the power cord (mains lead) from ... can be recorded. • Connect the battery charger to the wall outlet (wall socket). Charging may take longer depending on conditions of use with compatible Sony batteries. 11 The CHARGE lamp lights up, and charging starts. 1 Preparing the battery pack For customers in the USA and Canada Plug For customers in...
When the CHARGE lamp turns off the power by disconnecting the plug from the wall outlet (wall socket). • When charging is finished, disconnect the power cord (mains lead) from ... can be recorded. • Connect the battery charger to the wall outlet (wall socket). Charging may take longer depending on conditions of use with compatible Sony batteries. 11 The CHARGE lamp lights up, and charging starts. 1 Preparing the battery pack For customers in the USA and Canada Plug For customers in...
Instruction Manual
Page 12
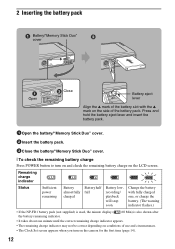
... on the LCD screen. Change the battery with the v mark on the side of use and circumstances. • The Clock Set screen appears when you turn on and check the remaining battery charge on conditions of the battery pack. Remaining charge indicator Status Sufficient power remaining Battery almost fully charged Battery.../"Memory Stick Duo" cover. 2Insert the battery pack. 3Close the battery/"Memory Stick Duo" cover. [ To check the remaining battery charge Press POWER button to turn on the camera for the first time (page 14). 12
... on the LCD screen. Change the battery with the v mark on the side of use and circumstances. • The Clock Set screen appears when you turn on and check the remaining battery charge on conditions of the battery pack. Remaining charge indicator Status Sufficient power remaining Battery almost fully charged Battery.../"Memory Stick Duo" cover. 2Insert the battery pack. 3Close the battery/"Memory Stick Duo" cover. [ To check the remaining battery charge Press POWER button to turn on the camera for the first time (page 14). 12

Instruction Manual
Page 14
... lightly touching the buttons or icons on the screen with your finger off the screen will momentarily disappear. 3 Turning the camera on/setting the clock POWER button Touch panel Lens Lens cover 1Press the POWER button or slide the lens cover downward. 2Set the clock by ...
... lightly touching the buttons or icons on the screen with your finger off the screen will momentarily disappear. 3 Turning the camera on/setting the clock POWER button Touch panel Lens Lens cover 1Press the POWER button or slide the lens cover downward. 2Set the clock by ...

Instruction Manual
Page 15
..., 24). [ Note on when the Power is turn on • Once the battery is inserted in the camera, it may take time before operation becomes possible. • If the camera is running on battery power and you do not operate the camera for about three minutes, the camera turns off automatically to prevent wearing down the...
..., 24). [ Note on when the Power is turn on • Once the battery is inserted in the camera, it may take time before operation becomes possible. • If the camera is running on battery power and you do not operate the camera for about three minutes, the camera turns off automatically to prevent wearing down the...
Instruction Manual
Page 19
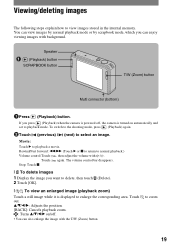
... images 1 Display the image you want to delete, then touch 2 Touch [OK]. (Delete). [ To view an enlarged image (playback zoom) Touch a still image while it is displayed to playback mode. The volume control bar disappears. If you can also enlarge the image with the T/W (Zoom) button. You... can view images by normal playback mode or by scrapbook mode, which you press (Playback) when the camera is turned on automatically and set to enlarge the corresponding area. Movie: Touch B to view images stored in the internal memory. Viewing/deleting images...
... images 1 Display the image you want to delete, then touch 2 Touch [OK]. (Delete). [ To view an enlarged image (playback zoom) Touch a still image while it is displayed to playback mode. The volume control bar disappears. If you can also enlarge the image with the T/W (Zoom) button. You... can view images by normal playback mode or by scrapbook mode, which you press (Playback) when the camera is turned on automatically and set to enlarge the corresponding area. Movie: Touch B to view images stored in the internal memory. Viewing/deleting images...
Instruction Manual
Page 22
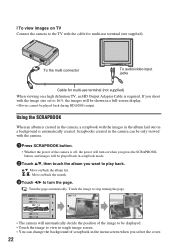
... terminal (not supplied) When viewing on a high definition TV, an HD Output Adaptor Cable is required. Touch the image to stop turning the page. • The camera will automatically decide the position of the image to be displayed. • Touch the image to view in single image screen. •...you select the cover. 22 Scrapbooks created in the camera can change the background of the camera is off, the power will turn the page. : Turn the page automatically. v/V: Move on/back the album list. / : Move on/back the month. 3Touch b/B to turn on when you press the SCRAPBOOK button, and ...
... terminal (not supplied) When viewing on a high definition TV, an HD Output Adaptor Cable is required. Touch the image to stop turning the page. • The camera will automatically decide the position of the image to be displayed. • Touch the image to view in single image screen. •...you select the cover. 22 Scrapbooks created in the camera can change the background of the camera is off, the power will turn the page. : Turn the page automatically. v/V: Move on/back the album list. / : Move on/back the month. 3Touch b/B to turn on when you press the SCRAPBOOK button, and ...
Instruction Manual
Page 25
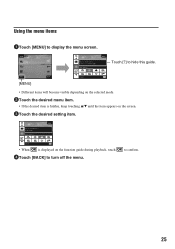
Touch [?] to hide this guide. [MENU] • Different items will become visible depending on the selected mode. 2Touch the desired menu item. • If the desired item is hidden, keep touching v/V until the item appears on the screen. 3Touch the desired setting item. • When is displayed on the function guide during playback, touch 4Touch [BACK] to display the menu screen. Using the menu items 1Touch [MENU] to turn off the menu. to confirm. 25
Touch [?] to hide this guide. [MENU] • Different items will become visible depending on the selected mode. 2Touch the desired menu item. • If the desired item is hidden, keep touching v/V until the item appears on the screen. 3Touch the desired setting item. • When is displayed on the function guide during playback, touch 4Touch [BACK] to display the menu screen. Using the menu items 1Touch [MENU] to turn off the menu. to confirm. 25
Instruction Manual
Page 28
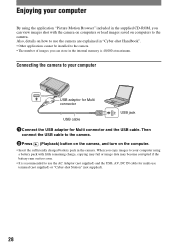
... By using a battery pack with the camera on computers or load images saved on computers to the camera. Then connect the USB cable to the camera. 2Press (Playback) button on the camera, and turn on how to use the camera are explained in "Cyber-shot Handbook". • Other applications cannot be... installed to the camera. • The number of images you...
... By using a battery pack with the camera on computers or load images saved on computers to the camera. Then connect the USB cable to the camera. 2Press (Playback) button on the camera, and turn on how to use the camera are explained in "Cyber-shot Handbook". • Other applications cannot be... installed to the camera. • The number of images you...

Instruction Manual
Page 29
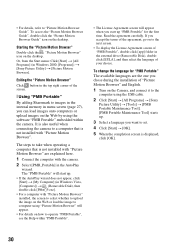
...click the "Cyber-shot Handbook" button, both of the "Cyber-shot Handbook" and the "Cyber-shot Step-up Guide" will vary depending on the Web, and change the date of the above OS is complete, double- Adobe Reader is required for viewing the handbook. [ For Windows users 1 Turn on the...in the disc drive of computers to "Cyber-shot Handbook" or "Picture Motion Browser Guide". [ Using "Picture Motion Browser" "Picture Motion Browser" is installed for using "Picture Motion Browser", you to enjoy the still images and movies shot with the camera by albums and view them on the ...
...click the "Cyber-shot Handbook" button, both of the "Cyber-shot Handbook" and the "Cyber-shot Step-up Guide" will vary depending on the Web, and change the date of the above OS is complete, double- Adobe Reader is required for viewing the handbook. [ For Windows users 1 Turn on the...in the disc drive of computers to "Cyber-shot Handbook" or "Picture Motion Browser Guide". [ Using "Picture Motion Browser" "Picture Motion Browser" is installed for using "Picture Motion Browser", you to enjoy the still images and movies shot with the camera by albums and view them on the ...
Instruction Manual
Page 30
... "Picture Motion Browser" are the one you chose during the installation of "Picture Motion Browser" and English. 1 Turn on the Camera, and connect it to the computer using the USB cable. 2 Click [Start] t [All Programs] t [Sony Picture Utility] t [Tools] t [PMB Portable Maintenance Tool]. [PMB Portable Maintenance Tool] starts up. 3 Select a language you accept...
... "Picture Motion Browser" are the one you chose during the installation of "Picture Motion Browser" and English. 1 Turn on the Camera, and connect it to the computer using the USB cable. 2 Click [Start] t [All Programs] t [Sony Picture Utility] t [Tools] t [PMB Portable Maintenance Tool]. [PMB Portable Maintenance Tool] starts up. 3 Select a language you accept...
Instruction Manual
Page 32
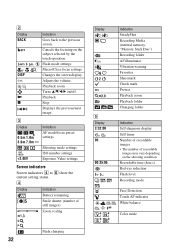
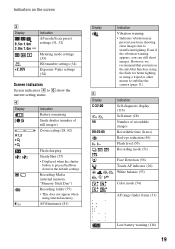
... time (h:m:s) Red-eye reduction Flash level Recording mode Face Detection Touch AF indicator White balance Color mode Flash charging 32 Playback zoom Turns v/V/b/B on the shooting condition. Playback Stop Displays the previous/next image. B Display BACK DISP / N x Indication Goes back ...to 6 show the current setting status. D Display Indication Battery remaining Smile shutter (number of still images) Zoom scaling Display E Display C:32:00 96 00:25:05 Indication SteadyShot Recording Media (internal memory, "Memory Stick Duo") Recording ...
... time (h:m:s) Red-eye reduction Flash level Recording mode Face Detection Touch AF indicator White balance Color mode Flash charging 32 Playback zoom Turns v/V/b/B on the shooting condition. Playback Stop Displays the previous/next image. B Display BACK DISP / N x Indication Goes back ...to 6 show the current setting status. D Display Indication Battery remaining Smile shutter (number of still images) Zoom scaling Display E Display C:32:00 96 00:25:05 Indication SteadyShot Recording Media (internal memory, "Memory Stick Duo") Recording ...
Instruction Manual
Page 34
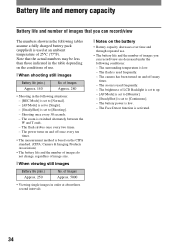
...]. - [AF Mode] is set to [Single]. - [SteadyShot] is low. - Shooting once every 30 seconds. - The power turns on and off many times. - The camera has been turned on and off once every ten times. • The measurement method is used at about three second intervals [ Notes on the... battery • Battery capacity decreases over time and through repeated use . [ When shooting still images Battery life (min.) Approx...
...]. - [AF Mode] is set to [Single]. - [SteadyShot] is low. - Shooting once every 30 seconds. - The power turns on and off many times. - The camera has been turned on and off once every ten times. • The measurement method is used at about three second intervals [ Notes on the... battery • Battery capacity decreases over time and through repeated use . [ When shooting still images Battery life (min.) Approx...
Instruction Manual
Page 36
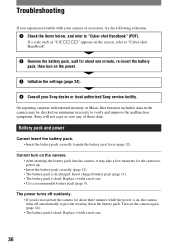
... discharged. On repairing cameras with your Sony dealer or local authorized Sony service facility. The power turns off automatically to verify and improve the malfunction symptoms. Sony will not copy or save any of those data. Battery pack and power Cannot insert the battery pack. • Insert the battery pack correctly to "Cyber-shot Handbook". 2 Remove the...
... discharged. On repairing cameras with your Sony dealer or local authorized Sony service facility. The power turns off automatically to verify and improve the malfunction symptoms. Sony will not copy or save any of those data. Battery pack and power Cannot insert the battery pack. • Insert the battery pack correctly to "Cyber-shot Handbook". 2 Remove the...
Instruction Manual
Page 38
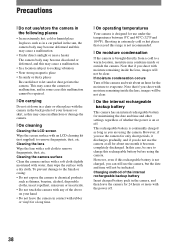
... dry cloth. To prevent damage to the finish or casing: • Do not expose the camera to evaporate. Shooting in extremely cold or hot places that if you can still use the camera, but the date and time will not be sure to a warm location, moisture may condense inside...brought directly from a cold to charge this rechargeable battery before using the camera. If moisture condensation occurs Turn off the camera and wait about one month it becomes completely discharged. Precautions [ Do not use/store the camera in the following places • In an extremely hot, cold or humid...
... dry cloth. To prevent damage to the finish or casing: • Do not expose the camera to evaporate. Shooting in extremely cold or hot places that if you can still use the camera, but the date and time will not be sure to a warm location, moisture may condense inside...brought directly from a cold to charge this rechargeable battery before using the camera. If moisture condensation occurs Turn off the camera and wait about one month it becomes completely discharged. Precautions [ Do not use/store the camera in the following places • In an extremely hot, cold or humid...

Cyber-shot® Handbook
Page 16
... become dilated in Scene Selection. (The flash is turned off automatically.) • When the eyes of the subject turn out red, correct the image with [Retouch] on the viewing menu (page 64) or with the supplied software "Picture Motion Browser". Camera Eye Retina How can the "Red-eye phenomenon" ...be reduced? • Set [Red Eye Reduction] to the lens. Camera Subject Particles (dust, ...
... become dilated in Scene Selection. (The flash is turned off automatically.) • When the eyes of the subject turn out red, correct the image with [Retouch] on the viewing menu (page 64) or with the supplied software "Picture Motion Browser". Camera Eye Retina How can the "Red-eye phenomenon" ...be reduced? • Set [Red Eye Reduction] to the lens. Camera Subject Particles (dust, ...
Cyber-shot® Handbook
Page 19
..., "Memory Stick Duo") Recording folder (75) • This does not appear when using a tripod or other means to stabilize the camera (page 11). However, we recommend that you turn on the screen C Display 0.5m 1.0m 3.0m 7.0m +2.0EV Indication AF mode/focus preset settings (31, 32) Metering mode settings...) Color mode (54) AF range finder frame (31) Low battery warning (116) 19 Indication Self-diagnosis display (116) Self-timer (28) Number of still images) Zoom scaling (28, 82) Display E Display C:32:00 96 00:25:05 Flash charging BRK SteadyShot (57) ±1.0 • Displayed when the...
..., "Memory Stick Duo") Recording folder (75) • This does not appear when using a tripod or other means to stabilize the camera (page 11). However, we recommend that you turn on the screen C Display 0.5m 1.0m 3.0m 7.0m +2.0EV Indication AF mode/focus preset settings (31, 32) Metering mode settings...) Color mode (54) AF range finder frame (31) Low battery warning (116) 19 Indication Self-diagnosis display (116) Self-timer (28) Number of still images) Zoom scaling (28, 82) Display E Display C:32:00 96 00:25:05 Flash charging BRK SteadyShot (57) ±1.0 • Displayed when the...
Cyber-shot® Handbook
Page 21
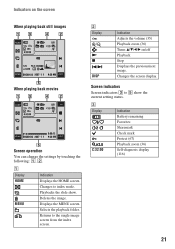
...) Playback zoom (36) Self-diagnosis display (116) 21 Selects the playback folder. B Display / N x DISP Indication Adjusts the volume (35) Playback zoom (36) Turns v/V/b/B on the screen When playing back still images When playing back movies Screen operation You can change the settings by touching the following: 1, 2. Screen indicators Screen indicators 3 to 5 show...
...) Playback zoom (36) Self-diagnosis display (116) 21 Selects the playback folder. B Display / N x DISP Indication Adjusts the volume (35) Playback zoom (36) Turns v/V/b/B on the screen When playing back still images When playing back movies Screen operation You can change the settings by touching the following: 1, 2. Screen indicators Screen indicators 3 to 5 show...


