Operating Instructions
Page 1
...Digital Still Camera Operating Instructions Before operating the unit, please read this product. Record the serial number in the space provided below. Model No. DSC-T1 Serial No. Refer to these numbers whenever you call upon your computer__________ Troubleshooting Additional information Index Owner's Record The model and serial numbers are located on your Sony... dealer regarding this manual thoroughly, and retain it for future reference. DSC-T1 © 2003 Sony Corporation 3-085-733-12(1) Getting started Shooting still ...
...Digital Still Camera Operating Instructions Before operating the unit, please read this product. Record the serial number in the space provided below. Model No. DSC-T1 Serial No. Refer to these numbers whenever you call upon your computer__________ Troubleshooting Additional information Index Owner's Record The model and serial numbers are located on your Sony... dealer regarding this manual thoroughly, and retain it for future reference. DSC-T1 © 2003 Sony Corporation 3-085-733-12(1) Getting started Shooting still ...

Operating Instructions
Page 3
...above 60°C (140°F), such as the supplied one and approved by returning your nearest Sony service station. Should the fuse in the sun or under direct sunlight. Notice If static electricity or...1363 is fitted to this equipment has a detachable fuse cover, be sure to power this camera. Never use the plug without the fuse cover. For the Customers in the U.S.A. "Memory Stick" ...N50 For the Customers in Canada THIS CLASS B DIGITAL APPARATUS COMPLIES WITH CANADIAN ICES-003. THIS DEVICE COMPLIES WITH PART 15 OF THE FCC RULES...
...above 60°C (140°F), such as the supplied one and approved by returning your nearest Sony service station. Should the fuse in the sun or under direct sunlight. Notice If static electricity or...1363 is fitted to this equipment has a detachable fuse cover, be sure to power this camera. Never use the plug without the fuse cover. For the Customers in the U.S.A. "Memory Stick" ...N50 For the Customers in Canada THIS CLASS B DIGITAL APPARATUS COMPLIES WITH CANADIAN ICES-003. THIS DEVICE COMPLIES WITH PART 15 OF THE FCC RULES...

Operating Instructions
Page 26
...scale 3.8× 6.1× 12× When you purchase your camera, the image size is set to [5M]. Smart zoom cannot be selected from optical zoom to digital zoom when the zoom scale exceeds 3×. To set precision digital zoom, set [Digital Zoom] to [Smart] on the LCD screen, and the ..., the zoom scaling indicator appears on the LCD screen as follows. Digital zoom can be used when the image size is set [Digital Zoom] to [Off] on the Setup screen (page 106). Optical zoom: - Zoom Your camera is digital zoom Zoom scaling indicator • The indicator differs according to the ...
...scale 3.8× 6.1× 12× When you purchase your camera, the image size is set to [5M]. Smart zoom cannot be selected from optical zoom to digital zoom when the zoom scale exceeds 3×. To set precision digital zoom, set [Digital Zoom] to [Smart] on the LCD screen, and the ..., the zoom scaling indicator appears on the LCD screen as follows. Digital zoom can be used when the image size is set [Digital Zoom] to [Off] on the Setup screen (page 106). Optical zoom: - Zoom Your camera is digital zoom Zoom scaling indicator • The indicator differs according to the ...

Operating Instructions
Page 31
...the date and time" (page 17). • This setting is maintained even when the power is turned off. 31 The Setup screen appears. 3 , Select (Camera) with v/V on the control button, then press B. Select [Date/Time] with v/V, then press B. 4 , Select the date and time setting with v on.... Day&Time: Superimposes the date, hour, and minute onto the image. Setup t Mode Camera AF Mode: Digital Zoom: Date/Time: 1 Red Eye Reduction: 2 AF Illuminator: Auto Review: Day&Time Date Off Camera AF Mode: Digital Zoom: Date/Time: 1 Red Eye Reduction: 2 AF Illuminator: Auto Review: Single Smart ...
...the date and time" (page 17). • This setting is maintained even when the power is turned off. 31 The Setup screen appears. 3 , Select (Camera) with v/V on the control button, then press B. Select [Date/Time] with v/V, then press B. 4 , Select the date and time setting with v on.... Day&Time: Superimposes the date, hour, and minute onto the image. Setup t Mode Camera AF Mode: Digital Zoom: Date/Time: 1 Red Eye Reduction: 2 AF Illuminator: Auto Review: Day&Time Date Off Camera AF Mode: Digital Zoom: Date/Time: 1 Red Eye Reduction: 2 AF Illuminator: Auto Review: Single Smart ...

Operating Instructions
Page 32
...LCD screen magnified by up to scene conditions - Allows you see details that would otherwise be used. • When you to shake while holding the camera. • The close -ups (Macro) function does not work . • You cannot shoot in Exposure Bracket, Burst and Multi Burst mode. &#...8226; The flash is set to shake while holding the camera. • You cannot shoot in dark places without losing the dark atmosphere of people in Exposure Bracket, Burst and Multi Burst mode. • The flash is enlarged using the digital zoom. 1.1 Twilight mode Allows you press the zoom button...
...LCD screen magnified by up to scene conditions - Allows you see details that would otherwise be used. • When you to shake while holding the camera. • The close -ups (Macro) function does not work . • You cannot shoot in Exposure Bracket, Burst and Multi Burst mode. &#...8226; The flash is set to shake while holding the camera. • You cannot shoot in dark places without losing the dark atmosphere of people in Exposure Bracket, Burst and Multi Burst mode. • The flash is enlarged using the digital zoom. 1.1 Twilight mode Allows you press the zoom button...
Operating Instructions
Page 38
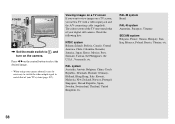
... want to view images on the control button to select the desired image. • When using your camera abroad, it may be necessary to switch the video output signal to , and turn on the camera. POWER VGA 101 2/9 101-0002 2004 1 1 10:30PM BACK/NEXT VOLUME 4 , Set the mode switch to match...
... want to view images on the control button to select the desired image. • When using your camera abroad, it may be necessary to switch the video output signal to , and turn on the camera. POWER VGA 101 2/9 101-0002 2004 1 1 10:30PM BACK/NEXT VOLUME 4 , Set the mode switch to match...

Operating Instructions
Page 47
... When shooting still images, set the AF range finder frame and the AF mode. Use together with the AF lock function lets you use the digital zoom or AF illuminator, priority AF movement is estimated as an average, so the AF works even with v/V. 60min VGAFINE 101 98 AF range finder... menu to the left, right, top, bottom and in the center of vibration. Spot AF ( ) This is adjusted automatically. When you press and hold the camera steady so that the subject does not deviate from white to green. • When you are convenient when you want to the subject position and...
... When shooting still images, set the AF range finder frame and the AF mode. Use together with the AF lock function lets you use the digital zoom or AF illuminator, priority AF movement is estimated as an average, so the AF works even with v/V. 60min VGAFINE 101 98 AF range finder... menu to the left, right, top, bottom and in the center of vibration. Spot AF ( ) This is adjusted automatically. When you press and hold the camera steady so that the subject does not deviate from white to green. • When you are convenient when you want to the subject position and...

Operating Instructions
Page 48
Camera AF Mode: xSingle Digital Zoom: Monitor Date/Time: Cont 1 Red Eye Reduction: 2 AF Illuminator: Auto Review: When you compose images with the focus already adjusted. The camera operates in the dark place - Before operation Set the menu to keep up when shooting fast moving subjects with ...and held halfway down , letting you select [Single] or [Monitor], also select the AF range finder frame (page 47). 48 The camera automatically adjusts the focus before the shutter button is Single AF. When the shutter button is pressed and held halfway down . • ...
Camera AF Mode: xSingle Digital Zoom: Monitor Date/Time: Cont 1 Red Eye Reduction: 2 AF Illuminator: Auto Review: When you compose images with the focus already adjusted. The camera operates in the dark place - Before operation Set the menu to keep up when shooting fast moving subjects with ...and held halfway down , letting you select [Single] or [Monitor], also select the AF range finder frame (page 47). 48 The camera automatically adjusts the focus before the shutter button is Single AF. When the shutter button is pressed and held halfway down . • ...

Operating Instructions
Page 51
... shooting When the image size is slow or high • The histogram may appear in the following cases: - Shooting techniques Normally, the camera automatically sets the exposure. The graph display indicates a dark image when skewed to the left side, and a bright image when skewed to...the exposure during Quick Review. d Adjust the exposure based on the LCD screen at that time. During Quick Review of an image recorded in the digital zoom range - When rotating a still image - A difference occurs in the following cases: - When this happens, check the histogram while playing back...
... shooting When the image size is slow or high • The histogram may appear in the following cases: - Shooting techniques Normally, the camera automatically sets the exposure. The graph display indicates a dark image when skewed to the left side, and a bright image when skewed to...the exposure during Quick Review. d Adjust the exposure based on the LCD screen at that time. During Quick Review of an image recorded in the digital zoom range - When rotating a still image - A difference occurs in the following cases: - When this happens, check the histogram while playing back...

Operating Instructions
Page 54
...under fixed conditions or special lighting conditions, you can resolve these adjustments automatically, but digital still cameras cannot recognize the correct colors without adjustments. b Press MENU. Normally, the camera makes these problems, but if recorded image colors appear unnatural, we recommend that flicker,...the mode switch is set to .) Before operation When shooting still images, set and the overall color balance is automatically set (Camera) in the summer, and white items gain a reddish tint under fluorescent lighting 54 (Incandescent) • Places where the ...
...under fixed conditions or special lighting conditions, you can resolve these adjustments automatically, but digital still cameras cannot recognize the correct colors without adjustments. b Press MENU. Normally, the camera makes these problems, but if recorded image colors appear unnatural, we recommend that flicker,...the mode switch is set to .) Before operation When shooting still images, set and the overall color balance is automatically set (Camera) in the summer, and white items gain a reddish tint under fluorescent lighting 54 (Incandescent) • Places where the ...
Operating Instructions
Page 68
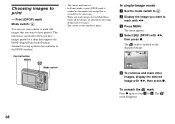
...movies. • In E-mail mode, a print (DPOF) mark is marked on the normal size image that is recorded at a shop that supports the DPOF (Digital Print Order Format) standard or using a printer that you want to the DPOF standard. b Display the image you want to mark with b/B, then press z. ...The menu appears. Choosing images to . Print (DPOF) mark Mode switch: You can use your camera to mark still images that conforms to have printed. The mark is convenient when you have images printed at the same time. • When you...
...movies. • In E-mail mode, a print (DPOF) mark is marked on the normal size image that is recorded at a shop that supports the DPOF (Digital Print Order Format) standard or using a printer that you want to the DPOF standard. b Display the image you want to mark with b/B, then press z. ...The menu appears. Choosing images to . Print (DPOF) mark Mode switch: You can use your camera to mark still images that conforms to have printed. The mark is convenient when you have images printed at the same time. • When you...

Operating Instructions
Page 90
... does not function. • [Digital Zoom] is set to [Off] on the Setup screen. • The image size is set to [5M] or [3:2] (only when using the smart zoom). p Use close . • When shooting still images, (Camera) in a dark p Adjust the exposure (page 50). p Cancel the function (page 49... shooting distance (page 27). p Set image size to other settings (page 32). p This is connected to the A/V OUT (MONO) jack. p Set [Digital Zoom] to [Smart] or [Precision] (pages 44 and 106). The image is out of the LCD screen is set to (Magnifying glass mode). p Adjust...
... does not function. • [Digital Zoom] is set to [Off] on the Setup screen. • The image size is set to [5M] or [3:2] (only when using the smart zoom). p Use close . • When shooting still images, (Camera) in a dark p Adjust the exposure (page 50). p Cancel the function (page 49... shooting distance (page 27). p Set image size to other settings (page 32). p This is connected to the A/V OUT (MONO) jack. p Set [Digital Zoom] to [Smart] or [Precision] (pages 44 and 106). The image is out of the LCD screen is set to (Magnifying glass mode). p Adjust...

Operating Instructions
Page 97
...and 72). Select a different folder (page 45). Image size over • You are using a "Memory Stick Duo" with the same first three digits number already exists in the selected folder. No file in this folder Folder error • No images have been recorded in this "Memory Stick Duo...." Cannot record • The camera cannot record images in the "Memory Stick Duo." (For example: 123MSDCF and 123ABCDE) Select other folders, or create a new folder. Warnings and ...
...and 72). Select a different folder (page 45). Image size over • You are using a "Memory Stick Duo" with the same first three digits number already exists in the selected folder. No file in this folder Folder error • No images have been recorded in this "Memory Stick Duo...." Cannot record • The camera cannot record images in the "Memory Stick Duo." (For example: 123MSDCF and 123ABCDE) Select other folders, or create a new folder. Warnings and ...

Operating Instructions
Page 99
...ss E:61: ss E:91: ss Cause Corrective action There is inserted. If you cannot reverse has occurred. Duo" is trouble with your Sony dealer or local authorized Sony service facility. Insert a new "Memory Stick Duo" (page 19). An unformatted "Memory Stick Format the "Memory Stick Duo" (page 41)..... Press the RESET button (page 88) located on the lower right side of a letter and four numerical digits. Turn the power off and on the power again. A camera malfunction that you are unable to solve the problem even after trying the corrective actions a few times, contact ...
...ss E:61: ss E:91: ss Cause Corrective action There is inserted. If you cannot reverse has occurred. Duo" is trouble with your Sony dealer or local authorized Sony service facility. Insert a new "Memory Stick Duo" (page 19). An unformatted "Memory Stick Format the "Memory Stick Duo" (page 41)..... Press the RESET button (page 88) located on the lower right side of a letter and four numerical digits. Turn the power off and on the power again. A camera malfunction that you are unable to solve the problem even after trying the corrective actions a few times, contact ...

Operating Instructions
Page 106
The date and time are indicated with x. (Camera) Item AF Mode Digital Zoom Date/Time Red Eye Reduction AF Illuminator Auto Review Setting Description xSingle / Monitor / Cont Selects the focus operation mode (page 48). On / xOff Reduces ... not inserted in the menu and press B again. Folder OK / Cancel Change REC. Changes a folder for recording images (page 45). xSmart / Precision / Off Selects the digital zoom mode (page 26). When set to [On], the recorded image is hard to focus on the subject under dark lighting (page 30). Folder OK...
The date and time are indicated with x. (Camera) Item AF Mode Digital Zoom Date/Time Red Eye Reduction AF Illuminator Auto Review Setting Description xSingle / Monitor / Cont Selects the focus operation mode (page 48). On / xOff Reduces ... not inserted in the menu and press B again. Folder OK / Cancel Change REC. Changes a folder for recording images (page 45). xSmart / Precision / Off Selects the digital zoom mode (page 26). When set to [On], the recorded image is hard to focus on the subject under dark lighting (page 30). Folder OK...

Operating Instructions
Page 119
... can be shot or viewed 14, 21, 100 P PAL system 38, 107 Picture effect 58 Playback zoom 61 Power on/off 16 Precautions 108 Precision digital zoom 26 Print (DPOF) mark 68 Program auto shooting mode 23 Protect 66 PTP 75, 86, 107 Q Quick Review 24 R Red Eye Reduction 29 Remaining... TV color system 38 U USB connection 79, 107 USB cradle 10 USB driver 76, 86 USB jack 10, 79 USB mode 75, 86 Using your camera abroad 15 V VGA 21, 100 Viewing images on TV 37 Viewing images on your computer 87 Viewing movies on the LCD screen 71 Viewing still...
... can be shot or viewed 14, 21, 100 P PAL system 38, 107 Picture effect 58 Playback zoom 61 Power on/off 16 Precautions 108 Precision digital zoom 26 Print (DPOF) mark 68 Program auto shooting mode 23 Protect 66 PTP 75, 86, 107 Q Quick Review 24 R Red Eye Reduction 29 Remaining... TV color system 38 U USB connection 79, 107 USB cradle 10 USB driver 76, 86 USB jack 10, 79 USB mode 75, 86 Using your camera abroad 15 V VGA 21, 100 Viewing images on TV 37 Viewing images on your computer 87 Viewing movies on the LCD screen 71 Viewing still...


