Instruction Manual
Page 7
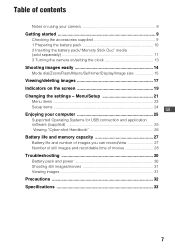
...Menu items 23 Setup items 24 GB Enjoying your computer 25 Supported Operating Systems for USB connection and application software (supplied 25 Viewing "Cyber-shot Handbook 26 Battery life and memory capacity 27 Battery life and number of images you can record/view 27 Number of still images ...and recordable time of contents Notes on using your camera 8 Getting started 9 Checking the accessories supplied 9 1 Preparing the battery pack 10 2 Inserting the battery pack/"Memory Stick Duo" media (sold separately...
...Menu items 23 Setup items 24 GB Enjoying your computer 25 Supported Operating Systems for USB connection and application software (supplied 25 Viewing "Cyber-shot Handbook 26 Battery life and memory capacity 27 Battery life and number of images you can record/view 27 Number of still images ...and recordable time of contents Notes on using your camera 8 Getting started 9 Checking the accessories supplied 9 1 Preparing the battery pack 10 2 Inserting the battery pack/"Memory Stick Duo" media (sold separately...
Instruction Manual
Page 8
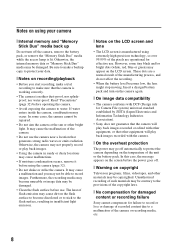
... system) universal standard established by JEITA (Japan Electronics and Information Technology Industries Association). • Sony does not guarantee that the camera will play back images recorded with other equipment will play back images. • Using the camera in insufficient light emission. [ Notes on recording/playback • Before you may not be damaged. •...
... system) universal standard established by JEITA (Japan Electronics and Information Technology Industries Association). • Sony does not guarantee that the camera will play back images recorded with other equipment will play back images. • Using the camera in insufficient light emission. [ Notes on recording/playback • Before you may not be damaged. •...
Instruction Manual
Page 9
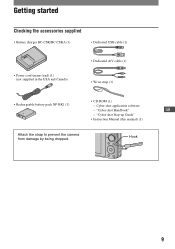
"Cyber-shot Handbook" GB - Hook 9 Getting started Checking the accessories supplied • Battery charger BC-CSK/BC-CSKA (1) • Dedicated USB cable (1) • Power cord (mains lead) (1) (not supplied in the USA and Canada) • Dedicated A/V cable (1) • Wrist strap (1) • CD-ROM (1) • Rechargeable battery pack NP-BK1 (1) - "Cyber-shot Step-up Guide" • Instruction Manual (this manual) (1) Attach the strap to prevent the camera from damage by being dropped. Cyber-shot application software -
"Cyber-shot Handbook" GB - Hook 9 Getting started Checking the accessories supplied • Battery charger BC-CSK/BC-CSKA (1) • Dedicated USB cable (1) • Power cord (mains lead) (1) (not supplied in the USA and Canada) • Dedicated A/V cable (1) • Wrist strap (1) • CD-ROM (1) • Rechargeable battery pack NP-BK1 (1) - "Cyber-shot Step-up Guide" • Instruction Manual (this manual) (1) Attach the strap to prevent the camera from damage by being dropped. Cyber-shot application software -

Instruction Manual
Page 11
..." media (sold separately). 3 Insert the battery pack. 4 Close the battery/"Memory Stick Duo" media cover. [ When there is no "Memory Stick Duo" media inserted The camera records/plays back images using the internal memory (approx. 12 MB). 11
..." media (sold separately). 3 Insert the battery pack. 4 Close the battery/"Memory Stick Duo" media cover. [ When there is no "Memory Stick Duo" media inserted The camera records/plays back images using the internal memory (approx. 12 MB). 11

Instruction Manual
Page 12
... depending on conditions of use and circumstances. • The Clock Set screen appears when you turn on and check the remaining battery charge on the camera for the first time (page 13). [ To remove the battery pack/"Memory Stick Duo" media Open the battery/"Memory Stick Duo" media cover.
... depending on conditions of use and circumstances. • The Clock Set screen appears when you turn on and check the remaining battery charge on the camera for the first time (page 13). [ To remove the battery pack/"Memory Stick Duo" media Open the battery/"Memory Stick Duo" media cover.

Instruction Manual
Page 13
... may take time before operation becomes possible. • If the camera is running on images. 3 Turning the camera on/setting the clock ON/OFF (power) button 1 ɟ Control button z button 2 3 GB 1 Press the ON/OFF (power) button. 2 Set the clock with the control ...). [ Notes on when the power is turned on • Once the battery pack is inserted in the CD-ROM (supplied), you do not operate the camera for superimposing dates on battery power and you can print or save images with v/V, then press z. 3 Select [OK], then press z. • The...
... may take time before operation becomes possible. • If the camera is running on images. 3 Turning the camera on/setting the clock ON/OFF (power) button 1 ɟ Control button z button 2 3 GB 1 Press the ON/OFF (power) button. 2 Set the clock with the control ...). [ Notes on when the power is turned on • Once the battery pack is inserted in the CD-ROM (supplied), you do not operate the camera for superimposing dates on battery power and you can print or save images with v/V, then press z. 3 Select [OK], then press z. • The...

Instruction Manual
Page 14
... DISP button Control button Flash button Tripod receptacle (bottom) (Image Size) button Self-timer button 1Select a mode with the shutter button. Movie: Select . 2Hold the camera steady, keeping your arms at your side. Still image (auto adjustment mode): Select . Position the subject in the center of the lens). 14
... DISP button Control button Flash button Tripod receptacle (bottom) (Image Size) button Self-timer button 1Select a mode with the shutter button. Movie: Select . 2Hold the camera steady, keeping your arms at your side. Still image (auto adjustment mode): Select . Position the subject in the center of the lens). 14

Instruction Manual
Page 15
... for still images) Press B ( ) on the control button repeatedly until the desired mode is out of people in this mode. : Macro The camera adjusts the focus with the exposure adjusted automatically (both the shutter speed and the aperture value). Landscape Shoots with the focus on the control button.... Twilight Portrait Shoots sharp images of flash light. : Flash forced off GB [ Macro (Shooting close subjects. 15 Normally, put the camera in a dark place without losing the nighttime atmosphere. Movie Allows you to clearly shoot the background that is selected. : Auto The...
... for still images) Press B ( ) on the control button repeatedly until the desired mode is out of people in this mode. : Macro The camera adjusts the focus with the exposure adjusted automatically (both the shutter speed and the aperture value). Landscape Shoots with the focus on the control button.... Twilight Portrait Shoots sharp images of flash light. : Flash forced off GB [ Macro (Shooting close subjects. 15 Normally, put the camera in a dark place without losing the nighttime atmosphere. Movie Allows you to clearly shoot the background that is selected. : Auto The...
Instruction Manual
Page 17
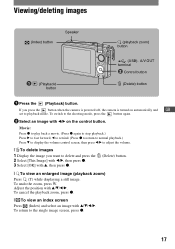
... display the volume control screen, then press b/B to adjust the volume. [ To delete images 1 Display the image you press the button when the camera is powered off, the camera is turned on automatically and GB set to the shooting mode, press the button again. 2 Select an image with v, then press z. (Delete) button...
... display the volume control screen, then press b/B to adjust the volume. [ To delete images 1 Display the image you press the button when the camera is powered off, the camera is turned on automatically and GB set to the shooting mode, press the button again. 2 Select an image with v, then press z. (Delete) button...

Instruction Manual
Page 18
... index screen is checked in the checkbox of a folder, select [All In This Folder] in step 1, then press z. [ To view images on TV Connect the camera to the TV with the dedicated A/V cable (supplied). • Align the arrow mark on the control button, then press z. 2 Select the image you have selected...) · A/V OUT terminal To audio/video input jacks Dedicated A/V cable (supplied) Arrow mark (back) 18 To cancel a selection, select an image you want to the camera.
... index screen is checked in the checkbox of a folder, select [All In This Folder] in step 1, then press z. [ To view images on TV Connect the camera to the TV with the dedicated A/V cable (supplied). • Align the arrow mark on the control button, then press z. 2 Select the image you have selected...) · A/V OUT terminal To audio/video input jacks Dedicated A/V cable (supplied) Arrow mark (back) 18 To cancel a selection, select an image you want to the camera.

Instruction Manual
Page 19
...order (DPOF) mark Volume PictBridge connecting • Do not disconnect the dedicated USB cable while the mark is displayed only for the DSC-S950. Scene Selection Mode dial White balance Burst mode Metering mode Face Detection GB SteadyShot Vibration warning • Indicates vibration may prevent... you set the anti-blur function to [Auto], using the flash for the DSC-S980. • is displayed. 19 However, we recommend that you from shooting clear images due to stabilize the camera. Even if the vibration warning appears, you press v (DISP) on the A control ...
...order (DPOF) mark Volume PictBridge connecting • Do not disconnect the dedicated USB cable while the mark is displayed only for the DSC-S950. Scene Selection Mode dial White balance Burst mode Metering mode Face Detection GB SteadyShot Vibration warning • Indicates vibration may prevent... you set the anti-blur function to [Auto], using the flash for the DSC-S980. • is displayed. 19 However, we recommend that you from shooting clear images due to stabilize the camera. Even if the vibration warning appears, you press v (DISP) on the A control ...

Instruction Manual
Page 24
... the USB mode to a computer or a PictBridge compliant printer using the dedicated USB cable. Main Settings 1 Beep Selects the sound produced when you operate the camera. Shooting Settings Grid Line Digital Zoom Auto Review Displays lines to "Memory Stick Duo" media. Internal Memory Tool Format Formats the internal memory.
... the USB mode to a computer or a PictBridge compliant printer using the dedicated USB cable. Main Settings 1 Beep Selects the sound produced when you operate the camera. Shooting Settings Grid Line Digital Zoom Auto Review Displays lines to "Memory Stick Duo" media. Internal Memory Tool Format Formats the internal memory.
Instruction Manual
Page 25
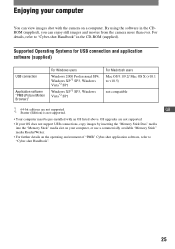
...Windows Vista*2 SP1 For Macintosh users Mac OS 9.1/9.2/ Mac OS X (v10.1 to "Cyber-shot Handbook". 25 GB *2 Starter (Edition) is not supported. • Your computer must be pre-installed with the camera on the operating environment of "PMB" Cyber-shot application software, refer to v10.5) not compatible *1 64-bit editions are not supported. By...the "Memory Stick Duo" media into the "Memory Stick" media slot on your computer You can enjoy still images and movies from the camera more than ever. For details, refer to "Cyber-shot Handbook" in the CDROM (supplied), you can view images...
...Windows Vista*2 SP1 For Macintosh users Mac OS 9.1/9.2/ Mac OS X (v10.1 to "Cyber-shot Handbook". 25 GB *2 Starter (Edition) is not supported. • Your computer must be pre-installed with the camera on the operating environment of "PMB" Cyber-shot application software, refer to v10.5) not compatible *1 64-bit editions are not supported. By...the "Memory Stick Duo" media into the "Memory Stick" media slot on your computer You can enjoy still images and movies from the camera more than ever. For details, refer to "Cyber-shot Handbook" in the CDROM (supplied), you can view images...
Instruction Manual
Page 26
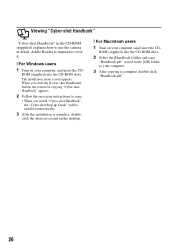
...stored in the [GB] folder to copy. • When you install "Cyber-shot Handbook", the "Cyber-shot Step-up Guide" will be installed automatically. 3 After the installation is complete, double-click... "Handbook.pdf". 26 When you click the [Cyber-shot Handbook] button, the screen for copying "Cyber-shot Handbook" appears. 2 Follow the on-screen instructions to your computer. 3... computer, and insert the CD- ROM (supplied) into the CD-ROM drive. Viewing "Cyber-shot Handbook" "Cyber-shot Handbook" in the CD-ROM (supplied) explains how to view it. [ For Windows ...
...stored in the [GB] folder to copy. • When you install "Cyber-shot Handbook", the "Cyber-shot Step-up Guide" will be installed automatically. 3 After the installation is complete, double-click... "Handbook.pdf". 26 When you click the [Cyber-shot Handbook] button, the screen for copying "Cyber-shot Handbook" appears. 2 Follow the on-screen instructions to your computer. 3... computer, and insert the CD- ROM (supplied) into the CD-ROM drive. Viewing "Cyber-shot Handbook" "Cyber-shot Handbook" in the CD-ROM (supplied) explains how to view it. [ For Windows ...
Instruction Manual
Page 27
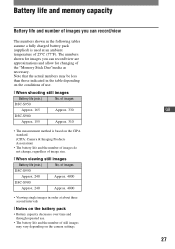
Note that the actual numbers may vary depending on the camera settings. of images DSC-S950 Approx. 165 Approx. 330 DSC-S980 Approx. 155 Approx. 310 • The measurement method is used at about three second intervals [ Notes on the battery pack • Battery ...for changing of the "Memory Stick Duo"media as necessary. GB 27 of images DSC-S950 Approx. 240 Approx. 4800 DSC-S980 Approx. 240 Approx. 4800 • Viewing single images in the table depending on the CIPA standard. (CIPA: Camera & Imaging Products Association) • The battery life and the number of images...
Note that the actual numbers may vary depending on the camera settings. of images DSC-S950 Approx. 165 Approx. 330 DSC-S980 Approx. 155 Approx. 310 • The measurement method is used at about three second intervals [ Notes on the battery pack • Battery ...for changing of the "Memory Stick Duo"media as necessary. GB 27 of images DSC-S950 Approx. 240 Approx. 4800 DSC-S980 Approx. 240 Approx. 4800 • Viewing single images in the table depending on the CIPA standard. (CIPA: Camera & Imaging Products Association) • The battery life and the number of images...
Instruction Manual
Page 28
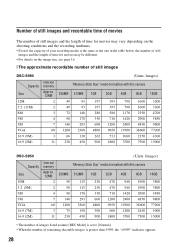
...For details on the image size, see page 16. [ The approximate recordable number of still images DSC-S980 (Units: Images) Internal Capacity memory Size Approx. 12MB "Memory Stick Duo" media formatted with this camera 256MB 512MB 1GB 2GB 4GB 8GB 16GB 12M 2 49 93 197 395 790 1600 3200 3:2 (...130 262 533 1060 2150 4300 16:9 (2M) 11 230 450 900 1800 3700 7500 15000 DSC-S950 (Units: Images) Internal Capacity memory Size Approx. 12MB "Memory Stick Duo" media formatted with this camera 256MB 512MB 1GB 2GB 4GB 8GB 16GB 10M 2 58 115 230 470 940 1900 3800 3:2...
...For details on the image size, see page 16. [ The approximate recordable number of still images DSC-S980 (Units: Images) Internal Capacity memory Size Approx. 12MB "Memory Stick Duo" media formatted with this camera 256MB 512MB 1GB 2GB 4GB 8GB 16GB 12M 2 49 93 197 395 790 1600 3200 3:2 (...130 262 533 1060 2150 4300 16:9 (2M) 11 230 450 900 1800 3700 7500 15000 DSC-S950 (Units: Images) Internal Capacity memory Size Approx. 12MB "Memory Stick Duo" media formatted with this camera 256MB 512MB 1GB 2GB 4GB 8GB 16GB 10M 2 58 115 230 470 940 1900 3800 3:2...
Instruction Manual
Page 29
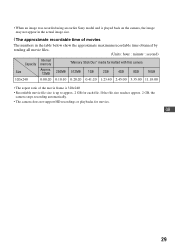
• When an image was recorded using an earlier Sony model and is played back on the camera, the image may not appear in the actual image size. [ The approximate recordable time of movies The numbers in the table below show the approximate ...maximum recordable time obtained by totaling all movie files. (Units: hour : minute : second) Internal Capacity memory "Memory Stick Duo" media formatted with this camera Size Approx. 12MB 256MB 512MB 1GB 2GB 4GB 8GB 16GB 320×240 0:00:20 0:10:10 0:20:20 0:41:20 1:23:40 2:45:00...
• When an image was recorded using an earlier Sony model and is played back on the camera, the image may not appear in the actual image size. [ The approximate recordable time of movies The numbers in the table below show the approximate ...maximum recordable time obtained by totaling all movie files. (Units: hour : minute : second) Internal Capacity memory "Memory Stick Duo" media formatted with this camera Size Approx. 12MB 256MB 512MB 1GB 2GB 4GB 8GB 16GB 320×240 0:00:20 0:10:10 0:20:20 0:41:20 1:23:40 2:45:00...
Instruction Manual
Page 30
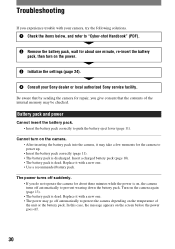
...a recommended battery pack. Cannot turn on the power. 3 Initialize the settings (page 24). 4 Consult your camera, try the following solutions. 1 Check the items below, and refer to "Cyber-shot Handbook" (PDF). 2 Remove the battery pack, wait for about three minutes while the power is discharged.... correctly to protect the camera depending on the temperature of the internal memory may be checked. Troubleshooting If you experience trouble with your Sony dealer or local authorized Sony service facility. Be aware that by sending the camera for the camera to prevent wearing down the...
...a recommended battery pack. Cannot turn on the power. 3 Initialize the settings (page 24). 4 Consult your camera, try the following solutions. 1 Check the items below, and refer to "Cyber-shot Handbook" (PDF). 2 Remove the battery pack, wait for about three minutes while the power is discharged.... correctly to protect the camera depending on the temperature of the internal memory may be checked. Troubleshooting If you experience trouble with your Sony dealer or local authorized Sony service facility. Be aware that by sending the camera for the camera to prevent wearing down the...
Instruction Manual
Page 31
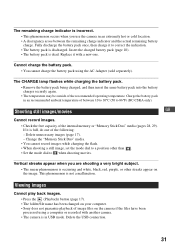
...of image files on the image. Fully discharge the battery pack once, then charge it to when shooting movies. If it with another camera. • The camera is incorrect. • This phenomenon occurs when you are shooting a very bright subject. • The smear phenomenon is not a ... images. • Press the (Playback) button (page 17). • The folder/file name has been changed on your computer. • Sony does not guarantee playback of between the remaining charge indicator and the actual remaining battery charge. Insert the charged battery pack (page 10). •...
...of image files on the image. Fully discharge the battery pack once, then charge it to when shooting movies. If it with another camera. • The camera is incorrect. • This phenomenon occurs when you are shooting a very bright subject. • The smear phenomenon is not a ... images. • Press the (Playback) button (page 17). • The folder/file name has been changed on your computer. • Sony does not guarantee playback of between the remaining charge indicator and the actual remaining battery charge. Insert the charged battery pack (page 10). •...
Instruction Manual
Page 32
...lens, images will not be indicated. Shooting in contact with an LCD cleaning kit (sold separately) to evaporate. This moisture condensation may cause the camera to malfunction, and in some cases this malfunction cannot be repaired. [ On carrying Do not sit down in a chair or other settings regardless... battery is continually charged as long as thinner, benzine, alcohol, disposable cloths, insect repellent, sunscreen or insecticide. • Do not touch the camera with any of the above on your trousers or skirt, as this case, be clear. [ On the internal rechargeable backup battery This...
...lens, images will not be indicated. Shooting in contact with an LCD cleaning kit (sold separately) to evaporate. This moisture condensation may cause the camera to malfunction, and in some cases this malfunction cannot be repaired. [ On carrying Do not sit down in a chair or other settings regardless... battery is continually charged as long as thinner, benzine, alcohol, disposable cloths, insect repellent, sunscreen or insecticide. • Do not touch the camera with any of the above on your trousers or skirt, as this case, be clear. [ On the internal rechargeable backup battery This...


