
Instruction Manual
Page 4
... energy and, if not installed and used with the equipment in a particular installation. Connect the equipment into an outlet on , the user is no guarantee that any changes or modifications not expressly approved in a residential installation. Telephone No.: 858-942-2230 This device complies with Part 15 of Conformity Trade Name: SONY Model No.: DSC-S950 Responsible Party: Sony Electronics Inc. These...
... energy and, if not installed and used with the equipment in a particular installation. Connect the equipment into an outlet on , the user is no guarantee that any changes or modifications not expressly approved in a residential installation. Telephone No.: 858-942-2230 This device complies with Part 15 of Conformity Trade Name: SONY Model No.: DSC-S950 Responsible Party: Sony Electronics Inc. These...
Instruction Manual
Page 5
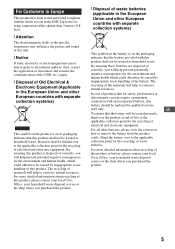
... connection with an incorporated battery, this product shall not be replaced by inappropriate waste handling of waste batteries. For more detailed information about recycling of this product. By ensuring this unit. [ Notice If static electricity or electromagnetism causes data transfer to conserve natural resources. Hand the battery over the product at the specific frequencies may influence the picture and sound...
... connection with an incorporated battery, this product shall not be replaced by inappropriate waste handling of waste batteries. For more detailed information about recycling of this product. By ensuring this unit. [ Notice If static electricity or electromagnetism causes data transfer to conserve natural resources. Hand the battery over the product at the specific frequencies may influence the picture and sound...
Instruction Manual
Page 7
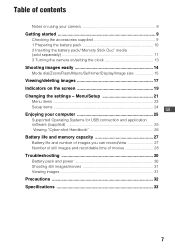
... 3 Turning the camera on/setting the clock 13 Shooting images easily 14 Mode dial/Zoom/Flash/Macro/Self-timer/Display/Image size 15 Viewing/deleting images 17 Indicators on the screen 19 Changing the settings - Table of contents Notes on using your computer 25 Supported Operating Systems for USB connection and application software (supplied 25 Viewing "Cyber-shot Handbook 26 Battery life and memory capacity 27 Battery life and number of images you can record/view 27 Number of still images and recordable time of movies 28 Troubleshooting 30 Battery pack and power 30 Shooting still...
... 3 Turning the camera on/setting the clock 13 Shooting images easily 14 Mode dial/Zoom/Flash/Macro/Self-timer/Display/Image size 15 Viewing/deleting images 17 Indicators on the screen 19 Changing the settings - Table of contents Notes on using your computer 25 Supported Operating Systems for USB connection and application software (supplied 25 Viewing "Cyber-shot Handbook 26 Battery life and memory capacity 27 Battery life and number of images you can record/view 27 Number of still images and recordable time of movies 28 Troubleshooting 30 Battery pack and power 30 Shooting still...
Instruction Manual
Page 8
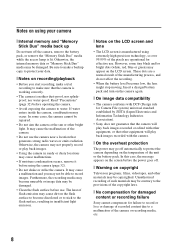
... on the LCD screen. These dots are operational for effective use . Insert a charged battery pack and turn off the camera, remove the battery pack, or remove the "Memory Stick Duo" media while the access lamp is neither dust-proof, nor splashproof, nor water-proof. In this case, the message appears on the screen before use . In some tiny black and/or bright dots (white, red, blue or green) may...
... on the LCD screen. These dots are operational for effective use . Insert a charged battery pack and turn off the camera, remove the battery pack, or remove the "Memory Stick Duo" media while the access lamp is neither dust-proof, nor splashproof, nor water-proof. In this case, the message appears on the screen before use . In some tiny black and/or bright dots (white, red, blue or green) may...

Instruction Manual
Page 12
... data in once. Remaining charge indicator Status Sufficient power remaining Battery almost fully charged Battery half full Battery low, recording/ playback will stop soon. This may not be correct depending on conditions of use and circumstances. • The Clock Set screen appears when you turn on and check the remaining battery charge on the camera for the first time (page 13). [ To remove the battery pack/"Memory Stick Duo" media Open the battery/"Memory...
... data in once. Remaining charge indicator Status Sufficient power remaining Battery almost fully charged Battery half full Battery low, recording/ playback will stop soon. This may not be correct depending on conditions of use and circumstances. • The Clock Set screen appears when you turn on and check the remaining battery charge on the camera for the first time (page 13). [ To remove the battery pack/"Memory Stick Duo" media Open the battery/"Memory...

Instruction Manual
Page 13
... date and time Select [Clock Settings] in the (Setup) screen (page 21). [ Notes on when the power is turned on • Once the battery pack is running on images. By using "PMB" in the camera, it may take time before operation becomes possible. • If the camera is inserted in the CD-ROM (supplied), you do not operate the camera for superimposing dates on battery power and you can print or save images...
... date and time Select [Clock Settings] in the (Setup) screen (page 21). [ Notes on when the power is turned on • Once the battery pack is running on images. By using "PMB" in the camera, it may take time before operation becomes possible. • If the camera is inserted in the CD-ROM (supplied), you do not operate the camera for superimposing dates on battery power and you can print or save images...

Instruction Manual
Page 15
... settings using the menu. Landscape Shoots with the focus on ) The shutter speed is selected. : Auto The camera adjusts the focus automatically from the Scene Selection menu. Twilight Portrait Shoots sharp images of people in this mode. : Macro The camera adjusts the focus with the exposure adjusted automatically (both the shutter speed and the aperture value). Set Macro On when shooting close -up ) Press b ( ) on the control button repeatedly until the desired mode is selected. : Flash Auto Strobes when there is insufficient light (default setting). : Flash...
... settings using the menu. Landscape Shoots with the focus on ) The shutter speed is selected. : Auto The camera adjusts the focus automatically from the Scene Selection menu. Twilight Portrait Shoots sharp images of people in this mode. : Macro The camera adjusts the focus with the exposure adjusted automatically (both the shutter speed and the aperture value). Set Macro On when shooting close -up ) Press b ( ) on the control button repeatedly until the desired mode is selected. : Flash Auto Strobes when there is insufficient light (default setting). : Flash...

Instruction Manual
Page 16
... shutter operates. Self-timer lamp [ DISP Changing the screen display Press v (DISP) on * r Indicators off the Image Size menu, press again. Each time you press v (DISP), the display changes as follows: Indicators on r Indicators on* r Histogram on the control button. To turn off * * The brightness of a movie is selected. : Not using the self-timer : Setting the 10-second delay self-timer : Setting the 2-second delay self-timer When you press the shutter button, the selftimer lamp flashes and a beep sounds until the desired mode...
... shutter operates. Self-timer lamp [ DISP Changing the screen display Press v (DISP) on * r Indicators off the Image Size menu, press again. Each time you press v (DISP), the display changes as follows: Indicators on r Indicators on* r Histogram on the control button. To turn off * * The brightness of a movie is selected. : Not using the self-timer : Setting the 10-second delay self-timer : Setting the 2-second delay self-timer When you press the shutter button, the selftimer lamp flashes and a beep sounds until the desired mode...

Instruction Manual
Page 19
... the camera. Indicators on the screen Each time you can still shoot images. Even if the vibration warning appears, you press v (DISP) on the A control button, the display changes (page 16). [ When shooting still images [ When shooting movies [ When playing back VOL. Zoom scaling Color mode PictBridge connecting Protect Print order (DPOF) mark Volume PictBridge connecting • Do not disconnect the dedicated USB cable while the mark is displayed only for better lighting or using the flash for the DSC...
... the camera. Indicators on the screen Each time you can still shoot images. Even if the vibration warning appears, you press v (DISP) on the A control button, the display changes (page 16). [ When shooting still images [ When shooting movies [ When playing back VOL. Zoom scaling Color mode PictBridge connecting Protect Print order (DPOF) mark Volume PictBridge connecting • Do not disconnect the dedicated USB cable while the mark is displayed only for better lighting or using the flash for the DSC...
Instruction Manual
Page 20
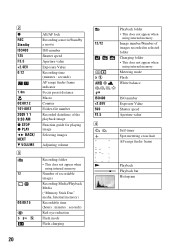
... Folder-file number Recorded date/time of recordable images Recording Media/Playback Media ("Memory Stick Duo" media, Internal memory) Recordable time (hours : minutes : seconds) Red-eye reduction Flash mode Flash charging 101 12/12 ISO400 +2.0EV 500 F3.5 D N 20 Playback folder • This does not appear when using internal memory. Number of the playback image Function guide for playing image Selecting images Adjusting volume Recording folder • This does not appear when using internal memory. Metering mode Flash White balance ISO number Exposure Value Shutter speed Aperture...
... Folder-file number Recorded date/time of recordable images Recording Media/Playback Media ("Memory Stick Duo" media, Internal memory) Recordable time (hours : minutes : seconds) Red-eye reduction Flash mode Flash charging 101 12/12 ISO400 +2.0EV 500 F3.5 D N 20 Playback folder • This does not appear when using internal memory. Number of the playback image Function guide for playing image Selecting images Adjusting volume Recording folder • This does not appear when using internal memory. Metering mode Flash White balance ISO number Exposure Value Shutter speed Aperture...
Instruction Manual
Page 21
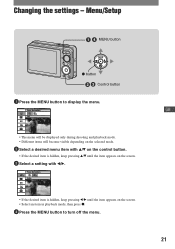
Menu/Setup MENU button z button ɟ ɠ Control button 1 Press the MENU button to turn off the menu. 21 GB • The menu will be displayed only during shooting and playback mode. • Different items will become visible depending on the selected mode. 2 Select a desired menu item with v/V on the control button. • If the desired item is hidden, keep pressing v/V until the item appears on the screen. 3 Select a setting with b/B. • If...
Menu/Setup MENU button z button ɟ ɠ Control button 1 Press the MENU button to turn off the menu. 21 GB • The menu will be displayed only during shooting and playback mode. • Different items will become visible depending on the selected mode. 2 Select a desired menu item with v/V on the control button. • If the desired item is hidden, keep pressing v/V until the item appears on the screen. 3 Select a setting with b/B. • If...

Instruction Manual
Page 23
...Selects the folder for adjusting the focus when using a PictBridge compliant printer. Image Size Selects the image size in Easy Shooting mode. Prevents accidental erasure. Changes Setup items. 23 REC Mode Selects the continuous shooting method. Shooting menu Scene Selection Selects the settings pre-adjusted to print out. White Balance Adjusts the color tones. Retouches still images. For details on the operation 1 page 21 Menu items The available menu items vary depending on the screen. SteadyShot Selects the anti-blur mode. Color Mode Changes the...
...Selects the folder for adjusting the focus when using a PictBridge compliant printer. Image Size Selects the image size in Easy Shooting mode. Prevents accidental erasure. Changes Setup items. 23 REC Mode Selects the continuous shooting method. Shooting menu Scene Selection Selects the settings pre-adjusted to print out. White Balance Adjusts the color tones. Retouches still images. For details on the operation 1 page 21 Menu items The available menu items vary depending on the screen. SteadyShot Selects the anti-blur mode. Color Mode Changes the...

Instruction Manual
Page 24
... Settings 2 USB Connect Selects the USB mode to a computer or a PictBridge compliant printer using the dedicated USB cable. Displays the recorded image on the operation 1 page 21 Setup items Main Settings - Change REC.Folder Changes the folder currently used for approximately two seconds immediately after shooting a still image. Copy Copies all images in a horizontal or vertical position. Internal Memory Tool Format Formats the internal memory. Shooting Settings Grid Line Digital Zoom Auto Review Displays lines to the TV color system of functions when you operate the camera...
... Settings 2 USB Connect Selects the USB mode to a computer or a PictBridge compliant printer using the dedicated USB cable. Displays the recorded image on the operation 1 page 21 Setup items Main Settings - Change REC.Folder Changes the folder currently used for approximately two seconds immediately after shooting a still image. Copy Copies all images in a horizontal or vertical position. Internal Memory Tool Format Formats the internal memory. Shooting Settings Grid Line Digital Zoom Auto Review Displays lines to the TV color system of functions when you operate the camera...
Instruction Manual
Page 25
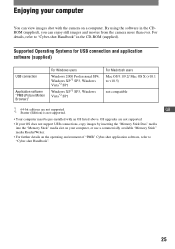
For details, refer to "Cyber-shot Handbook". 25 Supported Operating Systems for USB connection and application software (supplied) USB connection Application software "PMB (Picture Motion Browser)" For Windows users Windows 2000 Professional SP4, Windows XP*1 SP3, Windows Vista*2 SP1 Windows XP*1 SP3, Windows Vista*2 SP1 For Macintosh users Mac OS 9.1/9.2/ Mac OS X (v10.1 to v10.5) not compatible *1 64-bit editions are not supported. • If your OS does not support USB connections, copy images by inserting the "Memory Stick Duo" media...
For details, refer to "Cyber-shot Handbook". 25 Supported Operating Systems for USB connection and application software (supplied) USB connection Application software "PMB (Picture Motion Browser)" For Windows users Windows 2000 Professional SP4, Windows XP*1 SP3, Windows Vista*2 SP1 Windows XP*1 SP3, Windows Vista*2 SP1 For Macintosh users Mac OS 9.1/9.2/ Mac OS X (v10.1 to v10.5) not compatible *1 64-bit editions are not supported. • If your OS does not support USB connections, copy images by inserting the "Memory Stick Duo" media...
Instruction Manual
Page 26
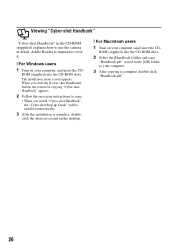
... the CD- Viewing "Cyber-shot Handbook" "Cyber-shot Handbook" in the CD-ROM (supplied) explains how to use the camera in the [GB] folder to your computer. 3 After copying is required to copy. • When you install "Cyber-shot Handbook", the "Cyber-shot Step-up Guide" will be installed automatically. 3 After the installation is complete, double- click the shortcut created on the desktop. [ For Macintosh users 1 Turn on -screen instructions to view it. [ For Windows users 1 Turn on your...
... the CD- Viewing "Cyber-shot Handbook" "Cyber-shot Handbook" in the CD-ROM (supplied) explains how to use the camera in the [GB] folder to your computer. 3 After copying is required to copy. • When you install "Cyber-shot Handbook", the "Cyber-shot Step-up Guide" will be installed automatically. 3 After the installation is complete, double- click the shortcut created on the desktop. [ For Macintosh users 1 Turn on -screen instructions to view it. [ For Windows users 1 Turn on your...
Instruction Manual
Page 27
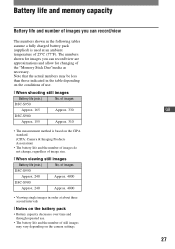
... of use. [ When shooting still images Battery life (min.) No. GB 27 The numbers shown for images you can record/view are approximations and allow for changing of image size. [ When viewing still images Battery life (min.) No. Battery life and memory capacity Battery life and number of images you can record/view The numbers shown in the following tables assume a fully charged battery pack (supplied) is based on the CIPA standard. (CIPA: Camera & Imaging Products...
... of use. [ When shooting still images Battery life (min.) No. GB 27 The numbers shown for images you can record/view are approximations and allow for changing of image size. [ When viewing still images Battery life (min.) No. Battery life and memory capacity Battery life and number of images you can record/view The numbers shown in the following tables assume a fully charged battery pack (supplied) is based on the CIPA standard. (CIPA: Camera & Imaging Products...
Instruction Manual
Page 30
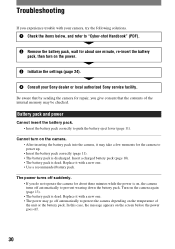
... the internal memory may take a few moments for the camera to power up. • Insert the battery pack correctly (page 11). • The battery pack is dead. Replace it with a new one. • The power may go off automatically to "Cyber-shot Handbook" (PDF). 2 Remove the battery pack, wait for about three minutes while the power is dead. Replace it may be checked. Cannot turn on , the camera turns off...
... the internal memory may take a few moments for the camera to power up. • Insert the battery pack correctly (page 11). • The battery pack is dead. Replace it with a new one. • The power may go off automatically to "Cyber-shot Handbook" (PDF). 2 Remove the battery pack, wait for about three minutes while the power is dead. Replace it may be checked. Cannot turn on , the camera turns off...
Instruction Manual
Page 31
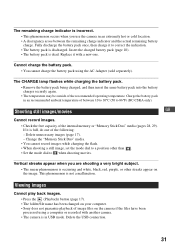
... occurring and white, black, red, purple, or other than . • Set the mode dial to correct the indication. • The battery pack is discharged. Viewing images Cannot play back images. • Press the (Playback) button (page 17). • The folder/file name has been changed on your computer. • Sony does not guarantee playback of between the remaining charge indicator and the actual remaining battery charge. Replace it to when shooting movies. Charge the battery pack in...
... occurring and white, black, red, purple, or other than . • Set the mode dial to correct the indication. • The battery pack is discharged. Viewing images Cannot play back images. • Press the (Playback) button (page 17). • The folder/file name has been changed on your computer. • Sony does not guarantee playback of between the remaining charge indicator and the actual remaining battery charge. Replace it to when shooting movies. Charge the battery pack in...
Instruction Manual
Page 32
... the date and time and other place with the camera in contact with rubber or vinyl for a long time. 32 [ On operating temperatures Your camera is on or off. Cleaning the lens Wipe the lens with moisture remaining inside or outside the camera. This moisture condensation may condense inside the lens, images will not be sure to charge this rechargeable battery is continually charged as...
... the date and time and other place with the camera in contact with rubber or vinyl for a long time. 32 [ On operating temperatures Your camera is on or off. Cleaning the lens Wipe the lens with moisture remaining inside or outside the camera. This moisture condensation may condense inside the lens, images will not be sure to charge this rechargeable battery is continually charged as...
Instruction Manual
Page 33
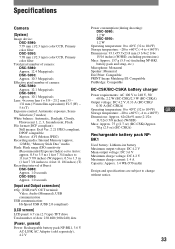
... pixel number of camera: DSC-S980: Approx. 12.1 Megapixels DSC-S950: Approx. 10.1 Megapixels Lens: 4× zoom lens f = 5.8 - 23.2 mm (33 - 132 mm (35 mm film equivalent)) F2.5 (W) - 5.6 (T) Exposure control: Automatic exposure, Scene Selection (7 modes) White balance: Automatic, Daylight, Cloudy, Fluorescent 1, 2, 3, Incandescent, Flash File format (DCF compliant): Still images: Exif Ver. 2.21 JPEG compliant, DPOF compatible Movies: AVI (Motion JPEG) Recording media: Internal Memory (approx. 12 MB), "Memory Stick Duo" media Flash: Flash range (ISO sensitivity (Recommended Exposure Index) set...
... pixel number of camera: DSC-S980: Approx. 12.1 Megapixels DSC-S950: Approx. 10.1 Megapixels Lens: 4× zoom lens f = 5.8 - 23.2 mm (33 - 132 mm (35 mm film equivalent)) F2.5 (W) - 5.6 (T) Exposure control: Automatic exposure, Scene Selection (7 modes) White balance: Automatic, Daylight, Cloudy, Fluorescent 1, 2, 3, Incandescent, Flash File format (DCF compliant): Still images: Exif Ver. 2.21 JPEG compliant, DPOF compatible Movies: AVI (Motion JPEG) Recording media: Internal Memory (approx. 12 MB), "Memory Stick Duo" media Flash: Flash range (ISO sensitivity (Recommended Exposure Index) set...


