
Instruction Manual
Page 4
...15 of Conformity Trade Name: SONY Model No.: DSC-S980 Responsible Party: Sony Electronics Inc. For the State of Conformity Trade Name: SONY Model No.: DSC-S950 Responsible Party: Sony Electronics Inc. Address: 16530 ..., San Diego, CA 92127U.S.A. Reorient or relocate the receiving antenna. - The supplied interface cable must be determined by turning the equipment off and on a circuit different from that interference ...used with the equipment in order to comply with the limits for a Class B digital device, pursuant to the following two conditions: (1) This device may not cause harmful ...
...15 of Conformity Trade Name: SONY Model No.: DSC-S980 Responsible Party: Sony Electronics Inc. For the State of Conformity Trade Name: SONY Model No.: DSC-S950 Responsible Party: Sony Electronics Inc. Address: 16530 ..., San Diego, CA 92127U.S.A. Reorient or relocate the receiving antenna. - The supplied interface cable must be determined by turning the equipment off and on a circuit different from that interference ...used with the equipment in order to comply with the limits for a Class B digital device, pursuant to the following two conditions: (1) This device may not cause harmful ...
Instruction Manual
Page 5
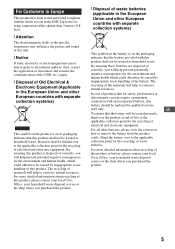
... For all other batteries, please view the section on how to discontinue midway (fail), restart the application or disconnect and connect the communication cable (USB, etc.) again. [ Disposal of Old Electrical & Electronic Equipment (Applicable in the European Union and other European countries with separate ... Customers in Europe This product has been tested and found compliant with the limits set out in the EMC Directive for using connection cables shorter than 3 meters (9.8 feet). [ Attention The electromagnetic fields at end-of-life to conserve natural resources. Instead it shall ...
... For all other batteries, please view the section on how to discontinue midway (fail), restart the application or disconnect and connect the communication cable (USB, etc.) again. [ Disposal of Old Electrical & Electronic Equipment (Applicable in the European Union and other European countries with separate ... Customers in Europe This product has been tested and found compliant with the limits set out in the EMC Directive for using connection cables shorter than 3 meters (9.8 feet). [ Attention The electromagnetic fields at end-of-life to conserve natural resources. Instead it shall ...
Instruction Manual
Page 9
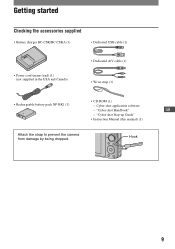
Hook 9 "Cyber-shot Handbook" GB - Cyber-shot application software - Getting started Checking the accessories supplied • Battery charger BC-CSK/BC-CSKA (1) • Dedicated USB cable (1) • Power cord (mains lead) (1) (not supplied in the USA and Canada) • Dedicated A/V cable (1) • Wrist strap (1) • CD-ROM (1) • Rechargeable battery pack NP-BK1 (1) - "Cyber-shot Step-up Guide" • Instruction Manual (this manual) (1) Attach the strap to prevent the camera from damage by being dropped.
Hook 9 "Cyber-shot Handbook" GB - Cyber-shot application software - Getting started Checking the accessories supplied • Battery charger BC-CSK/BC-CSKA (1) • Dedicated USB cable (1) • Power cord (mains lead) (1) (not supplied in the USA and Canada) • Dedicated A/V cable (1) • Wrist strap (1) • CD-ROM (1) • Rechargeable battery pack NP-BK1 (1) - "Cyber-shot Step-up Guide" • Instruction Manual (this manual) (1) Attach the strap to prevent the camera from damage by being dropped.

Instruction Manual
Page 18
To the (USB) · A/V OUT terminal To audio/video input jacks Dedicated A/V cable (supplied) Arrow mark (back) 18 To cancel a selection, select an image you want to the camera. The mark is checked in the checkbox of a folder, select [All In This Folder] in index mode 1 While an index ...delete all the images of the image. [ To delete images in step 1, then press z. [ To view images on TV Connect the camera to the TV with the dedicated A/V cable (supplied). • Align the arrow mark on the control button, then press z. 2 Select the image you have selected for deletion, ...
To the (USB) · A/V OUT terminal To audio/video input jacks Dedicated A/V cable (supplied) Arrow mark (back) 18 To cancel a selection, select an image you want to the camera. The mark is checked in the checkbox of a folder, select [All In This Folder] in index mode 1 While an index ...delete all the images of the image. [ To delete images in step 1, then press z. [ To view images on TV Connect the camera to the TV with the dedicated A/V cable (supplied). • Align the arrow mark on the control button, then press z. 2 Select the image you have selected for deletion, ...

Instruction Manual
Page 19
... However, we recommend that you press v (DISP) on the A control button, the display changes (page 16). [ When shooting still images [ When shooting movies [ When playing back VOL. Even if the vibration warning appears, you from shooting clear images due to ... only for the DSC-S980. • is displayed. 19 Zoom scaling Color mode PictBridge connecting Protect Print order (DPOF) mark Volume PictBridge connecting • Do not disconnect the dedicated USB cable while the mark is displayed only for better lighting or using a tripod or other means to stabilize the camera.
... However, we recommend that you press v (DISP) on the A control button, the display changes (page 16). [ When shooting still images [ When shooting movies [ When playing back VOL. Even if the vibration warning appears, you from shooting clear images due to ... only for the DSC-S980. • is displayed. 19 Zoom scaling Color mode PictBridge connecting Protect Print order (DPOF) mark Volume PictBridge connecting • Do not disconnect the dedicated USB cable while the mark is displayed only for better lighting or using a tripod or other means to stabilize the camera.

Instruction Manual
Page 24
...the language to be used when connecting the camera to the default setting. Selects the digital zoom mode. Create REC.Folder Creates a folder in the menu items, warnings, and messages. 24 Shooting Settings Grid Line Digital Zoom Auto Review Displays lines to easily set ... to a computer or a PictBridge compliant printer using the dedicated USB cable. Internal Memory Tool Format Formats the internal memory. For details on the screen for approximately two seconds immediately after shooting a still image. Function Guide Displays the description of the connected video equipment....
...the language to be used when connecting the camera to the default setting. Selects the digital zoom mode. Create REC.Folder Creates a folder in the menu items, warnings, and messages. 24 Shooting Settings Grid Line Digital Zoom Auto Review Displays lines to easily set ... to a computer or a PictBridge compliant printer using the dedicated USB cable. Internal Memory Tool Format Formats the internal memory. For details on the screen for approximately two seconds immediately after shooting a still image. Function Guide Displays the description of the connected video equipment....
Cyber-shot® Handbook
Page 16
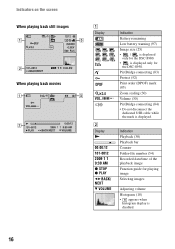
...disconnect the dedicated USB cable while the mark is disabled. 16 B Display N 00:00:12 101-0012 2009 1 1 9:30 AM z STOP z PLAY BACK/ NEXT V VOLUME Indication Battery remaining Low battery warning (97) Image size (25) • / is displayed only for the DSC-S980. • is ...displayed only for playing image Selecting images Adjusting volume Histogram (18) • appears when histogram display is displayed. Indicators on the screen When playing back still images When playing back movies A Display VOL.
...disconnect the dedicated USB cable while the mark is disabled. 16 B Display N 00:00:12 101-0012 2009 1 1 9:30 AM z STOP z PLAY BACK/ NEXT V VOLUME Indication Battery remaining Low battery warning (97) Image size (25) • / is displayed only for the DSC-S980. • is ...displayed only for playing image Selecting images Adjusting volume Histogram (18) • appears when histogram display is displayed. Indicators on the screen When playing back still images When playing back movies A Display VOL.
Cyber-shot® Handbook
Page 19
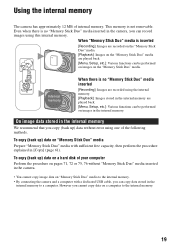
... [Playback]: Images on the "Memory Stick Duo" media are played back. [Menu, Setup, etc.]: Various functions can be performed on images in the camera. • You cannot copy image data on a computer to a computer. On image data stored in the internal memory to the internal memory. 19 ...Menu, Setup, etc.]: Various functions can be performed on images on "Memory Stick Duo" media Prepare "Memory Stick Duo" media with a dedicated USB cable, you can copy data stored in the internal memory We recommend that you copy (back up ) data on the "Memory Stick Duo" media. However...
... [Playback]: Images on the "Memory Stick Duo" media are played back. [Menu, Setup, etc.]: Various functions can be performed on images in the camera. • You cannot copy image data on a computer to a computer. On image data stored in the internal memory to the internal memory. 19 ...Menu, Setup, etc.]: Various functions can be performed on images on "Memory Stick Duo" media Prepare "Memory Stick Duo" media with a dedicated USB cable, you can copy data stored in the internal memory We recommend that you copy (back up ) data on the "Memory Stick Duo" media. However...
Cyber-shot® Handbook
Page 57
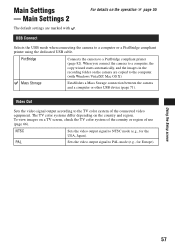
...wizard starts automatically, and the images in the recording folder on the operation 1 page 55 USB Connect Selects the USB mode when connecting the camera to the computer. (with . The TV color systems differ depending on a TV screen, check the TV color system of the country ... connected video equipment. Main Settings - Main Settings 2 The default settings are copied to a computer or a PictBridge compliant printer using the dedicated USB cable. PAL Sets the video output signal to NTSC mode (e.g., for Europe). NTSC Sets the video output signal to PAL mode (e.g., for the USA, ...
...wizard starts automatically, and the images in the recording folder on the operation 1 page 55 USB Connect Selects the USB mode when connecting the camera to the computer. (with . The TV color systems differ depending on a TV screen, check the TV color system of the country ... connected video equipment. Main Settings - Main Settings 2 The default settings are copied to a computer or a PictBridge compliant printer using the dedicated USB cable. PAL Sets the video output signal to NTSC mode (e.g., for Europe). NTSC Sets the video output signal to PAL mode (e.g., for the USA, ...
Cyber-shot® Handbook
Page 65
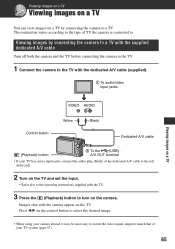
...on a TV You can view images on a TV by connecting the camera to a TV with the supplied dedicated A/V cable Turn off both the camera and the TV before connecting the camera to the TV. 1 Connect the camera to the TV with the dedicated A/V cable (supplied). 1 To audio/video input jacks Viewing images on a ...input jacks, connect the audio plug (black) of the dedicated A/V cable to the left audio jack. 2 Turn on the TV and set the input. • Refer also to the operating instructions supplied with the camera appear on the TV. Images shot with the TV. 3 Press the (Playback) button to match ...
...on a TV You can view images on a TV by connecting the camera to a TV with the supplied dedicated A/V cable Turn off both the camera and the TV before connecting the camera to the TV. 1 Connect the camera to the TV with the dedicated A/V cable (supplied). 1 To audio/video input jacks Viewing images on a ...input jacks, connect the audio plug (black) of the dedicated A/V cable to the left audio jack. 2 Turn on the TV and set the input. • Refer also to the operating instructions supplied with the camera appear on the TV. Images shot with the TV. 3 Press the (Playback) button to match ...
Cyber-shot® Handbook
Page 66
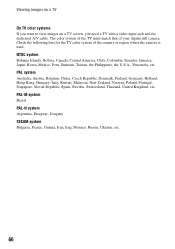
... TV color systems If you want to view images on a TV screen, you need a TV with a video input jack and the dedicated A/V cable. NTSC system Bahama Islands, Bolivia, Canada, Central America, Chile, Colombia, Ecuador, Jamaica, Japan, Korea, Mexico, Peru, Surinam, Taiwan, the ..., Singapore, Slovak Republic, Spain, Sweden, Switzerland, Thailand, United Kingdom, etc. Check the following lists for the TV color system of your digital still camera. PAL-M system Brazil PAL-N system Argentina, Paraguay, Uruguay SECAM system Bulgaria, France, Guiana, Iran, Iraq, Monaco, Russia, Ukraine, etc....
... TV color systems If you want to view images on a TV screen, you need a TV with a video input jack and the dedicated A/V cable. NTSC system Bahama Islands, Bolivia, Canada, Central America, Chile, Colombia, Ecuador, Jamaica, Japan, Korea, Mexico, Peru, Surinam, Taiwan, the ..., Singapore, Slovak Republic, Spain, Sweden, Switzerland, Thailand, United Kingdom, etc. Check the following lists for the TV color system of your digital still camera. PAL-M system Brazil PAL-N system Argentina, Paraguay, Uruguay SECAM system Bulgaria, France, Guiana, Iran, Iraq, Monaco, Russia, Ukraine, etc....
Cyber-shot® Handbook
Page 71
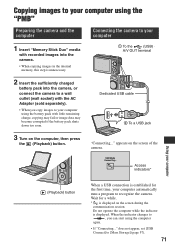
... images in the internal memory, this step is unnecessary. 1 To the (USB) · A/V OUT terminal 2 Insert the sufficiently charged battery pack into the camera, or connect the camera to a wall outlet (wall socket) with the AC Adaptor (sold separately). • When you can start using the battery pack with little remaining charge... using the computer again. • If "Connecting..." appears on the computer, then press the (Playback) button. does not appear, set [USB Connect] to recognize the camera. "Connecting..." Dedicated USB cable 2 To a USB jack 3 Turn on the screen of the...
... images in the internal memory, this step is unnecessary. 1 To the (USB) · A/V OUT terminal 2 Insert the sufficiently charged battery pack into the camera, or connect the camera to a wall outlet (wall socket) with the AC Adaptor (sold separately). • When you can start using the battery pack with little remaining charge... using the computer again. • If "Connecting..." appears on the computer, then press the (Playback) button. does not appear, set [USB Connect] to recognize the camera. "Connecting..." Dedicated USB cable 2 To a USB jack 3 Turn on the screen of the...
Cyber-shot® Handbook
Page 73
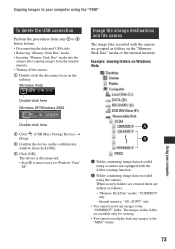
... to 4 below before: • Disconnecting the dedicated USB cable. • Removing "Memory Stick Duo" media. • Inserting "Memory Stick Duo" media into the camera after copying images from the internal memory. • Turning off the camera. 1 Double-click the disconnect icon on the tasktray. When ...no new folders are created, there are grouped as follows: - A Folder containing image data recorded using a camera not equipped with the camera are folders as folders on the confirmation window, then click [OK]. 4 Click [OK]. "Memory Stick Duo" media: "101MSDCF" ...
... to 4 below before: • Disconnecting the dedicated USB cable. • Removing "Memory Stick Duo" media. • Inserting "Memory Stick Duo" media into the camera after copying images from the internal memory. • Turning off the camera. 1 Double-click the disconnect icon on the tasktray. When ...no new folders are created, there are grouped as follows: - A Folder containing image data recorded using a camera not equipped with the camera are folders as folders on the confirmation window, then click [OK]. 4 Click [OK]. "Memory Stick Duo" media: "101MSDCF" ...

Cyber-shot® Handbook
Page 75
... • Even when you are the examples for copying images from "Memory Stick Duo" media to your computer. • To copy images in "Connecting the camera to your computer" on page 71. • If "PMB" is already installed, then [Import Media Files] is started on "PMB" but select [Cancel...] to finish. For a computer with the dedicated USB cable. Copying images to a computer without "PMB" You can copy images by inserting the "Memory Stick Duo" media into the "Memory Stick" media slot on your...
... • Even when you are the examples for copying images from "Memory Stick Duo" media to your computer. • To copy images in "Connecting the camera to your computer" on page 71. • If "PMB" is already installed, then [Import Media Files] is started on "PMB" but select [Cancel...] to finish. For a computer with the dedicated USB cable. Copying images to a computer without "PMB" You can copy images by inserting the "Memory Stick Duo" media into the "Memory Stick" media slot on your...
Cyber-shot® Handbook
Page 78
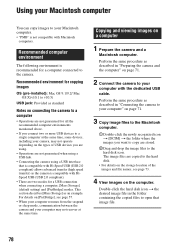
...camera to a computer • Operations are stored. 2Drag and drop the image files to the hard disk icon. Perform the same procedure as described in "Preparing the camera... the camera to ...camera is compatible with HiSpeed USB (USB 2.0 compliant). • There are two modes for a computer connected to the camera.... Double-click the hard disk icon t the desired image file in "Connecting the camera...camera and your computer may not recover at the same time, some devices, including your camera... • Connecting the camera using a USB interface... 1 Prepare the camera and a Macintosh computer....
...camera to a computer • Operations are stored. 2Drag and drop the image files to the hard disk icon. Perform the same procedure as described in "Preparing the camera... the camera to ...camera is compatible with HiSpeed USB (USB 2.0 compliant). • There are two modes for a computer connected to the camera.... Double-click the hard disk icon t the desired image file in "Connecting the camera...camera and your computer may not recover at the same time, some devices, including your camera... • Connecting the camera using a USB interface... 1 Prepare the camera and a Macintosh computer....
Cyber-shot® Handbook
Page 79
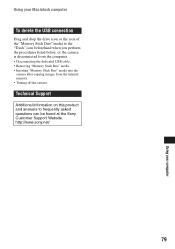
... from the computer. • Disconnecting the dedicated USB cable. • Removing "Memory Stick Duo" media. • Inserting "Memory Stick Duo" media into the camera after copying images from the internal memory. • Turning off the camera. http://www.sony.net/ 79 Using your Macintosh computer To delete the ...USB connection Drag and drop the drive icon or the icon of the "Memory Stick Duo" media to frequently asked questions can be found at the Sony Customer Support Website. Using ...
... from the computer. • Disconnecting the dedicated USB cable. • Removing "Memory Stick Duo" media. • Inserting "Memory Stick Duo" media into the camera after copying images from the internal memory. • Turning off the camera. http://www.sony.net/ 79 Using your Macintosh computer To delete the ...USB connection Drag and drop the drive icon or the icon of the "Memory Stick Duo" media to frequently asked questions can be found at the Sony Customer Support Website. Using ...
Cyber-shot® Handbook
Page 82
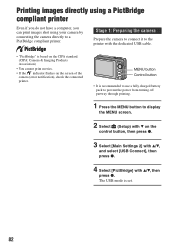
...printer Even if you do not have a computer, you can print images shot using your camera by connecting the camera directly to display the MENU screen. 2 Select (Setup) with V on the screen of the camera (error notification), check the connected printer. The USB mode is based ... CIPA standard. (CIPA: Camera & Imaging Products Association) • You cannot print movies. • If the indicator flashes on the control button, then press z. 3 Select [Main Settings 2] with v/V, and select [USB Connect], then press z. 4 Select [PictBridge] with the dedicated USB cable. • "PictBridge" ...
...printer Even if you do not have a computer, you can print images shot using your camera by connecting the camera directly to display the MENU screen. 2 Select (Setup) with V on the screen of the camera (error notification), check the connected printer. The USB mode is based ... CIPA standard. (CIPA: Camera & Imaging Products Association) • You cannot print movies. • If the indicator flashes on the control button, then press z. 3 Select [Main Settings 2] with v/V, and select [USB Connect], then press z. 4 Select [PictBridge] with the dedicated USB cable. • "PictBridge" ...

Cyber-shot® Handbook
Page 83
... the check box. When you select [Multiple Images] You can print the selected image. Move on the printer. The camera is made, the indicator appears. 3 Press the MENU button, select [Print] with v/V, then press z. appears on the.... Printing images directly using a PictBridge compliant printer Stage 2: Connecting the camera to the printer 1 Connect the camera to the printer. 1 To the (USB) · A/V OUT terminal Dedicated USB cable 2 To the USB jack 2 Turn on to Stage 4. After the... (Playback) button and turn on the control button, then press z. Printing still images 83
... the check box. When you select [Multiple Images] You can print the selected image. Move on the printer. The camera is made, the indicator appears. 3 Press the MENU button, select [Print] with v/V, then press z. appears on the.... Printing images directly using a PictBridge compliant printer Stage 2: Connecting the camera to the printer 1 Connect the camera to the printer. 1 To the (USB) · A/V OUT terminal Dedicated USB cable 2 To the USB jack 2 Turn on to Stage 4. After the... (Playback) button and turn on the control button, then press z. Printing still images 83

Cyber-shot® Handbook
Page 84
...4: Printing 1 Select print settings with v/V/b/ B. 2 Select [OK] with v, then press z. The image is printed. • Do not disconnect the dedicated USB cable while the (PictBridge Connecting) indicator appears on a sheet. [Size] Select the size of the printing sheet. [Date] Select [Day&Time] or [Date] to Stage... 2, and disconnect the dedicated USB cable from the camera. 84 Stage 5: Completing the printing Make sure the screen has returned to insert the date and time on images. • When you choose...
...4: Printing 1 Select print settings with v/V/b/ B. 2 Select [OK] with v, then press z. The image is printed. • Do not disconnect the dedicated USB cable while the (PictBridge Connecting) indicator appears on a sheet. [Size] Select the size of the printing sheet. [Date] Select [Day&Time] or [Date] to Stage... 2, and disconnect the dedicated USB cable from the camera. 84 Stage 5: Completing the printing Make sure the screen has returned to insert the date and time on images. • When you choose...
Cyber-shot® Handbook
Page 92
...your TV (page 57). • Check whether the connection is not supported, connect the camera to see if the video output signal of your computer without passing through a USB hub or other than Sony should contact those manufacturers. • If "Memory Stick PRO Duo" media is correct (...Mass Storage] (page 57). • Use the dedicated USB cable (supplied) (page 71). • Disconnect the dedicated USB cable from both the computer and the camera, and connect it again firmly. • Disconnect all equipment other than the camera, the keyboard and the mouse from the USB connectors of your ...
...your TV (page 57). • Check whether the connection is not supported, connect the camera to see if the video output signal of your computer without passing through a USB hub or other than Sony should contact those manufacturers. • If "Memory Stick PRO Duo" media is correct (...Mass Storage] (page 57). • Use the dedicated USB cable (supplied) (page 71). • Disconnect the dedicated USB cable from both the computer and the camera, and connect it again firmly. • Disconnect all equipment other than the camera, the keyboard and the mouse from the USB connectors of your ...


