Instruction Manual
Page 7
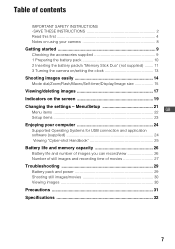
...camera on/setting the clock 13 Shooting images easily 14 Mode dial/Zoom/Flash/Macro/Self-timer/Display/Image size 15 Viewing/deleting images 17 Indicators on using your computer 24 Supported Operating Systems for USB connection and application software (supplied 24 Viewing "Cyber-shot... Handbook 25 Battery life and memory capacity 26 Battery life and number of images you can record/view 26 Number of still images ...and recording time of movies 27 Troubleshooting 29 Battery pack and power 29 Shooting still images/movies 30 Viewing ...
...camera on/setting the clock 13 Shooting images easily 14 Mode dial/Zoom/Flash/Macro/Self-timer/Display/Image size 15 Viewing/deleting images 17 Indicators on using your computer 24 Supported Operating Systems for USB connection and application software (supplied 24 Viewing "Cyber-shot... Handbook 25 Battery life and memory capacity 26 Battery life and number of images you can record/view 26 Number of still images ...and recording time of movies 27 Troubleshooting 29 Battery pack and power 29 Shooting still images/movies 30 Viewing ...

Instruction Manual
Page 8
... dots (white, red, blue or green) may appear on the LCD screen and lens • The LCD screen is neither dust-proof, nor splashproof, nor water-proof. It may cause the malfunction of the camera or recording media, etc. [ On illustrations Illustrations used in sandy or... compensation for damaged content or recording failure Sony cannot compensate for failure to record or loss or damage of recorded content due to the flash surface, resulting in insufficient light emission. [ Notes on the LCD screen. If water enters inside the camera, a malfunction may be copyrighted. These ...
... dots (white, red, blue or green) may appear on the LCD screen and lens • The LCD screen is neither dust-proof, nor splashproof, nor water-proof. It may cause the malfunction of the camera or recording media, etc. [ On illustrations Illustrations used in sandy or... compensation for damaged content or recording failure Sony cannot compensate for failure to record or loss or damage of recorded content due to the flash surface, resulting in insufficient light emission. [ Notes on the LCD screen. If water enters inside the camera, a malfunction may be copyrighted. These ...
Instruction Manual
Page 11
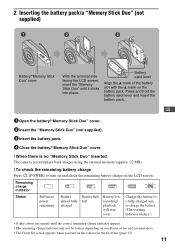
... the battery to turn on the camera for the first time (page 13). 11 Battery eject lever Align the v mark of use and circumstances. • The Clock Set screen appears when you turn on and check the remaining battery charge on the LCD screen. Press and hold the battery eject... the battery pack/a "Memory Stick Duo" (not supplied) ɟ ɠ Battery/"Memory Stick Duo" cover With the terminal side facing the LCD screen, insert the "Memory Stick Duo" until the correct remaining charge indicator appears. • The remaining charge indicator may not be correct depending on conditions of...
... the battery to turn on the camera for the first time (page 13). 11 Battery eject lever Align the v mark of use and circumstances. • The Clock Set screen appears when you turn on and check the remaining battery charge on the LCD screen. Press and hold the battery eject... the battery pack/a "Memory Stick Duo" (not supplied) ɟ ɠ Battery/"Memory Stick Duo" cover With the terminal side facing the LCD screen, insert the "Memory Stick Duo" until the correct remaining charge indicator appears. • The remaining charge indicator may not be correct depending on conditions of...
Instruction Manual
Page 13
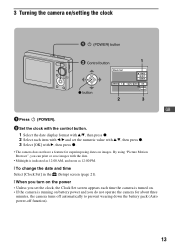
3 Turning the camera on images. By using "Picture Motion Browser", you can print or save images with the date. • Midnight is indicated as 12:00 AM, and noon as 12:00 PM. [ To change the date and time Select [Clock Set] in the (Setup) screen (page 21). [ When you turn on the... power • Unless you set the clock, the Clock Set screen appears each item with b/B and set the numeric value with v/V, then press z. 3 Select [OK] with v/V, then press z. 2 Select each time the camera is turned on. • If the camera is running on battery power and you do not operate the...
3 Turning the camera on images. By using "Picture Motion Browser", you can print or save images with the date. • Midnight is indicated as 12:00 AM, and noon as 12:00 PM. [ To change the date and time Select [Clock Set] in the (Setup) screen (page 21). [ When you turn on the... power • Unless you set the clock, the Clock Set screen appears each item with b/B and set the numeric value with v/V, then press z. 3 Select [OK] with v/V, then press z. 2 Select each time the camera is turned on. • If the camera is running on battery power and you do not operate the...
Instruction Manual
Page 16
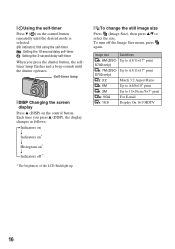
To turn off * * The brightness of the LCD Backlight up [ To change the still image size Press (Image Size), then press v/V to A3/11×17" print S780 only) 7M: 7M (DSC- Up to select the size. [ Using the self-timer Press V ( ) on the control button repeatedly until ...the shutter operates. Self-timer lamp [ DISP Changing the screen display Press v (DISP) on * r Indicators off the Image Size menu, press again. Image size Guidelines 8M: 8M (DSC- Each time you press the shutter button, the selftimer lamp flashes and a beep sounds until...
To turn off * * The brightness of the LCD Backlight up [ To change the still image size Press (Image Size), then press v/V to A3/11×17" print S780 only) 7M: 7M (DSC- Up to select the size. [ Using the self-timer Press V ( ) on the control button repeatedly until ...the shutter operates. Self-timer lamp [ DISP Changing the screen display Press v (DISP) on * r Indicators off the Image Size menu, press again. Image size Guidelines 8M: 8M (DSC- Each time you press the shutter button, the selftimer lamp flashes and a beep sounds until...
Instruction Manual
Page 17
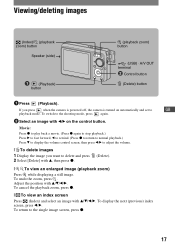
...Delete). [ To view an enlarged image (playback zoom) Press while displaying a still image. To cancel the playback zoom, press z. [ To view an index screen Press (Index) and select an image with v/V/b/B. To display the next (previous) index screen, press b/B. Movie: Press z to play back a movie. (Press z again...to adjust the volume. [ To delete images 1 Display the image you press when the camera is powered off, the camera is turned on the control button. If you want to the single image screen, press z. 17 Viewing/deleting images (Index)/ (playback zoom) button Speaker (side) (...
...Delete). [ To view an enlarged image (playback zoom) Press while displaying a still image. To cancel the playback zoom, press z. [ To view an index screen Press (Index) and select an image with v/V/b/B. To display the next (previous) index screen, press b/B. Movie: Press z to play back a movie. (Press z again...to adjust the volume. [ To delete images 1 Display the image you press when the camera is powered off, the camera is turned on the control button. If you want to the single image screen, press z. 17 Viewing/deleting images (Index)/ (playback zoom) button Speaker (side) (...
Instruction Manual
Page 18
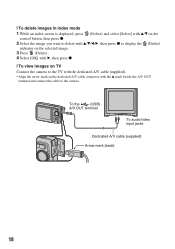
... A/V OUT terminal To audio/video input jacks Dedicated A/V cable (supplied) Arrow mark (back) 18 [ To delete images in index mode 1 While an index screen is displayed, press (Delete) and select [Select] with v/V on the control button, then press z. 2 Select the image you want to delete with v/V/b/B, ... the (Delete) indicator on the selected image. 3 Press (Delete). 4 Select [OK] with B, then press z. [ To view images on TV Connect the camera to the TV with the dedicated A/V cable (supplied). • Align the arrow mark on the dedicated A/V cable connector with the v mark beside the A/V OUT...
... A/V OUT terminal To audio/video input jacks Dedicated A/V cable (supplied) Arrow mark (back) 18 [ To delete images in index mode 1 While an index screen is displayed, press (Delete) and select [Select] with v/V on the control button, then press z. 2 Select the image you want to delete with v/V/b/B, ... the (Delete) indicator on the selected image. 3 Press (Delete). 4 Select [OK] with B, then press z. [ To view images on TV Connect the camera to the TV with the dedicated A/V cable (supplied). • Align the arrow mark on the dedicated A/V cable connector with the v mark beside the A/V OUT...
Instruction Manual
Page 19
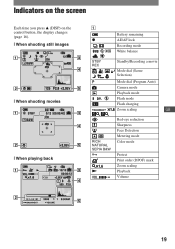
N Red-eye reduction Sharpness Face Detection Metering mode Color mode Protect Print order (DPOF) mark Zoom scaling Playback Volume 19 Indicators on the screen Each time you press v (DISP) on the control button, the display changes (page 16). [ When shooting still images [ When shooting movies [ When playing back A Battery remaining z AE/AF lock Recording mode White balance STBY REC Standby/Recording a movie Mode dial (Scene Selection) Mode dial (Program Auto) Camera mode Playback mode Flash mode Flash charging Zoom scaling GB RICH NATURAL SEPIA B&W -
N Red-eye reduction Sharpness Face Detection Metering mode Color mode Protect Print order (DPOF) mark Zoom scaling Playback Volume 19 Indicators on the screen Each time you press v (DISP) on the control button, the display changes (page 16). [ When shooting still images [ When shooting movies [ When playing back A Battery remaining z AE/AF lock Recording mode White balance STBY REC Standby/Recording a movie Mode dial (Scene Selection) Mode dial (Program Auto) Camera mode Playback mode Flash mode Flash charging Zoom scaling GB RICH NATURAL SEPIA B&W -

Instruction Manual
Page 21
Select the item to set the mode dial. The setting you select is invisible, keep pressing b/B until the item appears on the screen. • Select an item in step 3 and then press B. Playback: Press (Playback). Changing the settings - Menu/Setup ɟ MENU button Mode dial ɠ Control ... button. • If the desired item is zoomed and set. 5 Press MENU to display the menu. 3 Select the desired menu item with b/B on the camera, then set with v/V. Different items are available depending on the position of the mode dial and Recording/Playback mode. 2 Press MENU to turn off the...
Select the item to set the mode dial. The setting you select is invisible, keep pressing b/B until the item appears on the screen. • Select an item in step 3 and then press B. Playback: Press (Playback). Changing the settings - Menu/Setup ɟ MENU button Mode dial ɠ Control ... button. • If the desired item is zoomed and set. 5 Press MENU to display the menu. 3 Select the desired menu item with b/B on the camera, then set with v/V. Different items are available depending on the position of the mode dial and Recording/Playback mode. 2 Press MENU to turn off the...
Instruction Manual
Page 22
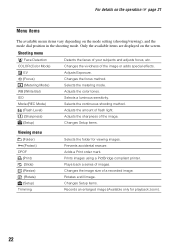
...Selects the folder for playback zoom). 22 For details on the operation 1 page 21 Menu items The available menu items vary depending on the screen. Only the available items are displayed on the mode setting (shooting/viewing), and the mode dial position in the shooting mode. Mode (...an enlarged image (Available only for viewing images. COLOR (Color Mode) Changes the vividness of your subjects and adjusts focus, etc. Rotates a still image. WB (White Bal) Adjusts the color tones. Shooting menu Face Detection Detects the faces of the image or adds special effects. Changes the...
...Selects the folder for playback zoom). 22 For details on the operation 1 page 21 Menu items The available menu items vary depending on the screen. Only the available items are displayed on the mode setting (shooting/viewing), and the mode dial position in the shooting mode. Mode (...an enlarged image (Available only for viewing images. COLOR (Color Mode) Changes the vividness of your subjects and adjusts focus, etc. Rotates a still image. WB (White Bal) Adjusts the color tones. Shooting menu Face Detection Detects the faces of the image or adds special effects. Changes the...
Instruction Manual
Page 23
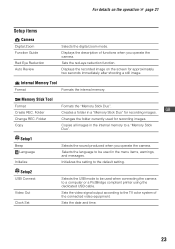
...sound produced when you operate the camera. Selects the language to be used when connecting the camera to the TV color system of functions when you operate the camera. Displays the recorded image on the operation 1 page 21 Setup items Camera Digital Zoom Function Guide Red Eye ...Reduction Auto Review Selects the digital zoom mode. Copy Copies all images in a "Memory Stick Duo" for recording images. For details on the screen for approximately two seconds immediately after shooting a still image. Displays the description ...
...sound produced when you operate the camera. Selects the language to be used when connecting the camera to the TV color system of functions when you operate the camera. Displays the recorded image on the operation 1 page 21 Setup items Camera Digital Zoom Function Guide Red Eye ...Reduction Auto Review Selects the digital zoom mode. Copy Copies all images in a "Memory Stick Duo" for recording images. For details on the screen for approximately two seconds immediately after shooting a still image. Displays the description ...
Instruction Manual
Page 25
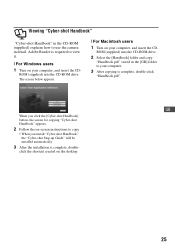
...When you install "Cyber-shot Handbook," the "Cyber-shot Step-up Guide" will be installed automatically. 3 After the installation is complete, double-click "Handbook.pdf". click the shortcut created on -screen instructions to view ...Cyber-shot Handbook] button, the screen for copying "Cyber-shot Handbook" appears. 2 Follow the on the desktop. 25 ROM (supplied) into the CD-ROM drive. Viewing "Cyber-shot Handbook" "Cyber-shot Handbook" in detail. ROM (supplied) into the CD-ROM drive. 2 Select the [Handbook] folder and copy "Handbook.pdf" stored in the [GB] folder to use the camera...
...When you install "Cyber-shot Handbook," the "Cyber-shot Step-up Guide" will be installed automatically. 3 After the installation is complete, double-click "Handbook.pdf". click the shortcut created on -screen instructions to view ...Cyber-shot Handbook] button, the screen for copying "Cyber-shot Handbook" appears. 2 Follow the on the desktop. 25 ROM (supplied) into the CD-ROM drive. Viewing "Cyber-shot Handbook" "Cyber-shot Handbook" in detail. ROM (supplied) into the CD-ROM drive. 2 Select the [Handbook] folder and copy "Handbook.pdf" stored in the [GB] folder to use the camera...
Instruction Manual
Page 31
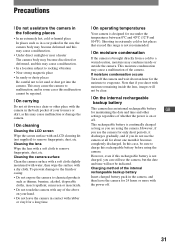
...as this may cause malfunction or damage the camera. [ On cleaning Cleaning the LCD screen Wipe the screen surface with moisture remaining inside or outside the camera. Cleaning the lens Wipe the lens with a dry cloth. Cleaning the camera surface Clean the camera surface with a soft cloth slightly moistened with...month it discharges gradually, and if you can still use the camera at all for about an hour for a long time. [ On operating temperatures Your camera is brought directly from a cold to a warm location, moisture may cause the camera to malfunction, and in some cases this ...
...as this may cause malfunction or damage the camera. [ On cleaning Cleaning the LCD screen Wipe the screen surface with moisture remaining inside or outside the camera. Cleaning the lens Wipe the lens with a dry cloth. Cleaning the camera surface Clean the camera surface with a soft cloth slightly moistened with...month it discharges gradually, and if you can still use the camera at all for about an hour for a long time. [ On operating temperatures Your camera is brought directly from a cold to a warm location, moisture may cause the camera to malfunction, and in some cases this ...
Instruction Manual
Page 32
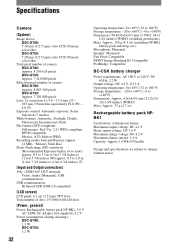
... pixels Effective pixel number of camera: DSC-S780: Approx. 8 083 560 pixels DSC-S750: Approx. 7 201 000 pixels Lens: 3× zoom lens f = 5.8 - 17.4 mm (35 - 105 mm (35mm film equivalent)) F2.8 (W) - 4.8 (T) Exposure control: Automatic exposure, Scene Selection (7 modes) White balance: Automatic, Daylight, Cloudy, Fluorescent, Incandescent, Flash File format (DCF compliant): Still images: Exif Ver. 2.21...
... pixels Effective pixel number of camera: DSC-S780: Approx. 8 083 560 pixels DSC-S750: Approx. 7 201 000 pixels Lens: 3× zoom lens f = 5.8 - 17.4 mm (35 - 105 mm (35mm film equivalent)) F2.8 (W) - 4.8 (T) Exposure control: Automatic exposure, Scene Selection (7 modes) White balance: Automatic, Daylight, Cloudy, Fluorescent, Incandescent, Flash File format (DCF compliant): Still images: Exif Ver. 2.21...
Cyber-shot® Handbook
Page 1
Table of contents Basic Operations Using the menu Using the Setup screen Viewing images on a TV Using your computer Printing still images Troubleshooting Others Index 3-285-742-11(1) GB Digital Still Camera Cyber-shot Handbook DSC-S750/S780 Before operating the unit, please read this Handbook thoroughly together with the "Instruction Manual" and the "Cyber-shot Step-up Guide", and retain them for future reference. © 2008 Sony Corporation VCLICK!
Table of contents Basic Operations Using the menu Using the Setup screen Viewing images on a TV Using your computer Printing still images Troubleshooting Others Index 3-285-742-11(1) GB Digital Still Camera Cyber-shot Handbook DSC-S750/S780 Before operating the unit, please read this Handbook thoroughly together with the "Instruction Manual" and the "Cyber-shot Step-up Guide", and retain them for future reference. © 2008 Sony Corporation VCLICK!
Cyber-shot® Handbook
Page 2
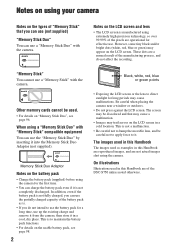
...Duo" by inserting it is not completely discharged. Be careful when placing the camera near a window or outdoors. • Do not press against the LCD screen. On illustrations Illustrations used in this Handbook are of the DSC-S750 unless noted otherwise. "Memory Stick" You cannot use a "Memory Stick...charged capacity of the battery pack as examples in this Handbook are reproduced images, and are not actual images shot using the camera. The images used in a cool, dry place. The screen may cause malfunctions. In addition, even if the battery pack is . • If you can use a...
...Duo" by inserting it is not completely discharged. Be careful when placing the camera near a window or outdoors. • Do not press against the LCD screen. On illustrations Illustrations used in this Handbook are of the DSC-S750 unless noted otherwise. "Memory Stick" You cannot use a "Memory Stick...charged capacity of the battery pack as examples in this Handbook are reproduced images, and are not actual images shot using the camera. The images used in a cool, dry place. The screen may cause malfunctions. In addition, even if the battery pack is . • If you can use a...

Cyber-shot® Handbook
Page 3
... Changing the screen display 18 Using the internal memory 19 Basic Operations Using the mode dial 20 Shooting images easily (Auto adjustment mode 21 Shooting still images (Scene selection 25 Viewing/deleting images 28 Using the menu Using menu items 30 Menu items 31 Shooting menu 32 (Face Detection): Detecting ... Mode): Selecting the continuous shooting method (Flash Level): Adjusting the amount of flash light (Sharpness): Adjusting the sharpness of lighting 9 Quality - On using your camera 2 Basic techniques for better images 6 Focus - Adjusting the light intensity 8 Color -
... Changing the screen display 18 Using the internal memory 19 Basic Operations Using the mode dial 20 Shooting images easily (Auto adjustment mode 21 Shooting still images (Scene selection 25 Viewing/deleting images 28 Using the menu Using menu items 30 Menu items 31 Shooting menu 32 (Face Detection): Detecting ... Mode): Selecting the continuous shooting method (Flash Level): Adjusting the amount of flash light (Sharpness): Adjusting the sharpness of lighting 9 Quality - On using your camera 2 Basic techniques for better images 6 Focus - Adjusting the light intensity 8 Color -
Cyber-shot® Handbook
Page 4
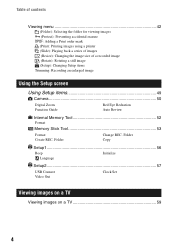
... (Slide): Playing back a series of images (Resize): Changing the image size of a recorded image (Rotate): Rotating a still image (Setup): Changing Setup items Trimming: Recording an enlarged image Using the Setup screen Using Setup items 49 Camera 50 Digital Zoom Function Guide Red Eye Reduction Auto Review Internal Memory Tool 52 Format Memory Stick Tool...
... (Slide): Playing back a series of images (Resize): Changing the image size of a recorded image (Rotate): Rotating a still image (Setup): Changing Setup items Trimming: Recording an enlarged image Using the Setup screen Using Setup items 49 Camera 50 Digital Zoom Function Guide Red Eye Reduction Auto Review Internal Memory Tool 52 Format Memory Stick Tool...

Cyber-shot® Handbook
Page 7
...Select (High Sensitivity mode) in Scene Selection. • Select a higher ISO sensitivity to hold the camera and press the shutter button, and the entire screen is blurred. Notes Besides, camera shake and subject blur occur frequently under low-light or slow shutter speed conditions, such as those encountered... in mind. 7 In that case, shoot with a 2-second delay self-timer and stabilize the camera by holding your arms...
...Select (High Sensitivity mode) in Scene Selection. • Select a higher ISO sensitivity to hold the camera and press the shutter button, and the entire screen is blurred. Notes Besides, camera shake and subject blur occur frequently under low-light or slow shutter speed conditions, such as those encountered... in mind. 7 In that case, shoot with a 2-second delay self-timer and stabilize the camera by holding your arms...

Cyber-shot® Handbook
Page 10
... size" is shown by email 10 If it contains a large number of the camera, the fine detail and data processing time differ when the image is printed or displayed on the screen of pixels, the picture becomes large, it takes up more memory, and the image is displayed in up to A3... size Example: An attached image to be sent by the number of small dots called pixels. Description of the pixels and the image size 1 Image size: 8M (DSC-S780 only...
... size" is shown by email 10 If it contains a large number of the camera, the fine detail and data processing time differ when the image is printed or displayed on the screen of pixels, the picture becomes large, it takes up more memory, and the image is displayed in up to A3... size Example: An attached image to be sent by the number of small dots called pixels. Description of the pixels and the image size 1 Image size: 8M (DSC-S780 only...


