Operating Instructions
Page 7
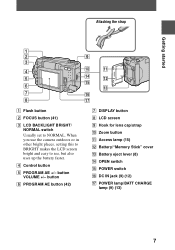
... I Hook for lens cap/strap J Zoom button K Access lamp (15) L Battery/"Memory Stick" cover M Battery eject lever (8) N OPEN switch O POWER switch P DC IN jack (9) (12) Q POWER lamp/BATT CHARGE lamp (9) (13) 7 When you use the camera outdoors or in other bright places, setting this to BRIGHT makes the LCD screen bright and easy to NORMAL.
... I Hook for lens cap/strap J Zoom button K Access lamp (15) L Battery/"Memory Stick" cover M Battery eject lever (8) N OPEN switch O POWER switch P DC IN jack (9) (12) Q POWER lamp/BATT CHARGE lamp (9) (13) 7 When you use the camera outdoors or in other bright places, setting this to BRIGHT makes the LCD screen bright and easy to NORMAL.
Operating Instructions
Page 8
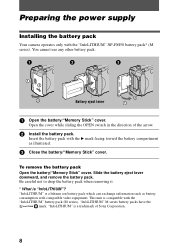
... OPEN switch in the direction of Sony Corporation. 8 This unit is a trademark of the arrow. 2 Install the battery pack. Slide the battery eject lever downward, and remove the battery pack. "InfoLITHIUM" M series battery packs have the mark. "InfoLITHIUM" is compatible with compatible video equipment. Preparing the power supply Installing the battery pack Your camera...
... OPEN switch in the direction of Sony Corporation. 8 This unit is a trademark of the arrow. 2 Install the battery pack. Slide the battery eject lever downward, and remove the battery pack. "InfoLITHIUM" M series battery packs have the mark. "InfoLITHIUM" is compatible with compatible video equipment. Preparing the power supply Installing the battery pack Your camera...
Operating Instructions
Page 9
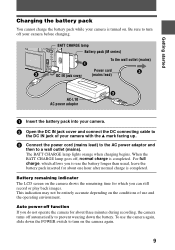
... the remaining time for about three minutes during recording, the camera turns off automatically to use the battery longer than usual, leave the battery pack inserted for which allows you to prevent wearing down the POWER switch to a wall outlet (mains). Battery remaining indicator The LCD screen on . To use and the operating...
... the remaining time for about three minutes during recording, the camera turns off automatically to use the battery longer than usual, leave the battery pack inserted for which allows you to prevent wearing down the POWER switch to a wall outlet (mains). Battery remaining indicator The LCD screen on . To use and the operating...

Operating Instructions
Page 13
If these are not set the date and time. The menu bar appears on the LCD screen. 3 Select [SETUP] with B on the control button, then press the center z. 4 Select [CLOCK SET] with v/V on the control button. Getting started Setting the date and time When you turn on your camera, set , the CLOCK SET screen appears whenever you first use your camera for recording. Control button POWER lamp 1 Slide down the POWER switch to turn on the power. The POWER lamp lights up. 2 Press v on the control button, then press the center z. 13
If these are not set the date and time. The menu bar appears on the LCD screen. 3 Select [SETUP] with B on the control button, then press the center z. 4 Select [CLOCK SET] with v/V on the control button. Getting started Setting the date and time When you turn on your camera, set , the CLOCK SET screen appears whenever you first use your camera for recording. Control button POWER lamp 1 Slide down the POWER switch to turn on the power. The POWER lamp lights up. 2 Press v on the control button, then press the center z. 13
Operating Instructions
Page 15
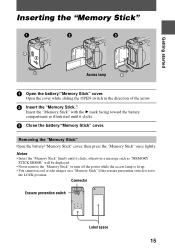
... "Memory Stick" firmly until it clicks, otherwise a message such as illustrated until it clicks. 3 Close the battery/"Memory Stick" cover. Connector Erasure prevention switch OC Label space 15 Insert the "Memory Stick" with the B mark facing toward the battery compartment as "MEMORY STICK ERROR" will be displayed. •...; Never remove the "Memory Stick" or turn off the power while the access lamp is lit up. • You cannot record or edit images on a "Memory Stick" if the erasure prevention...
... "Memory Stick" firmly until it clicks, otherwise a message such as illustrated until it clicks. 3 Close the battery/"Memory Stick" cover. Connector Erasure prevention switch OC Label space 15 Insert the "Memory Stick" with the B mark facing toward the battery compartment as "MEMORY STICK ERROR" will be displayed. •...; Never remove the "Memory Stick" or turn off the power while the access lamp is lit up. • You cannot record or edit images on a "Memory Stick" if the erasure prevention...
Operating Instructions
Page 16
... record the next image. ∗ Exposure and focus are recorded in JPEG format. Also, do not shake or strike the camera. To record still images, slide the POWER switch down to turn the power off, or remove the battery pack or "Memory Stick." • When recording a bright subject, the LCD screen color may change...
... record the next image. ∗ Exposure and focus are recorded in JPEG format. Also, do not shake or strike the camera. To record still images, slide the POWER switch down to turn the power off, or remove the battery pack or "Memory Stick." • When recording a bright subject, the LCD screen color may change...

Operating Instructions
Page 20
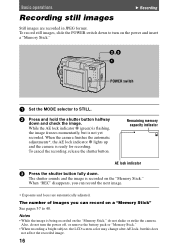
... 18. LCD screen indicators during recording Press DISPLAY to turn on/off the indicators on the power and insert a "Memory Stick." Zooming or using the self-timer, etc. Recording moving images, slide the POWER switch down . DISPLAY POWER switch 1 Set the MODE selector to MOVIE. 2 Press the shutter button fully down to turn on the...
... 18. LCD screen indicators during recording Press DISPLAY to turn on/off the indicators on the power and insert a "Memory Stick." Zooming or using the self-timer, etc. Recording moving images, slide the POWER switch down . DISPLAY POWER switch 1 Set the MODE selector to MOVIE. 2 Press the shutter button fully down to turn on the...
Operating Instructions
Page 21
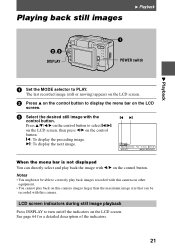
...the desired still image with b/B on the control button. Playing back still images B Playback B Playback DISPLAY POWER switch 1 Set the MODE selector to correctly play back images recorded with this camera on other equipment. • You cannot play back the image with the control button. Notes • You... might not be recorded with this camera images larger than the maximum image size that can directly select and play back on this camera. "b: To display the preceding image. See page 64 for a detailed description of the ...
...the desired still image with b/B on the control button. Playing back still images B Playback B Playback DISPLAY POWER switch 1 Set the MODE selector to correctly play back images recorded with this camera on other equipment. • You cannot play back the image with the control button. Notes • You... might not be recorded with this camera images larger than the maximum image size that can directly select and play back on this camera. "b: To display the preceding image. See page 64 for a detailed description of the ...
Operating Instructions
Page 22
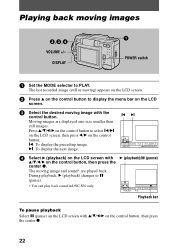
... LCD screen, then press b/B on the control button, then press the center z. "b: To display the preceding image. DISPLAY POWER switch 1 Set the MODE selector to X (pause). ∗ You can play back sound in DSC-S50 only. Playback bar To pause playback Select X (pause) on the control button, then press the center z. 22 Moving images...
... LCD screen, then press b/B on the control button, then press the center z. "b: To display the preceding image. DISPLAY POWER switch 1 Set the MODE selector to X (pause). ∗ You can play back sound in DSC-S50 only. Playback bar To pause playback Select X (pause) on the control button, then press the center z. 22 Moving images...
Operating Instructions
Page 55
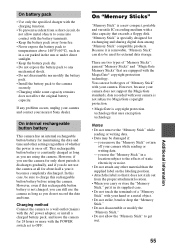
...Memory Stick" to get wet. you use the camera at all for exchanging and sharing digital data among "Memory Stick" compatible products. However, if you use both types of a "Memory Stick" with the POWER switch set to OFF. Charging method Connect the camera to the effects of "Memory Sticks": general "Memory... label on or off your camera. Notes • Do not remove the "Memory Stick" while reading or writing data. • Data may be used for 24 hours or more with your nearest Sony dealer. If any other settings regardless of whether the power is removable, "Memory Stick"...
...Memory Stick" to get wet. you use the camera at all for exchanging and sharing digital data among "Memory Stick" compatible products. However, if you use both types of a "Memory Stick" with the POWER switch set to OFF. Charging method Connect the camera to the effects of "Memory Sticks": general "Memory... label on or off your camera. Notes • Do not remove the "Memory Stick" while reading or writing data. • Data may be used for 24 hours or more with your nearest Sony dealer. If any other settings regardless of whether the power is removable, "Memory Stick"...
Operating Instructions
Page 57
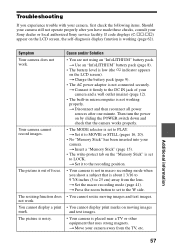
...power sources after you shoot a subject that uses strong magnets. Troubleshooting If you experience trouble with your camera, first check the following items. Should your camera still not operate properly after one minute. The picture is out of your camera...consult your camera away from...power on by sliding the POWER switch down and check that the camera...on the LCD screen). Your camera cannot record images. The ... power adaptor is noisy. t Connect it to the recording position. • Your camera...Memory Stick" has been inserted into your camera. t Insert a "Memory Stick" ...
...power sources after you shoot a subject that uses strong magnets. Troubleshooting If you experience trouble with your camera, first check the following items. Should your camera still not operate properly after one minute. The picture is out of your camera...consult your camera away from...power on by sliding the POWER switch down and check that the camera...on the LCD screen). Your camera cannot record images. The ... power adaptor is noisy. t Connect it to the recording position. • Your camera...Memory Stick" has been inserted into your camera. t Insert a "Memory Stick" ...


