
Operating Instructions
Page 1
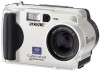
Model No Serial No DSC-S50 DSC-S30/S50 ©2000 Sony Corporation Owner's Record The model and serial numbers are located on the bottom. 3-060-523-12(1) Digital Still Camera Operating Instructions Before operating the unit, please read this product. Refer to these numbers whenever you call upon your Sony dealer regarding this manual thoroughly, and retain it for future reference. Record the serial number in the space provided below.
Model No Serial No DSC-S50 DSC-S30/S50 ©2000 Sony Corporation Owner's Record The model and serial numbers are located on the bottom. 3-060-523-12(1) Digital Still Camera Operating Instructions Before operating the unit, please read this product. Refer to these numbers whenever you call upon your Sony dealer regarding this manual thoroughly, and retain it for future reference. Record the serial number in the space provided below.
Operating Instructions
Page 4
... in CANADA This Class B digital apparatus complies with Part 15 of the recording cannot be copyrighted. No compensation for contents of the recording Contents of the FCC Rules. LCD screen and lens • The LCD screen is manufactured using the camera. Exposing the LCD screen or... following before using high-precision technology. Back up recommendation To avoid the potential risk of the DSC-S30 and the DSC-S50. Over 99.99% of your camera, etc. 4 Notes on your camera still images recorded on how to a malfunction of the pixels are not guaranteed. Precaution on copyright...
... in CANADA This Class B digital apparatus complies with Part 15 of the recording cannot be copyrighted. No compensation for contents of the recording Contents of the FCC Rules. LCD screen and lens • The LCD screen is manufactured using the camera. Exposing the LCD screen or... following before using high-precision technology. Back up recommendation To avoid the potential risk of the DSC-S30 and the DSC-S50. Over 99.99% of your camera, etc. 4 Notes on your camera still images recorded on how to a malfunction of the pixels are not guaranteed. Precaution on copyright...

Operating Instructions
Page 5
... supply 8 Setting the date and time 13 Inserting the "Memory Stick 15 Basic operations B Recording Recording still images 16 Recording moving images (DSC-S50 only 20 B Playback Playing back still images 21 Playing back moving images 22 Viewing images using a personal computer 24 Image file storage destinations...the control button 29 How to print (PRINT MARK 53 Additional information Precautions 54 On "Memory Sticks 55 Using your camera abroad 56 Troubleshooting 57 Warning and notice messages 61 Self-diagnosis display 62 Specifications 63 LCD screen indicators 64 Index 66 5
... supply 8 Setting the date and time 13 Inserting the "Memory Stick 15 Basic operations B Recording Recording still images 16 Recording moving images (DSC-S50 only 20 B Playback Playing back still images 21 Playing back moving images 22 Viewing images using a personal computer 24 Image file storage destinations...the control button 29 How to print (PRINT MARK 53 Additional information Precautions 54 On "Memory Sticks 55 Using your camera abroad 56 Troubleshooting 57 Warning and notice messages 61 Self-diagnosis display 62 Specifications 63 LCD screen indicators 64 Index 66 5
Operating Instructions
Page 6
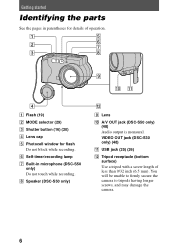
You will be unable to firmly secure the camera to tripods having longer screws, and may damage the camera. 6 F Self-timer/recording lamp G Built-in parentheses for details of less than 9/32 inch (6.5 mm). VIDEO OUT jack (DSC-S30 only) (48) K USB jack (25) (26) L Tripod receptacle (bottom surface) Use ...) (20) D Lens cap E Photocell window for flash Do not block while recording. Getting started Identifying the parts See the pages in microphone (DSC-S50 only) Do not touch while recording. H Speaker (DSC-S50 only) qs I Lens J A/V OUT jack (DSC-S50 only) (48) Audio output is monaural.
You will be unable to firmly secure the camera to tripods having longer screws, and may damage the camera. 6 F Self-timer/recording lamp G Built-in parentheses for details of less than 9/32 inch (6.5 mm). VIDEO OUT jack (DSC-S30 only) (48) K USB jack (25) (26) L Tripod receptacle (bottom surface) Use ...) (20) D Lens cap E Photocell window for flash Do not block while recording. Getting started Identifying the parts See the pages in microphone (DSC-S50 only) Do not touch while recording. H Speaker (DSC-S50 only) qs I Lens J A/V OUT jack (DSC-S50 only) (48) Audio output is monaural.
Operating Instructions
Page 7
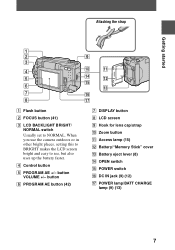
... B FOCUS button (41) C LCD BACKLIGHT BRIGHT/ NORMAL switch Usually set to see, but also uses up the battery faster. button VOLUME +/- When you use the camera outdoors or in other bright places, setting this to BRIGHT makes the LCD screen bright and easy to NORMAL. D Control button E PROGRAM AE +/- button F PROGRAM...
... B FOCUS button (41) C LCD BACKLIGHT BRIGHT/ NORMAL switch Usually set to see, but also uses up the battery faster. button VOLUME +/- When you use the camera outdoors or in other bright places, setting this to BRIGHT makes the LCD screen bright and easy to NORMAL. D Control button E PROGRAM AE +/- button F PROGRAM...
Operating Instructions
Page 8
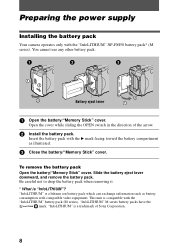
Preparing the power supply Installing the battery pack Your camera operates only with the B mark facing toward the battery compartment as battery consumption with the "InfoLITHIUM" battery pack (M series). Slide the battery eject lever downward, ... pack with the "InfoLITHIUM" NP-FM50 battery pack* (M series). This unit is "InfoLITHIUM"? Open the cover while sliding the OPEN switch in the direction of Sony Corporation. 8 You cannot use any other battery pack. To remove the battery pack Open the battery/"Memory Stick" cover. Be careful not to drop the...
Preparing the power supply Installing the battery pack Your camera operates only with the B mark facing toward the battery compartment as battery consumption with the "InfoLITHIUM" battery pack (M series). Slide the battery eject lever downward, ... pack with the "InfoLITHIUM" NP-FM50 battery pack* (M series). This unit is "InfoLITHIUM"? Open the cover while sliding the OPEN switch in the direction of Sony Corporation. 8 You cannot use any other battery pack. To remove the battery pack Open the battery/"Memory Stick" cover. Be careful not to drop the...
Operating Instructions
Page 9
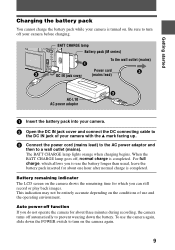
For full charge, which you can still record or play back images. Battery remaining indicator The LCD screen on the conditions of your camera with the v mark facing up. 3 Connect the power cord (mains lead) to the AC power adaptor and then to a wall outlet (mains). Auto power-off ... (M series) To the wall outlet (mains) DC IN jack cover Power cord (mains lead) AC-L10 AC power adaptor 1 Insert the battery pack into your camera. 2 Open the DC IN jack cover and connect the DC connecting cable to the DC IN jack of use the...
For full charge, which you can still record or play back images. Battery remaining indicator The LCD screen on the conditions of your camera with the v mark facing up. 3 Connect the power cord (mains lead) to the AC power adaptor and then to a wall outlet (mains). Auto power-off ... (M series) To the wall outlet (mains) DC IN jack cover Power cord (mains lead) AC-L10 AC power adaptor 1 Insert the battery pack into your camera. 2 Open the DC IN jack cover and connect the DC connecting cable to the DC IN jack of use the...

Operating Instructions
Page 11
... remaining time appears. • Do not short the DC plug of the "Memory Stick" is limited. The above figures are a guide when you use your camera at low temperatures, use the flash, repeatedly turn the power on/off or use the zoom. • The capacity of the AC power adaptor with...
... remaining time appears. • Do not short the DC plug of the "Memory Stick" is limited. The above figures are a guide when you use your camera at low temperatures, use the flash, repeatedly turn the power on/off or use the zoom. • The capacity of the AC power adaptor with...

Operating Instructions
Page 12
Using a car battery Use Sony DC adaptor/charger. 12 Using the AC power adaptor DC IN jack cover To the wall outlet (mains) Power cord (mains lead) AC-L10 AC power adaptor 1 Open the DC IN jack cover and connect the DC connecting cable to the DC IN jack of your camera with the v mark facing up. 2 Connect the power cord (mains lead) to the AC power adaptor and then to a wall outlet (mains).
Using a car battery Use Sony DC adaptor/charger. 12 Using the AC power adaptor DC IN jack cover To the wall outlet (mains) Power cord (mains lead) AC-L10 AC power adaptor 1 Open the DC IN jack cover and connect the DC connecting cable to the DC IN jack of your camera with the v mark facing up. 2 Connect the power cord (mains lead) to the AC power adaptor and then to a wall outlet (mains).

Operating Instructions
Page 13
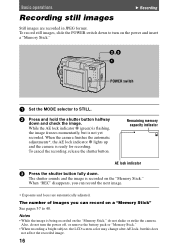
If these are not set the date and time. Control button POWER lamp 1 Slide down the POWER switch to turn on the power. The menu bar appears on the LCD screen. 3 Select [SETUP] with B on the control button, then press the center z. 4 Select [CLOCK SET] with v/V on the control button. The POWER lamp lights up. 2 Press v on the control button, then press the center z. 13 Getting started Setting the date and time When you first use your camera, set , the CLOCK SET screen appears whenever you turn on your camera for recording.
If these are not set the date and time. Control button POWER lamp 1 Slide down the POWER switch to turn on the power. The menu bar appears on the LCD screen. 3 Select [SETUP] with B on the control button, then press the center z. 4 Select [CLOCK SET] with v/V on the control button. The POWER lamp lights up. 2 Press v on the control button, then press the center z. 13 Getting started Setting the date and time When you first use your camera, set , the CLOCK SET screen appears whenever you turn on your camera for recording.
Operating Instructions
Page 16
...REC" disappears, you can record the next image. ∗ Exposure and focus are recorded in JPEG format. Also, do not shake or strike the camera. The number of images you can record on a "Memory Stick" See pages 37 to STILL. 2 Press and hold the shutter button halfway down and... the recording, release the shutter button. Notes • While the image is not yet recorded. When the camera finishes the automatic adjustments*, the AE lock indicator z lights up and the camera is recorded on the power and insert a "Memory Stick." The shutter sounds and the image is ready for...
...REC" disappears, you can record the next image. ∗ Exposure and focus are recorded in JPEG format. Also, do not shake or strike the camera. The number of images you can record on a "Memory Stick" See pages 37 to STILL. 2 Press and hold the shutter button halfway down and... the recording, release the shutter button. Notes • While the image is not yet recorded. When the camera finishes the automatic adjustments*, the AE lock indicator z lights up and the camera is recorded on the power and insert a "Memory Stick." The shutter sounds and the image is ready for...
Operating Instructions
Page 17
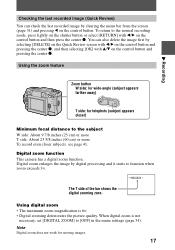
Digital zoom function This camera has a digital zoom function. Digital zoom enlarges the image by digital processing and it starts to [OFF] in the menu settings (page 34). When digital zoom is 6×. • Digital zooming deteriorates the picture quality. Using the zoom feature Zoom button W side: for wide-angle (subject...25 cm) or more T side: About 23 5/8 inches (60 cm) or more To record even closer subjects, see page 41. Note Digital zoom does not work for telephoto (subject appears closer) Minimum focal distance to the normal recording mode, press lightly on the shutter button or...
Digital zoom function This camera has a digital zoom function. Digital zoom enlarges the image by digital processing and it starts to [OFF] in the menu settings (page 34). When digital zoom is 6×. • Digital zooming deteriorates the picture quality. Using the zoom feature Zoom button W side: for wide-angle (subject...25 cm) or more T side: About 23 5/8 inches (60 cm) or more To record even closer subjects, see page 41. Note Digital zoom does not work for telephoto (subject appears closer) Minimum focal distance to the normal recording mode, press lightly on the shutter button or...
Operating Instructions
Page 21
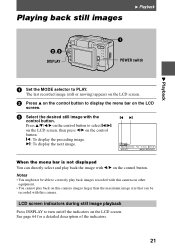
...Playback DISPLAY POWER switch 1 Set the MODE selector to display the menu bar on the LCD screen. 3 Select the desired still image with this camera images larger than the maximum image size that can be able to turn on/off the indicators on the control button. Press v/V/b/B on the .... LCD screen indicators during still image playback Press DISPLAY to correctly play back images recorded with this camera on other equipment. • You cannot play back the image with b/B on this camera. See page 64 for a detailed description of the indicators. 21 When the menu bar is not...
...Playback DISPLAY POWER switch 1 Set the MODE selector to display the menu bar on the LCD screen. 3 Select the desired still image with this camera images larger than the maximum image size that can be able to turn on/off the indicators on the control button. Press v/V/b/B on the .... LCD screen indicators during still image playback Press DISPLAY to correctly play back images recorded with this camera on other equipment. • You cannot play back the image with b/B on this camera. See page 64 for a detailed description of the indicators. 21 When the menu bar is not...
Operating Instructions
Page 24
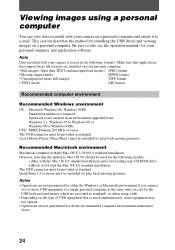
... back moving pictures). Be sure to Mac OS 9.0 should be used simultaneously, some equipment may not operate. • Operations are installed on your camera on a personal computer. Operation is not assured in the following models. • iMac with the Mac OS 8.6 standard installation and a slot loading... images using a hub. • Depending on the type of USB equipment that the update to also see the operation manuals for your camera is stored in an environment upgraded from: Windows 3.1, Windows 95 to Windows 98 or Windows 98 to e-mail. Make sure that applications ...
... back moving pictures). Be sure to Mac OS 9.0 should be used simultaneously, some equipment may not operate. • Operations are installed on your camera on a personal computer. Operation is not assured in the following models. • iMac with the Mac OS 8.6 standard installation and a slot loading... images using a hub. • Depending on the type of USB equipment that the update to also see the operation manuals for your camera is stored in an environment upgraded from: Windows 3.1, Windows 95 to Windows 98 or Windows 98 to e-mail. Make sure that applications ...
Operating Instructions
Page 25
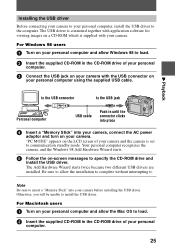
...Macintosh users 1 Turn on your personal computer and allow Windows 98 to load. 2 Insert the supplied CD-ROM in the CD-ROM drive of your camera. The Add Hardware Wizard starts twice because two different USB drivers are installed. B Playback to the USB connector to the USB jack Personal computer USB... the AC power adaptor and turn on the LCD screen of your personal computer. 3 Connect the USB jack on your camera with your camera and the camera is set to communication standby mode. For Windows 98 users 1 Turn on your personal computer and allow the Mac OS to load. 2 Insert the ...
...Macintosh users 1 Turn on your personal computer and allow Windows 98 to load. 2 Insert the supplied CD-ROM in the CD-ROM drive of your camera. The Add Hardware Wizard starts twice because two different USB drivers are installed. B Playback to the USB connector to the USB jack Personal computer USB... the AC power adaptor and turn on the LCD screen of your personal computer. 3 Connect the USB jack on your camera with your camera and the camera is set to communication standby mode. For Windows 98 users 1 Turn on your personal computer and allow the Mac OS to load. 2 Insert the ...
Operating Instructions
Page 26
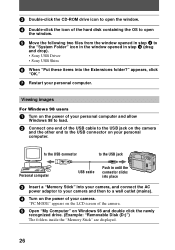
...Push in step 4 (drag and drop). • Sony USB Driver • Sony USB Shim 6 When "Put these items into your camera, and connect the AC power adaptor to your camera. "PC MODE" appears on the LCD screen of the camera. 5 Open "My Computer" on the power of your camera and then to a wall outlet (mains). 4 Turn... the power of your personal computer and allow Windows 98 to load. 2 Connect one end of the USB cable to the USB jack on the camera and the other end to the USB connector on your personal computer. appears, click "OK." 7 Restart your personal computer. 3 Double-click the CD-ROM...
...Push in step 4 (drag and drop). • Sony USB Driver • Sony USB Shim 6 When "Put these items into your camera, and connect the AC power adaptor to your camera. "PC MODE" appears on the LCD screen of the camera. 5 Open "My Computer" on the power of your camera and then to a wall outlet (mains). 4 Turn... the power of your personal computer and allow Windows 98 to load. 2 Connect one end of the USB cable to the USB jack on the camera and the other end to the USB connector on your personal computer. appears, click "OK." 7 Restart your personal computer. 3 Double-click the CD-ROM...
Operating Instructions
Page 27
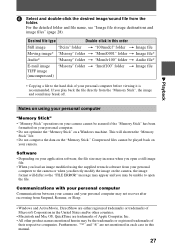
...break off. Compressed files cannot be played back on your personal computer. • Do not optimize the "Memory Stick" on your camera cannot be unable to the hard disk of their respective companies. For the detailed folder and file name, see "Image file storage ..." message may not recover after recovering from your personal computer before viewing it is recommended. Communications with your personal computer Communications between your camera and your personal computer may appear and you load an image modified using your personal computer "Memory Stick" • "Memory Stick" ...
...break off. Compressed files cannot be played back on your personal computer. • Do not optimize the "Memory Stick" on your camera cannot be unable to the hard disk of their respective companies. For the detailed folder and file name, see "Image file storage ..." message may not recover after recovering from your personal computer before viewing it is recommended. Communications with your personal computer Communications between your camera and your personal computer may appear and you load an image modified using your personal computer "Memory Stick" • "Memory Stick" ...
Operating Instructions
Page 28
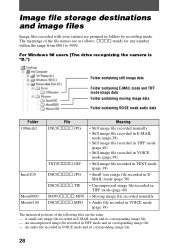
... VOICE mode and its corresponding image file 28 The meanings of the following files are as follows. For Windows 98 users (The drive recognizing the camera is "D.") Folder containing still image data Folder containing E-MAIL mode and TIFF mode image data Folder containing moving image data Folder containing VOICE mode audio... corresponding image file - An uncompressed image file recorded in folders by recording mode. Image file storage destinations and image files Image files recorded with your camera are grouped in TIFF mode and its corresponding image file -
... VOICE mode and its corresponding image file 28 The meanings of the following files are as follows. For Windows 98 users (The drive recognizing the camera is "D.") Folder containing still image data Folder containing E-MAIL mode and TIFF mode image data Folder containing moving image data Folder containing VOICE mode audio... corresponding image file - An uncompressed image file recorded in folders by recording mode. Image file storage destinations and image files Image files recorded with your camera are grouped in TIFF mode and its corresponding image file -
Operating Instructions
Page 29
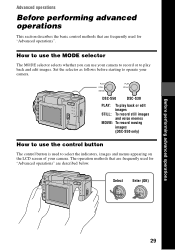
...and edit images. Set the selector as follows before starting to operate your camera to record or to select the indicators, images and menus appearing on the LCD screen of your camera. PLAY STILL MOVIE PLAY STILL DSC-S50 DSC-S30 PLAY: To play back or edit images STILL: To record still images... and voice memos MOVIE: To record moving images (DSC-S50 only) How to use the MODE selector The MODE selector selects...
...and edit images. Set the selector as follows before starting to operate your camera to record or to select the indicators, images and menus appearing on the LCD screen of your camera. PLAY STILL MOVIE PLAY STILL DSC-S50 DSC-S30 PLAY: To play back or edit images STILL: To record still images... and voice memos MOVIE: To record moving images (DSC-S50 only) How to use the MODE selector The MODE selector selects...
Operating Instructions
Page 31
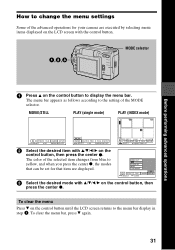
... control button until the LCD screen returns to display the menu bar. The color of the advanced operations for that can be set for your camera are displayed. 3 Select the desired mode with v/V/b/B on the control button, then press the center z. To clear the menu Press V on the LCD screen with...
... control button until the LCD screen returns to display the menu bar. The color of the advanced operations for that can be set for your camera are displayed. 3 Select the desired mode with v/V/b/B on the control button, then press the center z. To clear the menu Press V on the LCD screen with...


