
Operating Instructions (Camera)
Page 5
... LCD finder are manufactured using this manual are reproduced images, and are not actual images shot using extremely high-precision technology so over 99.99% of the copyright laws. Warning on the LCD screen and the LCD finder. Unauthorized recording of such materials may be contrary to bump the ...be some tiny black points and/or bright points (white, red, blue, or green in any way. • Exposing the LCD screen, the finder, or the lens to it. The screen may be careful not to apply force to direct sunlight for Camera File system universal standard) established by JEITA (Japan ...
... LCD finder are manufactured using this manual are reproduced images, and are not actual images shot using extremely high-precision technology so over 99.99% of the copyright laws. Warning on the LCD screen and the LCD finder. Unauthorized recording of such materials may be contrary to bump the ...be some tiny black points and/or bright points (white, red, blue, or green in any way. • Exposing the LCD screen, the finder, or the lens to it. The screen may be careful not to apply force to direct sunlight for Camera File system universal standard) established by JEITA (Japan ...

Operating Instructions (Camera)
Page 7
Focusing on using your camera 4 Enjoying the camera Basic techniques for better images 10 Focus - On "image quality" and "image size 12 Identifying parts 14 Indicators on the screen 16 Changing the screen display 20 Number of still images and recording time of movies 21 When you do not have a "... that can be recorded/viewed 23 Using the mode switch 24 Using the menu Using menu items 26 Menu items 27 Shooting menu 28 (Camera) (EV) 9 (Focus) WB (White Bal) ISO (P.Quality) Mode (REC Mode) M (Interval) (Flash Level) PFX (P.Effect) (Saturation) (Contrast) (Sharpness) (Setup) 7 Table of ...
Focusing on using your camera 4 Enjoying the camera Basic techniques for better images 10 Focus - On "image quality" and "image size 12 Identifying parts 14 Indicators on the screen 16 Changing the screen display 20 Number of still images and recording time of movies 21 When you do not have a "... that can be recorded/viewed 23 Using the mode switch 24 Using the menu Using menu items 26 Menu items 27 Shooting menu 28 (Camera) (EV) 9 (Focus) WB (White Bal) ISO (P.Quality) Mode (REC Mode) M (Interval) (Flash Level) PFX (P.Effect) (Saturation) (Contrast) (Sharpness) (Setup) 7 Table of ...

Operating Instructions (Camera)
Page 12
However, you cannot see the differences on the screen of the camera, the fine detail and data processing time differ when the image is affected by the lighting conditions. Reddish Quality On "image quality" and "image size" A digital image is displayed in the auto adjustment mode. If...by the number of pixels. "Image size" is shown by light sources Weather/lighting Daylight Cloudy Fluorescent Incandescent Characteristics of light White (standard) Bluish Blue-tinged The color tones are adjusted automatically in fine detail. Color On the effects of lighting The ...
However, you cannot see the differences on the screen of the camera, the fine detail and data processing time differ when the image is affected by the lighting conditions. Reddish Quality On "image quality" and "image size" A digital image is displayed in the auto adjustment mode. If...by the number of pixels. "Image size" is shown by light sources Weather/lighting Daylight Cloudy Fluorescent Incandescent Characteristics of light White (standard) Bluish Blue-tinged The color tones are adjusted automatically in fine detail. Color On the effects of lighting The ...

Operating Instructions (Camera)
Page 16
When shooting still images VGA 101 1/30" C:32:00 + S... 5 in "Read This First") Recording mode (24, 31) White balance (30) Standby/Recording a movie (t step 5 in "Read This First") Camera mode (Scene Selection) (t step 5 in "Read This First") Camera mode (Program) (24) Flash mode (t step 5 in "...Read This First") Zoom scaling (42, t step 5 in "Read This First") Red-eye reduction (43) Sharpness (33) Saturation (33) Contrast (33) AF illuminator (44) Metering mode (t step 5 in parentheses for details of operation. Indicators on the screen...
When shooting still images VGA 101 1/30" C:32:00 + S... 5 in "Read This First") Recording mode (24, 31) White balance (30) Standby/Recording a movie (t step 5 in "Read This First") Camera mode (Scene Selection) (t step 5 in "Read This First") Camera mode (Program) (24) Flash mode (t step 5 in "...Read This First") Zoom scaling (42, t step 5 in "Read This First") Red-eye reduction (43) Sharpness (33) Saturation (33) Contrast (33) AF illuminator (44) Metering mode (t step 5 in parentheses for details of operation. Indicators on the screen...

Operating Instructions (Camera)
Page 27
PFX (P.Effect) - (Saturation) - (Contrast) - (Sharpness) - (Setup) Menu for shooting (page 28) (EV) - 9 (Focus) - WB (White Bal) - DPOF - - (Print) - - (Slide) - - (Resize) - - (Rotate) - - (Divide) - - (Setup) - - Mode switch ... - - - - - - - - - - - - - - - - - - - - - - 27 For details on the operation t page 26 Using the menu Menu items The menu items available vary depending on the screen. Mode (REC Mode) M (Interval) - (Flash Level) - Only the available items are displayed on the mode switch position.
PFX (P.Effect) - (Saturation) - (Contrast) - (Sharpness) - (Setup) Menu for shooting (page 28) (EV) - 9 (Focus) - WB (White Bal) - DPOF - - (Print) - - (Slide) - - (Resize) - - (Rotate) - - (Divide) - - (Setup) - - Mode switch ... - - - - - - - - - - - - - - - - - - - - - - 27 For details on the operation t page 26 Using the menu Menu items The menu items available vary depending on the screen. Mode (REC Mode) M (Interval) - (Flash Level) - Only the available items are displayed on the mode switch position.

Operating Instructions (Camera)
Page 35
...images. 7 Press MENU. 8 Select [OK] with B, then press z. Exit Exits the Protection function. To protect images in step 4, and press z. indicator turns white. Select [On] with v/V/b/B, then press z. The - Using the menu For details on the image. Protect (-) See the following procedure. VGA 2/9 - A ...are protected. • To protect all images in the folder, select [All In This Folder] in index mode 1 Press (index) to display the index screen. 2 Press MENU to display the menu. 3 Select [-] (Protect) with b/B on the selected image. - (green) • SELECT MENU TONEXT 6 ...
...images. 7 Press MENU. 8 Select [OK] with B, then press z. Exit Exits the Protection function. To protect images in step 4, and press z. indicator turns white. Select [On] with v/V/b/B, then press z. The - Using the menu For details on the image. Protect (-) See the following procedure. VGA 2/9 - A ...are protected. • To protect all images in the folder, select [All In This Folder] in index mode 1 Press (index) to display the index screen. 2 Press MENU to display the menu. 3 Select [-] (Protect) with b/B on the selected image. - (green) • SELECT MENU TONEXT 6 ...

Operating Instructions (Camera)
Page 55
...When the copying is inserted, images in Stage 3, click [Copy pictures to a folder on my computer using Microsoft Scanner and Camera Wizard] t [OK] as the wizard screen appears automatically on the desktop. 3 Click the check box of copying images to [Normal] (page 50). Stage 4-A: Copying... * During communication, the access indicators turn white. • If "USB Mode Normal" does not appear, set [USB Connect] to the "My Documents" folder. 55 Wait for the images, then click [Next]. 1 Using your computer 1 2 The "Scanner and Camera Wizard" screen appears. 2 Click [Next]. The images ...
...When the copying is inserted, images in Stage 3, click [Copy pictures to a folder on my computer using Microsoft Scanner and Camera Wizard] t [OK] as the wizard screen appears automatically on the desktop. 3 Click the check box of copying images to [Normal] (page 50). Stage 4-A: Copying... * During communication, the access indicators turn white. • If "USB Mode Normal" does not appear, set [USB Connect] to the "My Documents" folder. 55 Wait for the images, then click [Next]. 1 Using your computer 1 2 The "Scanner and Camera Wizard" screen appears. 2 Click [Next]. The images ...

Operating Instructions (Camera)
Page 69
... [Off], then press z. To remove all the marks in the folder Select [All In This Folder] in step 5, then press z. The mark turns white. A green mark appears on the selected image. Green mark To cancel, select [Cancel] in step 4 or select [Exit] in [All In This ...mark other images. 7 Press MENU. 8 Select [OK] with v/V, then press z. • You cannot add a Folder]. Printing still images 69 mark in step 8, then press z. Marking in index mode 1 Display the index screen. (t step 6 in "Read This First") 2 Press MENU to display the menu. 3 Select DPOF with b/B, then press z. ...
... [Off], then press z. To remove all the marks in the folder Select [All In This Folder] in step 5, then press z. The mark turns white. A green mark appears on the selected image. Green mark To cancel, select [Cancel] in step 4 or select [Exit] in [All In This ...mark other images. 7 Press MENU. 8 Select [OK] with v/V, then press z. • You cannot add a Folder]. Printing still images 69 mark in step 8, then press z. Marking in index mode 1 Display the index screen. (t step 6 in "Read This First") 2 Press MENU to display the menu. 3 Select DPOF with b/B, then press z. ...

Operating Instructions (Camera)
Page 87
... (32 - 96 mm when converted to a 35 mm still camera) F2.8 - 5.1 Automatic ND filter switching Exposure control Automatic exposure, Scene Selection (7 modes) White balance Automatic, Daylight, Cloudy, Fluorescent, Incandescent File format (DCF compliant) Still images: Exif Ver. 2.2 JPEG compliant, DPOF compatible Movies... Oxy Nickel Primary Battery (2, not supplied), 3 V AC-LS5K AC Adaptor (not supplied), 4.2 V Power consumption (during shooting with the LCD screen on) 0.9 W Operating temperature 0°C to +40°C (+32°F to +104°F) Storage temperature -20°C to +60&#...
... (32 - 96 mm when converted to a 35 mm still camera) F2.8 - 5.1 Automatic ND filter switching Exposure control Automatic exposure, Scene Selection (7 modes) White balance Automatic, Daylight, Cloudy, Fluorescent, Incandescent File format (DCF compliant) Still images: Exif Ver. 2.2 JPEG compliant, DPOF compatible Movies... Oxy Nickel Primary Battery (2, not supplied), 3 V AC-LS5K AC Adaptor (not supplied), 4.2 V Power consumption (during shooting with the LCD screen on) 0.9 W Operating temperature 0°C to +40°C (+32°F to +104°F) Storage temperature -20°C to +60&#...
Marketing Specifications
Page 2
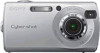
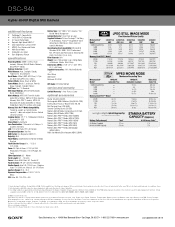
.... Actual results may vary. DSC-S40 Cyber-shot® Digital Still Camera additional features s PictBridge™...White Balance: Auto, Daylight, Cloudy, Fluorescent, Incandescent Burst Mode: 4 Shot (4MP JPEG fine), 0.7fps, 30 Shot VGA (JPEG std.), 0.6fps Picture Effects: Sepia, Black & White Scene Modes: Beach, Landscape, Portrait, Snow, Twilight, Twilight Portrait Self Timer: Yes, 10 Seconds Still... Aspheric Elements LCD: 1.5" 67K Pixels TFT LCD Screen Microphone/Speaker: Yes/Yes USB Port(s): Yes (...Program Auto: 1-1/2000 sec; Sony, Cyber-shot, Digital, Powerful, Transportable, Memory Stick...
.... Actual results may vary. DSC-S40 Cyber-shot® Digital Still Camera additional features s PictBridge™...White Balance: Auto, Daylight, Cloudy, Fluorescent, Incandescent Burst Mode: 4 Shot (4MP JPEG fine), 0.7fps, 30 Shot VGA (JPEG std.), 0.6fps Picture Effects: Sepia, Black & White Scene Modes: Beach, Landscape, Portrait, Snow, Twilight, Twilight Portrait Self Timer: Yes, 10 Seconds Still... Aspheric Elements LCD: 1.5" 67K Pixels TFT LCD Screen Microphone/Speaker: Yes/Yes USB Port(s): Yes (...Program Auto: 1-1/2000 sec; Sony, Cyber-shot, Digital, Powerful, Transportable, Memory Stick...


