
Operating Instructions (Camera)
Page 51
... automatically when "PicturePackage" is not needed when using a Macintosh computer, refer to your computer (page 53) Preparation Viewing images on your computer Installing the USB driver. • Installation of the USB driver is installed. 51 Using your computer Enjoying your Windows computer For details on using Windows XP.
... automatically when "PicturePackage" is not needed when using a Macintosh computer, refer to your computer (page 53) Preparation Viewing images on your computer Installing the USB driver. • Installation of the USB driver is installed. 51 Using your computer Enjoying your Windows computer For details on using Windows XP.
Operating Instructions (Camera)
Page 52
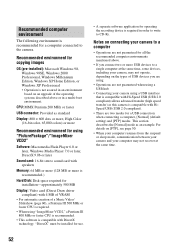
...: 64 MB or more (128 MB or more is recommended.) Hard Disk: Disk space required for installation-approximately 500 MB Display: Video card (Direct Draw driver compliant) with 4 MB of VRAM • For automatic creation of a Music Video/ Slideshow (page 60), a Pentium III 500 MHz or faster CPU ...time. 52 Notes on [PTP], see page 50. • When your computer resumes from the suspend or sleep mode, communication between your camera and your camera, may not recover at the same time, some devices, including your computer may not operate, depending on an upgrade of USB devices you ...
...: 64 MB or more (128 MB or more is recommended.) Hard Disk: Disk space required for installation-approximately 500 MB Display: Video card (Direct Draw driver compliant) with 4 MB of VRAM • For automatic creation of a Music Video/ Slideshow (page 60), a Pentium III 500 MHz or faster CPU ...time. 52 Notes on [PTP], see page 50. • When your computer resumes from the suspend or sleep mode, communication between your camera and your camera, may not recover at the same time, some devices, including your computer may not operate, depending on an upgrade of USB devices you ...

Operating Instructions (Camera)
Page 53
... copy the images. You can establish a USB connection. When the installation is finished, the screen informs you can copy images from the camera to your computer This section describes the process using Windows XP, start from Stage 2. • When "PicturePackage" is already installed, Stage... 1 is unnecessary. For a computer with a "Memory Stick" slot Remove the "Memory Stick" from the camera and insert the "Memory Stick" into the computer, then click [USB Driver] when the install menu screen appears. 2 Your computer restarts. The "InstallShield Wizard" screen appears. • If...
... copy the images. You can establish a USB connection. When the installation is finished, the screen informs you can copy images from the camera to your computer This section describes the process using Windows XP, start from Stage 2. • When "PicturePackage" is already installed, Stage... 1 is unnecessary. For a computer with a "Memory Stick" slot Remove the "Memory Stick" from the camera and insert the "Memory Stick" into the computer, then click [USB Driver] when the install menu screen appears. 2 Your computer restarts. The "InstallShield Wizard" screen appears. • If...
Operating Instructions (Camera)
Page 60
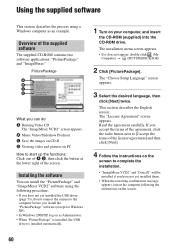
...you can install the "PicturePackage" and "ImageMixer VCD2" software using a Windows computer as Administrator. • When "PicturePackage" is installed, the USB driver is installed automatically. 1 Turn on your computer, and insert the CD-ROM (supplied) into the CD-ROM drive. The "Choose Setup Language" ... does not appear, double-click (My Computer) t (PICTUREPACKAGE). 2 Click [PicturePackage]. Installing the software You can do not connect the camera to start up the functions: Click one of A-D, then click the button at the lower right of the supplied software The supplied CD-ROM...
...you can install the "PicturePackage" and "ImageMixer VCD2" software using a Windows computer as Administrator. • When "PicturePackage" is installed, the USB driver is installed automatically. 1 Turn on your computer, and insert the CD-ROM (supplied) into the CD-ROM drive. The "Choose Setup Language" ... does not appear, double-click (My Computer) t (PICTUREPACKAGE). 2 Click [PicturePackage]. Installing the software You can do not connect the camera to start up the functions: Click one of A-D, then click the button at the lower right of the supplied software The supplied CD-ROM...
Operating Instructions (Camera)
Page 75
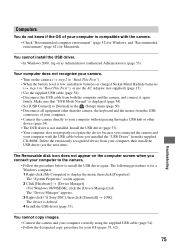
... following procedure is deleted. 4 Install the USB driver (page 53). The "Device Manager" appears. 3 Right-click [ Sony DSC], then click [Uninstall] t [OK]. Install the USB driver (page 53). • Your computer does not properly recognize the device because you installed the "USB Driver" from your computer to the camera. • Follow the procedure below to install...
... following procedure is deleted. 4 Install the USB driver (page 53). The "Device Manager" appears. 3 Right-click [ Sony DSC], then click [Uninstall] t [OK]. Install the USB driver (page 53). • Your computer does not properly recognize the device because you installed the "USB Driver" from your computer to the camera. • Follow the procedure below to install...

Operating Instructions (Camera)
Page 90
...t step 2 in "Read This First" Setup 33, 40, 41 Camera 1 42 Camera 2 45 Internal Memory Tool ...46 Memory Stick Tool .......47 Setup 1 49 Setup 2 50 Setup 1 49 Setup 2 50 Sharpness 33 Shooting Movie t step 5 in "Read This First" Still image t step 5 in "Read This First" Shooting menu 28 Shooting...First" Twilight portrait mode t step 5 in "Read This First" U Underexposure 11 USB Connect 50 USB Driver 53 V VGA t step 4 in "Read This First" Video CD 60, 63 Viewing Movie t step 6 in "Read This First" Still image t step 6 in "Read This First" Viewing menu 34 Volume t step 6 in "Read This...
...t step 2 in "Read This First" Setup 33, 40, 41 Camera 1 42 Camera 2 45 Internal Memory Tool ...46 Memory Stick Tool .......47 Setup 1 49 Setup 2 50 Setup 1 49 Setup 2 50 Sharpness 33 Shooting Movie t step 5 in "Read This First" Still image t step 5 in "Read This First" Shooting menu 28 Shooting...First" Twilight portrait mode t step 5 in "Read This First" U Underexposure 11 USB Connect 50 USB Driver 53 V VGA t step 4 in "Read This First" Video CD 60, 63 Viewing Movie t step 6 in "Read This First" Still image t step 6 in "Read This First" Viewing menu 34 Volume t step 6 in "Read This...
Marketing Specifications
Page 2
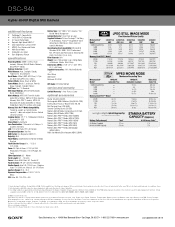
DSC-S40 Cyber-shot® Digital Still Camera additional features s PictBridge™ Compatibility s 14-Bit DXP A/D Conversion s 3:2 Aspect Ratio Mode s Supports High Speed USB 2.02 s Clear Color/Clear Luminance NR s MPEG1 Cue,... USB 2.02 ) Output(s): N/A Flash Modes: Auto/Forced On/Forced Off/Slow Synchro Flash Effective Range: 6 in MBs is used for Sony v1.6 (Windows), Pixela™ ImageMixer VCD2 (Macintosh), USB Driver, Cyber-shot Life tutorial (Windows) Operating System Compatibility: Microsoft® Windows® 98, 98SE, 2000 Professional, Me, XP Home and Professional; Program ...
DSC-S40 Cyber-shot® Digital Still Camera additional features s PictBridge™ Compatibility s 14-Bit DXP A/D Conversion s 3:2 Aspect Ratio Mode s Supports High Speed USB 2.02 s Clear Color/Clear Luminance NR s MPEG1 Cue,... USB 2.02 ) Output(s): N/A Flash Modes: Auto/Forced On/Forced Off/Slow Synchro Flash Effective Range: 6 in MBs is used for Sony v1.6 (Windows), Pixela™ ImageMixer VCD2 (Macintosh), USB Driver, Cyber-shot Life tutorial (Windows) Operating System Compatibility: Microsoft® Windows® 98, 98SE, 2000 Professional, Me, XP Home and Professional; Program ...


