
Operating Instructions
Page 3
... camera near a window or outdoors. • Do not press against the LCD screen. On moisture condensation • If the camera is recommended that you can use the "Memory Stick Duo" media by inserting it . However, some tiny black and/or bright dots (white, red, blue or green) may be discolored and that if you attempt to record clear images. The screen may appear on "Memory...
... camera near a window or outdoors. • Do not press against the LCD screen. On moisture condensation • If the camera is recommended that you can use the "Memory Stick Duo" media by inserting it . However, some tiny black and/or bright dots (white, red, blue or green) may be discolored and that if you attempt to record clear images. The screen may appear on "Memory...

Operating Instructions
Page 4
Table of contents Table of contents Operation Search MENU/Settings Search Index Notes on using the camera How to use this handbook 2 Notes on using the camera 3 Operation Search 6 MENU/Settings Search 8 Identifying parts 11 List of icons displayed on the screen 12 Using the mode switch 14 Using the internal memory 15 Shooting Zoom 16 DISP (Screen Display Settings 17 Flash 18 Smile Shutter 19 Self-Timer 20 Viewing Viewing still images 21 Playback zoom 22 Image Index 23 Delete 24 Viewing movies 25 MENU (Shooting) MENU items (Shooting 8 4GB
Table of contents Table of contents Operation Search MENU/Settings Search Index Notes on using the camera How to use this handbook 2 Notes on using the camera 3 Operation Search 6 MENU/Settings Search 8 Identifying parts 11 List of icons displayed on the screen 12 Using the mode switch 14 Using the internal memory 15 Shooting Zoom 16 DISP (Screen Display Settings 17 Flash 18 Smile Shutter 19 Self-Timer 20 Viewing Viewing still images 21 Playback zoom 22 Image Index 23 Delete 24 Viewing movies 25 MENU (Shooting) MENU items (Shooting 8 4GB

Operating Instructions
Page 5
Table of contents Operation Search MENU/Settings Search MENU (Viewing) MENU items (Viewing 9 Settings Setting items 10 Computer Using with your computer 68 Using the software 69 Connecting the camera to a computer 71 Uploading images to a media service 73 Printing Printing still images 75 Troubleshooting Troubleshooting 77 Warning messages 85 Others "Memory Stick Duo" media 88 Batteries 90 Index Index 92 Index 5GB
Table of contents Operation Search MENU/Settings Search MENU (Viewing) MENU items (Viewing 9 Settings Setting items 10 Computer Using with your computer 68 Using the software 69 Connecting the camera to a computer 71 Uploading images to a media service 73 Printing Printing still images 75 Troubleshooting Troubleshooting 77 Warning messages 85 Others "Memory Stick Duo" media 88 Batteries 90 Index Index 92 Index 5GB

Operating Instructions
Page 7
Table of contents Operation Search MENU/Settings Search Deleting images Delete 24, 46 Format 61 Displaying enlarged images Playback zoom 22 Trimming (Resize 45 Editing images Retouch 45 Playing back a series of Slideshow 44 images in order Shooting/Viewing with Easy Mode 31, 43 easy-to-see indicators Printing images with the date Using the "PMB (Picture Motion Browser)" 69 Changing date and time settings Date & Time Setting 67 Initializing settings Printing images Initialize 58 Print 75 Index 7GB
Table of contents Operation Search MENU/Settings Search Deleting images Delete 24, 46 Format 61 Displaying enlarged images Playback zoom 22 Trimming (Resize 45 Editing images Retouch 45 Playing back a series of Slideshow 44 images in order Shooting/Viewing with Easy Mode 31, 43 easy-to-see indicators Printing images with the date Using the "PMB (Picture Motion Browser)" 69 Changing date and time settings Date & Time Setting 67 Initializing settings Printing images Initialize 58 Print 75 Index 7GB
Operating Instructions
Page 8
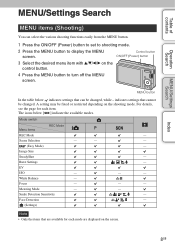
...on the screen. Image Size SteadyShot - Mode switch Menu items REC Mode REC Mode - EV ISO - - - Focus - - - Smile Detection Sensitivity - indicates settings that can select the various shooting functions easily from the MENU button. 1 Press the ON/OFF (Power) button to set to shooting mode. 2 Press the MENU button to turn off the MENU screen. Burst Settings - Table of contents Operation Search MENU/Settings Search MENU/Settings Search MENU items (Shooting) You can be changed . For details, see the page for each item. Control button ON/OFF (Power) button...
...on the screen. Image Size SteadyShot - Mode switch Menu items REC Mode REC Mode - EV ISO - - - Focus - - - Smile Detection Sensitivity - indicates settings that can select the various shooting functions easily from the MENU button. 1 Press the ON/OFF (Power) button to set to shooting mode. 2 Press the MENU button to turn off the MENU screen. Burst Settings - Table of contents Operation Search MENU/Settings Search MENU/Settings Search MENU items (Shooting) You can be changed . For details, see the page for each item. Control button ON/OFF (Power) button...
Operating Instructions
Page 10
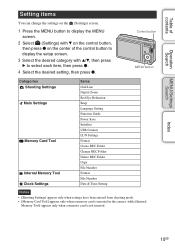
Index 10GB Control button MENU button Categories Shooting Settings Main Settings Memory Card Tool Internal Memory Tool Clock Settings Items Grid Line Digital Zoom Red Eye Reduction Beep Language Setting Function Guide Power Save Initialize USB Connect LUN Settings Format Create REC.Folder Change REC.Folder Delete REC.Folder Copy File Number Format File Number Date & Time Setting Notes • [Shooting Settings] appears only when settings have been entered from shooting mode. • [Memory Card Tool] appears only when a memory card is inserted in the camera, while [Internal Memory Tool] ...
Index 10GB Control button MENU button Categories Shooting Settings Main Settings Memory Card Tool Internal Memory Tool Clock Settings Items Grid Line Digital Zoom Red Eye Reduction Beep Language Setting Function Guide Power Save Initialize USB Connect LUN Settings Format Create REC.Folder Change REC.Folder Delete REC.Folder Copy File Number Format File Number Date & Time Setting Notes • [Shooting Settings] appears only when settings have been entered from shooting mode. • [Memory Card Tool] appears only when a memory card is inserted in the camera, while [Internal Memory Tool] ...

Operating Instructions
Page 13
... Display 96 12/12 100Min Indication AE/AF lock ISO number Shutter speed Aperture value Exposure Value AF range finder frame indicator Recording a movie/Standby a movie Recording time (m:s) Folder-file number Recorded date/time of the playback image Function guide for playing image Selecting images Indication Recording folder Playback folder Number of recordable images Image number/Number of images recorded in selected folder Recordable time Recording/Playback Media (Memory card, internal memory) Changing folder Red-eye reduction Metering mode Flash mode Flash charging White balance D Display...
... Display 96 12/12 100Min Indication AE/AF lock ISO number Shutter speed Aperture value Exposure Value AF range finder frame indicator Recording a movie/Standby a movie Recording time (m:s) Folder-file number Recorded date/time of the playback image Function guide for playing image Selecting images Indication Recording folder Playback folder Number of recordable images Image number/Number of images recorded in selected folder Recordable time Recording/Playback Media (Memory card, internal memory) Changing folder Red-eye reduction Metering mode Flash mode Flash charging White balance D Display...

Operating Instructions
Page 23
... the control button, then press z. You cannot view images in index mode during image index display, the LCD screen changes to the single-image screen, select an image with even more images. 3 To return to the single- zDisplaying images of contents Operation Search MENU/Settings Search Index Image Index Displays multiple images at the same time. 1 Press the (Playback) button to switch to playback mode. 2 Press the (Index) button to display the image index screen. Note • When the camera is set to Easy Mode during Easy Mode.
... the control button, then press z. You cannot view images in index mode during image index display, the LCD screen changes to the single-image screen, select an image with even more images. 3 To return to the single- zDisplaying images of contents Operation Search MENU/Settings Search Index Image Index Displays multiple images at the same time. 1 Press the (Playback) button to switch to playback mode. 2 Press the (Index) button to display the image index screen. Note • When the camera is set to Easy Mode during Easy Mode.

Operating Instructions
Page 35
...; Burst shooting is not available in Movie Mode, Smile Shutter or Easy Mode. • The flash is set to 100 images in succession when you press and hold down the shutter button. MENU/Settings Search Index 35GB Table of five images is recorded. • The recording interval becomes longer, depending on the setting for the image size. • When the battery level is low, or when the internal memory or the memory card is...
...; Burst shooting is not available in Movie Mode, Smile Shutter or Easy Mode. • The flash is set to 100 images in succession when you press and hold down the shutter button. MENU/Settings Search Index 35GB Table of five images is recorded. • The recording interval becomes longer, depending on the setting for the image size. • When the battery level is low, or when the internal memory or the memory card is...

Operating Instructions
Page 43
..., indicators become easier to see. 1 Press the 2 MENU t (Playback) button to switch to playback mode. (Easy Mode) t [OK] t z on the control button Notes • The battery charge is available. (Delete) button You can delete the currently displayed image. MENU/Settings Search Index 43GB Table of contents Operation Search Easy Mode When viewing still images in a folder with [All]. zViewing functions available in Easy Mode In Easy Mode, only deleting function is used up more quickly because the screen brightness increases automatically. • The shooting mode also changes...
..., indicators become easier to see. 1 Press the 2 MENU t (Playback) button to switch to playback mode. (Easy Mode) t [OK] t z on the control button Notes • The battery charge is available. (Delete) button You can delete the currently displayed image. MENU/Settings Search Index 43GB Table of contents Operation Search Easy Mode When viewing still images in a folder with [All]. zViewing functions available in Easy Mode In Easy Mode, only deleting function is used up more quickly because the screen brightness increases automatically. • The shooting mode also changes...

Operating Instructions
Page 60
... connect the camera to a media service using a USB connection. 1 MENU t (Settings) t (Main Settings) t [LUN Settings] t desired mode t z on the control button Multi Single The images both the memory card and the internal memory are displayed. Table of both on the memory card are displayed; Select this setting in the internal memory are not displayed when the camera is connected to a device other monitor when the camera is not inserted, the images in cases where the images of contents Operation Search LUN Settings Sets the display...
... connect the camera to a media service using a USB connection. 1 MENU t (Settings) t (Main Settings) t [LUN Settings] t desired mode t z on the control button Multi Single The images both the memory card and the internal memory are displayed. Table of both on the memory card are displayed; Select this setting in the internal memory are not displayed when the camera is connected to a device other monitor when the camera is not inserted, the images in cases where the images of contents Operation Search LUN Settings Sets the display...

Operating Instructions
Page 66
... contents File Number Selects the method used to assign file numbers to images. 1 MENU t (Settings) t (Memory Card Tool) or (Internal Memory Tool) t [File Number] t desired mode t z on the control button Series Reset Assigns numbers to files in sequence even if the recording folder or the memory card is changed. (When the replaced memory card contains a file with a number higher than the last assigned number, a number one higher than the largest number is assigned.) Starts from 0001 each time the folder is changed. (When the recording folder contains a file, a number one higher...
... contents File Number Selects the method used to assign file numbers to images. 1 MENU t (Settings) t (Memory Card Tool) or (Internal Memory Tool) t [File Number] t desired mode t z on the control button Series Reset Assigns numbers to files in sequence even if the recording folder or the memory card is changed. (When the replaced memory card contains a file with a number higher than the last assigned number, a number one higher than the largest number is assigned.) Starts from 0001 each time the folder is changed. (When the recording folder contains a file, a number one higher...

Operating Instructions
Page 69
... the restarting confirmation message appears, restart the computer following the instructions on the screen. • DirectX may be installed depending on the system environment of your computer. 6 Remove the CD-ROM after the installation is started up "PMB Launcher", doubleclick (PMB Launcher) on the desktop. Select [Start]. 69GB Continued r Table of contents Operation Search MENU/Settings Search Index Using the software Installing "PMB (Picture Motion Browser)" (Windows) 1 Turn on your...
... the restarting confirmation message appears, restart the computer following the instructions on the screen. • DirectX may be installed depending on the system environment of your computer. 6 Remove the CD-ROM after the installation is started up "PMB Launcher", doubleclick (PMB Launcher) on the desktop. Select [Start]. 69GB Continued r Table of contents Operation Search MENU/Settings Search Index Using the software Installing "PMB (Picture Motion Browser)" (Windows) 1 Turn on your...

Operating Instructions
Page 76
... dedicated USB cable while the (PictBridge Connecting) indicator appears on the camera. Printing at a print shop directly from the camera. Notes • You cannot print images stored in the internal memory at a shop You can take image data to a shop, always copy (back up) your photo printing service shop as the shop supports photo printing services conforming to be inserted in single-image mode. Selects the size of images you print them when you want to superimpose dates on images. •...
... dedicated USB cable while the (PictBridge Connecting) indicator appears on the camera. Printing at a print shop directly from the camera. Notes • You cannot print images stored in the internal memory at a shop You can take image data to a shop, always copy (back up) your photo printing service shop as the shop supports photo printing services conforming to be inserted in single-image mode. Selects the size of images you print them when you want to superimpose dates on images. •...

Operating Instructions
Page 78
... shutter button halfway down the batteries. Turn off automatically to (Movie) when shooting movies. SD memory card or SDHC memory card (Class 2 or faster) • Set the mode switch to (Still Image) when shooting still images. • Set the mode switch to prevent wearing down . When shooting, make sure that you do one of contents Operation Search MENU/Settings Search Index Camera power is turned off suddenly. • When [Power Save] is set to [Standard] or [Stamina], if you use the following : - Turn...
... shutter button halfway down the batteries. Turn off automatically to (Movie) when shooting movies. SD memory card or SDHC memory card (Class 2 or faster) • Set the mode switch to (Still Image) when shooting still images. • Set the mode switch to prevent wearing down . When shooting, make sure that you do one of contents Operation Search MENU/Settings Search Index Camera power is turned off suddenly. • When [Power Save] is set to [Standard] or [Stamina], if you use the following : - Turn...

Operating Instructions
Page 80
... playing back, on this camera, files containing images which were processed on a computer or images which were shot using "PMB". Viewing images Cannot play back images. • Check that the memory card is not a malfunction. Cancel Easy Mode. Dots appear and remain on the recorded image. Cannot shoot images in index mode. • The camera is full. Press the DISP (Screen Display Settings) button to image processing. Cannot display images in succession. • The internal memory or the memory card is set to Easy Mode...
... playing back, on this camera, files containing images which were processed on a computer or images which were shot using "PMB". Viewing images Cannot play back images. • Check that the memory card is not a malfunction. Cancel Easy Mode. Dots appear and remain on the recorded image. Cannot shoot images in index mode. • The camera is full. Press the DISP (Screen Display Settings) button to image processing. Cannot display images in succession. • The internal memory or the memory card is set to Easy Mode...

Operating Instructions
Page 81
... are playing back the movie directly from the internal memory or the memory card. After making a USB connection, "PMB Portable" does not start automatically. • Make the USB connection after the computer is turned on the camera. • Export them to a computer. Images once exported to a computer cannot be able to import the images to a folder recognized by the camera (page 61). Shoot using a memory card formatted by the camera, such as "101MSDCF". 81GB Cannot play the file (page...
... are playing back the movie directly from the internal memory or the memory card. After making a USB connection, "PMB Portable" does not start automatically. • Make the USB connection after the computer is turned on the camera. • Export them to a computer. Images once exported to a computer cannot be able to import the images to a folder recognized by the camera (page 61). Shoot using a memory card formatted by the camera, such as "101MSDCF". 81GB Cannot play the file (page...

Operating Instructions
Page 83
... printed. • Images shot using the dedicated USB cable. • Turn on the printer, refer to the operating instructions supplied with a computer may not be printed. Consult the printer manufacturer. For details, refer to the operating instructions supplied with the PictBridge standard. Cannot print the image at the size selected. • When you have the recording data so the date cannot be inserted. Table of contents Operation Search MENU/Settings Search PictBridge-compliant printer A connection...
... printed. • Images shot using the dedicated USB cable. • Turn on the printer, refer to the operating instructions supplied with a computer may not be printed. Consult the printer manufacturer. For details, refer to the operating instructions supplied with the PictBridge standard. Cannot print the image at the size selected. • When you have the recording data so the date cannot be inserted. Table of contents Operation Search MENU/Settings Search PictBridge-compliant printer A connection...

Operating Instructions
Page 85
... remaining battery time left. Read only memory card • The camera cannot record or delete images on again. Table of battery, the indicator may be used in a cool location until the temperature goes down. Memory card type error • The inserted memory card cannot be unable to the LOCK position. Camera overheating Allow it to the recording position. Set the switch to cool • The camera temperature has risen. Internal memory error • Turn the power off...
... remaining battery time left. Read only memory card • The camera cannot record or delete images on again. Table of battery, the indicator may be used in a cool location until the temperature goes down. Memory card type error • The inserted memory card cannot be unable to the LOCK position. Camera overheating Allow it to the recording position. Set the switch to cool • The camera temperature has risen. Internal memory error • Turn the power off...

Operating Instructions
Page 86
... the memory card. Turn the power off and on the memory card. Maximum number of images already selected • Up to 100 files can be able to insufficient light. Read only folder • You have selected a folder that cannot be played back on the image. (Vibration warning indicator) • Camera shake may not be selected when using other cameras. File protected • Release the protection (page 47). Unable to secure the camera. Image size...
... the memory card. Turn the power off and on the memory card. Maximum number of images already selected • Up to 100 files can be able to insufficient light. Read only folder • You have selected a folder that cannot be played back on the image. (Vibration warning indicator) • Camera shake may not be selected when using other cameras. File protected • Release the protection (page 47). Unable to secure the camera. Image size...


