Cyber-shot® User Guide (Printable PDF)
Page 9
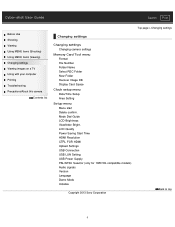
Mode Dial Guide LCD Brightness Viewfinder Bright. Cyber-shot User Guide Search Print Before Use Shooting Viewing Using MENU items (Shooting) Using MENU items (Viewing) Changing settings Viewing images on a TV Using with your computer Printing Troubleshooting Precautions/About this camera Contents list Changing settings Changing settings Changing camera settings Memory Card Tool menu Format File Number Folder Name Select REC Folder New Folder Recover Image DB Display Card Space Clock setup menu Date/Time Setup Area Setting Setup menu Menu start Delete confirm. LCD Quality Power Saving ...
Mode Dial Guide LCD Brightness Viewfinder Bright. Cyber-shot User Guide Search Print Before Use Shooting Viewing Using MENU items (Shooting) Using MENU items (Viewing) Changing settings Viewing images on a TV Using with your computer Printing Troubleshooting Precautions/About this camera Contents list Changing settings Changing settings Changing camera settings Memory Card Tool menu Format File Number Folder Name Select REC Folder New Folder Recover Image DB Display Card Space Clock setup menu Date/Time Setup Area Setting Setup menu Menu start Delete confirm. LCD Quality Power Saving ...

Cyber-shot® User Guide (Printable PDF)
Page 18
...(Viewing) Using MENU items (Viewing) Using MENU items (Viewing) Playback menu Still/Movie Select Delete Slide Show Image Index Rotate Protect Specify Printing Picture Effect Volume Settings Playback Display Playback menu items that cannot be set in View Mode Changing settings Changing settings Changing camera settings Memory Card Tool menu Format File Number Folder Name Select REC Folder New Folder Recover Image DB Display Card Space Clock setup menu Date/Time Setup Area Setting Setup menu Menu start Delete confirm. Mode Dial Guide LCD Brightness Viewfinder Bright. LCD Quality Power Saving...
...(Viewing) Using MENU items (Viewing) Using MENU items (Viewing) Playback menu Still/Movie Select Delete Slide Show Image Index Rotate Protect Specify Printing Picture Effect Volume Settings Playback Display Playback menu items that cannot be set in View Mode Changing settings Changing settings Changing camera settings Memory Card Tool menu Format File Number Folder Name Select REC Folder New Folder Recover Image DB Display Card Space Clock setup menu Date/Time Setup Area Setting Setup menu Menu start Delete confirm. Mode Dial Guide LCD Brightness Viewfinder Bright. LCD Quality Power Saving...
Cyber-shot® User Guide (Printable PDF)
Page 38
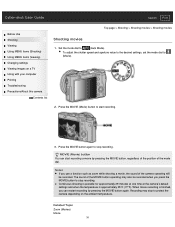
...-shot User Guide Search Print Before Use Shooting Viewing Using MENU items (Shooting) Using MENU items (Viewing) Changing settings Viewing images on the ambient temperature. The sound of the camera operating will be recorded when you can start recording. 3. Related Topic Zoom (Movies) Movie 38 When movie recording is approximately 25°C (77°F). Press the MOVIE button again to start recording a movie by pressing the MOVIE button again. Press the MOVIE (Movie) button to stop recording. Recording may also be recorded. Set the mode dial to protect...
...-shot User Guide Search Print Before Use Shooting Viewing Using MENU items (Shooting) Using MENU items (Viewing) Changing settings Viewing images on the ambient temperature. The sound of the camera operating will be recorded when you can start recording. 3. Related Topic Zoom (Movies) Movie 38 When movie recording is approximately 25°C (77°F). Press the MOVIE button again to start recording a movie by pressing the MOVIE button again. Press the MOVIE (Movie) button to stop recording. Recording may also be recorded. Set the mode dial to protect...
Cyber-shot® User Guide (Printable PDF)
Page 41
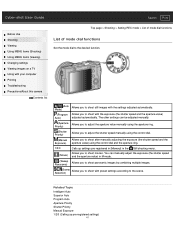
...-shot User Guide Search Print Before Use Shooting Viewing Using MENU items (Shooting) Using MENU items (Viewing) Changing settings Viewing images on a TV Using with your computer Printing Troubleshooting Precautions/About this camera Contents list Top page > Shooting > Setting REC mode > List of mode dial functions List of mode dial functions Set the mode dial to the desired function. (Auto Allows you to shoot still images with preset settings according to the scene. Allows you to shoot after manually adjusting the exposure (the shutter speed and the aperture value) using the control...
...-shot User Guide Search Print Before Use Shooting Viewing Using MENU items (Shooting) Using MENU items (Viewing) Changing settings Viewing images on a TV Using with your computer Printing Troubleshooting Precautions/About this camera Contents list Top page > Shooting > Setting REC mode > List of mode dial functions List of mode dial functions Set the mode dial to the desired function. (Auto Allows you to shoot still images with preset settings according to the scene. Allows you to shoot after manually adjusting the exposure (the shutter speed and the aperture value) using the control...
Cyber-shot® User Guide (Printable PDF)
Page 46
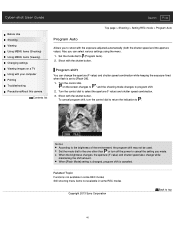
... page > Shooting > Setting REC mode > Program Auto Program Auto Allows you made. When the brightness changes, the aperture (F value) and shutter speed also change the aperture (F value) and shutter speed combination while keeping the exposure fixed when flash is canceled. Cyber-shot User Guide Search Print Before Use Shooting Viewing Using MENU items (Shooting) Using MENU items (Viewing) Changing settings Viewing images on the screen changes to " " and the shooting mode changes to program shift. 2. Program shift You can select various settings using the menu. 1. Turn the control dial...
... page > Shooting > Setting REC mode > Program Auto Program Auto Allows you made. When the brightness changes, the aperture (F value) and shutter speed also change the aperture (F value) and shutter speed combination while keeping the exposure fixed when flash is canceled. Cyber-shot User Guide Search Print Before Use Shooting Viewing Using MENU items (Shooting) Using MENU items (Viewing) Changing settings Viewing images on the screen changes to " " and the shooting mode changes to program shift. 2. Program shift You can select various settings using the menu. 1. Turn the control dial...
Cyber-shot® User Guide (Printable PDF)
Page 51
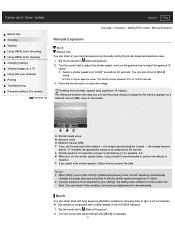
... slow shutter speeds, it takes time to the set and the proper exposure judged by manually setting the shutter speed and aperture value. 1. "0" indicates the appropriate exposure as fireworks. If you set shutter speed and aperture (F value). Cyber-shot User Guide Search Print Before Use Shooting Viewing Using MENU items (Shooting) Using MENU items (Viewing) Changing settings Viewing images on the screen. Set the mode dial to (Manual Exposure). 2. You can shoot at F2.0 is recommended. Notes When [ISO] is indicated by ["], for proper exposure according to process the data...
... slow shutter speeds, it takes time to the set and the proper exposure judged by manually setting the shutter speed and aperture value. 1. "0" indicates the appropriate exposure as fireworks. If you set shutter speed and aperture (F value). Cyber-shot User Guide Search Print Before Use Shooting Viewing Using MENU items (Shooting) Using MENU items (Viewing) Changing settings Viewing images on the screen. Set the mode dial to (Manual Exposure). 2. You can shoot at F2.0 is recommended. Notes When [ISO] is indicated by ["], for proper exposure according to process the data...
Cyber-shot® User Guide (Printable PDF)
Page 63
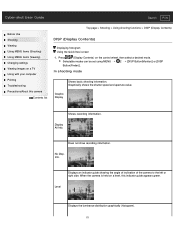
... or [DISP Button(Finder)]. Info. When the camera is held on a level, this camera Contents list Top page > Shooting > Using shooting functions > DISP (Display Contents) DISP (Display Contents) Displaying histogram Using the Quick Navi screen 1. Press (Display Contents) on the control wheel, then select a desired mode. Graphically shows the shutter speed and aperture value. Graphic Display Shows recording information. Cyber-shot User Guide Search Print Before Use Shooting Viewing Using MENU items (Shooting) Using MENU items (Viewing) Changing settings Viewing images on a TV...
... or [DISP Button(Finder)]. Info. When the camera is held on a level, this camera Contents list Top page > Shooting > Using shooting functions > DISP (Display Contents) DISP (Display Contents) Displaying histogram Using the Quick Navi screen 1. Press (Display Contents) on the control wheel, then select a desired mode. Graphically shows the shutter speed and aperture value. Graphic Display Shows recording information. Cyber-shot User Guide Search Print Before Use Shooting Viewing Using MENU items (Shooting) Using MENU items (Viewing) Changing settings Viewing images on a TV...
Cyber-shot® User Guide (Printable PDF)
Page 75
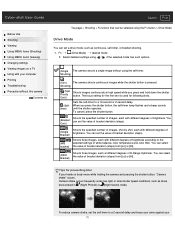
... the shutter button, the self-timer lamp flashes and a beep sounds until the shutter operates. Shooting) (Spd Priority Cont.) (Selftimer) Shoots images continuously at different degrees of D-Range Optimizer. Shoots three images, each with your computer Printing Troubleshooting Precautions/About this camera Contents list Top page > Shooting > Functions that can select the value of bracket deviation (steps) from [Lo] or [Hi]. Cyber-shot User Guide Search Print Before Use Shooting Viewing Using MENU items (Shooting) Using MENU items (Viewing) Changing settings Viewing images on...
... the shutter button, the self-timer lamp flashes and a beep sounds until the shutter operates. Shooting) (Spd Priority Cont.) (Selftimer) Shoots images continuously at different degrees of D-Range Optimizer. Shoots three images, each with your computer Printing Troubleshooting Precautions/About this camera Contents list Top page > Shooting > Functions that can select the value of bracket deviation (steps) from [Lo] or [Hi]. Cyber-shot User Guide Search Print Before Use Shooting Viewing Using MENU items (Shooting) Using MENU items (Viewing) Changing settings Viewing images on...
Cyber-shot® User Guide (Printable PDF)
Page 84
... is affected by the lighting conditions. Adjusts for photography. If you can adjust color tones manually using the Fn button > White Balance White Balance To capture a basic white color in [Custom] mode. Cyber-shot User Guide Search Print Before Use Shooting Viewing Using MENU items (Shooting) Using MENU items (Viewing) Changing settings Viewing images on a TV Using with your computer Printing Troubleshooting Precautions/About this camera Contents list Top page > Shooting > Functions that the colors appear natural. Use this function if image color appears unnatural. 1.
... is affected by the lighting conditions. Adjusts for photography. If you can adjust color tones manually using the Fn button > White Balance White Balance To capture a basic white color in [Custom] mode. Cyber-shot User Guide Search Print Before Use Shooting Viewing Using MENU items (Shooting) Using MENU items (Viewing) Changing settings Viewing images on a TV Using with your computer Printing Troubleshooting Precautions/About this camera Contents list Top page > Shooting > Functions that the colors appear natural. Use this function if image color appears unnatural. 1.
Cyber-shot® User Guide (Printable PDF)
Page 106
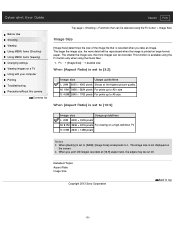
... pixels M: 8.7M 3936 × 2216 pixels For viewing on the screen. When you take an image. Related Topic Aspect Ratio Image Size Copyright 2013 Sony Corporation Back to L. Cyber-shot User Guide Search Print Before Use Shooting Viewing Using MENU items (Shooting) Using MENU items (Viewing) Changing settings Viewing images on a TV Using with your computer Printing Troubleshooting Precautions/About this camera Contents list Top page > Shooting > Functions that can be recorded. The image size is printed on large-format paper. M: 10M 3936 × 2624 pixels...
... pixels M: 8.7M 3936 × 2216 pixels For viewing on the screen. When you take an image. Related Topic Aspect Ratio Image Size Copyright 2013 Sony Corporation Back to L. Cyber-shot User Guide Search Print Before Use Shooting Viewing Using MENU items (Shooting) Using MENU items (Viewing) Changing settings Viewing images on a TV Using with your computer Printing Troubleshooting Precautions/About this camera Contents list Top page > Shooting > Functions that can be recorded. The image size is printed on large-format paper. M: 10M 3936 × 2624 pixels...
Cyber-shot® User Guide (Printable PDF)
Page 188
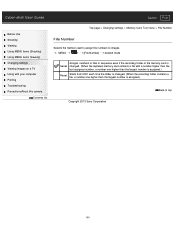
Cyber-shot User Guide Search Print Before Use Shooting Viewing Using MENU items (Shooting) Using MENU items (Viewing) Changing settings Viewing images on a TV Using with a number higher than the last assigned number, a number one higher than the largest number is assigned.) Reset Starts from 0001 each time the folder is assigned.) Copyright 2013 Sony Corporation Back to images. 1. MENU 1 [File Number] desired mode Assigns numbers to files in sequence even if the recording folder or the memory card is Series changed . (When the recording folder contains a file, a number one higher...
Cyber-shot User Guide Search Print Before Use Shooting Viewing Using MENU items (Shooting) Using MENU items (Viewing) Changing settings Viewing images on a TV Using with a number higher than the last assigned number, a number one higher than the largest number is assigned.) Reset Starts from 0001 each time the folder is assigned.) Copyright 2013 Sony Corporation Back to images. 1. MENU 1 [File Number] desired mode Assigns numbers to files in sequence even if the recording folder or the memory card is Series changed . (When the recording folder contains a file, a number one higher...
Cyber-shot® User Guide (Printable PDF)
Page 201
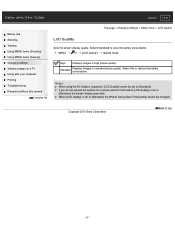
... the [Power Saving Start Time] setting cannot be set to save the battery consumption. 1. Notes When using the AC Adaptor (supplied), [LCD Quality] cannot be changed. Select this camera Contents list Top page > Changing settings > Setup menu > LCD Quality LCD Quality Sets the screen display quality. Standard Displays images in high picture quality. Copyright 2013 Sony Corporation Back to reduce the battery consumption. When [LCD Quality] is set to [Standard]. Cyber-shot User Guide Search Print Before Use Shooting Viewing Using MENU items (Shooting) Using MENU...
... the [Power Saving Start Time] setting cannot be set to save the battery consumption. 1. Notes When using the AC Adaptor (supplied), [LCD Quality] cannot be changed. Select this camera Contents list Top page > Changing settings > Setup menu > LCD Quality LCD Quality Sets the screen display quality. Standard Displays images in high picture quality. Copyright 2013 Sony Corporation Back to reduce the battery consumption. When [LCD Quality] is set to [Standard]. Cyber-shot User Guide Search Print Before Use Shooting Viewing Using MENU items (Shooting) Using MENU...
Cyber-shot® User Guide (Printable PDF)
Page 202
... > Changing settings > Setup menu > Power Saving Start Time Power Saving Start Time Sets the length of time until the camera turns off function" under conditions such as during a slideshow, when recording movies or when the camera is connected to [Standard], the [Power Saving Start Time] setting cannot be changed. MENU 2 [Power Saving Start Time] desired mode 30 Min 5 Min 1 Min Turns off function). 1. When [LCD Quality] is set . 20 Sec 10 Sec Notes The camera does not enter "Auto power-off automatically. Cyber-shot User Guide Search Print Before Use Shooting Viewing Using MENU...
... > Changing settings > Setup menu > Power Saving Start Time Power Saving Start Time Sets the length of time until the camera turns off function" under conditions such as during a slideshow, when recording movies or when the camera is connected to [Standard], the [Power Saving Start Time] setting cannot be changed. MENU 2 [Power Saving Start Time] desired mode 30 Min 5 Min 1 Min Turns off function). 1. When [LCD Quality] is set . 20 Sec 10 Sec Notes The camera does not enter "Auto power-off automatically. Cyber-shot User Guide Search Print Before Use Shooting Viewing Using MENU...
Cyber-shot® User Guide (Printable PDF)
Page 205
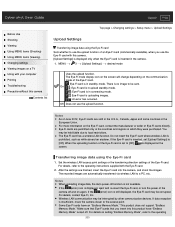
... Memory Mode." If the For details, contact Eye-Fi, Inc. (error) icon is no image to the operating 205 MENU 3 [Upload Settings] desired mode Uses the upload function. When the uploading function of the Eye-Fi card. : Eye-Fi card is displayed on the screen. For details, refer to the access point. Notes When uploading image data, the Auto power-off and on again. If data reception is insufficient, move the camera closer to the operating instructions supplied with this camera. [Upload Settings] is displayed...
... Memory Mode." If the For details, contact Eye-Fi, Inc. (error) icon is no image to the operating 205 MENU 3 [Upload Settings] desired mode Uses the upload function. When the uploading function of the Eye-Fi card. : Eye-Fi card is displayed on the screen. For details, refer to the access point. Notes When uploading image data, the Auto power-off and on again. If data reception is insufficient, move the camera closer to the operating instructions supplied with this camera. [Upload Settings] is displayed...
Cyber-shot® User Guide (Printable PDF)
Page 209
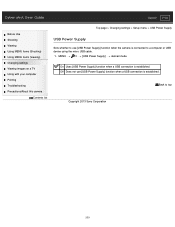
... micro USB cable. 1. Back to top Copyright 2013 Sony Corporation 209 MENU 3 [USB Power Supply] desired mode On Uses [USB Power Supply] function when a USB connection is established. Cyber-shot User Guide Search Print Before Use Shooting Viewing Using MENU items (Shooting) Using MENU items (Viewing) Changing settings Viewing images on a TV Using with your computer Printing Troubleshooting Precautions/About this camera Contents list Top page > Changing settings > Setup menu > USB Power Supply USB Power Supply Sets whether to use [USB Power Supply] function when a USB connection is...
... micro USB cable. 1. Back to top Copyright 2013 Sony Corporation 209 MENU 3 [USB Power Supply] desired mode On Uses [USB Power Supply] function when a USB connection is established. Cyber-shot User Guide Search Print Before Use Shooting Viewing Using MENU items (Shooting) Using MENU items (Viewing) Changing settings Viewing images on a TV Using with your computer Printing Troubleshooting Precautions/About this camera Contents list Top page > Changing settings > Setup menu > USB Power Supply USB Power Supply Sets whether to use [USB Power Supply] function when a USB connection is...
Cyber-shot® User Guide (Printable PDF)
Page 216
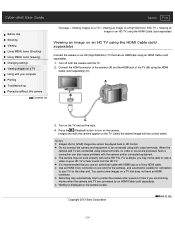
... displayed on the camera screen. Nothing is recommended that you use an authorized cable with HDMI logo or a Sony HDMI cable. Press the (Playback) button to turn on the TV. Such a connection can also cause problems with the control wheel. Images shot with the camera appear on the camera. Notes Images shot in HD format. When the camera and TV are connected by an HDMI Cable (sold separately) Connect the camera to view a video on your computer Printing Troubleshooting...
... displayed on the camera screen. Nothing is recommended that you use an authorized cable with HDMI logo or a Sony HDMI cable. Press the (Playback) button to turn on the TV. Such a connection can also cause problems with the control wheel. Images shot with the camera appear on the camera. Notes Images shot in HD format. When the camera and TV are connected by an HDMI Cable (sold separately) Connect the camera to view a video on your computer Printing Troubleshooting...
Cyber-shot® User Guide (Printable PDF)
Page 222
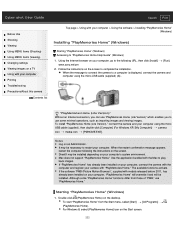
Cyber-shot User Guide Search Print Before Use Shooting Viewing Using MENU items (Shooting) Using MENU items (Viewing) Changing settings Viewing images on a TV Using with your computer Printing Troubleshooting Precautions/About this camera Contents list Top page > Using with your computer, "PlayMemories Home" will overwrite it and will be installed. If the software "PMB (Picture Motion Browser)", supplied with the computer and register your computer. Notes Log on your computer, connect the camera with models released before 2011, has...
Cyber-shot User Guide Search Print Before Use Shooting Viewing Using MENU items (Shooting) Using MENU items (Viewing) Changing settings Viewing images on a TV Using with your computer Printing Troubleshooting Precautions/About this camera Contents list Top page > Using with your computer, "PlayMemories Home" will overwrite it and will be installed. If the software "PMB (Picture Motion Browser)", supplied with the computer and register your computer. Notes Log on your computer, connect the camera with models released before 2011, has...
Cyber-shot® User Guide (Printable PDF)
Page 242
Disconnect the USB cable from the memory card. Connect the camera and your computer correctly making a USB connection, "PlayMemories Home" does not start automatically. If you are using a memory card formatted by a computer, you shoot images with your computer Printing Troubleshooting Precautions/About this camera and view them on . Use "PlayMemories Home" to "PlayMemories Home Help Guide." [Details] Consult the computer or software manufacturer. Set [USB Power Supply] to top 242 Shoot using "PlayMemories Home", refer to copy images stored on a PC...
Disconnect the USB cable from the memory card. Connect the camera and your computer correctly making a USB connection, "PlayMemories Home" does not start automatically. If you are using a memory card formatted by a computer, you shoot images with your computer Printing Troubleshooting Precautions/About this camera and view them on . Use "PlayMemories Home" to "PlayMemories Home Help Guide." [Details] Consult the computer or software manufacturer. Set [USB Power Supply] to top 242 Shoot using "PlayMemories Home", refer to copy images stored on a PC...
Cyber-shot® User Guide (Printable PDF)
Page 247
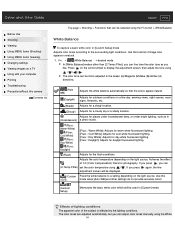
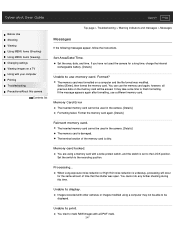
... a memory card with your computer Printing Troubleshooting Precautions/About this time. Images recorded with a DPOF mark. 247 Set Area/Date/Time. When Long exposure noise reduction or High ISO noise reduction is damaged. Format? Processing... You cannot do any further shooting during this camera Contents list Top page > Troubleshooting > Warning indicators and messages > Messages Messages If the following messages appear, follow the instructions. Cyber-shot User Guide Search Print Before Use Shooting Viewing Using MENU items (Shooting) Using MENU items (Viewing) Changing...
... a memory card with your computer Printing Troubleshooting Precautions/About this time. Images recorded with a DPOF mark. 247 Set Area/Date/Time. When Long exposure noise reduction or High ISO noise reduction is damaged. Format? Processing... You cannot do any further shooting during this camera Contents list Top page > Troubleshooting > Warning indicators and messages > Messages Messages If the following messages appear, follow the instructions. Cyber-shot User Guide Search Print Before Use Shooting Viewing Using MENU items (Shooting) Using MENU items (Viewing) Changing...
Marketing Specifications
Page 2
... settings (including exposure modes, shutter speed, Drive mode, ISO, White Balance, Metering modes, etc.). There are recorded at Full HD resolution (1920 x 1080 pixel) in handy when using the Memory Recall mode. For extra assistance, the Dual-axis Digital Level Gauge can save it in memory by compensating for a certain type of shooting situation, you frequently use MF Assist to enlarge the displayed image up to achieve better results during real-time monitoring of the camera...
... settings (including exposure modes, shutter speed, Drive mode, ISO, White Balance, Metering modes, etc.). There are recorded at Full HD resolution (1920 x 1080 pixel) in handy when using the Memory Recall mode. For extra assistance, the Dual-axis Digital Level Gauge can save it in memory by compensating for a certain type of shooting situation, you frequently use MF Assist to enlarge the displayed image up to achieve better results during real-time monitoring of the camera...


