Operating Instructions
Page 4
... the recording in a cold location. The screen may be uneven and that may cause a malfunction. • Images may not be copyrighted. "Memory Stick" N50 For the Customers in color) that the camera is not a malfunction. Remove dirt from the surface of the flash If the dirt changes color or... any way. • Be careful when placing the camera near a window or outdoors. Exposing the LCD screen, the finder or the lens to a disk. However, there may occur. These points are not guaranteed. and Canada THIS CLASS B DIGITAL DEVICE COMPLIES WITH PART 15 OF THE FCC RULES AND...
... the recording in a cold location. The screen may be uneven and that may cause a malfunction. • Images may not be copyrighted. "Memory Stick" N50 For the Customers in color) that the camera is not a malfunction. Remove dirt from the surface of the flash If the dirt changes color or... any way. • Be careful when placing the camera near a window or outdoors. Exposing the LCD screen, the finder or the lens to a disk. However, there may occur. These points are not guaranteed. and Canada THIS CLASS B DIGITAL DEVICE COMPLIES WITH PART 15 OF THE FCC RULES AND...
Operating Instructions
Page 5
... and follow the instructions on locations where you can use the camera Do not use the camera near a location that generates strong radio waves or emits radiation. Trademarks • is a trademark of Sony Corporation. • "Memory Stick," , "Memory Stick PRO," , "Memory Stick Duo," , "Memory Stick PRO Duo," , "MagicGate," are trademarks of Sony Corporation. • Picture Package is equipped with power zoom lens...
... and follow the instructions on locations where you can use the camera Do not use the camera near a location that generates strong radio waves or emits radiation. Trademarks • is a trademark of Sony Corporation. • "Memory Stick," , "Memory Stick PRO," , "Memory Stick Duo," , "Memory Stick PRO Duo," , "MagicGate," are trademarks of Sony Corporation. • Picture Package is equipped with power zoom lens...

Operating Instructions
Page 6
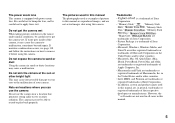
... an auto focus method 49 Choosing a focus range finder frame - Table of your camera 38 Viewing images on a TV screen 40 Deleting still images Deleting images 42 Formatting a "Memory Stick 44 Before advanced operations How to setup and operate your camera on/off 17 How to use the control button 18 Setting the date and...
... an auto focus method 49 Choosing a focus range finder frame - Table of your camera 38 Viewing images on a TV screen 40 Deleting still images Deleting images 42 Formatting a "Memory Stick 44 Before advanced operations How to setup and operate your camera on/off 17 How to use the control button 18 Setting the date and...
Operating Instructions
Page 7
...an alphabet letter appears ..... 110 Additional information The number of a still image - Enlarging a portion of images that can be saved/ shooting time 111 Menu items 112 SET UP items 116 Precautions 118 The "Memory Stick 119 The nickel-metal hydride batteries ........120 The battery charger 121 ...Package 95 Copying images to your computer Copying images to print - For Windows users 84 Installing the USB driver 85 Connecting the camera to your computer 86 Copying images 87 Viewing the images on your computer - Playback zoom 64 Playing back successive images - ...
...an alphabet letter appears ..... 110 Additional information The number of a still image - Enlarging a portion of images that can be saved/ shooting time 111 Menu items 112 SET UP items 116 Precautions 118 The "Memory Stick 119 The nickel-metal hydride batteries ........120 The battery charger 121 ...Package 95 Copying images to your computer Copying images to print - For Windows users 84 Installing the USB driver 85 Connecting the camera to your computer 86 Copying images 87 Viewing the images on your computer - Playback zoom 64 Playing back successive images - ...

Operating Instructions
Page 9
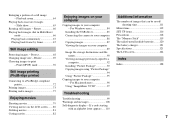
...) jack (40) J (Image Size/Delete) button (22, 42) K Zoom (W/T) buttons (27)/ (Index) button (39)/ / (Playback zoom) buttons (64) L Access lamp (21) M OPEN button (13) N Battery/"Memory Stick" cover (13) O Battery insertion slot (13) P "Memory Stick" insertion slot (21) Q Jack cover (16) R Hook for wrist strap (bottom surface) Attaching the wrist strap. 9
...) jack (40) J (Image Size/Delete) button (22, 42) K Zoom (W/T) buttons (27)/ (Index) button (39)/ / (Playback zoom) buttons (64) L Access lamp (21) M OPEN button (13) N Battery/"Memory Stick" cover (13) O Battery insertion slot (13) P "Memory Stick" insertion slot (21) Q Jack cover (16) R Hook for wrist strap (bottom surface) Attaching the wrist strap. 9

Operating Instructions
Page 13
...of the batteries or the terminals become covered with a dry cloth. Turn up the battery/"Memory Stick" cover, and slide the cover in any way. Never use up the batteries completely, put the camera in the slide show mode (page 65) and leave it that have been partially or ...clean the poles of the batteries and the terminals of the arrow. 2 , Insert the batteries. poles of the battery charger. 1 , Open the battery/"Memory Stick" cover. Match the +/- Getting started Inserting the batteries • To use batteries from the skin, the operating time of dirt or oil from which the...
...of the batteries or the terminals become covered with a dry cloth. Turn up the battery/"Memory Stick" cover, and slide the cover in any way. Never use up the batteries completely, put the camera in the slide show mode (page 65) and leave it that have been partially or ...clean the poles of the batteries and the terminals of the arrow. 2 , Insert the batteries. poles of the battery charger. 1 , Open the battery/"Memory Stick" cover. Match the +/- Getting started Inserting the batteries • To use batteries from the skin, the operating time of dirt or oil from which the...

Operating Instructions
Page 14
3 , Close the battery/"Memory Stick" cover. The cover is closed when it on. • Based on the conditions under which the camera is being used and the state of the charge, or on the environment, this case, replace the batteries with use, the battery remaining indicator... (A full charge is off even if the battery remaining indicator shows sufficient battery life remaining. To remove the batteries Turn up the battery/"Memory Stick" cover, open the battery/"Memory Stick" cover, then remove the batteries. • Make sure you do not drop the batteries when opening or closing the battery...
3 , Close the battery/"Memory Stick" cover. The cover is closed when it on. • Based on the conditions under which the camera is being used and the state of the charge, or on the environment, this case, replace the batteries with use, the battery remaining indicator... (A full charge is off even if the battery remaining indicator shows sufficient battery life remaining. To remove the batteries Turn up the battery/"Memory Stick" cover, open the battery/"Memory Stick" cover, then remove the batteries. • Make sure you do not drop the batteries when opening or closing the battery...
Operating Instructions
Page 15
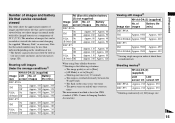
...CIPA: Camera & Imaging Products Association) Viewing still images2) NH-AA-DA (2) (supplied) No. of Image size images Battery life (min.) DSC-P93A 5M Approx. 9200 Approx. 460 VGA (E-Mail) Approx. 9200 Approx. 460 DSC-P73 ...180 Approx. 90 DSC-P73 On 4M Off Approx. 110 Approx. 55 Approx. 240 Approx. 120 VGA On Approx. 110 Approx. 55 (E-Mail) Off Approx. 240 Approx. 120 When using Sony alkaline batteries 1)...battery life that can be recorded or viewed take into account changing the supplied "Memory Stick" as time passes (page 120). The power turns on and off once every ...
...CIPA: Camera & Imaging Products Association) Viewing still images2) NH-AA-DA (2) (supplied) No. of Image size images Battery life (min.) DSC-P93A 5M Approx. 9200 Approx. 460 VGA (E-Mail) Approx. 9200 Approx. 460 DSC-P73 ...180 Approx. 90 DSC-P73 On 4M Off Approx. 110 Approx. 55 Approx. 240 Approx. 120 VGA On Approx. 110 Approx. 55 (E-Mail) Off Approx. 240 Approx. 120 When using Sony alkaline batteries 1)...battery life that can be recorded or viewed take into account changing the supplied "Memory Stick" as time passes (page 120). The power turns on and off once every ...

Operating Instructions
Page 21
... as it out. • Whenever the access lamp is lit, the camera is recording or reading out an image. Shooting still images Inserting and removing a "Memory Stick" Shooting still images Label side Terminal side Access lamp 1 , Open the battery/"Memory Stick" cover. Never open the battery/"Memory Stick" cover or turn off the power at this time. Turn up...
... as it out. • Whenever the access lamp is lit, the camera is recording or reading out an image. Shooting still images Inserting and removing a "Memory Stick" Shooting still images Label side Terminal side Access lamp 1 , Open the battery/"Memory Stick" cover. Never open the battery/"Memory Stick" cover or turn off the power at this time. Turn up...
Operating Instructions
Page 23
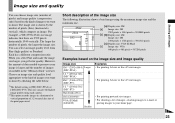
... 1944 vertically. Short description of the image size The following illustration shows a brief image using each camera. 2) This option records images in the "Memory Stick" is [5M] (DSC-P93A) or [4M] (DSC-P73). Choose an image size and quality level appropriate to the kind of images you get better quality...the number of images recordable in a horizontal to vertical proportion of 3:2 to match the size of the print paper used. Shooting still images Image size and quality You can give the highest image quality using the maximum image size and the minimum one. 2592 2304 ...
... 1944 vertically. Short description of the image size The following illustration shows a brief image using each camera. 2) This option records images in the "Memory Stick" is [5M] (DSC-P93A) or [4M] (DSC-P73). Choose an image size and quality level appropriate to the kind of images you get better quality...the number of images recordable in a horizontal to vertical proportion of 3:2 to match the size of the print paper used. Shooting still images Image size and quality You can give the highest image quality using the maximum image size and the minimum one. 2592 2304 ...

Operating Instructions
Page 24
... • To shoot more images. (normal) The number of images that can be saved in a "Memory Stick"3) The number of images that can be saved in Fine (Standard)4) mode are shown below. (Units: number...image quality (compression ratio) setup, see page 47. 24 • When the images recorded using other Sony devices are played back, the image size indication may be different from the actual image size. •... When the images are viewed on the LCD screen of the camera, they all look the same size. • Number of shooting images can differ from these values...
... • To shoot more images. (normal) The number of images that can be saved in a "Memory Stick"3) The number of images that can be saved in Fine (Standard)4) mode are shown below. (Units: number...image quality (compression ratio) setup, see page 47. 24 • When the images recorded using other Sony devices are played back, the image size indication may be different from the actual image size. •... When the images are viewed on the LCD screen of the camera, they all look the same size. • Number of shooting images can differ from these values...
Operating Instructions
Page 25
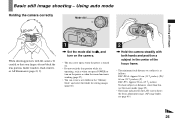
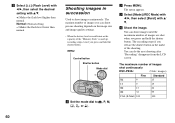
...mode Holding the camera correctly Mode dial Shooting still images When shooting pictures with the camera, be careful so that your fingers do not block the lens portion, finder window, flash emitter, or AF illuminator (pages 8, 9). 1 , Set the mode dial to , and turn on the camera. • The...can create a new folder in the "Memory Stick" and select the folder for storing images (page 48). 2 , Hold the camera steadily with both hands and position a subject in the center of the focus frame. • The minimum focal distance to a subject is as follows: DSC-P93A: Approx 50 cm (19 3/4 inches)...
...mode Holding the camera correctly Mode dial Shooting still images When shooting pictures with the camera, be careful so that your fingers do not block the lens portion, finder window, flash emitter, or AF illuminator (pages 8, 9). 1 , Set the mode dial to , and turn on the camera. • The...can create a new folder in the "Memory Stick" and select the folder for storing images (page 48). 2 , Hold the camera steadily with both hands and position a subject in the center of the focus frame. • The minimum focal distance to a subject is as follows: DSC-P93A: Approx 50 cm (19 3/4 inches)...

Operating Instructions
Page 26
... stops flashing and remains on . The Auto Focus function may be frozen for shooting. (The LCD screen may be canceled. • When the camera does not beep, the AF adjustment is ready for a split second depending on the subject.) • If you are two Auto Focus functions: ... size, and "AF mode" which sets when the camera starts and stops focusing on , the camera is not complete. When the focus is saved in the following subjects. The shutter clicks, the shooting is completed, and the still image is achieved, the camera beeps. There are shooting with in the "Memory Stick."
... stops flashing and remains on . The Auto Focus function may be frozen for shooting. (The LCD screen may be canceled. • When the camera does not beep, the AF adjustment is ready for a split second depending on the subject.) • If you are two Auto Focus functions: ... size, and "AF mode" which sets when the camera starts and stops focusing on , the camera is not complete. When the focus is saved in the following subjects. The shutter clicks, the shooting is completed, and the still image is achieved, the camera beeps. There are shooting with in the "Memory Stick."

Operating Instructions
Page 44
... used immediately. • When you want to format into the camera. • The term "formatting" means preparing a "Memory Stick" to record images; Formatting a "Memory Stick" 4 , Press (delete). To cancel the deletion Select [Exit] with B on the control button, then press z. 1 , Insert the "Memory Stick" you format a "Memory Stick," be aware that all the images in the folder In Step...
... used immediately. • When you want to format into the camera. • The term "formatting" means preparing a "Memory Stick" to record images; Formatting a "Memory Stick" 4 , Press (delete). To cancel the deletion Select [Exit] with B on the control button, then press z. 1 , Insert the "Memory Stick" you format a "Memory Stick," be aware that all the images in the folder In Step...

Operating Instructions
Page 45
Deleting still images Memory Stick Tool Format: OK Create REC. To cancel the formatting Select [Cancel] with V on the control button, then press z. 4 , Select [OK] with B on the control button, ... the control button. When this message disappears, the format is complete. 45 OK Cancel 2 , Set the mode dial to SET UP, and turn on the camera. 3 , Select (Memory Stick Tool) with v on the control button, then press z. Folder: Format All data will be erased Ready? Select [OK] with v/V on the LCD screen...
Deleting still images Memory Stick Tool Format: OK Create REC. To cancel the formatting Select [Cancel] with V on the control button, then press z. 4 , Select [OK] with B on the control button, ... the control button. When this message disappears, the format is complete. 45 OK Cancel 2 , Set the mode dial to SET UP, and turn on the camera. 3 , Select (Memory Stick Tool) with v on the control button, then press z. Folder: Format All data will be erased Ready? Select [OK] with v/V on the LCD screen...

Operating Instructions
Page 48
...Creating a new folder a Set the mode dial to SET UP. Creating or selecting a folder Your camera can select the folder used to store images. You can create multiple folders within a "Memory Stick." OK Cancel c Select [OK] with v/V, [Change REC. Select REC. The creating folder screen ... 2 or 3, select [Cancel]. • Once you create a new folder, you cannot delete the new folder with a number one folder. b Select (Memory Stick Tool) with v , then press z. To cancel changing the recording folder In Step 2 or 3, select [Cancel]. • You cannot select the "100MSDCF...
...Creating a new folder a Set the mode dial to SET UP. Creating or selecting a folder Your camera can select the folder used to store images. You can create multiple folders within a "Memory Stick." OK Cancel c Select [OK] with v/V, [Change REC. Select REC. The creating folder screen ... 2 or 3, select [Cancel]. • Once you create a new folder, you cannot delete the new folder with a number one folder. b Select (Memory Stick Tool) with v , then press z. To cancel changing the recording folder In Step 2 or 3, select [Cancel]. • You cannot select the "100MSDCF...
Operating Instructions
Page 60
Shooting images in the midst of the "Memory Stick" is insufficient or the capacity of the shooting. d Shoot the image. The maximum number of images you can do the next shooting after "Recording" disappears ... if you press and hold the shutter button. c Select [ ] (Flash Level) with b/B, then select the desired setting with v/ V. The maxium number of images shot continuously DSC-P93A: (Units: images) Fine Standard 5M 9 15 3:2 9 15 3M 13 24 1M 32 59 VGA (E-Mail) 100 100 60 MENU Control button Shutter button Mode dial...
Shooting images in the midst of the "Memory Stick" is insufficient or the capacity of the shooting. d Shoot the image. The maximum number of images you can do the next shooting after "Recording" disappears ... if you press and hold the shutter button. c Select [ ] (Flash Level) with b/B, then select the desired setting with v/ V. The maxium number of images shot continuously DSC-P93A: (Units: images) Fine Standard 5M 9 15 3:2 9 15 3M 13 24 1M 32 59 VGA (E-Mail) 100 100 60 MENU Control button Shutter button Mode dial...

Operating Instructions
Page 63
...Mode dial a Set the mode dial to both the previous and next folders. When multiple folders are created in the "Memory Stick" When the first or last image in this folder" appears. Advanced still image viewing 63 b Press MENU. c Select (Folder) with v , then press z. To cancel the selection In Step...screen. : Moves to the previous folder. : Moves to the next folder. : Moves to . Select Folder 102 2/2 Folder Name:102MSDCF No. Advanced still image viewing On the single screen VGA 101 9/9 101-0009 2005 1 1 10:30PM BACK/NEXT VOLUME On the Index screen SINGLE DISPLAY • When...
...Mode dial a Set the mode dial to both the previous and next folders. When multiple folders are created in the "Memory Stick" When the first or last image in this folder" appears. Advanced still image viewing 63 b Press MENU. c Select (Folder) with v , then press z. To cancel the selection In Step...screen. : Moves to the previous folder. : Moves to the next folder. : Moves to . Select Folder 102 2/2 Folder Name:102MSDCF No. Advanced still image viewing On the single screen VGA 101 9/9 101-0009 2005 1 1 10:30PM BACK/NEXT VOLUME On the Index screen SINGLE DISPLAY • When...

Operating Instructions
Page 65
...]. Playing back successive images - All:Plays back all the images in the selected folder. The slide show You can play back recorded images in the "Memory Stick." b Press MENU. The menu appears. d Select [Start] with v/V/b/B. Interval settings 3 sec/5 sec/10 sec/30 sec/1 min Image Folder:Plays back all the images in...
...]. Playing back successive images - All:Plays back all the images in the selected folder. The slide show You can play back recorded images in the "Memory Stick." b Press MENU. The menu appears. d Select [Start] with v/V/b/B. Interval settings 3 sec/5 sec/10 sec/30 sec/1 min Image Folder:Plays back all the images in...

Operating Instructions
Page 68
... screen a Set the mode dial to the Index screen. d Select - (Protect) with b/B, then press z. c Select - (Protect) with b/B, then press z. Still image editing On the Index screen a Set the mode dial to , press (index) to switch to . b Press MENU. e Select the image you want to ...green - (Protect) mark is indicated on the selected image. MENU Control button Mode dial • Note that formatting the "Memory Stick" erases all the data in the "Memory Stick" even if images are protected, and these images cannot be recovered. • It may take some time to protect with ...
... screen a Set the mode dial to the Index screen. d Select - (Protect) with b/B, then press z. c Select - (Protect) with b/B, then press z. Still image editing On the Index screen a Set the mode dial to , press (index) to switch to . b Press MENU. e Select the image you want to ...green - (Protect) mark is indicated on the selected image. MENU Control button Mode dial • Note that formatting the "Memory Stick" erases all the data in the "Memory Stick" even if images are protected, and these images cannot be recovered. • It may take some time to protect with ...


