Operating Instructions
Page 1
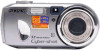
... started Shooting still images Viewing still images Deleting still images Before advanced operations Advanced still image shooting Advanced still image viewing Still image editing Still image printing PictBridge printer) Enjoying movies Enjoying images on the bottom. Record the serial number in the space provided below. Digital Still Camera Operating Instructions Before operating the unit, please read this product. Model No. DSC-P73/P93A Serial No. Refer to these numbers whenever you call upon your computer _______ Troubleshooting Additional information Index Owner...
... started Shooting still images Viewing still images Deleting still images Before advanced operations Advanced still image shooting Advanced still image viewing Still image editing Still image printing PictBridge printer) Enjoying movies Enjoying images on the bottom. Record the serial number in the space provided below. Digital Still Camera Operating Instructions Before operating the unit, please read this product. Model No. DSC-P73/P93A Serial No. Refer to these numbers whenever you call upon your computer _______ Troubleshooting Additional information Index Owner...
Operating Instructions
Page 3
... for your nearest Sony service station. For the Customers in accordance with the limits for a Class B digital device, pursuant to discontinue midway (fail), restart the application or disconnect and connect the USB cable again. These limits are recyclable. This equipment generates, uses, and can help . Attention The electromagnetic fields at the specific frequencies may influence the picture and sound of the FCC...
... for your nearest Sony service station. For the Customers in accordance with the limits for a Class B digital device, pursuant to discontinue midway (fail), restart the application or disconnect and connect the USB cable again. These limits are recyclable. This equipment generates, uses, and can help . Attention The electromagnetic fields at the specific frequencies may influence the picture and sound of the FCC...
Operating Instructions
Page 4
... flash, sufficient light may be some tiny black points and/or bright points (white, red, blue or green in any way. • Be careful when placing the camera near a window or outdoors. No compensation for Camera File system universal standard established by the JEITA (Japan Electronics and Information Technology Industries Association). • Playback of images recorded with your camera on the LCD screen in the U.S.A. Unauthorized recording...
... flash, sufficient light may be some tiny black points and/or bright points (white, red, blue or green in any way. • Be careful when placing the camera near a window or outdoors. No compensation for Camera File system universal standard established by the JEITA (Japan Electronics and Information Technology Industries Association). • Playback of images recorded with your camera on the LCD screen in the U.S.A. Unauthorized recording...

Operating Instructions
Page 6
... a focus range finder frame - White Balance...58 Adjusting the flash level - Picture Effect 62 Advanced still image viewing Selecting the folder and playing back images - Focus preset 51 Shooting with special effects - Manual Exposure 52 Adjusting the exposure - Quick Review 27 Using the zoom feature 27 Shooting close-ups - Macro 29 Using the self-timer 30 Selecting a flash mode 31 Shooting images with the finder......... 33 6 Inserting the date and time on a still image 34 Shooting according to scene conditions 35 Viewing still images Viewing images on the LCD screen of...
... a focus range finder frame - White Balance...58 Adjusting the flash level - Picture Effect 62 Advanced still image viewing Selecting the folder and playing back images - Focus preset 51 Shooting with special effects - Manual Exposure 52 Adjusting the exposure - Quick Review 27 Using the zoom feature 27 Shooting close-ups - Macro 29 Using the self-timer 30 Selecting a flash mode 31 Shooting images with the finder......... 33 6 Inserting the date and time on a still image 34 Shooting according to scene conditions 35 Viewing still images Viewing images on the LCD screen of...
Operating Instructions
Page 7
... Burst mode 66 Playing back continuously 67 Playing back frame by frame 67 Still image editing Protecting images - For Macintosh users 96 Using "ImageMixer VCD2 97 Troubleshooting Troubleshooting 99 Warnings and messages 108 Self-diagnosis display - Print (DPOF) mark 70 Still image printing (PictBridge printer) Connecting to a PictBridge compliant printer 72 Printing images 73 Printing index-images 75 Enjoying movies Shooting movies 79 Viewing movies on the LCD screen .......80 Deleting movies 81 Cutting movies 82 Enjoying images on your computer 89 Image file storage...
... Burst mode 66 Playing back continuously 67 Playing back frame by frame 67 Still image editing Protecting images - For Macintosh users 96 Using "ImageMixer VCD2 97 Troubleshooting Troubleshooting 99 Warnings and messages 108 Self-diagnosis display - Print (DPOF) mark 70 Still image printing (PictBridge printer) Connecting to a PictBridge compliant printer 72 Printing images 73 Printing index-images 75 Enjoying movies Shooting movies 79 Viewing movies on the LCD screen .......80 Deleting movies 81 Cutting movies 82 Enjoying images on your computer 89 Image file storage...
Operating Instructions
Page 18
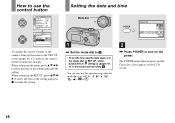
... POWER to make the changes. How to use the control button Camera AF Mode: Digital Zoom: Date/Time: Red Eye Reduction: AF Illuminator: Auto Review: Single Smart Off Off Auto Off SELECT Setup 2 File Number: USB Connect: Video Out: OK Clock Set: Cancel To change the current settings of the camera, bring up the menu or the SET UP screen (pages 46, 47), and use the control button to turn on the LCD screen. 18 When setting up the menu, press v/V/b/B to select the item or the setting and make...
... POWER to make the changes. How to use the control button Camera AF Mode: Digital Zoom: Date/Time: Red Eye Reduction: AF Illuminator: Auto Review: Single Smart Off Off Auto Off SELECT Setup 2 File Number: USB Connect: Video Out: OK Clock Set: Cancel To change the current settings of the camera, bring up the menu or the SET UP screen (pages 46, 47), and use the control button to turn on the LCD screen. 18 When setting up the menu, press v/V/b/B to select the item or the setting and make...
Operating Instructions
Page 47
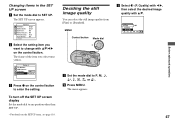
... the setting. c Select (P. Setup 2 File Number: USB Connect: Video Out: OK Clock Set: Cancel c Press z on the control button to any position other than SET UP. • For details on the control button. The menu appears. Quality) with b/B, then select the desired image quality with v/V/b/B on the SET UP items, see page 116. The SET UP screen appears. Changing items in the SET UP screen a Set the mode dial to P, M, , , , , or . b Press MENU. Camera AF Mode: Digital Zoom: Date/Time: Red Eye...
... the setting. c Select (P. Setup 2 File Number: USB Connect: Video Out: OK Clock Set: Cancel c Press z on the control button to any position other than SET UP. • For details on the control button. The menu appears. Quality) with b/B, then select the desired image quality with v/V/b/B on the SET UP items, see page 116. The SET UP screen appears. Changing items in the SET UP screen a Set the mode dial to P, M, , , , , or . b Press MENU. Camera AF Mode: Digital Zoom: Date/Time: Red Eye...
Operating Instructions
Page 84
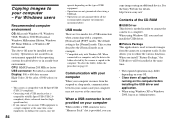
... Windows XP. Copying images to a computer easily. When you connect two or more USB equipment to a single computer at the factory. This section describes the [Normal] mode as an example. * Compatible only with Hi-Speed USB (USB 2.0compliant) allows advanced transfer (highspeed transfer). • If you install "Picture Package," the USB driver will be installed at the same time, some equipment, including your camera, may differ depending on your computer copy images using Windows...
... Windows XP. Copying images to a computer easily. When you connect two or more USB equipment to a single computer at the factory. This section describes the [Normal] mode as an example. * Compatible only with Hi-Speed USB (USB 2.0compliant) allows advanced transfer (highspeed transfer). • If you install "Picture Package," the USB driver will be installed at the same time, some equipment, including your camera, may differ depending on your computer copy images using Windows...

Operating Instructions
Page 87
... if you change the file name to display the menu, then select [Paste] from the menu. Double-click here 2 Click (Sony DSC), then click [Stop]. 3 Confirm the device on page 92. 87 Enjoying images on your computer P Disconnecting the USB cable, removing the "Memory Stick," or turning off the camera. Step 4 is deleted. For Windows 98 or 98SE users Confirm that image with the camera, perform the operation on the...
... if you change the file name to display the menu, then select [Paste] from the menu. Double-click here 2 Click (Sony DSC), then click [Stop]. 3 Confirm the device on page 92. 87 Enjoying images on your computer P Disconnecting the USB cable, removing the "Memory Stick," or turning off the camera. Step 4 is deleted. For Windows 98 or 98SE users Confirm that image with the camera, perform the operation on the...

Operating Instructions
Page 92
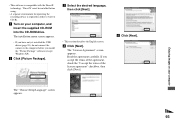
... for installation: approximately 200 MB Display: A video card equipped with a computer or images shot using the camera. b Copy the image file to "DSC0ssss". Installing "Picture Package" "Picture Package" is required. For computer environment See page 84 for any number within the range from [Removable Disk] or [Sony MemoryStick] in [My Computer]. 3 Right-click the [sssMSDCF] folder in use the "Picture Package" software on your computer to a "Memory Stick" and view them on your Windows computer...
... for installation: approximately 200 MB Display: A video card equipped with a computer or images shot using the camera. b Copy the image file to "DSC0ssss". Installing "Picture Package" "Picture Package" is required. For computer environment See page 84 for any number within the range from [Removable Disk] or [Sony MemoryStick] in [My Computer]. 3 Right-click the [sssMSDCF] folder in use the "Picture Package" software on your computer to a "Memory Stick" and view them on your Windows computer...
Operating Instructions
Page 93
...]. Enjoying images on your computer • This software is required in order to write to the computer before using. • A separate environment for operating the recording device is compatible with the DirectX technology. The installation menu screen appears. • If you have not yet installed the USB driver (page 85), do not connect the camera to CD-Rs. If you install the "Picture Package" software (except Windows XP). The...
...]. Enjoying images on your computer • This software is required in order to write to the computer before using. • A separate environment for operating the recording device is compatible with the DirectX technology. The installation menu screen appears. • If you have not yet installed the USB driver (page 85), do not connect the camera to CD-Rs. If you install the "Picture Package" software (except Windows XP). The...

Operating Instructions
Page 94
... "Memory Stick" are copied into these folders. • If "Picture Package" cannot copy images automatically, start up and the images copied are displayed. • Normally "Picture Package" and "Date" folders are created inside the "My Documents" folder, and all of "Picture Package Menu" and "Picture Package destination Folder" are displayed. 94 Copying images using [Settings] on the "Ready to Install the Program" screen. The installation starts. Your computer restarts. h Remove the CD-ROM. The shortcut icons of the image files recorded with the USB cable...
... "Memory Stick" are copied into these folders. • If "Picture Package" cannot copy images automatically, start up and the images copied are displayed. • Normally "Picture Package" and "Date" folders are created inside the "My Documents" folder, and all of "Picture Package Menu" and "Picture Package destination Folder" are displayed. 94 Copying images using [Settings] on the "Ready to Install the Program" screen. The installation starts. Your computer restarts. h Remove the CD-ROM. The shortcut icons of the image files recorded with the USB cable...

Operating Instructions
Page 99
... ones. p Replace the batteries with new ones. 99 p Install charged batteries (page 11). p Replace the batteries with your camera still not work properly, press the RESET button located inside the jack cover, then turn on . • The batteries are not installed properly. p See page 120. Or the sufficient battery remaining indicator is working. p Fully charge the batteries (page 12). If the LCD screen shows "C:ss:ss," the self-diagnosis function is displayed but the power soon...
... ones. p Replace the batteries with new ones. 99 p Install charged batteries (page 11). p Replace the batteries with your camera still not work properly, press the RESET button located inside the jack cover, then turn on . • The batteries are not installed properly. p See page 120. Or the sufficient battery remaining indicator is working. p Fully charge the batteries (page 12). If the LCD screen shows "C:ss:ss," the self-diagnosis function is displayed but the power soon...
Operating Instructions
Page 100
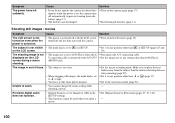
... [640 (Fine)]. p Set the macro recording mode. shooting a movie. Precision digital zoom does not function. • [Digital Zoom] is not displayed on , the camera turns off suddenly. Cause Solution • If you shoot a movie. Shooting still images / movies Symptom Cause Solution The LCD screen is not • The power was turned off the last time you used when you do not operate the camera for about three minutes while the power is on the LCD screen during a movie shooting. • The image size is set to [Smart] or...
... [640 (Fine)]. p Set the macro recording mode. shooting a movie. Precision digital zoom does not function. • [Digital Zoom] is not displayed on , the camera turns off suddenly. Cause Solution • If you shoot a movie. Shooting still images / movies Symptom Cause Solution The LCD screen is not • The power was turned off the last time you used when you do not operate the camera for about three minutes while the power is on the LCD screen during a movie shooting. • The image size is set to [Smart] or...
Operating Instructions
Page 102
... hold the shutter button halfway down. • The exposure is activated. p See page 37. The macro mode does not • When shooting still images, the mode dial is not a malfunction. p Set the mode dial to [On] (page 32). Recording takes a long time. • NR slow shutter function is incorrect. Solution p Insert a "Memory Stick" (page 21). The aperture value and shutter speed flash when you want to shoot a movie. • The image size is set to , , or . p Set [Red Eye Reduction...
... hold the shutter button halfway down. • The exposure is activated. p See page 37. The macro mode does not • When shooting still images, the mode dial is not a malfunction. p Set the mode dial to [On] (page 32). Recording takes a long time. • NR slow shutter function is incorrect. Solution p Insert a "Memory Stick" (page 21). The aperture value and shutter speed flash when you want to shoot a movie. • The image size is set to , , or . p Set [Red Eye Reduction...
Operating Instructions
Page 104
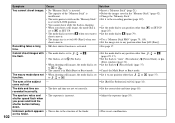
... computer are not using a computer. - - Solution p Check "Recommended computer environment" (pages 84, 96). p Set it again. p Run "Picture Package Menu" and check [Settings]. p Use the AC Adaptor (not supplied) (page 16). p Use the supplied USB cable (page 86). p Make a USB connection when the computer is not directly connected to [Normal] (page 117). You cannot install the USB driver. p Directly connect the camera and your camera. p Turn on . p Use a "Memory Stick" that was formatted using a USB hub (page 84...
... computer are not using a computer. - - Solution p Check "Recommended computer environment" (pages 84, 96). p Set it again. p Run "Picture Package Menu" and check [Settings]. p Use the AC Adaptor (not supplied) (page 16). p Use the supplied USB cable (page 86). p Make a USB connection when the computer is not directly connected to [Normal] (page 117). You cannot install the USB driver. p Directly connect the camera and your camera. p Turn on . p Use a "Memory Stick" that was formatted using a USB hub (page 84...

Operating Instructions
Page 108
... "Memory Stick" format failed. Format the "Memory Stick" again (page 44). Depending on the "Memory Stick" with your camera. Memory Stick locked • The write-protect switch on the "Memory Stick" is available only for viewing with the same first three digits number already exists on the "Memory Stick." Delete unnecessary images or data (pages 42, 81). Cannot record • You attempted to select the folder that is set the image size to use or...
... "Memory Stick" format failed. Format the "Memory Stick" again (page 44). Depending on the "Memory Stick" with your camera. Memory Stick locked • The write-protect switch on the "Memory Stick" is available only for viewing with the same first three digits number already exists on the "Memory Stick." Delete unnecessary images or data (pages 42, 81). Cannot record • You attempted to select the folder that is set the image size to use or...

Operating Instructions
Page 116
... the dark. Helps when it is played back. Note that formatting erases all data on the subject under dark lighting (page 32). Selects whether to display the image just after you cannot shoot the next image. (Memory Stick Tool) Item Format Setting OK / Cancel 116 Create REC. Default settings are indicated with x. (Camera) Item AF Mode Digital Zoom Date/Time Setting xSingle / Monitor xSmart / Precision / Off Day&Time / Date / xOff Red Eye Reduction AF Illuminator Auto Review On / xOff...
... the dark. Helps when it is played back. Note that formatting erases all data on the subject under dark lighting (page 32). Selects whether to display the image just after you cannot shoot the next image. (Memory Stick Tool) Item Format Setting OK / Cancel 116 Create REC. Default settings are indicated with x. (Camera) Item AF Mode Digital Zoom Date/Time Setting xSingle / Monitor xSmart / Precision / Off Day&Time / Date / xOff Red Eye Reduction AF Illuminator Auto Review On / xOff...
Operating Instructions
Page 119
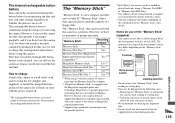
.... Never remove the rechargeable button battery. However, if you can be recorded or played back only using the camera. In this camera. • The data read/write time differs depending on the combination of the "Memory Stick" (supplied) • You cannot record, edit, or delete images when the write-protect switch is set to MagicGate copyright protection. 3) Supports high-speed data transmission using the parallel interface. 4) [640 (Fine)] size movies can be used with this rechargeable button battery is...
.... Never remove the rechargeable button battery. However, if you can be recorded or played back only using the camera. In this camera. • The data read/write time differs depending on the combination of the "Memory Stick" (supplied) • You cannot record, edit, or delete images when the write-protect switch is set to MagicGate copyright protection. 3) Supports high-speed data transmission using the parallel interface. 4) [640 (Fine)] size movies can be used with this rechargeable button battery is...

Operating Instructions
Page 128
... 33 Flash 31 Flash Level 59 Fluorescent 58 Focus preset 51 Folder 48, 63 Format 44 H Histogram 56 Index I Image quality 47 Image size 22, 23 ImageMixer VCD2 97 Incandescent 58 Index screen 38 Inserting a "Memory Stick 21 Inserting the date and time 34 Installation 85, 92 J JPG 91 L Landscape 35 LCD backlight 117 LCD screen display 124 Lens ring 8 M Macro 29 Manual exposure 52 Memory Stick 119 Menu 46, 112 Metering mode 57 Mode...
... 33 Flash 31 Flash Level 59 Fluorescent 58 Focus preset 51 Folder 48, 63 Format 44 H Histogram 56 Index I Image quality 47 Image size 22, 23 ImageMixer VCD2 97 Incandescent 58 Index screen 38 Inserting a "Memory Stick 21 Inserting the date and time 34 Installation 85, 92 J JPG 91 L Landscape 35 LCD backlight 117 LCD screen display 124 Lens ring 8 M Macro 29 Manual exposure 52 Memory Stick 119 Menu 46, 112 Metering mode 57 Mode...


