Operating Instructions
Page 1
DSC-P73/P93 Serial No. Model No. Digital Still Camera Operating Instructions Before operating the unit, please read this product. Refer to these numbers whenever you call upon your computer _______ Troubleshooting Additional information Index DSC-P73/P93 © 2004 Sony Corporation 3-091-340-12(1) Getting started Shooting still images... movies Enjoying images on the bottom. Owner's Record The model and serial numbers are located on your Sony dealer regarding this manual thoroughly, and retain it for future reference. Record the serial number in the space provided below.
DSC-P73/P93 Serial No. Model No. Digital Still Camera Operating Instructions Before operating the unit, please read this product. Refer to these numbers whenever you call upon your computer _______ Troubleshooting Additional information Index DSC-P73/P93 © 2004 Sony Corporation 3-091-340-12(1) Getting started Shooting still images... movies Enjoying images on the bottom. Owner's Record The model and serial numbers are located on your Sony dealer regarding this manual thoroughly, and retain it for future reference. Record the serial number in the space provided below.
Operating Instructions
Page 3
...and found compliant with the limits sets out in the plug supplied need to be used. If the plug supplied with your nearest Sony service station. Should the fuse in the EMC Directive for help preserve our environment by ASTA or BSI to discontinue midway (fail...mark) must be determined by turning the equipment off and on a circuit different from that interference will not occur in the U.S.A. If this digital camera. For the Customers in a particular installation. and Canada RECYCLING NICKEL METAL HYDRIDE BATTERIES Nickel Metal Hydride batteries are designed to Subpart B of...
...and found compliant with the limits sets out in the plug supplied need to be used. If the plug supplied with your nearest Sony service station. Should the fuse in the EMC Directive for help preserve our environment by ASTA or BSI to discontinue midway (fail...mark) must be determined by turning the equipment off and on a circuit different from that interference will not occur in the U.S.A. If this digital camera. For the Customers in a particular installation. and Canada RECYCLING NICKEL METAL HYDRIDE BATTERIES Nickel Metal Hydride batteries are designed to Subpart B of...

Operating Instructions
Page 4
and Canada THIS CLASS B DIGITAL DEVICE COMPLIES WITH PART 15 OF THE FCC RULES AND THE...render the "Memory Stick" unusable or image data breakdown, damage or loss may be trailed on your camera are operational for Camera File system universal standard established by the JEITA (Japan Electronics and Information Technology Industries Association). •... recommendation To avoid the potential risk of the copyright laws. Notes on image data compatibility • This camera conforms with other materials may occur. Unauthorized recording of such materials may be contrary to the provision of ...
and Canada THIS CLASS B DIGITAL DEVICE COMPLIES WITH PART 15 OF THE FCC RULES AND THE...render the "Memory Stick" unusable or image data breakdown, damage or loss may be trailed on your camera are operational for Camera File system universal standard established by the JEITA (Japan Electronics and Information Technology Industries Association). •... recommendation To avoid the potential risk of the copyright laws. Notes on image data compatibility • This camera conforms with other materials may occur. Unauthorized recording of such materials may be contrary to the provision of ...
Operating Instructions
Page 5
... 118 and follow the instructions on locations where you can use the camera Do not use the camera near a location that generates strong radio waves or emits radiation. Trademarks • is a trademark of Sony Corporation. • "Memory Stick," , "Memory Stick PRO," ,...Stick Duo," , "Memory Stick PRO Duo," , "MagicGate," are trademarks of Sony Corporation. • Picture Package is equipped with power zoom lens. The power zoom lens This camera is a trademark of Sony Corporation. • Microsoft, Windows, WindowsMedia, and DirectX are trademarks or registered ...
... 118 and follow the instructions on locations where you can use the camera Do not use the camera near a location that generates strong radio waves or emits radiation. Trademarks • is a trademark of Sony Corporation. • "Memory Stick," , "Memory Stick PRO," ,...Stick Duo," , "Memory Stick PRO Duo," , "MagicGate," are trademarks of Sony Corporation. • Picture Package is equipped with power zoom lens. The power zoom lens This camera is a trademark of Sony Corporation. • Microsoft, Windows, WindowsMedia, and DirectX are trademarks or registered ...
Operating Instructions
Page 6
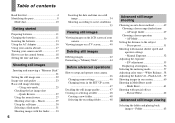
... Mode dial 10 Getting started Preparing batteries 11 Charging the batteries 11 Inserting the batteries 13 Using the AC Adaptor 16 Using your camera abroad 17 Turning your camera on a TV screen 40 Deleting still images Deleting images 42 Formatting a "Memory Stick 44 Before advanced operations How to setup and ...operate your camera 38 Viewing images on /off 17 How to the subject - AF Mode 50 Setting the distance to use the control button 18 Setting ...
... Mode dial 10 Getting started Preparing batteries 11 Charging the batteries 11 Inserting the batteries 13 Using the AC Adaptor 16 Using your camera abroad 17 Turning your camera on a TV screen 40 Deleting still images Deleting images 42 Formatting a "Memory Stick 44 Before advanced operations How to setup and ...operate your camera 38 Viewing images on /off 17 How to the subject - AF Mode 50 Setting the distance to use the control button 18 Setting ...
Operating Instructions
Page 7
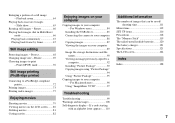
... images using "Picture Package" 94 Using "Picture Package 95 Copying images to your computer - For Windows users 84 Installing the USB driver 85 Connecting the camera to your computer 86 Copying images 87 Viewing the images on your computer Copying images to print - Enlarging a portion of images that can be saved...
... images using "Picture Package" 94 Using "Picture Package 95 Copying images to your computer - For Windows users 84 Installing the USB driver 85 Connecting the camera to your computer 86 Copying images 87 Viewing the images on your computer Copying images to print - Enlarging a portion of images that can be saved...
Operating Instructions
Page 8
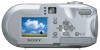
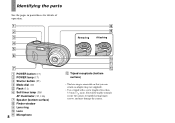
... See the pages in parentheses for details of less than 5.5 mm (7/32 inch). You will be unable to firmly secure the camera to tripods having longer screws, and may damage the camera. Removing Attaching A POWER button (17) B POWER lamp (17) C Shutter button (25) D Mode dial (10) E Flash (31) F Self-timer lamp (30...
... See the pages in parentheses for details of less than 5.5 mm (7/32 inch). You will be unable to firmly secure the camera to tripods having longer screws, and may damage the camera. Removing Attaching A POWER button (17) B POWER lamp (17) C Shutter button (25) D Mode dial (10) E Flash (31) F Self-timer lamp (30...
Operating Instructions
Page 10
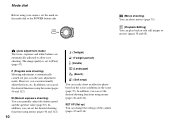
...). (Playback/Editing) You can set the desired functions using the menu (pages 46 and 112). M (Manual exposure shooting) You can change the settings of the camera (pages 47 and 116). SET UP (Set up) You can manually adjust the shutter speed and the aperture value (page 52). In addition, you can... is set to allow easy shooting. The image quality is automatically carried out just as in the scene (page 35). Mode dial Before using your camera, set the mark on the scene conditions in the auto adjustment mode.
...). (Playback/Editing) You can set the desired functions using the menu (pages 46 and 112). M (Manual exposure shooting) You can change the settings of the camera (pages 47 and 116). SET UP (Set up) You can manually adjust the shutter speed and the aperture value (page 52). In addition, you can... is set to allow easy shooting. The image quality is automatically carried out just as in the scene (page 35). Mode dial Before using your camera, set the mark on the scene conditions in the auto adjustment mode.
Operating Instructions
Page 11
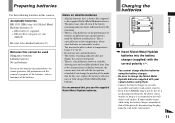
... be used Manganese batteries Lithium batteries Ni-cad batteries If you use the batteries described above, we cannot guarantee full performance of the camera by property of the batteries, such as it is a big difference in this case, replace the batteries with the lens portion extended... outlet (wall socket). 11 Getting started Charging the batteries 1 , Insert Nickel-Metal Hydride batteries into the battery charger (supplied) with your camera before using the battery charger, immediately shut off the power by disconnecting the plug from the AC power source (mains) as long as brownout...
... be used Manganese batteries Lithium batteries Ni-cad batteries If you use the batteries described above, we cannot guarantee full performance of the camera by property of the batteries, such as it is a big difference in this case, replace the batteries with the lens portion extended... outlet (wall socket). 11 Getting started Charging the batteries 1 , Insert Nickel-Metal Hydride batteries into the battery charger (supplied) with your camera before using the battery charger, immediately shut off the power by disconnecting the plug from the AC power source (mains) as long as brownout...
Operating Instructions
Page 13
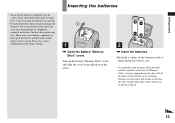
Getting started Inserting the batteries • To use batteries from the skin, the operating time of the camera can be caused. Never use up of the battery, and personal scald or injury may cause a malfunction of the battery charger. 1 , Open the battery/"Memory ...Stick" cover. These may cause leakage, explosion, or heat-up the batteries completely, put the camera in the slide show mode (page 65) and leave it that have been split in the direction of the batteries or the terminals become covered...
Getting started Inserting the batteries • To use batteries from the skin, the operating time of the camera can be caused. Never use up of the battery, and personal scald or injury may cause a malfunction of the battery charger. 1 , Open the battery/"Memory ...Stick" cover. These may cause leakage, explosion, or heat-up the batteries completely, put the camera in the slide show mode (page 65) and leave it that have been split in the direction of the batteries or the terminals become covered...
Operating Instructions
Page 14
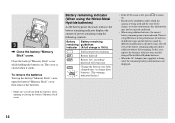
.../ playback will stop soon. Battery Battery remaining remaining guidelines indicator (A full charge is closed when it on. • Based on the conditions under which the camera is being used and the state of the charge, or on the environment, this case, replace the batteries with use, the battery remaining indicator displays...
.../ playback will stop soon. Battery Battery remaining remaining guidelines indicator (A full charge is closed when it on. • Based on the conditions under which the camera is being used and the state of the charge, or on the environment, this case, replace the batteries with use, the battery remaining indicator displays...
Operating Instructions
Page 15
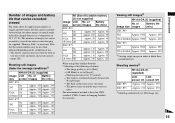
...Approx. 460 VGA (E-Mail) Approx. 9200 Approx. 460 DSC-P73 4M Approx. 9800 Approx. 490 VGA (E-Mail) Approx. 9800 Approx. 490 2) Viewing single images in the following situations: - The zoom is based on CIPA standard. (CIPA: Camera & Imaging Products Association) Viewing still images2) NH-AA-DA...Mail) Off Approx. 240 Approx. 120 When using Sony alkaline batteries 1) Shooting in order at about three second intervals Shooting movies3) NH-AA-DA (2) (supplied) LCD LCD screen On screen Off DSC-P93 Approx. 210 Approx. 270 DSC-P73 Approx. 210 Approx. 270 3) Shooting continuously at...
...Approx. 460 VGA (E-Mail) Approx. 9200 Approx. 460 DSC-P73 4M Approx. 9800 Approx. 490 VGA (E-Mail) Approx. 9800 Approx. 490 2) Viewing single images in the following situations: - The zoom is based on CIPA standard. (CIPA: Camera & Imaging Products Association) Viewing still images2) NH-AA-DA...Mail) Off Approx. 240 Approx. 120 When using Sony alkaline batteries 1) Shooting in order at about three second intervals Shooting movies3) NH-AA-DA (2) (supplied) LCD LCD screen On screen Off DSC-P93 Approx. 210 Approx. 270 DSC-P73 Approx. 210 Approx. 270 3) Shooting continuously at...
Operating Instructions
Page 16
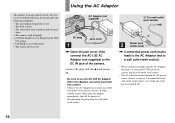
... [LCD Backlight] is set to [Bright] in the SET UP settings - [AF Mode] is set is not disconnected from the DC IN jack of the camera and the wall outlet (wall socket). • The set to [Monitor] - Other AC adaptors cannot be recorded/viewed are decreased under the following conditions: -...Adaptor (not supplied) to the wall outlet (wall socket), even if the unit itself has been turned off many times - Connect the plug with this camera. • Connect the AC Adaptor to an easily accessible wall outlet (wall socket) close by disconnecting the plug from the wall outlet (wall socket). ...
... [LCD Backlight] is set to [Bright] in the SET UP settings - [AF Mode] is set is not disconnected from the DC IN jack of the camera and the wall outlet (wall socket). • The set to [Monitor] - Other AC adaptors cannot be recorded/viewed are decreased under the following conditions: -...Adaptor (not supplied) to the wall outlet (wall socket), even if the unit itself has been turned off many times - Connect the plug with this camera. • Connect the AC Adaptor to an easily accessible wall outlet (wall socket) close by disconnecting the plug from the wall outlet (wall socket). ...
Operating Instructions
Page 17
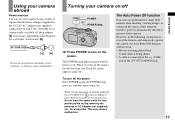
...set to SET UP or , the lens begins to preserve battery power. Please be careful not to touch the lens. • Do not leave the camera with the lens portion pulled out by removing the batteries or AC Adaptor (not supplied), etc., for about three minutes when shooting, viewing images, or... setting up the camera while using the batteries, power is connected to 240 V AC, 50/60 Hz. However, in the following circumstances, even if the batteries are being ...
...set to SET UP or , the lens begins to preserve battery power. Please be careful not to touch the lens. • Do not leave the camera with the lens portion pulled out by removing the batteries or AC Adaptor (not supplied), etc., for about three minutes when shooting, viewing images, or... setting up the camera while using the batteries, power is connected to 240 V AC, 50/60 Hz. However, in the following circumstances, even if the batteries are being ...
Operating Instructions
Page 18
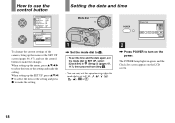
... dial to SET UP, select [Clock Set] in green and the Clock Set screen appears on the power. How to use the control button Camera AF Mode: Digital Zoom: Date/Time: Red Eye Reduction: AF Illuminator: Auto Review: Single Smart Off Off Auto Off SELECT Setup 2 File Number: USB Connect: Video Out...: OK Clock Set: Cancel To change the current settings of the camera, bring up the menu or the SET UP screen (pages 46, 47), and ...
... dial to SET UP, select [Clock Set] in green and the Clock Set screen appears on the power. How to use the control button Camera AF Mode: Digital Zoom: Date/Time: Red Eye Reduction: AF Illuminator: Auto Review: Single Smart Off Off Auto Off SELECT Setup 2 File Number: USB Connect: Video Out...: OK Clock Set: Cancel To change the current settings of the camera, bring up the menu or the SET UP screen (pages 46, 47), and ...

Operating Instructions
Page 21
...," push it as far as shown in the illustration. • Whenever you do not insert it out. • Whenever the access lamp is lit, the camera is recording or reading out an image. Never open the battery/"Memory Stick" cover or turn off the power at this time. Turn up the...
...," push it as far as shown in the illustration. • Whenever you do not insert it out. • Whenever the access lamp is lit, the camera is recording or reading out an image. Never open the battery/"Memory Stick" cover or turn off the power at this time. Turn up the...
Operating Instructions
Page 23
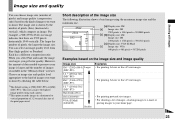
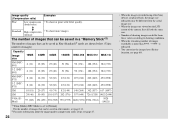
...(compression ratio) based on the image size and image quality Image size 5M 1) (2592×1944) Larger (DSC-P93) 3:2 2) (2592×1728) (DSC-P93) 4M 1) (2304×1728) (DSC-P73) 3:2 2) (2304×1536) (DSC-P73) 3M (2048×1536) 1M (1280×960) VGA (E-Mail) (640×480) Smaller Examples &#.... However, the amount of the image size The following illustration shows a brief image using each camera. 2) This option records images in the "Memory Stick" is [5M] (DSC-P93) or [4M] (DSC-P73). Choose an image size and quality level appropriate to shoot. When you select Fine and make...
...(compression ratio) based on the image size and image quality Image size 5M 1) (2592×1944) Larger (DSC-P93) 3:2 2) (2592×1728) (DSC-P93) 4M 1) (2304×1728) (DSC-P73) 3:2 2) (2304×1536) (DSC-P73) 3M (2048×1536) 1M (1280×960) VGA (E-Mail) (640×480) Smaller Examples &#.... However, the amount of the image size The following illustration shows a brief image using each camera. 2) This option records images in the "Memory Stick" is [5M] (DSC-P93) or [4M] (DSC-P73). Choose an image size and quality level appropriate to shoot. When you select Fine and make...
Operating Instructions
Page 24
..., see page 111. 4) For more information about the image quality (compression ratio) setup, see page 47. 24 • When the images recorded using other Sony devices are played back, the image size indication may be different from the actual image size. • When the images are viewed on the LCD... screen of the camera, they all look the same size. • Number of shooting images can differ from these values according to shooting conditions. • When the remaining ...
..., see page 111. 4) For more information about the image quality (compression ratio) setup, see page 47. 24 • When the images recorded using other Sony devices are played back, the image size indication may be different from the actual image size. • When the images are viewed on the LCD... screen of the camera, they all look the same size. • Number of shooting images can differ from these values according to shooting conditions. • When the remaining ...
Operating Instructions
Page 25
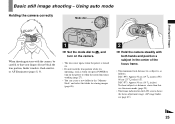
... emitter, or AF illuminator (pages 8, 9). 1 , Set the mode dial to , and turn on the camera. • The lens cover opens when the power is turned on. • Do not touch the lens portion... turn on the LCD screen shows the focus adjustment range. (AF range finder, see page 49.) 25 DSC-P73: Approx 50 cm (19 3/4 inches) To shoot subjects at distances closer than this, use the macro ...folder in the "Memory Stick" and select the folder for storing images (page 48). 2 , Hold the camera steadily with both hands and position a subject in the center of the focus frame. • The minimum focal...
... emitter, or AF illuminator (pages 8, 9). 1 , Set the mode dial to , and turn on the camera. • The lens cover opens when the power is turned on. • Do not touch the lens portion... turn on the LCD screen shows the focus adjustment range. (AF range finder, see page 49.) 25 DSC-P73: Approx 50 cm (19 3/4 inches) To shoot subjects at distances closer than this, use the macro ...folder in the "Memory Stick" and select the folder for storing images (page 48). 2 , Hold the camera steadily with both hands and position a subject in the center of the focus frame. • The minimum focal...
Operating Instructions
Page 26
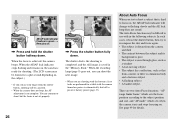
...49 for a split second depending on , power is automatically shut off to recompose the shot and focus again. • The subject is distant from the camera and dark • The contrast between the subject and its background is poor • The subject is seen through glass, such as a window •... screen may be frozen for details. When the focus is hard to focus on, the AE/AF lock indicator will be canceled. • When the camera does not beep, the AF adjustment is a luminous body and a lustrous subject • A flashing subject • A backlit subject. You can shoot the next ...
...49 for a split second depending on , power is automatically shut off to recompose the shot and focus again. • The subject is distant from the camera and dark • The contrast between the subject and its background is poor • The subject is seen through glass, such as a window •... screen may be frozen for details. When the focus is hard to focus on, the AE/AF lock indicator will be canceled. • When the camera does not beep, the AF adjustment is a luminous body and a lustrous subject • A flashing subject • A backlit subject. You can shoot the next ...


