
Operating Instructions
Page 6
...still images Deleting images 40 Formatting a "Memory Stick 44 Before advanced operations How to setup and operate your camera on the LCD screen of contents Before using auto mode 26 Checking the last image shot - Flash level ....53 Shooting multiple frames - Burst 2 56 Shooting still images for e-mail - Multi... and removing a "Memory Stick 23 Setting the still image size 24 Image size and quality 25 Basic still image shooting - Macro (DSC-P72 only 30 Using the self-timer 31 Selecting a flash mode 32 Shooting with audio files - Focus preset 49 Adjusting the exposure -
...still images Deleting images 40 Formatting a "Memory Stick 44 Before advanced operations How to setup and operate your camera on the LCD screen of contents Before using auto mode 26 Checking the last image shot - Flash level ....53 Shooting multiple frames - Burst 2 56 Shooting still images for e-mail - Multi... and removing a "Memory Stick 23 Setting the still image size 24 Image size and quality 25 Basic still image shooting - Macro (DSC-P72 only 30 Using the self-timer 31 Selecting a flash mode 32 Shooting with audio files - Focus preset 49 Adjusting the exposure -

Operating Instructions
Page 8
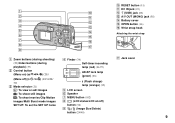
... less than 5.5 mm (7/32 inch). You will be unable to firmly secure the camera to tripods having longer screws, and may damage the camera. Identifying the parts (DSC-P72) 1 7 2 8 3 9 4 q; 5 qa 6 A POWER button (20) B Shutter button (26) C Flash (32) D Microphone E Self-timer lamp (31)/ AF illuminator (33) F Tripod receptacle (bottom surface) G POWER lamp (20) H Finder...
... less than 5.5 mm (7/32 inch). You will be unable to firmly secure the camera to tripods having longer screws, and may damage the camera. Identifying the parts (DSC-P72) 1 7 2 8 3 9 4 q; 5 qa 6 A POWER button (20) B Shutter button (26) C Flash (32) D Microphone E Self-timer lamp (31)/ AF illuminator (33) F Tripod receptacle (bottom surface) G POWER lamp (20) H Finder...
Operating Instructions
Page 9
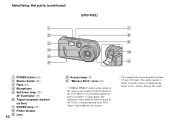
...) qd P Wrist strap hook 5 qf Attaching the wrist strap 6 qg 7 qh 8 qj 9 A Zoom buttons (during shooting) D Finder (34) Q Jack cover (29)/Index buttons (during Self-timer/recording playback) (37) B Control button (Menu on) (v/V/b/B/z) (20)/ (Menu off) ( / /7/ ) (32/31/28/ 30) C Mode selector (21) : To view or edit images : To shoot still...
...) qd P Wrist strap hook 5 qf Attaching the wrist strap 6 qg 7 qh 8 qj 9 A Zoom buttons (during shooting) D Finder (34) Q Jack cover (29)/Index buttons (during Self-timer/recording playback) (37) B Control button (Menu on) (v/V/b/B/z) (20)/ (Menu off) ( / /7/ ) (32/31/28/ 30) C Mode selector (21) : To view or edit images : To shoot still...
Operating Instructions
Page 10
.... You will be unable to firmly secure the camera to tripods having longer screws, and may damage the camera. However, the maximum number of less than 5.5 mm (7/32 inch). Identifying the parts (continued) (DSC-P52) 1 7 2 8 3 9 4 q; 5 6 qa A POWER button (20) B Shutter button (26) C Flash (32) D Microphone E Self-timer lamp (31)/ AF illuminator (33) F Tripod receptacle (bottom...
.... You will be unable to firmly secure the camera to tripods having longer screws, and may damage the camera. However, the maximum number of less than 5.5 mm (7/32 inch). Identifying the parts (continued) (DSC-P52) 1 7 2 8 3 9 4 q; 5 6 qa A POWER button (20) B Shutter button (26) C Flash (32) D Microphone E Self-timer lamp (31)/ AF illuminator (33) F Tripod receptacle (bottom...

Operating Instructions
Page 11
...) qd P Wrist strap hook 5 qf Attaching the wrist strap 6 qg 7 qh 8 qj 9 A Zoom buttons (during shooting) D Finder (34) Q Jack cover (29)/Index buttons (during Self-timer/recording playback) (37) B Control button (Menu on) (v/V/b/B/z) (20)/ (Menu off) ( / /7/ ) (32/31/28/ 51) C Mode selector (21) : To view or edit images : To shoot still...
...) qd P Wrist strap hook 5 qf Attaching the wrist strap 6 qg 7 qh 8 qj 9 A Zoom buttons (during shooting) D Finder (34) Q Jack cover (29)/Index buttons (during Self-timer/recording playback) (37) B Control button (Menu on) (v/V/b/B/z) (20)/ (Menu off) ( / /7/ ) (32/31/28/ 51) C Mode selector (21) : To view or edit images : To shoot still...

Operating Instructions
Page 12
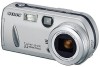
Identifying the parts (continued) (DSC-P32) 1 7 2 8 3 9 4 5 q; 6 qa A POWER button (20) B Shutter button (26) C Flash (32) D Finder window E Lens F Tripod receptacle (bottom surface) G POWER lamp (20) H Microphone I Self-timer lamp (31)/ 12 AF illuminator (33) J Access lamp (23) K "Memory Stick" cover (23) • "3.2MEGA PIXELS" shown on the surface of the camera is the number...
Identifying the parts (continued) (DSC-P32) 1 7 2 8 3 9 4 5 q; 6 qa A POWER button (20) B Shutter button (26) C Flash (32) D Finder window E Lens F Tripod receptacle (bottom surface) G POWER lamp (20) H Microphone I Self-timer lamp (31)/ 12 AF illuminator (33) J Access lamp (23) K "Memory Stick" cover (23) • "3.2MEGA PIXELS" shown on the surface of the camera is the number...

Operating Instructions
Page 13
...) qd P Wrist strap hook 5 qf Attaching the wrist strap 6 qg 7 qh 8 qj 9 A Zoom buttons (during shooting) D Finder (34) Q Jack cover (29)/Index buttons (during Self-timer/recording playback) (37) B Control button (Menu on) (v/V/b/B/z) (20)/ (Menu off) ( / /7/ ) (32/31/28/ 51) C Mode selector (21) : To view or edit images : To shoot still...
...) qd P Wrist strap hook 5 qf Attaching the wrist strap 6 qg 7 qh 8 qj 9 A Zoom buttons (during shooting) D Finder (34) Q Jack cover (29)/Index buttons (during Self-timer/recording playback) (37) B Control button (Menu on) (v/V/b/B/z) (20)/ (Menu off) ( / /7/ ) (32/31/28/ 51) C Mode selector (21) : To view or edit images : To shoot still...

Operating Instructions
Page 31
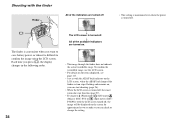
... to , and press V ( ) on the control button again. The (Self-timer) indicator appears on the LCD screen. • If the menu is currently displayed, press MENU first to . 2 , Center the subject in front of the camera and press the shutter button, the focus and the exposure may not be... shot after approximately 10 seconds. The indicator dissapears from the LCD screen. • If you will hear a beeping sound....
... to , and press V ( ) on the control button again. The (Self-timer) indicator appears on the LCD screen. • If the menu is currently displayed, press MENU first to . 2 , Center the subject in front of the camera and press the shutter button, the focus and the exposure may not be... shot after approximately 10 seconds. The indicator dissapears from the LCD screen. • If you will hear a beeping sound....
Operating Instructions
Page 34
... 26). • When the LCD screen is turned off, the smart zoom does not function (page 29). • If you press (Flash mode)/ (Self-timer)/ (Macro) (DSC-P72) or (Spot meter) (DSCP52/P32) with the finder Finder All of the available indicators are turned off • This setting is maintained even when...
... 26). • When the LCD screen is turned off, the smart zoom does not function (page 29). • If you press (Flash mode)/ (Self-timer)/ (Macro) (DSC-P72) or (Spot meter) (DSCP52/P32) with the finder Finder All of the available indicators are turned off • This setting is maintained even when...

Operating Instructions
Page 72
b Press (Image Size). c Select the desired mode with a self-timer Set the mode selector to and follow the procedure on the screen and the camera starts recording the image and sound. 160 101 REC 00:00:02[00:10:48] • When the capacity of the "Memory Stick" is used . &#... Image Size setup item appears. Enjoying movies Indicators on the screen while you press , the status of the indicated items. To shoot close-ups (Macro) (DSC-P72 only) Set the mode selector to and follow the procedure on . See page 114 for each image size.
b Press (Image Size). c Select the desired mode with a self-timer Set the mode selector to and follow the procedure on the screen and the camera starts recording the image and sound. 160 101 REC 00:00:02[00:10:48] • When the capacity of the "Memory Stick" is used . &#... Image Size setup item appears. Enjoying movies Indicators on the screen while you press , the status of the indicated items. To shoot close-ups (Macro) (DSC-P72 only) Set the mode selector to and follow the procedure on . See page 114 for each image size.

Operating Instructions
Page 113
...DSC-P52/P32. wa WB ws qa wd qs wf A Image size indicator (24, 25) B Recording mode indicator (54-57) C AE/AF lock indicator (26, 49) D Battery remaining indicator (17) E Flash mode (32)/ Red-eye reduction (33)/ White balance indicator (52)/ AF illuminator indicator (33) F Camera... AF /Multi AF indicator (48)/ Focus preset value (49) R EV adjustment indicator (50) S Iris value indicator T Shutter speed indicator U Macro (DSC-P72) (30) V Self-timer indicator (31) W Vibration warning indicator (99) X Menu/Guide menu (45) • Pressing the MENU button switches the menu/ guide menu on/off...
...DSC-P52/P32. wa WB ws qa wd qs wf A Image size indicator (24, 25) B Recording mode indicator (54-57) C AE/AF lock indicator (26, 49) D Battery remaining indicator (17) E Flash mode (32)/ Red-eye reduction (33)/ White balance indicator (52)/ AF illuminator indicator (33) F Camera... AF /Multi AF indicator (48)/ Focus preset value (49) R EV adjustment indicator (50) S Iris value indicator T Shutter speed indicator U Macro (DSC-P72) (30) V Self-timer indicator (31) W Vibration warning indicator (99) X Menu/Guide menu (45) • Pressing the MENU button switches the menu/ guide menu on/off...

Operating Instructions
Page 114
... indicator (46) K Remaining "Memory Stick" capacity indicator 114 L Center AF /Multi AF indicator (48)/ Focus preset value (49) M EV adjustment indicator (50) N Macro (DSC-P72) (30) O Self-timer indicator (31) P Menu/Guide menu (45) • Pressing the MENU button switches the menu/ guide menu on/off. • (Metering Mode) is not displayed...
... indicator (46) K Remaining "Memory Stick" capacity indicator 114 L Center AF /Multi AF indicator (48)/ Focus preset value (49) M EV adjustment indicator (50) N Macro (DSC-P72) (30) O Self-timer indicator (31) P Menu/Guide menu (45) • Pressing the MENU button switches the menu/ guide menu on/off. • (Metering Mode) is not displayed...
Operating Instructions
Page 117
... 20 Precautions 108 R Red Eye Reduction 33 RESET button 91 S Self-diagnosis display 100 Self-timer 31 Setting Changing menu 45 Date and time 21 Image size 24 SET UP 45 Shooting close-... images that can be saved/ shooting time 17, 25, 101 Using auto mode 26 Using the self-timer 31 White balance 52 T Trimming 63 U USB Cancel the USB connection 83, 89 Installing the USB... driver 79, 88 USB connection 82, 88 Using your camera abroad 19 V Viewing on the single-image screen 36 Voice 57 W Warnings and messages 98 White balance ...
... 20 Precautions 108 R Red Eye Reduction 33 RESET button 91 S Self-diagnosis display 100 Self-timer 31 Setting Changing menu 45 Date and time 21 Image size 24 SET UP 45 Shooting close-... images that can be saved/ shooting time 17, 25, 101 Using auto mode 26 Using the self-timer 31 White balance 52 T Trimming 63 U USB Cancel the USB connection 83, 89 Installing the USB... driver 79, 88 USB connection 82, 88 Using your camera abroad 19 V Viewing on the single-image screen 36 Voice 57 W Warnings and messages 98 White balance ...
