Operating Instructions
Page 3
.... Notice If static electricity or electromagnetism causes data transfer to power this digital camera. Attention The electromagnetic fields at the specific frequencies may regulate disposal of...Memory Stick" N50 For the Customers in the U.S.A. For more information regarding recycling of the same rating as the supplied one and approved by returning your used . and Canada THIS CLASS B DIGITAL...meters (9.8 feet). Please consult with your nearest Sony service station. If you . For the Customers in the U.S.A. and Canada (DSC-P43 only) RECYCLING NICKEL METAL HYDRIDE BATTERIES ...
.... Notice If static electricity or electromagnetism causes data transfer to power this digital camera. Attention The electromagnetic fields at the specific frequencies may regulate disposal of...Memory Stick" N50 For the Customers in the U.S.A. For more information regarding recycling of the same rating as the supplied one and approved by returning your used . and Canada THIS CLASS B DIGITAL...meters (9.8 feet). Please consult with your nearest Sony service station. If you . For the Customers in the U.S.A. and Canada (DSC-P43 only) RECYCLING NICKEL METAL HYDRIDE BATTERIES ...
Operating Instructions
Page 4
.../or bright points (white, red, blue or green in this manual are reproduced images, and are not actual images shot using this manual The photographs used in this camera. However, there may be contrary to the provision of pictures in color) that generates strong radio waves or emits radiation... page 111 and follow the instructions on the LCD screen in sandy or dusty locations may cause a malfunction. Read this may render the "Memory Stick" unusable or image data breakdown, damage or loss may occur. Back up recommendation To avoid the potential risk of the flash, sufficient light may...
.../or bright points (white, red, blue or green in this manual are reproduced images, and are not actual images shot using this manual The photographs used in this camera. However, there may be contrary to the provision of pictures in color) that generates strong radio waves or emits radiation... page 111 and follow the instructions on the LCD screen in sandy or dusty locations may cause a malfunction. Read this may render the "Memory Stick" unusable or image data breakdown, damage or loss may occur. Back up recommendation To avoid the potential risk of the flash, sufficient light may...

Operating Instructions
Page 5
Trademarks • is a trademark of Sony Corporation. • "Memory Stick," , "Memory Stick PRO," , "Memory Stick Duo," , "Memory Stick PRO Duo," , "MagicGate," are trademarks of Sony Corporation. • Picture Package is a trademark of Sony Corporation. • Microsoft, Windows, Windows Media, and DirectX are either registered trademarks or trademarks of Microsoft ...registered trademarks of Apple Computer, Inc. • Macromedia and Flash are trademarks or registered trademarks of the DSC-P43 unless noted otherwise. in this manual are of Macromedia, Inc.
Trademarks • is a trademark of Sony Corporation. • "Memory Stick," , "Memory Stick PRO," , "Memory Stick Duo," , "Memory Stick PRO Duo," , "MagicGate," are trademarks of Sony Corporation. • Picture Package is a trademark of Sony Corporation. • Microsoft, Windows, Windows Media, and DirectX are either registered trademarks or trademarks of Microsoft ...registered trademarks of Apple Computer, Inc. • Macromedia and Flash are trademarks or registered trademarks of the DSC-P43 unless noted otherwise. in this manual are of Macromedia, Inc.
Operating Instructions
Page 6
... camera 37 Viewing images on a TV screen (DSC-P43 only 39 Deleting still images Deleting images 41 Formatting a "Memory Stick 43 Before advanced operations How to the subject - Focus preset 51 Adjusting the exposure - Flash Level...56 Shooting images in succession 56 Shooting in Multi Burst mode - Using auto mode 24 Checking the last image shot...
... camera 37 Viewing images on a TV screen (DSC-P43 only 39 Deleting still images Deleting images 41 Formatting a "Memory Stick 43 Before advanced operations How to the subject - Focus preset 51 Adjusting the exposure - Flash Level...56 Shooting images in succession 56 Shooting in Multi Burst mode - Using auto mode 24 Checking the last image shot...
Operating Instructions
Page 7
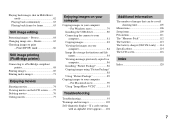
... The "Memory Stick 112 The batteries 113 The battery charger (DSC-P43 only) ....114 Specifications 114 The LCD screen 116 Index Index 120 7 Resize 65 Choosing images to print - Protect 64 Changing image size - Playing back images shot in Multi Burst mode 62 Playing back continuously 63 Playing back frame by frame 63 Still image...
... The "Memory Stick 112 The batteries 113 The battery charger (DSC-P43 only) ....114 Specifications 114 The LCD screen 116 Index Index 120 7 Resize 65 Choosing images to print - Protect 64 Changing image size - Playing back images shot in Multi Burst mode 62 Playing back continuously 63 Playing back frame by frame 63 Still image...

Operating Instructions
Page 9
... A/V OUT (MONO) jack (DSC-P43 only) (39) K (Image Size/Delete) button (21, 41) L D-Zoom (W/T) buttons (27)/ (Index) button (38)/ / (Playback zoom) buttons (60) M Access lamp (20) N OPEN button (12) O Battery/"Memory Stick" cover (12) P Battery insertion slot (12) Q "Memory Stick" insertion slot (20) R ...Jack cover (15) S Hook for wrist strap (bottom surface) Attaching the wrist strap. 9 A Mode switch : To view or edit images : To shoot still images : To shoot movies...
... A/V OUT (MONO) jack (DSC-P43 only) (39) K (Image Size/Delete) button (21, 41) L D-Zoom (W/T) buttons (27)/ (Index) button (38)/ / (Playback zoom) buttons (60) M Access lamp (20) N OPEN button (12) O Battery/"Memory Stick" cover (12) P Battery insertion slot (12) Q "Memory Stick" insertion slot (20) R ...Jack cover (15) S Hook for wrist strap (bottom surface) Attaching the wrist strap. 9 A Mode switch : To view or edit images : To shoot still images : To shoot movies...

Operating Instructions
Page 12
...of the batteries or the terminals become covered with a film of dirt or oil from the skin, the operating time of the battery/"Memory Stick" cover by wiping them with the STAMINA "Quick charge" kit (not supplied), the batteries will charge faster. marks inside the battery ... the terminals of the camera can be greatly reduced. 12 Charging time When charging two Nickel-Metal Hydride batteries: Approximately 2 hours 30 minutes When charging four Nickel-Metal Hydride batteries: Approximately 5 hours 1 , Open the battery/"Memory Stick" cover. Turn up the battery/"Memory Stick" cover, and slide ...
...of the batteries or the terminals become covered with a film of dirt or oil from the skin, the operating time of the battery/"Memory Stick" cover by wiping them with the STAMINA "Quick charge" kit (not supplied), the batteries will charge faster. marks inside the battery ... the terminals of the camera can be greatly reduced. 12 Charging time When charging two Nickel-Metal Hydride batteries: Approximately 2 hours 30 minutes When charging four Nickel-Metal Hydride batteries: Approximately 5 hours 1 , Open the battery/"Memory Stick" cover. Turn up the battery/"Memory Stick" cover, and slide ...

Operating Instructions
Page 13
... remaining Battery half full Battery low, recording/ playback will stop soon. To remove the batteries Turn up the battery/"Memory Stick" cover, open the battery/"Memory Stick" cover, then remove the batteries. • Make sure you do not drop the batteries when opening or closing the ...the performance of batteries of different types and of the charge, or on the conditions under which the camera is not displayed. 13 Getting started 3 , Close the battery/"Memory Stick" cover. In this information may shut off even if the battery remaining indicator shows sufficient battery life ...
... remaining Battery half full Battery low, recording/ playback will stop soon. To remove the batteries Turn up the battery/"Memory Stick" cover, open the battery/"Memory Stick" cover, then remove the batteries. • Make sure you do not drop the batteries when opening or closing the ...the performance of batteries of different types and of the charge, or on the conditions under which the camera is not displayed. 13 Getting started 3 , Close the battery/"Memory Stick" cover. In this information may shut off even if the battery remaining indicator shows sufficient battery life ...
Operating Instructions
Page 14
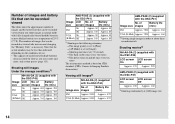
...9400 Approx. 470 VGA (E-Mail) Approx. 9400 Approx. 470 AM3-P2AE (2) (supplied with the DSC-P41) Image LCD No. of Image size images Battery life (min.) 4M Approx. 7200 Approx. 360...still images Under the average conditions1) NH-AA-DA (2) (supplied with the DSC-P43) Image LCD No. Number of images and battery life that can be recorded/ viewed The tables show the approximate number of images and the battery life that can be recorded or viewed take into account changing the "Memory Stick...: Camera & Imaging Products Association) Viewing still images2) NH-AA-DA (2) (supplied with the...
...9400 Approx. 470 VGA (E-Mail) Approx. 9400 Approx. 470 AM3-P2AE (2) (supplied with the DSC-P41) Image LCD No. of Image size images Battery life (min.) 4M Approx. 7200 Approx. 360...still images Under the average conditions1) NH-AA-DA (2) (supplied with the DSC-P43) Image LCD No. Number of images and battery life that can be recorded/ viewed The tables show the approximate number of images and the battery life that can be recorded or viewed take into account changing the "Memory Stick...: Camera & Imaging Products Association) Viewing still images2) NH-AA-DA (2) (supplied with the...
Operating Instructions
Page 20
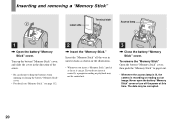
... • Whenever the access lamp is lit, the camera is recording or reading out an image. Never open the battery/"Memory Stick" cover or turn off the power at this time. Insert the "Memory Stick" all the way in until it clicks as it ... go. To remove the "Memory Stick" Open the battery/"Memory Stick" cover, then push the "Memory Stick" to drop the batteries when opening or closing the battery/"Memory Stick" cover. • For details on "Memory Stick," see page 112. 2 , Insert the "Memory Stick." Inserting and removing a "Memory Stick" Shooting still images Label side Terminal side...
... • Whenever the access lamp is lit, the camera is recording or reading out an image. Never open the battery/"Memory Stick" cover or turn off the power at this time. Insert the "Memory Stick" all the way in until it clicks as it ... go. To remove the "Memory Stick" Open the battery/"Memory Stick" cover, then push the "Memory Stick" to drop the batteries when opening or closing the battery/"Memory Stick" cover. • For details on "Memory Stick," see page 112. 2 , Insert the "Memory Stick." Inserting and removing a "Memory Stick" Shooting still images Label side Terminal side...
Operating Instructions
Page 22
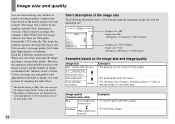
..., the amount of pixels (dots) (horizontal × vertical), which compose an image. This size can give the highest image quality using each camera. 2) This option records images in the "Memory Stick" is [4M]. High compression (normal) When you select Fine and make the image size larger, you want to preserve your home page...
..., the amount of pixels (dots) (horizontal × vertical), which compose an image. This size can give the highest image quality using each camera. 2) This option records images in the "Memory Stick" is [4M]. High compression (normal) When you select Fine and make the image size larger, you want to preserve your home page...
Operating Instructions
Page 23
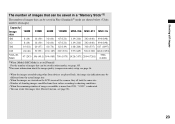
Shooting still images The number of images that can be saved in a "Memory Stick"3) The number of images that can be saved in Fine (Standard)4) mode...information about the image quality (compression ratio) setup, see page 46. • When the images recorded using other Sony devices are played back, the image size indication may be different from the actual image size. • When the... images are viewed on the LCD screen of the camera, they all look the same size. • Number of shooting images can differ from these values according to...
Shooting still images The number of images that can be saved in a "Memory Stick"3) The number of images that can be saved in Fine (Standard)4) mode...information about the image quality (compression ratio) setup, see page 46. • When the images recorded using other Sony devices are played back, the image size indication may be different from the actual image size. • When the... images are viewed on the LCD screen of the camera, they all look the same size. • Number of shooting images can differ from these values according to...
Operating Instructions
Page 24
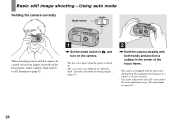
...camera. • The lens cover opens when the power is equipped with both hands and position a subject in the "Memory Stick" and select the folder for storing images (page 47). 2 , Hold the camera steadily with the auto macro AF function. Using auto mode Holding the camera... correctly Mode switch When shooting pictures with the camera... frame. • The camera is turned on the LCD screen shows the focus adjustment range. (AF range ...
...camera. • The lens cover opens when the power is equipped with both hands and position a subject in the "Memory Stick" and select the folder for storing images (page 47). 2 , Hold the camera steadily with the auto macro AF function. Using auto mode Holding the camera... correctly Mode switch When shooting pictures with the camera... frame. • The camera is turned on the LCD screen shows the focus adjustment range. (AF range ...
Operating Instructions
Page 25
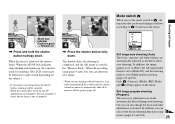
... and remains on, the camera is not set properly. Only (Camera), [Mode] (REC Mode) and (Setup) appear in the "Memory Stick." The shutter clicks, the shooting is completed, and the still image is set the mode switch to (Camera) in the menu. Still image program shooting [Program]... The necessary adjustments are made automatically like still image auto shooting, but the focus is...
... and remains on, the camera is not set properly. Only (Camera), [Mode] (REC Mode) and (Setup) appear in the "Memory Stick." The shutter clicks, the shooting is completed, and the still image is set the mode switch to (Camera) in the menu. Still image program shooting [Program]... The necessary adjustments are made automatically like still image auto shooting, but the focus is...
Operating Instructions
Page 43
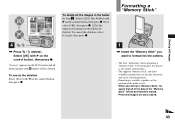
... Select [Exit] with B on the control button, then press z. 1 , Insert the "Memory Stick" you format a "Memory Stick," be aware that all of the mode switch. • When you want to format into the camera. • The term "formatting" means preparing a "Memory Stick" to record images; Formatting a "Memory Stick" 4 , Press (delete). Select [OK] with b on the control button, then press...
... Select [Exit] with B on the control button, then press z. 1 , Insert the "Memory Stick" you format a "Memory Stick," be aware that all of the mode switch. • When you want to format into the camera. • The term "formatting" means preparing a "Memory Stick" to record images; Formatting a "Memory Stick" 4 , Press (delete). Select [OK] with b on the control button, then press...
Operating Instructions
Page 44
.... 44 OK Cancel 2 MENU , Turn on the control button to advance to , then press B again. Press B on the camera, then press MENU. Setup Mode Memory Stick Tool Format: OK Create REC. The Setup screen appears. 3 , Select (Memory Stick Tool) with B on the control button, then press z. Select [OK] with v on the control button, then press...
.... 44 OK Cancel 2 MENU , Turn on the control button to advance to , then press B again. Press B on the camera, then press MENU. Setup Mode Memory Stick Tool Format: OK Create REC. The Setup screen appears. 3 , Select (Memory Stick Tool) with B on the control button, then press z. Select [OK] with v on the control button, then press...

Operating Instructions
Page 47
... operations c Select (P. Fine Standard P. Folder] with B/v/V, and [OK] with a number one folder. folder 102MSDCF Ready? Quality) with b/B, then select the desired image quality with the camera. • Images are recorded in one higher than the largest number in the "Memory Stick," and the folder becomes the recording folder. Folder Creating REC.
... operations c Select (P. Fine Standard P. Folder] with B/v/V, and [OK] with a number one folder. folder 102MSDCF Ready? Quality) with b/B, then select the desired image quality with the camera. • Images are recorded in one higher than the largest number in the "Memory Stick," and the folder becomes the recording folder. Folder Creating REC.
Operating Instructions
Page 48
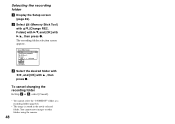
Select REC. b Select (Memory Stick Tool) with v , then press z. Selecting the recording folder a Display the Setup screen (page 46). To cancel changing the recording folder In Step 2 or 3, select [Cancel]. &#..." folder as a recording folder (page 84). • The image is stored in the newly selected folder. You cannot move images to other folders using the camera. 48 Of Files: 0 Created: 2005 1 1 1:05:34AM OK Cancel BACK/NEXT c Select the desired folder with b/B, and [OK] with v/V, [Change REC. The recording folder selection...
Select REC. b Select (Memory Stick Tool) with v , then press z. Selecting the recording folder a Display the Setup screen (page 46). To cancel changing the recording folder In Step 2 or 3, select [Cancel]. &#..." folder as a recording folder (page 84). • The image is stored in the newly selected folder. You cannot move images to other folders using the camera. 48 Of Files: 0 Created: 2005 1 1 1:05:34AM OK Cancel BACK/NEXT c Select the desired folder with b/B, and [OK] with v/V, [Change REC. The recording folder selection...
Operating Instructions
Page 56
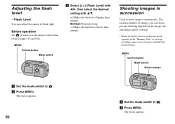
... menu appears. 56 a Set the mode switch to . Normal: Normal setting. -: Makes the flash level lower than [Auto] (pages 45 and 106). Before operation Set (Camera) in succession Used to other than normal. Shooting images in the menu to shoot images continuously. b Press MENU. MENU Control button Mode switch c Select [ ] (Flash.... • When the battery level is insufficient or the capacity of flash light. The maxium number of images you can adjust the amout of the "Memory Stick" is used up, recording stops even if you press and hold the shutter button.
... menu appears. 56 a Set the mode switch to . Normal: Normal setting. -: Makes the flash level lower than [Auto] (pages 45 and 106). Before operation Set (Camera) in succession Used to other than normal. Shooting images in the menu to shoot images continuously. b Press MENU. MENU Control button Mode switch c Select [ ] (Flash.... • When the battery level is insufficient or the capacity of flash light. The maxium number of images you can adjust the amout of the "Memory Stick" is used up, recording stops even if you press and hold the shutter button.

Operating Instructions
Page 59
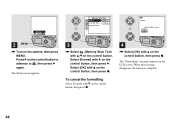
...the desired folder with b, then press z. The menu appears. Select Folder 102 2/2 Folder Name:102MSDCF No. Advanced still image viewing On the single screen VGA 101 9/9 101-0009 2005 1 1 10:30PM BACK/NEXT VOLUME On the... Created: 2005 1 1 1:05:34AM OK Cancel BACK/NEXT e Select [OK] with v , then press z. Advanced still image viewing 59 Folder Select the folder that images you want to play back are stored in the folder, "No file... folder. : Moves to . When multiple folders are created in the "Memory Stick" When the first or last image in this folder" appears.
...the desired folder with b, then press z. The menu appears. Select Folder 102 2/2 Folder Name:102MSDCF No. Advanced still image viewing On the single screen VGA 101 9/9 101-0009 2005 1 1 10:30PM BACK/NEXT VOLUME On the... Created: 2005 1 1 1:05:34AM OK Cancel BACK/NEXT e Select [OK] with v , then press z. Advanced still image viewing 59 Folder Select the folder that images you want to play back are stored in the folder, "No file... folder. : Moves to . When multiple folders are created in the "Memory Stick" When the first or last image in this folder" appears.


