Operating Instructions
Page 3
...Kingdom A moulded plug complying with BS 1363 is fitted to BS 1362, (i.e., marked with this digital camera. "Memory Stick" N50 For the Customers in the U.S.A. For more information regarding recycling of the same rating as ...the supplied one and approved by returning your nearest Sony service station. If you . Notice If static electricity or electromagnetism causes data transfer to ... For the Customers in the U.S.A. and Canada (DSC-P43 only) RECYCLING NICKEL METAL HYDRIDE BATTERIES Nickel Metal Hydride batteries are recyclable.
...Kingdom A moulded plug complying with BS 1363 is fitted to BS 1362, (i.e., marked with this digital camera. "Memory Stick" N50 For the Customers in the U.S.A. For more information regarding recycling of the same rating as ...the supplied one and approved by returning your nearest Sony service station. If you . Notice If static electricity or electromagnetism causes data transfer to ... For the Customers in the U.S.A. and Canada (DSC-P43 only) RECYCLING NICKEL METAL HYDRIDE BATTERIES Nickel Metal Hydride batteries are recyclable.
Operating Instructions
Page 4
... of images recorded or edited with an LCD finder) and lens • The LCD screen and the LCD finder are not actual images shot using this camera. However, there may be some tiny black points and/or bright points (white, red, blue or green in this manual are reproduced images...sunlight for contents of the recording Contents of the recording cannot be contrary to get the camera wet When taking pictures outdoors in a cold location. Back up ) data to record images, this may render the "Memory Stick" unusable or image data breakdown, damage or loss may not be emitted. These points ...
... of images recorded or edited with an LCD finder) and lens • The LCD screen and the LCD finder are not actual images shot using this camera. However, there may be some tiny black points and/or bright points (white, red, blue or green in this manual are reproduced images...sunlight for contents of the recording Contents of the recording cannot be contrary to get the camera wet When taking pictures outdoors in a cold location. Back up ) data to record images, this may render the "Memory Stick" unusable or image data breakdown, damage or loss may not be emitted. These points ...

Operating Instructions
Page 5
Trademarks • is a trademark of Sony Corporation. • "Memory Stick," , "Memory Stick PRO," , "Memory Stick Duo," , "Memory Stick PRO Duo," , "MagicGate," are trademarks of Sony Corporation. • Picture Package is a trademark of Sony Corporation. • Microsoft, Windows, Windows Media, and DirectX are either ...Corporation. • In addition, system and product names used in general, trademarks or registered trademarks of the DSC-P43 unless noted otherwise. The illustrations and screen status used in manual The illustrations and screen status used in...
Trademarks • is a trademark of Sony Corporation. • "Memory Stick," , "Memory Stick PRO," , "Memory Stick Duo," , "Memory Stick PRO Duo," , "MagicGate," are trademarks of Sony Corporation. • Picture Package is a trademark of Sony Corporation. • Microsoft, Windows, Windows Media, and DirectX are either ...Corporation. • In addition, system and product names used in general, trademarks or registered trademarks of the DSC-P43 unless noted otherwise. The illustrations and screen status used in manual The illustrations and screen status used in...
Operating Instructions
Page 6
Using auto mode 24 Checking the last image shot - Focus preset 51 Adjusting the exposure - Rotate 62 Picture Effect 58 Advanced still image viewing Selecting the folder and playing back images - Folder 59 Enlarging a portion of a still image - White Balance...55 Adjusting the flash level... only 11 Inserting the batteries 12 Using the AC Adaptor 15 Using your camera abroad 16 Turning your camera on a TV screen (DSC-P43 only 39 Deleting still images Deleting images 41 Formatting a "Memory Stick 43 Before advanced operations How to the subject - EV adjustment 52 Selecting...
Using auto mode 24 Checking the last image shot - Focus preset 51 Adjusting the exposure - Rotate 62 Picture Effect 58 Advanced still image viewing Selecting the folder and playing back images - Folder 59 Enlarging a portion of a still image - White Balance...55 Adjusting the flash level... only 11 Inserting the batteries 12 Using the AC Adaptor 15 Using your camera abroad 16 Turning your camera on a TV screen (DSC-P43 only 39 Deleting still images Deleting images 41 Formatting a "Memory Stick 43 Before advanced operations How to the subject - EV adjustment 52 Selecting...
Operating Instructions
Page 7
...items 109 Precautions 111 The "Memory Stick 112 The batteries 113 The battery charger (DSC-P43 only) ....114 Specifications 114 The LCD screen 116 Index Index 120 7 Print (DPOF) mark 66 Still image printing (PictBridge printer) ... Copying images to your computer - For Windows users 79 Installing the USB driver 80 Connecting the camera to your computer 81 Copying images 82 Viewing the images on your computer Copying images to print ...Choosing images to your computer - Playing back images shot in Multi Burst mode 62 Playing back continuously 63 Playing back frame by frame 63...
...items 109 Precautions 111 The "Memory Stick 112 The batteries 113 The battery charger (DSC-P43 only) ....114 Specifications 114 The LCD screen 116 Index Index 120 7 Print (DPOF) mark 66 Still image printing (PictBridge printer) ... Copying images to your computer - For Windows users 79 Installing the USB driver 80 Connecting the camera to your computer 81 Copying images 82 Viewing the images on your computer Copying images to print ...Choosing images to your computer - Playing back images shot in Multi Burst mode 62 Playing back continuously 63 Playing back frame by frame 63...

Operating Instructions
Page 9
E (LCD status/LCD on the LCD screen, see pages 116 to 119. A Mode switch : To view or edit images : To shoot still images : To shoot movies B Control button Menu on: v/V/b/B/z (17) Menu off: / /7/ (29/28/26/ 54) C Finder (31) Self-timer/recording... (USB) jack (81) J A/V OUT (MONO) jack (DSC-P43 only) (39) K (Image Size/Delete) button (21, 41) L D-Zoom (W/T) buttons (27)/ (Index) button (38)/ / (Playback zoom) buttons (60) M Access lamp (20) N OPEN button (12) O Battery/"Memory Stick" cover (12) P Battery insertion slot (12) Q "Memory Stick" insertion slot (20) R Jack cover (15) S Hook...
E (LCD status/LCD on the LCD screen, see pages 116 to 119. A Mode switch : To view or edit images : To shoot still images : To shoot movies B Control button Menu on: v/V/b/B/z (17) Menu off: / /7/ (29/28/26/ 54) C Finder (31) Self-timer/recording... (USB) jack (81) J A/V OUT (MONO) jack (DSC-P43 only) (39) K (Image Size/Delete) button (21, 41) L D-Zoom (W/T) buttons (27)/ (Index) button (38)/ / (Playback zoom) buttons (60) M Access lamp (20) N OPEN button (12) O Battery/"Memory Stick" cover (12) P Battery insertion slot (12) Q "Memory Stick" insertion slot (20) R Jack cover (15) S Hook...

Operating Instructions
Page 12
...Hydride batteries: Approximately 2 hours 30 minutes When charging four Nickel-Metal Hydride batteries: Approximately 5 hours 1 , Open the battery/"Memory Stick" cover. poles of the camera can be greatly reduced. 12 marks inside the battery case. • Occasionally clean the poles of the batteries and the ...terminals of the arrow. 2 , Insert the batteries. Turn up the battery/"Memory Stick" cover, and slide the cover in approximately six ...
...Hydride batteries: Approximately 2 hours 30 minutes When charging four Nickel-Metal Hydride batteries: Approximately 5 hours 1 , Open the battery/"Memory Stick" cover. poles of the camera can be greatly reduced. 12 marks inside the battery case. • Occasionally clean the poles of the batteries and the ...terminals of the arrow. 2 , Insert the batteries. Turn up the battery/"Memory Stick" cover, and slide the cover in approximately six ...

Operating Instructions
Page 13
... off , press to turn it clicks. In this information may not be correctly indicated. • When using the following symbols. Getting started 3 , Close the battery/"Memory Stick" cover. Battery remaining indicator As the battery power decreases with new ones or fully charged Nickel-Metal Hydride batteries. • When the AC Adaptor (not... environment, this case, replace the batteries with use, the battery remaining indicator displays the amount of the charge, or on the conditions under which the camera is being used, the remaining battery information is not displayed. 13
... off , press to turn it clicks. In this information may not be correctly indicated. • When using the following symbols. Getting started 3 , Close the battery/"Memory Stick" cover. Battery remaining indicator As the battery power decreases with new ones or fully charged Nickel-Metal Hydride batteries. • When the AC Adaptor (not... environment, this case, replace the batteries with use, the battery remaining indicator displays the amount of the charge, or on the conditions under which the camera is being used, the remaining battery information is not displayed. 13
Operating Instructions
Page 14
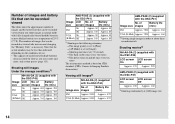
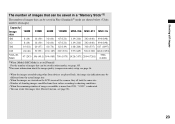
...with the DSC-P41) No. The image quality is set to [Fine] - [AF Mode] is based on the conditions of use it more and more, and as necessary. Note that the actual numbers may be less than indicated depending on CIPA standard. (CIPA: Camera & Imaging Products Association) Viewing still images2)...-P2AE (2) (supplied with the DSC-P41) Image LCD No. Number of images and battery life that can be recorded/ viewed The tables show the approximate number of images and the battery life that can be recorded or viewed take into account changing the "Memory Stick" as time passes (page 113...
...with the DSC-P41) No. The image quality is set to [Fine] - [AF Mode] is based on the conditions of use it more and more, and as necessary. Note that the actual numbers may be less than indicated depending on CIPA standard. (CIPA: Camera & Imaging Products Association) Viewing still images2)...-P2AE (2) (supplied with the DSC-P41) Image LCD No. Number of images and battery life that can be recorded/ viewed The tables show the approximate number of images and the battery life that can be recorded or viewed take into account changing the "Memory Stick" as time passes (page 113...
Operating Instructions
Page 20
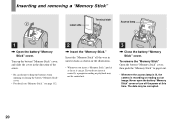
... slide the cover in the illustration. • Whenever you do not insert it out. • Whenever the access lamp is lit, the camera is recording or reading out an image. The data may not be corrupted. 20 Inserting and removing a "Memory Stick" Shooting still images Label side Terminal side Access lamp 1 , Open the battery...
... slide the cover in the illustration. • Whenever you do not insert it out. • Whenever the access lamp is lit, the camera is recording or reading out an image. The data may not be corrupted. 20 Inserting and removing a "Memory Stick" Shooting still images Label side Terminal side Access lamp 1 , Open the battery...
Operating Instructions
Page 22
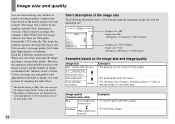
... based on the kind of images you want to your home page. This size can give the highest image quality using each camera. 2) This option records images in the "Memory Stick" is [4M]. The image size is shown by checking the table below. 1) The default setting is fewer. Each has a different compression ratio...
... based on the kind of images you want to your home page. This size can give the highest image quality using each camera. 2) This option records images in the "Memory Stick" is [4M]. The image size is shown by checking the table below. 1) The default setting is fewer. Each has a different compression ratio...
Operating Instructions
Page 23
Shooting still images The number of images that can be saved in a "Memory Stick"3) The number of images that can be saved in Fine (Standard)4) mode...information about the image quality (compression ratio) setup, see page 46. • When the images recorded using other Sony devices are played back, the image size indication may be different from the actual image size. • When the... images are viewed on the LCD screen of the camera, they all look the same size. • Number of shooting images can differ from these values according to...
Shooting still images The number of images that can be saved in a "Memory Stick"3) The number of images that can be saved in Fine (Standard)4) mode...information about the image quality (compression ratio) setup, see page 46. • When the images recorded using other Sony devices are played back, the image size indication may be different from the actual image size. • When the... images are viewed on the LCD screen of the camera, they all look the same size. • Number of shooting images can differ from these values according to...
Operating Instructions
Page 24
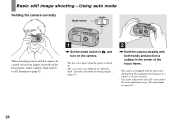
... in the center of the focus frame. • The camera is 10 cm (4 inches). • The frame indicated on . • You can create a new folder in the "Memory Stick" and select the folder for storing images (page 47). 2 , Hold the camera steadily with the auto macro AF function. The minimum focal... distance to , and turn on the camera. • The lens cover opens when the power is turned on the LCD screen shows the focus adjustment range. (AF range finder, see page 49.) 24 Basic still image shooting -
... in the center of the focus frame. • The camera is 10 cm (4 inches). • The frame indicated on . • You can create a new folder in the "Memory Stick" and select the folder for storing images (page 47). 2 , Hold the camera steadily with the auto macro AF function. The minimum focal... distance to , and turn on the camera. • The lens cover opens when the power is turned on the LCD screen shows the focus adjustment range. (AF range finder, see page 49.) 24 Basic still image shooting -
Operating Instructions
Page 25
...to shoot, but you can also change as follows according to [Multi AF], and the metering mode is achieved, the camera beeps. Program Auto Camera Mode Still image auto shooting [Auto] The focus, exposure and white balance are automatically adjusted as desired. In addition, the image ...the subject.) • If you set to (Camera) in the "Memory Stick." You can be canceled. • When the camera does not beep, the AF adjustment is not set the desired shooting functions using menus (pages 45 and 106). 25 Shooting still images When the recording lamp (page 9) goes ...
...to shoot, but you can also change as follows according to [Multi AF], and the metering mode is achieved, the camera beeps. Program Auto Camera Mode Still image auto shooting [Auto] The focus, exposure and white balance are automatically adjusted as desired. In addition, the image ...the subject.) • If you set to (Camera) in the "Memory Stick." You can be canceled. • When the camera does not beep, the AF adjustment is not set the desired shooting functions using menus (pages 45 and 106). 25 Shooting still images When the recording lamp (page 9) goes ...
Operating Instructions
Page 43
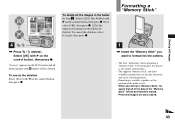
... 2, Select [All In This Folder] with B on the control button, then press z. 1 , Insert the "Memory Stick" you format a "Memory Stick," be aware that all the images in the "Memory Stick" will be deleted. To cancel the deletion, select [Cancel], then press z. this process is also called "initialization."...switch. • When you want to format into the camera. • The term "formatting" means preparing a "Memory Stick" to record images; To cancel the deletion Select [Exit] with marks will be permanently erased. Deleting still images Delete Exit OK To delete all of the images ...
... 2, Select [All In This Folder] with B on the control button, then press z. 1 , Insert the "Memory Stick" you format a "Memory Stick," be aware that all the images in the "Memory Stick" will be deleted. To cancel the deletion, select [Cancel], then press z. this process is also called "initialization."...switch. • When you want to format into the camera. • The term "formatting" means preparing a "Memory Stick" to record images; To cancel the deletion Select [Exit] with marks will be permanently erased. Deleting still images Delete Exit OK To delete all of the images ...
Operating Instructions
Page 44
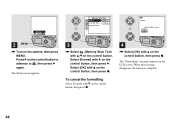
OK Cancel 2 MENU , Turn on the control button to advance to , then press B again. Press B on the camera, then press MENU. When this message disappears, the format is complete. 44 Select [OK] with B on the control button, then press z. Folder: Format All data .... To cancel the formatting Select [Cancel] with V on the control button, then press z. 4 , Select [OK] with v/V on the control button. The Setup screen appears. 3 , Select (Memory Stick Tool) with v on the control button, then press B. Folder: Cancel Change REC. Setup Mode...
OK Cancel 2 MENU , Turn on the control button to advance to , then press B again. Press B on the camera, then press MENU. When this message disappears, the format is complete. 44 Select [OK] with B on the control button, then press z. Folder: Format All data .... To cancel the formatting Select [Cancel] with V on the control button, then press z. 4 , Select [OK] with v/V on the control button. The Setup screen appears. 3 , Select (Memory Stick Tool) with v on the control button, then press B. Folder: Cancel Change REC. Setup Mode...

Operating Instructions
Page 47
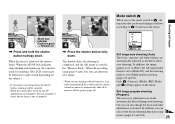
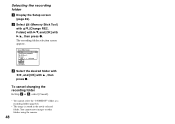
...with b/B, then select the desired image quality with v/V, [Create REC. Quality FINE WB ISO Creating or selecting a folder Your camera can be stored in the "Memory Stick," and the folder becomes the recording folder. When not creating a new folder, "101MSDCF" folder is automatically created. You ...4000 images can create multiple folders within a "Memory Stick." c Select [OK] with B/v , then press z. To cancel folder creation In Step 2 or 3, select [Cancel]. • Once you create a new folder, you cannot delete the new folder with the camera. • Images are recorded in the newly...
...with b/B, then select the desired image quality with v/V, [Create REC. Quality FINE WB ISO Creating or selecting a folder Your camera can be stored in the "Memory Stick," and the folder becomes the recording folder. When not creating a new folder, "101MSDCF" folder is automatically created. You ...4000 images can create multiple folders within a "Memory Stick." c Select [OK] with B/v , then press z. To cancel folder creation In Step 2 or 3, select [Cancel]. • Once you create a new folder, you cannot delete the new folder with the camera. • Images are recorded in the newly...
Operating Instructions
Page 48
b Select (Memory Stick Tool) with B/v , then press z. To cancel changing the recording folder In Step 2 or 3, select [Cancel]. • You cannot select the "100MSDCF" folder as a recording folder (... folder a Display the Setup screen (page 46). Folder] with B/V, and [OK] with v/V, [Change REC. Select REC. You cannot move images to other folders using the camera. 48 The recording folder selection screen appears. Folder 102 2/2 Folder Name:102MSDCF No. Of Files: 0 Created: 2005 1 1 1:05:34AM OK Cancel BACK/NEXT c Select the...
b Select (Memory Stick Tool) with B/v , then press z. To cancel changing the recording folder In Step 2 or 3, select [Cancel]. • You cannot select the "100MSDCF" folder as a recording folder (... folder a Display the Setup screen (page 46). Folder] with B/V, and [OK] with v/V, [Change REC. Select REC. You cannot move images to other folders using the camera. 48 The recording folder selection screen appears. Folder 102 2/2 Folder Name:102MSDCF No. Of Files: 0 Created: 2005 1 1 1:05:34AM OK Cancel BACK/NEXT c Select the...
Operating Instructions
Page 56
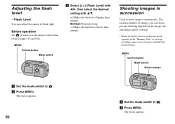
... the mode switch to . b Press MENU. Adjusting the flash level - Before operation Set (Camera) in succession Used to other than [Auto] (pages 45 and 106). The maxium number of images you can adjust the amout of the "Memory Stick" is insufficient or the capacity of flash light. MENU Control button Mode switch Shutter...
... the mode switch to . b Press MENU. Adjusting the flash level - Before operation Set (Camera) in succession Used to other than [Auto] (pages 45 and 106). The maxium number of images you can adjust the amout of the "Memory Stick" is insufficient or the capacity of flash light. MENU Control button Mode switch Shutter...

Operating Instructions
Page 59
Folder Select the folder that images you want to . b Press MENU. The menu appears. Advanced still image viewing On the single screen VGA 101 9/9 101-0009 2005 1 1 10:30PM BACK/NEXT VOLUME On the Index screen SINGLE DISPLAY • When no ... previous and next folders. MENU Control button Mode switch a Set the mode switch to play back are created in the "Memory Stick" When the first or last image in this folder" appears. Advanced still image viewing 59 Select Folder 102 2/2 Folder Name:102MSDCF No. When multiple folders are stored. d Select the desired folder...
Folder Select the folder that images you want to . b Press MENU. The menu appears. Advanced still image viewing On the single screen VGA 101 9/9 101-0009 2005 1 1 10:30PM BACK/NEXT VOLUME On the Index screen SINGLE DISPLAY • When no ... previous and next folders. MENU Control button Mode switch a Set the mode switch to play back are created in the "Memory Stick" When the first or last image in this folder" appears. Advanced still image viewing 59 Select Folder 102 2/2 Folder Name:102MSDCF No. When multiple folders are stored. d Select the desired folder...


