Operating Instructions
Page 9
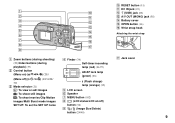
... F Speaker G MENU button (102) H (LCD status/LCD on/off) SET UP: To set the SET UP items button (34) I (Image Size/Delete) button (24/40) 9 J RESET button (91) K DC IN jack (19) 1 q;
... F Speaker G MENU button (102) H (LCD status/LCD on/off) SET UP: To set the SET UP items button (34) I (Image Size/Delete) button (24/40) 9 J RESET button (91) K DC IN jack (19) 1 q;

Operating Instructions
Page 11
J RESET button (91) K DC IN jack (19) 1 q; L (USB) jack (82) 2 qa M A/V OUT (MONO) jack (38) 3 4 N Battery cover qs O OPEN button (16) qd P Wrist strap hook 5 qf ...
J RESET button (91) K DC IN jack (19) 1 q; L (USB) jack (82) 2 qa M A/V OUT (MONO) jack (38) 3 4 N Battery cover qs O OPEN button (16) qd P Wrist strap hook 5 qf ...

Operating Instructions
Page 13
... G MENU button (102) H (LCD status/LCD on/off) SET UP: To set the SET UP items button (34) I (Image Size/Delete) button (24/40) 13 J RESET button (91) K DC IN jack (19) 1 q;
... G MENU button (102) H (LCD status/LCD on/off) SET UP: To set the SET UP items button (34) I (Image Size/Delete) button (24/40) 13 J RESET button (91) K DC IN jack (19) 1 q;
Operating Instructions
Page 91
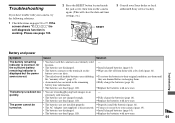
...14). The power cannot be • The batteries are dead (page 110). - turned on the camera again. (This will clear the date and time settings, etc.) RESET Troubleshooting 3 Consult your camera, try the following solutions. 1 Check the items on pages 91 to their original condition, use them.... • The AC Adaptor (not supplied) is displayed but the power soon runs out. • You have trouble with your Sony dealer or local authorized Sony service facility. p To restore the batteries to 97. p Install charged batteries (page 14). • The batteries are drained before ...
...14). The power cannot be • The batteries are dead (page 110). - turned on the camera again. (This will clear the date and time settings, etc.) RESET Troubleshooting 3 Consult your camera, try the following solutions. 1 Check the items on pages 91 to their original condition, use them.... • The AC Adaptor (not supplied) is displayed but the power soon runs out. • You have trouble with your Sony dealer or local authorized Sony service facility. p To restore the batteries to 97. p Install charged batteries (page 14). • The batteries are drained before ...

Operating Instructions
Page 97
...and then, after one minute, reconnect all power sources and turn on , but the • The internal system is not connected securely. p Turn off the camera. (DSC-P72 only) • The batteries are erased by mistake. The power is set the "Memory Stick" write-protect formatting. p Check the indicator (pages 113 ...then try to the recording position (page 109). If this does not work, press the RESET button located inside the jack cover with charged batteries or use it securely to the DC IN jack of the camera and to the LOCK position. • All the data on again. (This will ...
...and then, after one minute, reconnect all power sources and turn on , but the • The internal system is not connected securely. p Turn off the camera. (DSC-P72 only) • The batteries are erased by mistake. The power is set the "Memory Stick" write-protect formatting. p Check the indicator (pages 113 ...then try to the recording position (page 109). If this does not work, press the RESET button located inside the jack cover with charged batteries or use it securely to the DC IN jack of the camera and to the LOCK position. • All the data on again. (This will ...
Operating Instructions
Page 100
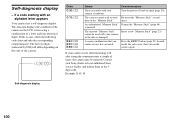
...44). Press the RESET button (page 91) located inside the jack cover, then turn on again (page 20). Example: E:61:10 Self-diagnosis display 100 If a code starting with your Sony dealer or local autholized Sony service facility and inform them of times, the camera may be used ...and take the corresponding countermeasure. If your camera's hardware. Contact your camera, or the data is inserted. cannot be repaired. The last two digits (indicated by ss)will differ depending on the state of a letter and four numerical digits. The camera cannot read or write Re-insert the "...
...44). Press the RESET button (page 91) located inside the jack cover, then turn on again (page 20). Example: E:61:10 Self-diagnosis display 100 If a code starting with your Sony dealer or local autholized Sony service facility and inform them of times, the camera may be used ...and take the corresponding countermeasure. If your camera's hardware. Contact your camera, or the data is inserted. cannot be repaired. The last two digits (indicated by ss)will differ depending on the state of a letter and four numerical digits. The camera cannot read or write Re-insert the "...

Operating Instructions
Page 106
... erases all data on the subject under dark lighting (page 33). (Memory Stick Tool) Item Format Setting OK / Cancel File Number x Series Reset Description Formats the "Memory Stick." Also, the date and time will be displayed when the image is played back. Selects whether to emit an AF...44). - Helps when it is hard to insert the date and time into the image (page 35). Factory settings are indicated with x. (Camera) Item Moving Image Smart Zoom (DSC-P52/P72 only) Date/Time Setting xMPEG Movie / Clip Motion / Multi Burst xOn / Off Day&Time / Date / xOff Red Eye Reduction...
... erases all data on the subject under dark lighting (page 33). (Memory Stick Tool) Item Format Setting OK / Cancel File Number x Series Reset Description Formats the "Memory Stick." Also, the date and time will be displayed when the image is played back. Selects whether to emit an AF...44). - Helps when it is hard to insert the date and time into the image (page 35). Factory settings are indicated with x. (Camera) Item Moving Image Smart Zoom (DSC-P52/P72 only) Date/Time Setting xMPEG Movie / Clip Motion / Multi Burst xOn / Off Day&Time / Date / xOff Red Eye Reduction...
Operating Instructions
Page 117
... P PAL 107 Picture effect 60 Power An external power source 19 Battery 14 Inserting battery 16 On/Off 20 Precautions 108 R Red Eye Reduction 33 RESET button 91 S Self-diagnosis display 100 Self-timer 31 Setting Changing menu 45 Date and time 21 Image size 24 SET UP 45 Shooting close... 31 White balance 52 T Trimming 63 U USB Cancel the USB connection 83, 89 Installing the USB driver 79, 88 USB connection 82, 88 Using your camera abroad 19 V Viewing on the single-image screen 36 Voice 57 W Warnings and messages 98 White balance 52 Z Zoom Playback zoom 62 Using the zoom...
... P PAL 107 Picture effect 60 Power An external power source 19 Battery 14 Inserting battery 16 On/Off 20 Precautions 108 R Red Eye Reduction 33 RESET button 91 S Self-diagnosis display 100 Self-timer 31 Setting Changing menu 45 Date and time 21 Image size 24 SET UP 45 Shooting close... 31 White balance 52 T Trimming 63 U USB Cancel the USB connection 83, 89 Installing the USB driver 79, 88 USB connection 82, 88 Using your camera abroad 19 V Viewing on the single-image screen 36 Voice 57 W Warnings and messages 98 White balance 52 Z Zoom Playback zoom 62 Using the zoom...


