Operating Instructions
Page 3
...a fuse of FCC Rules. Attention The electromagnetic fields at the specific frequencies may influence the picture and sound of rechargeable batteries, call toll free 1-800-822-8837, or visit http://www....(USB, etc.) again. For Customers in the EMC Directive for your nearest Sony service station. If the plug supplied with the limits set out in Europe This product has...found compliant with this camera. Never use the plug without the fuse cover. If you should lose the fuse cover, please contact your safety and convenience. THIS CLASS B DIGITAL APPARATUS COMPLIES WITH CANADIAN ...
...a fuse of FCC Rules. Attention The electromagnetic fields at the specific frequencies may influence the picture and sound of rechargeable batteries, call toll free 1-800-822-8837, or visit http://www....(USB, etc.) again. For Customers in the EMC Directive for your nearest Sony service station. If the plug supplied with the limits set out in Europe This product has...found compliant with this camera. Never use the plug without the fuse cover. If you should lose the fuse cover, please contact your safety and convenience. THIS CLASS B DIGITAL APPARATUS COMPLIES WITH CANADIAN ...
Operating Instructions
Page 5
...camera is equipped with a power zoom lens. These points are not guaranteed. On image data compatibility • This camera conforms with DCF (Design rule for Camera File system universal standard) established by JEITA (Japan Electronics and Information Technology Industries Association). • Playback of images recorded with your camera... are normal in the manufacturing process and do not affect the recording in this camera. 5 The pictures used in this manual The photographs used as examples of pictures in any way. • Exposing ...
...camera is equipped with a power zoom lens. These points are not guaranteed. On image data compatibility • This camera conforms with DCF (Design rule for Camera File system universal standard) established by JEITA (Japan Electronics and Information Technology Industries Association). • Playback of images recorded with your camera... are normal in the manufacturing process and do not affect the recording in this camera. 5 The pictures used in this manual The photographs used as examples of pictures in any way. • Exposing ...
Operating Instructions
Page 13
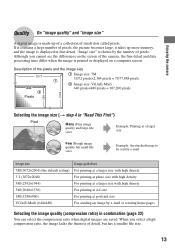
...detail and data processing time differ when the image is printed or displayed on a computer screen. If it contains a large number of pixels, the picture becomes large, it takes up of a collection of detail, but small file size) Example: An attached image to be sent by e-mail Image size...file size) Example: Printing at a larger size Few (Rough image quality but has a smaller file size. 13 Enjoying the camera Quality On "image quality" and "image size" A digital image is made up more memory, and the image is displayed in combination (page 32) You can select the compression ratio when...
...detail and data processing time differ when the image is printed or displayed on a computer screen. If it contains a large number of pixels, the picture becomes large, it takes up of a collection of detail, but small file size) Example: An attached image to be sent by e-mail Image size...file size) Example: Printing at a larger size Few (Rough image quality but has a smaller file size. 13 Enjoying the camera Quality On "image quality" and "image size" A digital image is made up more memory, and the image is displayed in combination (page 32) You can select the compression ratio when...
Operating Instructions
Page 16
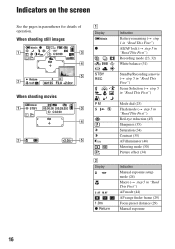
... dial (23) Flash mode (t step 5 in "Read This First") Red-eye reduction (45) Sharpness (35) Saturation (34) Contrast (35) AF illuminator (46) Metering mode (30) Picture effect (34) Indication Manual exposure setup mode (24) Macro (t step 5 in parentheses for details of operation. Indicators on the screen See the pages in "Read...
... dial (23) Flash mode (t step 5 in "Read This First") Red-eye reduction (45) Sharpness (35) Saturation (34) Contrast (35) AF illuminator (46) Metering mode (30) Picture effect (34) Indication Manual exposure setup mode (24) Macro (t step 5 in parentheses for details of operation. Indicators on the screen See the pages in "Read...
Operating Instructions
Page 24
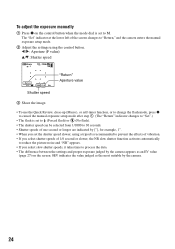
...prevent the effects of vibration. • If you select shutter speeds of 1/6 second or slower, the NR slow shutter function activates automatically to reduce the picture noise and "NR" appears. • If you select slow shutter speeds, it takes time to M. The "Set" indicator at the lower left ...). • The shutter speed can be selected from 1/1000 to 30 seconds. • Shutter speeds of the screen changes to "Return," and the camera enters the manual exposure setup mode. 2 Adjust the settings using a tripod is set to process the data. • The difference between the settings and...
...prevent the effects of vibration. • If you select shutter speeds of 1/6 second or slower, the NR slow shutter function activates automatically to reduce the picture noise and "NR" appears. • If you select slow shutter speeds, it takes time to M. The "Set" indicator at the lower left ...). • The shutter speed can be selected from 1/1000 to 30 seconds. • Shutter speeds of the screen changes to "Return," and the camera enters the manual exposure setup mode. 2 Adjust the settings using a tripod is set to process the data. • The difference between the settings and...
Operating Instructions
Page 51
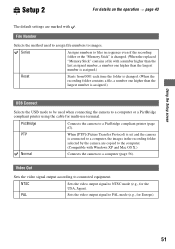
...according to a PictBridge compliant printer (page 67). NTSC Sets the video output signal to NTSC mode (e.g., for Europe). 51 PictBridge Connects the camera to connected equipment. Using the Setup screen Setup 2 2 For details on the operation t page 43 The default settings are copied to the... computer. (Compatible with . PTP When [PTP] (Picture Transfer Protocol) is set and the camera is assigned.) USB Connect Selects the USB mode to be used to assign file numbers to a computer or a PictBridge compliant ...
...according to a PictBridge compliant printer (page 67). NTSC Sets the video output signal to NTSC mode (e.g., for Europe). 51 PictBridge Connects the camera to connected equipment. Using the Setup screen Setup 2 2 For details on the operation t page 43 The default settings are copied to the... computer. (Compatible with . PTP When [PTP] (Picture Transfer Protocol) is set and the camera is assigned.) USB Connect Selects the USB mode to be used to assign file numbers to a computer or a PictBridge compliant ...
Operating Instructions
Page 57
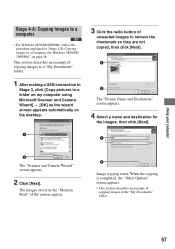
... to a computer • For Windows 98/98SE/2000/Me, follow the procedure explained in Stage 3, click [Copy pictures to a folder on my computer using Microsoft Scanner and Camera Wizard] t [OK] as the wizard screen appears automatically on the desktop. 3 Click the radio button of unwanted ...images to remove the checkmark so they are not copied, then click [Next]. 1 2 The "Picture Name and Destination" screen appears. 4 Select...
... to a computer • For Windows 98/98SE/2000/Me, follow the procedure explained in Stage 3, click [Copy pictures to a folder on my computer using Microsoft Scanner and Camera Wizard] t [OK] as the wizard screen appears automatically on the desktop. 3 Click the radio button of unwanted ...images to remove the checkmark so they are not copied, then click [Next]. 1 2 The "Picture Name and Destination" screen appears. 4 Select...
Operating Instructions
Page 58
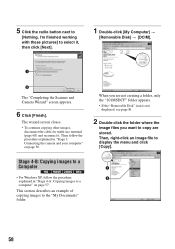
Then follow the procedure 2 explained in "Stage 3: Connecting the camera and your computer" on page 57. Then, right-click an image file to [Nothing. 5 Click the radio button next to display the menu and click [Copy]. I'm finished working with these pictures] to a computer" on page 56. Stage 4-B: Copying images to a Computer 1 • For... cable for multi-use terminal (page 60) and reconnect it , then click [Next]. 1 Double-click [My Computer] t [Removable Disk] t [DCIM]. 1 2 The "Completing the Scanner and Camera Wizard" screen appears. 6 Click [Finish].
Then follow the procedure 2 explained in "Stage 3: Connecting the camera and your computer" on page 57. Then, right-click an image file to [Nothing. 5 Click the radio button next to display the menu and click [Copy]. I'm finished working with these pictures] to a computer" on page 56. Stage 4-B: Copying images to a Computer 1 • For... cable for multi-use terminal (page 60) and reconnect it , then click [Next]. 1 Double-click [My Computer] t [Removable Disk] t [DCIM]. 1 2 The "Completing the Scanner and Camera Wizard" screen appears. 6 Click [Finish].
Operating Instructions
Page 62
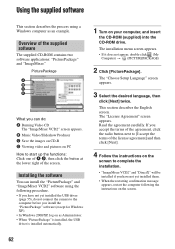
...) t (PICTUREPACKAGE) 2 Click [PicturePackage]. This section describes the English screen. B Music Video/Slideshow Producer C Save the images on CD-R D Viewing video and pictures on as an example. Overview of the screen. PicturePackage A B C D What you install the "PicturePackage" software (except for Windows XP). • In Windows... describes the process using the following the instructions on the screen. 62 Installing the software You can do not connect the camera to start up the functions: Click one of A-D, then click the button at the lower right of the supplied software ...
...) t (PICTUREPACKAGE) 2 Click [PicturePackage]. This section describes the English screen. B Music Video/Slideshow Producer C Save the images on CD-R D Viewing video and pictures on as an example. Overview of the screen. PicturePackage A B C D What you install the "PicturePackage" software (except for Windows XP). • In Windows... describes the process using the following the instructions on the screen. 62 Installing the software You can do not connect the camera to start up the functions: Click one of A-D, then click the button at the lower right of the supplied software ...
Operating Instructions
Page 78
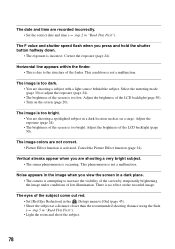
...The image colors are shooting a very bright subject. • The smear phenomenon is activated. Vertical streaks appear when you are not correct. • Picture Effect function is occurring. The date and time are shooting a spotlighted subject in a dark location such as on a stage. Correct the exposure (page ...the flash (t step 5 in "Read This First"). The F value and shutter speed flash when you view the screen in a dark place. • The camera is too bright. • You are recorded incorrectly. • Set the correct date and time (t step 2 in "Read This First"). • Light...
...The image colors are shooting a very bright subject. • The smear phenomenon is activated. Vertical streaks appear when you are not correct. • Picture Effect function is occurring. The date and time are shooting a spotlighted subject in a dark location such as on a stage. Correct the exposure (page ...the flash (t step 5 in "Read This First"). The F value and shutter speed flash when you view the screen in a dark place. • The camera is too bright. • You are recorded incorrectly. • Set the correct date and time (t step 2 in "Read This First"). • Light...
Operating Instructions
Page 96
... flash t step 5 in "Read This First" Format 48 H High-speed shutter mode t step 5 in "Read This First" Histogram 20, 28 Holding the camera t step 5 in "Read This First" I Identifying parts 14 Image file storage destinations and file names 60 Image quality 13, 32 Image size 13 t step ... NR slow shutter 24 NTSC 51 Number of images/Recording time 21 O One-push 31 Optical zoom 44 OS 54, 64 Overexposure 11 P P.Effect 34 PAL 51 Parallax 79 PC see "Computer" PFX 34 PictBridge 67 Picture effect 34 PicturePackage 62 Pixel 13 Playback see "Viewing" Playback/Edit 23 Power cord t ...
... flash t step 5 in "Read This First" Format 48 H High-speed shutter mode t step 5 in "Read This First" Histogram 20, 28 Holding the camera t step 5 in "Read This First" I Identifying parts 14 Image file storage destinations and file names 60 Image quality 13, 32 Image size 13 t step ... NR slow shutter 24 NTSC 51 Number of images/Recording time 21 O One-push 31 Optical zoom 44 OS 54, 64 Overexposure 11 P P.Effect 34 PAL 51 Parallax 79 PC see "Computer" PFX 34 PictBridge 67 Picture effect 34 PicturePackage 62 Pixel 13 Playback see "Viewing" Playback/Edit 23 Power cord t ...
