Read This First guide
Page 1
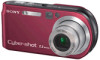
...within 100 V to frequently asked questions can use your camera. © 2005 Sony Corporation Printed in a specified language. To check the ...and furniture. DSC-P200 Refer to "User's Guide/Troubleshooting" (separate volume) Explains advanced techniques and what to do if you do not leave the camera with the...Memory Stick" (32 MB) (1) • Power cord (mains lead) (1) • USB, A/V cable for multiuse terminal (1) • NP-FR1 battery pack (1) • Wrist strap (1) • CD-ROM (Cyber-shot application software) (1) • Operating instructions for digital still camera...
...within 100 V to frequently asked questions can use your camera. © 2005 Sony Corporation Printed in a specified language. To check the ...and furniture. DSC-P200 Refer to "User's Guide/Troubleshooting" (separate volume) Explains advanced techniques and what to do if you do not leave the camera with the...Memory Stick" (32 MB) (1) • Power cord (mains lead) (1) • USB, A/V cable for multiuse terminal (1) • NP-FR1 battery pack (1) • Wrist strap (1) • CD-ROM (Cyber-shot application software) (1) • Operating instructions for digital still camera...
Operating Instructions
Page 3
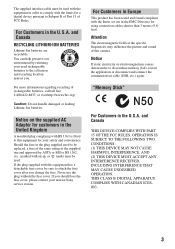
... of this camera. If you . THIS CLASS B DIGITAL APPARATUS COMPLIES WITH... CANADIAN ICES003. 3 The supplied interface cable must be used rechargeable batteries to this equipment for your safety and convenience. Notice If static electricity or electromagnetism causes data transfer to Subpart B of Part 15 of the same rating as the supplied one and approved by returning your nearest Sony...www.rbrc.org/ Caution: Do not handle damaged or leaking Lithium-Ion batteries. "Memory Stick" For Customers in the U.S.A. If the plug supplied with this equipment has a...
... of this camera. If you . THIS CLASS B DIGITAL APPARATUS COMPLIES WITH... CANADIAN ICES003. 3 The supplied interface cable must be used rechargeable batteries to this equipment for your safety and convenience. Notice If static electricity or electromagnetism causes data transfer to Subpart B of Part 15 of the same rating as the supplied one and approved by returning your nearest Sony...www.rbrc.org/ Caution: Do not handle damaged or leaking Lithium-Ion batteries. "Memory Stick" For Customers in the U.S.A. If the plug supplied with this equipment has a...
Operating Instructions
Page 4
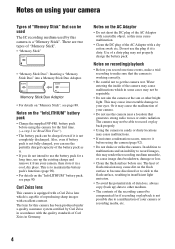
... 90. Notes on the flash surface to become discolored or to stick to use the battery pack for this camera has been produced under a quality assurance system certified by this may cause the malfunction of "Memory Stick". • "Memory Stick" • "Memory Stick Duo": Inserting a "Memory Stick Duo" into a Memory Stick Duo Adaptor. Also, even if battery pack is not fully charged...
... 90. Notes on the flash surface to become discolored or to stick to use the battery pack for this camera has been produced under a quality assurance system certified by this may cause the malfunction of "Memory Stick". • "Memory Stick" • "Memory Stick Duo": Inserting a "Memory Stick Duo" into a Memory Stick Duo Adaptor. Also, even if battery pack is not fully charged...
Operating Instructions
Page 6
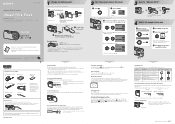
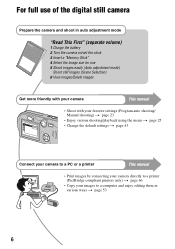
... of the digital still camera Prepare the camera and shoot in auto adjustment mode "Read This First" (separate volume) 1 Charge the battery 2 Turn the camera on/set the clock 3 Insert a "Memory Stick" 4 Select the image size for use 5 Shoot images easily (Auto adjustment mode) Shoot still images (Scene... Selection) 6 View images/Delete images Get more friendly with your camera This manual • Shoot with your...
... of the digital still camera Prepare the camera and shoot in auto adjustment mode "Read This First" (separate volume) 1 Charge the battery 2 Turn the camera on/set the clock 3 Insert a "Memory Stick" 4 Select the image size for use 5 Shoot images easily (Auto adjustment mode) Shoot still images (Scene... Selection) 6 View images/Delete images Get more friendly with your camera This manual • Shoot with your...
Operating Instructions
Page 8
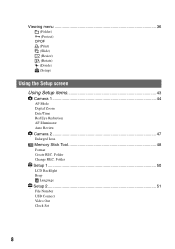
Folder Setup 1 50 1 LCD Backlight Beep Language Setup 2 51 2 File Number USB Connect Video Out Clock Set 8 Viewing menu 36 (Folder) - (Protect) DPOF (Print) (Slide) (Resize) (Rotate) (Divide) (Setup) Using the Setup screen Using Setup items 43 Camera 1 44 1 AF Mode Digital Zoom Date/Time Red Eye Reduction AF Illuminator Auto Review Camera 2 47 2 Enlarged Icon Memory Stick Tool 48 Format Create REC. Folder Change REC.
Folder Setup 1 50 1 LCD Backlight Beep Language Setup 2 51 2 File Number USB Connect Video Out Clock Set 8 Viewing menu 36 (Folder) - (Protect) DPOF (Print) (Slide) (Resize) (Rotate) (Divide) (Setup) Using the Setup screen Using Setup items 43 Camera 1 44 1 AF Mode Digital Zoom Date/Time Red Eye Reduction AF Illuminator Auto Review Camera 2 47 2 Enlarged Icon Memory Stick Tool 48 Format Create REC. Folder Change REC.
Operating Instructions
Page 9
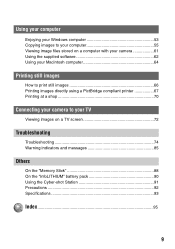
...images to your computer 55 Viewing image files stored on a computer with your camera 61 Using the supplied software 62 Using your Macintosh computer 64 Printing still images How to print still images 66 Printing images directly using a PictBridge compliant printer 67 Printing at a... shop 70 Connecting your camera to your TV Viewing images on a TV screen 72 Troubleshooting Troubleshooting 74 Warning indicators and messages 85 Others On the "Memory Stick 88...
...images to your computer 55 Viewing image files stored on a computer with your camera 61 Using the supplied software 62 Using your Macintosh computer 64 Printing still images How to print still images 66 Printing images directly using a PictBridge compliant printer 67 Printing at a... shop 70 Connecting your camera to your TV Viewing images on a TV screen 72 Troubleshooting Troubleshooting 74 Warning indicators and messages 85 Others On the "Memory Stick 88...
Operating Instructions
Page 15
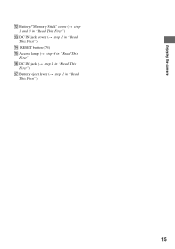
Enjoying the camera L Battery/"Memory Stick" cover (t step 1 and 3 in "Read This First") M DC IN jack cover (t step 1 in "Read This First") N RESET button (74) O Access lamp (t step 4 in "Read This First" P DC IN jack (t step 1 in "Read This First") Q Battery eject lever (t step 1 in "Read This First") 15
Enjoying the camera L Battery/"Memory Stick" cover (t step 1 and 3 in "Read This First") M DC IN jack cover (t step 1 in "Read This First") N RESET button (74) O Access lamp (t step 4 in "Read This First" P DC IN jack (t step 1 in "Read This First") Q Battery eject lever (t step 1 in "Read This First") 15

Operating Instructions
Page 17
.../Time (45) ISO number (32) D Display E + Indication Vibration warning (10) • Indicates vibration will prevent you can still shoot images. However, we recommend holding the camera steadily and turning off the indicator to avoid the effects of recordable images (21) Self-timer (t step 5 in the column on...25) 17 Enjoying the camera C Display 7M 3:2 5M 3M 1M VGA FINE 640 STD 640 160 FINE STD 101 00:00:00 [00:28:05] 1/30" 400 C:32:00 Indication Image size (t step 4 in "Read This First") Image quality (32) Recording folder (48) Remaining "Memory Stick" capacity (21) ...
.../Time (45) ISO number (32) D Display E + Indication Vibration warning (10) • Indicates vibration will prevent you can still shoot images. However, we recommend holding the camera steadily and turning off the indicator to avoid the effects of recordable images (21) Self-timer (t step 5 in the column on...25) 17 Enjoying the camera C Display 7M 3:2 5M 3M 1M VGA FINE 640 STD 640 160 FINE STD 101 00:00:00 [00:28:05] 1/30" 400 C:32:00 Indication Image size (t step 4 in "Read This First") Image quality (32) Recording folder (48) Remaining "Memory Stick" capacity (21) ...
Operating Instructions
Page 18
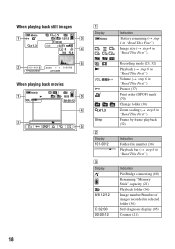
When playing back still images 60min 1.3 M VGA 101 101 12/12 C:32:00 +2.0EV 500 F2.8 BACK/NEXT VOLUME When playing back movies A Display 60min 7M 3:2 5M 3M 1M ... Folder-file number (36) Playback bar (t step 6 in "Read This First") C Display 101 8/8 12/12 C:32:00 00:00:12 Indication PictBridge connecting (68) Remaining "Memory Stick" capacity (21) Playback folder (36) Image number/Number of images recorded in selected folder (36) Self-diagnosis display (85) Counter (21) 18
When playing back still images 60min 1.3 M VGA 101 101 12/12 C:32:00 +2.0EV 500 F2.8 BACK/NEXT VOLUME When playing back movies A Display 60min 7M 3:2 5M 3M 1M ... Folder-file number (36) Playback bar (t step 6 in "Read This First") C Display 101 8/8 12/12 C:32:00 00:00:12 Indication PictBridge connecting (68) Remaining "Memory Stick" capacity (21) Playback folder (36) Image number/Number of images recorded in selected folder (36) Self-diagnosis display (85) Counter (21) 18
Operating Instructions
Page 21
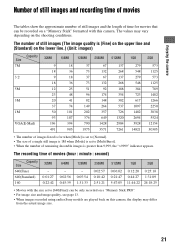
... 3038 5524 12154 30385 • The number of images listed is for movies that can be recorded on a "Memory Stick" formatted with this camera, the display may vary depending on this camera. The values may differ from the actual image size. 21 The recording time of movies (hour : minute : second... a single still image is 1M when [Mode] is set to [Normal]. • The size of remaining shootable images is set to [640(Fine)] can be only recorded on a "Memory Stick PRO". • For image size and image quality, see page 13. • When images recorded using earlier Sony models are...
... 3038 5524 12154 30385 • The number of images listed is for movies that can be recorded on a "Memory Stick" formatted with this camera, the display may vary depending on this camera. The values may differ from the actual image size. 21 The recording time of movies (hour : minute : second... a single still image is 1M when [Mode] is set to [Normal]. • The size of remaining shootable images is set to [640(Fine)] can be only recorded on a "Memory Stick PRO". • For image size and image quality, see page 13. • When images recorded using earlier Sony models are...
Operating Instructions
Page 22
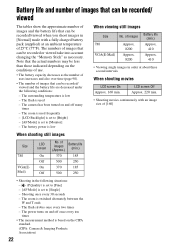
...- [AF Mode] is set to [Single] - The zoom is low When viewing still images Size No. of [160] When shooting still images Size 7M VGA(EMail) LCD screen On Off On Off No. The battery power... - The numbers of images that can be recorded or viewed take into account changing the "Memory Stick" as the number of uses increases and also over time (page 90). • The ... those indicated depending on the conditions of 25°C (77°F). The camera has been turned on the CIPA standard. (CIPA: Camera & Imaging Products Association) 22 The zoom is low - LCD screen Off ...
...- [AF Mode] is set to [Single] - The zoom is low When viewing still images Size No. of [160] When shooting still images Size 7M VGA(EMail) LCD screen On Off On Off No. The battery power... - The numbers of images that can be recorded or viewed take into account changing the "Memory Stick" as the number of uses increases and also over time (page 90). • The ... those indicated depending on the conditions of 25°C (77°F). The camera has been turned on the CIPA standard. (CIPA: Camera & Imaging Products Association) 22 The zoom is low - LCD screen Off ...
Operating Instructions
Page 33
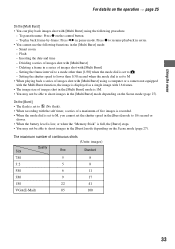
... to shoot images in the [Multi Burst] mode: - Inserting the date and time - Flash - To play back images shot with [Multi Burst] using a computer or a camera not equipped with the Multi Burst function, the image is displayed as a single image with the self timer, a series of a maximum of images shot in... mode dial is set the shutter speed in the [Burst] mode to 1/6 second or slower. • When the battery level is low, or when the "Memory Stick" is 1M. • You may not be able to -
... to shoot images in the [Multi Burst] mode: - Inserting the date and time - Flash - To play back images shot with [Multi Burst] using a computer or a camera not equipped with the Multi Burst function, the image is displayed as a single image with the self timer, a series of a maximum of images shot in... mode dial is set the shutter speed in the [Burst] mode to 1/6 second or slower. • When the battery level is low, or when the "Memory Stick" is 1M. • You may not be able to -
Operating Instructions
Page 36
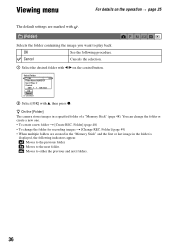
... selection. 1 Select the desired folder with b/B on the operation t page 25 The default settings are created in the "Memory Stick" and the first or last image in a specified folder of a "Memory Stick" (page 48). Folder] (page 48) • To change the folder or create a new one. • To... create a new folder t [Create REC. Folder] (page 49) • When multiple folders are marked with v, then press z. z On the [Folder] The camera stores images in the...
... selection. 1 Select the desired folder with b/B on the operation t page 25 The default settings are created in the "Memory Stick" and the first or last image in a specified folder of a "Memory Stick" (page 48). Folder] (page 48) • To change the folder or create a new one. • To... create a new folder t [Create REC. Folder] (page 49) • When multiple folders are marked with v, then press z. z On the [Folder] The camera stores images in the...
Operating Instructions
Page 38
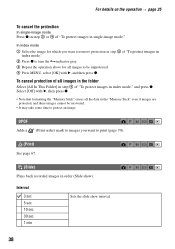
... z in step 3 or 4 of "To protect images in index mode," and press z. Select [Off] with B, then press z. • Note that formatting the "Memory Stick" erases all the data in the "Memory Stick" even if images are protected, and these images cannot be unprotected. 4 Press MENU, select [OK] with B, and then press z. indicator gray. 3 Repeat...
... z in step 3 or 4 of "To protect images in index mode," and press z. Select [Off] with B, then press z. • Note that formatting the "Memory Stick" erases all the data in the "Memory Stick" even if images are protected, and these images cannot be unprotected. 4 Press MENU, select [OK] with B, and then press z. indicator gray. 3 Repeat...
Operating Instructions
Page 39
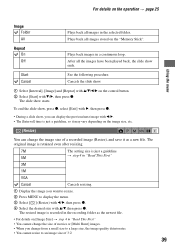
... (Resize), and save it may vary depending on the control button. 2 Select [Start] with B, then press z. • During a slide show starts. For details on the "Memory Stick". The resized image is just a guideline, so it as the newest file. • For details on [Image Size] t step 4 in a continuous loop.
... (Resize), and save it may vary depending on the control button. 2 Select [Start] with B, then press z. • During a slide show starts. For details on the "Memory Stick". The resized image is just a guideline, so it as the newest file. • For details on [Image Size] t step 4 in a continuous loop.

Operating Instructions
Page 40
...reflected depending on the image. (Rotate) Rotates a still image. Cancel Cancels division. 40 OK Cancel Rotates an image. OK See the following procedure. This is the recommended function to use when the "Memory Stick" capacity is insufficient, or when you attach movies ...(Rotate) with b/B on the control button, then press z. 4 Select [ ] with v, then rotate the image with b/B. 5 Select [OK] with other cameras. • When viewing images on a computer, the image rotation information may not be displayed on the software. (Divide) Cuts movies, or deletes unnecessary portions...
...reflected depending on the image. (Rotate) Rotates a still image. Cancel Cancels division. 40 OK Cancel Rotates an image. OK See the following procedure. This is the recommended function to use when the "Memory Stick" capacity is insufficient, or when you attach movies ...(Rotate) with b/B on the control button, then press z. 4 Select [ ] with v, then rotate the image with b/B. 5 Select [OK] with other cameras. • When viewing images on a computer, the image rotation information may not be displayed on the software. (Divide) Cuts movies, or deletes unnecessary portions...

Operating Instructions
Page 48
... control button, then press z. Folder Creates a folder in Memory Stick will be erased" appears. 2 Select [OK] with the camera. Folder Creating REC. Both the supplied "Memory Stick" and a commercially available "Memory Stick" are recorded in one higher than the largest number, and... delete a folder with v, then press z. Cancel Cancels folder creation. 1 Select [OK] with . folder 102MSDCF Ready? Format Formats the "Memory Stick". Create REC. When the folder capacity is exceeded, a new folder is complete. Cancel Cancels the formatting. 1 Select [OK] with v, ...
... control button, then press z. Folder Creates a folder in Memory Stick will be erased" appears. 2 Select [OK] with the camera. Folder Creating REC. Both the supplied "Memory Stick" and a commercially available "Memory Stick" are recorded in one higher than the largest number, and... delete a folder with v, then press z. Cancel Cancels folder creation. 1 Select [OK] with . folder 102MSDCF Ready? Format Formats the "Memory Stick". Create REC. When the folder capacity is exceeded, a new folder is complete. Cancel Cancels the formatting. 1 Select [OK] with v, ...
Operating Instructions
Page 51
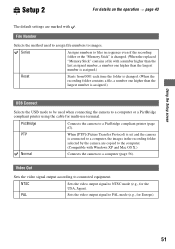
...page 67). Series Assigns numbers to files in sequence even if the recording folder or the "Memory Stick" is connected to a computer, the images in the recording folder selected by the camera are marked with a number higher than the last assigned number, a number one higher than the... 0001 each time the folder is changed . (When the replaced "Memory Stick" contains a file with . File Number Selects the method used when connecting the camera to PAL mode (e.g., for the USA, Japan). PictBridge Connects the camera to connected equipment. PAL Sets the video output signal to a computer...
...page 67). Series Assigns numbers to files in sequence even if the recording folder or the "Memory Stick" is connected to a computer, the images in the recording folder selected by the camera are marked with a number higher than the last assigned number, a number one higher than the... 0001 each time the folder is changed . (When the replaced "Memory Stick" contains a file with . File Number Selects the method used when connecting the camera to PAL mode (e.g., for the USA, Japan). PictBridge Connects the camera to connected equipment. PAL Sets the video output signal to a computer...
Operating Instructions
Page 54
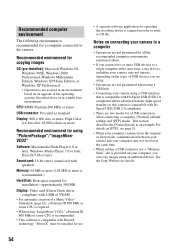
...single computer at the same time. • When neither a USB connector nor a "Memory Stick" slot is compatible with DirectX technology. "DirectX" must be installed for use. •...800 MHz or faster CPU is recommended. • This software is provided on connecting your camera to a computer • Operations are not guaranteed for all the recommended computer environments mentioned... connection when connecting a computer, [Normal] (default setting) and [PTP] modes. See the Sony Website for details. 54 This section describes the [Normal] mode as an example. Recommended computer ...
...single computer at the same time. • When neither a USB connector nor a "Memory Stick" slot is compatible with DirectX technology. "DirectX" must be installed for use. •...800 MHz or faster CPU is recommended. • This software is provided on connecting your camera to a computer • Operations are not guaranteed for all the recommended computer environments mentioned... connection when connecting a computer, [Normal] (default setting) and [PTP] modes. See the Sony Website for details. 54 This section describes the [Normal] mode as an example. Recommended computer ...
Operating Instructions
Page 55
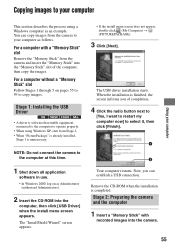
...• When "PicturePackage" is already installed, Stage 1 is finished, the screen informs you can copy images from the camera and insert the "Memory Stick" into the "Memory Stick" slot of completion. 4 Click the radio button next to [Yes, I want to restart my computer now] to ... 1 2 Your computer restarts. The USB driver installation starts. For a computer without a "Memory Stick" slot Follow Stages 1 through 5 on as Administrator (authorized Administrators). 2 Insert the CD-ROM into the camera. 55 Stage 1: Installing the USB Driver • A driver is software that enable equipment...
...• When "PicturePackage" is already installed, Stage 1 is finished, the screen informs you can copy images from the camera and insert the "Memory Stick" into the "Memory Stick" slot of completion. 4 Click the radio button next to [Yes, I want to restart my computer now] to ... 1 2 Your computer restarts. The USB driver installation starts. For a computer without a "Memory Stick" slot Follow Stages 1 through 5 on as Administrator (authorized Administrators). 2 Insert the CD-ROM into the camera. 55 Stage 1: Installing the USB Driver • A driver is software that enable equipment...


