Operating Instructions
Page 1
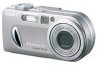
... computer__________ Troubleshooting Additional information Index Model No. Record the serial number in the space provided below. Digital Still Camera Operating Instructions Before operating the unit, please read this product. DSC-P8/P10/P12 Serial No. DSC-P8/P10/P12 © 2003 Sony Corporation 3-080-892-12(1) Getting started Shooting still images Viewing still images Deleting still images...
... computer__________ Troubleshooting Additional information Index Model No. Record the serial number in the space provided below. Digital Still Camera Operating Instructions Before operating the unit, please read this product. DSC-P8/P10/P12 Serial No. DSC-P8/P10/P12 © 2003 Sony Corporation 3-080-892-12(1) Getting started Shooting still images Viewing still images Deleting still images...
Operating Instructions
Page 3
... tested and found compliant with the limits sets out in the EMC Directive for your nearest Sony service station. Notice If static electricity or electromagnetism causes data transfer to this camera. and Canada THIS DEVICE COMPLIES WITH PART 15 OF THE FCC RULES. If the plug ...you . Certain countries may influence the picture and sound of this equipment for using connection cables shorter than 3 meters (9.8 feet). THIS CLASS B DIGITAL APPARATUS COMPLIES WITH CANADIAN ICES-003. 3 Notice on the supplied AC Adaptor for the customers in the plug supplied need to BS 1362, (i.e., ...
... tested and found compliant with the limits sets out in the EMC Directive for your nearest Sony service station. Notice If static electricity or electromagnetism causes data transfer to this camera. and Canada THIS DEVICE COMPLIES WITH PART 15 OF THE FCC RULES. If the plug ...you . Certain countries may influence the picture and sound of this equipment for using connection cables shorter than 3 meters (9.8 feet). THIS CLASS B DIGITAL APPARATUS COMPLIES WITH CANADIAN ICES-003. 3 Notice on the supplied AC Adaptor for the customers in the plug supplied need to BS 1362, (i.e., ...
Operating Instructions
Page 4
... provision of the pixels are normal in the manufacturing process and do not affect the recording in any way. • Be careful when placing the camera near a window or outdoors. LCD screen, LCD finder (only models with other materials may be able to record or play back properly. • Do...and the LCD finder are manufactured using extremely high-precision technology so over 99.99% of the copyright laws. 4 Do not shake or strike the camera In addition to malfunctions and inability to record images, this may render the "Memory Stick" unusable or image data breakdown, damage or loss may ...
... provision of the pixels are normal in the manufacturing process and do not affect the recording in any way. • Be careful when placing the camera near a window or outdoors. LCD screen, LCD finder (only models with other materials may be able to record or play back properly. • Do...and the LCD finder are manufactured using extremely high-precision technology so over 99.99% of the copyright laws. 4 Do not shake or strike the camera In addition to malfunctions and inability to record images, this may render the "Memory Stick" unusable or image data breakdown, damage or loss may ...
Operating Instructions
Page 5
...used in this camera. Trademarks • "Memory Stick," and "MagicGate Memory Stick" are trademarks of Sony Corporation. • "Memory Stick Duo" and are trademarks of Sony Corporation. • "Memory Stick PRO" and are trademarks of Sony Corporation. • "MagicGate" and are trademarks of Sony Corporation. •...pictures in this manual are reproduced images, and are not actual images shot using this manual are , in this manual. 5 The pictures used in this manual The photographs used in general, trademarks or registered trademarks of DSC-P8 unless noted otherwise.
...used in this camera. Trademarks • "Memory Stick," and "MagicGate Memory Stick" are trademarks of Sony Corporation. • "Memory Stick Duo" and are trademarks of Sony Corporation. • "Memory Stick PRO" and are trademarks of Sony Corporation. • "MagicGate" and are trademarks of Sony Corporation. •...pictures in this manual are reproduced images, and are not actual images shot using this manual are , in this manual. 5 The pictures used in this manual The photographs used in general, trademarks or registered trademarks of DSC-P8 unless noted otherwise.
Operating Instructions
Page 6
... Charging the battery pack 10 Using an external power source 13 Using your camera abroad 13 Turning on the LCD screen of contents Before using auto adjustment mode 21 Checking the last image you shot - Focus preset 44 Adjusting the exposure - Clip Motion 51 Shooting in ... still image 29 6 Viewing still images Viewing images on /off your camera .. 39 Changing the menu settings 39 Changing the items in Multi Burst mode - Flash Level 50 Shooting multiple frames - Burst 3 (DSC-P10/P12)/ Burst 2 (DSC-P8 53 Shooting still images for e-mail - White Balance 49 Adjusting the...
... Charging the battery pack 10 Using an external power source 13 Using your camera abroad 13 Turning on the LCD screen of contents Before using auto adjustment mode 21 Checking the last image you shot - Focus preset 44 Adjusting the exposure - Clip Motion 51 Shooting in ... still image 29 6 Viewing still images Viewing images on /off your camera .. 39 Changing the menu settings 39 Changing the items in Multi Burst mode - Flash Level 50 Shooting multiple frames - Burst 3 (DSC-P10/P12)/ Burst 2 (DSC-P8 53 Shooting still images for e-mail - White Balance 49 Adjusting the...
Operating Instructions
Page 8
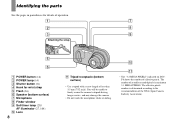
... receptacle (bottom surface) • Use a tripod with a screw length of the JCIA (Japan Camera Industry Association). The number of effective pixels. You will be unable to firmly secure the camera to tripods having longer screws, and may damage the camera. • Do not touch the microphone while recording. 0 qa • The "3.2 MEGA PIXELS...
... receptacle (bottom surface) • Use a tripod with a screw length of the JCIA (Japan Camera Industry Association). The number of effective pixels. You will be unable to firmly secure the camera to tripods having longer screws, and may damage the camera. • Do not touch the microphone while recording. 0 qa • The "3.2 MEGA PIXELS...
Operating Instructions
Page 10
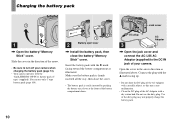
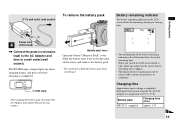
DC plug 3 AC Adaptor , Open the jack cover and connect the AC-LS5 AC Adaptor (supplied) to turn off your camera. Connect the plug with the v mark facing up. • Do not short the DC plug of the AC Adaptor with a metallic object, as this may ..." NP-FC11 battery pack (C type) (supplied). Make sure the battery pack is easily inserted by pushing the battery eject lever at the front of your camera when charging the battery pack (page 14). • Your camera operates with the B mark facing toward the battery compartment as illustrated above.
DC plug 3 AC Adaptor , Open the jack cover and connect the AC-LS5 AC Adaptor (supplied) to turn off your camera. Connect the plug with the v mark facing up. • Do not short the DC plug of the AC Adaptor with a metallic object, as this may ..." NP-FC11 battery pack (C type) (supplied). Make sure the battery pack is easily inserted by pushing the battery eject lever at the front of your camera when charging the battery pack (page 14). • Your camera operates with the B mark facing toward the battery compartment as illustrated above.
Operating Instructions
Page 11
... time to charge a completely discharged battery pack using the AC-LS5 AC Adaptor at a temperature of the battery remaining indicator in the direction of your camera. The /CHG lamp (orange) lights up when charging begins, and goes off , it . Battery pack Charging time (min.) NP-FC11 (supplied) Approx. 150 11 Slide...
... time to charge a completely discharged battery pack using the AC-LS5 AC Adaptor at a temperature of the battery remaining indicator in the direction of your camera. The /CHG lamp (orange) lights up when charging begins, and goes off , it . Battery pack Charging time (min.) NP-FC11 (supplied) Approx. 150 11 Slide...
Operating Instructions
Page 12
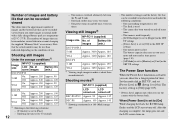
... the battery life that can be recorded/viewed are decreased under the following situations: - [P. Viewing still images2) NP-FC11 (supplied) Image size No. The camera has been turned on and off many times - Set the mode dial to SET UP, and set to [Off] in the SET UP settings - The...setting is set [Power Save] in (Setup 1) to [On] While charging the flash, the /CHG lamp flashes and the LCD screen turns off DSC-P10/P12 Approx. 90 Approx. 135 DSC-P8 Approx. 100 Approx. 145 3) Shooting continuously at a temperature of 25°C (77°F). The power turns on and off once every...
... the battery life that can be recorded/viewed are decreased under the following situations: - [P. Viewing still images2) NP-FC11 (supplied) Image size No. The camera has been turned on and off many times - Set the mode dial to SET UP, and set to [Off] in the SET UP settings - The...setting is set [Power Save] in (Setup 1) to [On] While charging the flash, the /CHG lamp flashes and the LCD screen turns off DSC-P10/P12 Approx. 90 Approx. 135 DSC-P8 Approx. 100 Approx. 145 3) Shooting continuously at a temperature of 25°C (77°F). The power turns on and off once every...
Operating Instructions
Page 13
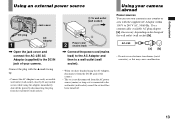
... shut off the power by . Use a commercially available AC plug adaptor [a], if necessary, depending on the design of your camera. AC-LS5 • Do not use your camera abroad Power sources You can use an electronic transformer (travel converter), as it is connected to the wall outlet (wall socket)...AC power source (mains) as long as this may cause a malfunction. 13 Using your camera in any trouble occurs while using the AC Adaptor, disconnect it from the DC IN jack of the camera. • The set itself has been turned off. Getting started Using an external power source...
... shut off the power by . Use a commercially available AC plug adaptor [a], if necessary, depending on the design of your camera. AC-LS5 • Do not use your camera abroad Power sources You can use an electronic transformer (travel converter), as it is connected to the wall outlet (wall socket)...AC power source (mains) as long as this may cause a malfunction. 13 Using your camera in any trouble occurs while using the AC Adaptor, disconnect it from the DC IN jack of the camera. • The set itself has been turned off. Getting started Using an external power source...
Operating Instructions
Page 14
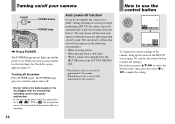
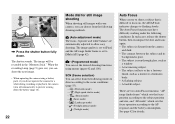
... The auto power-off the power Press POWER again. The POWER lamp goes out, and the camera turns off function also will not operate in the following circumstances. • When viewing movies •...to [On]: approximately 90 seconds When [Power Save] is on. Turning off function only operates when the camera is operating. Turning on/off automatically to prevent wearing down the battery. The POWER lamp (green) lights up... 0EV EV 0EV WB ISO 400 200 100 Auto WB ISO To change the current settings of the camera, bring up and the power is set to , , SCN or , the lens portion moves. ...
... The auto power-off the power Press POWER again. The POWER lamp goes out, and the camera turns off function also will not operate in the following circumstances. • When viewing movies •...to [On]: approximately 90 seconds When [Power Save] is on. Turning off function only operates when the camera is operating. Turning on/off automatically to prevent wearing down the battery. The POWER lamp (green) lights up... 0EV EV 0EV WB ISO 400 200 100 Auto WB ISO To change the current settings of the camera, bring up and the power is set to , , SCN or , the lens portion moves. ...

Operating Instructions
Page 17
... clicks as illustrated. • Push the "Memory Stick" all of the way in so that it out. • Whenever the access lamp is lit, the camera is not inserted correctly, you may be able to pop it is securely seated in the direction of the arrow. • For details on "Memory...
... clicks as illustrated. • Push the "Memory Stick" all of the way in so that it out. • Whenever the access lamp is lit, the camera is not inserted correctly, you may be able to pop it is securely seated in the direction of the arrow. • For details on "Memory...
Operating Instructions
Page 20
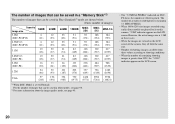
... number of actually recorded pixels is maximum 3.1 MEGA PIXELS. • When 1600×1200 size images recorded using earlier Sony models are viewed on the LCD screen of the camera, they all look the same size. • Number of shooting images can be saved in these values according to [... be saved in Fine (Standard)3) mode are shown below. (Units: number of images) Capacity 16MB Image size 5.0M 6 (DSC-P10/P12) (11) 4.5M(3:2) 6 (DSC-P10/P12) (11) 3.1M 10 (18) 2.8M(3:2) 10 (DSC-P8) (18) 2.0M 16 (DSC-P8) (30) 1.2M 24 (46) VGA 97 (243) 32MB 12 (23) 12 (23) 20 (37) 20...
... number of actually recorded pixels is maximum 3.1 MEGA PIXELS. • When 1600×1200 size images recorded using earlier Sony models are viewed on the LCD screen of the camera, they all look the same size. • Number of shooting images can be saved in these values according to [... be saved in Fine (Standard)3) mode are shown below. (Units: number of images) Capacity 16MB Image size 5.0M 6 (DSC-P10/P12) (11) 4.5M(3:2) 6 (DSC-P10/P12) (11) 3.1M 10 (18) 2.8M(3:2) 10 (DSC-P8) (18) 2.0M 16 (DSC-P8) (30) 1.2M 24 (46) VGA 97 (243) 32MB 12 (23) 12 (23) 20 (37) 20...
Operating Instructions
Page 21
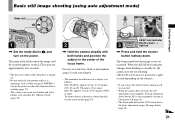
... • The minimum focal distance to a subject is not yet recorded. The name of the folder where the image will be canceled. • When the camera does not beep, the AF adjustment is not set properly (except in the center of the focus frame. Basic still image shooting (using auto adjustment... the power is turned on. • Do not touch the lens portion while it is operating, such as follows: DSC-P10/P12: Approx.50 cm (19 3/4 inches) (W)/ 60 cm (23 5/8 inches) (T) or more DSC-P8: Approx. 50 cm (19 3/4 inches) (W/T) or more To shoot subjects at distances closer than this, use the ...
... • The minimum focal distance to a subject is not yet recorded. The name of the folder where the image will be canceled. • When the camera does not beep, the AF adjustment is not set properly (except in the center of the focus frame. Basic still image shooting (using auto adjustment... the power is turned on. • Do not touch the lens portion while it is operating, such as follows: DSC-P10/P12: Approx.50 cm (19 3/4 inches) (W)/ 60 cm (23 5/8 inches) (T) or more DSC-P8: Approx. 50 cm (19 3/4 inches) (W/T) or more To shoot subjects at distances closer than this, use the ...
Operating Instructions
Page 22
... mode) - (Beach mode) - (Snow mode) - (Landscape mode) - (Twilight portrait mode) - (Twilight mode) Auto Focus When you can choose from the camera and dark. • The contrast between the subject and its background is poor. • The subject is distant from the following conditions. 60min VGA 101... dial for details. SCN (Scene selection) You can set to allow easy shooting. In such cases, release the shutter button, then recompose the shot and focus again. • The subject is seen through glass, such as a window. • A fast-moving subject. • The ...
... mode) - (Beach mode) - (Snow mode) - (Landscape mode) - (Twilight portrait mode) - (Twilight mode) Auto Focus When you can choose from the camera and dark. • The contrast between the subject and its background is poor. • The subject is distant from the following conditions. 60min VGA 101... dial for details. SCN (Scene selection) You can set to allow easy shooting. In such cases, release the shutter button, then recompose the shot and focus again. • The subject is seen through glass, such as a window. • A fast-moving subject. • The ...
Operating Instructions
Page 25
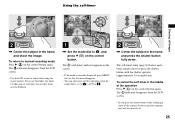
...-timer 60min VGA 101 96 S AF 60min VGA FINE 101 96 S AF F2.8 30 Shooting still images 2 , Center the subject in the middle of the camera, the focus and the exposure may not be different. 1 , Set the mode dial to shoot when using the macro feature.
...-timer 60min VGA 101 96 S AF 60min VGA FINE 101 96 S AF F2.8 30 Shooting still images 2 , Center the subject in the middle of the camera, the focus and the exposure may not be different. 1 , Set the mode dial to shoot when using the macro feature.
Operating Instructions
Page 29
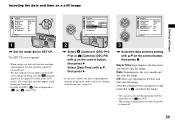
...screen appears. • When images are shot with v on the control button, then press B. Select [Date/Time] with v/V, then press B. • If you select [Date], the date is displayed as and (page 104). 1 2 2 , Select 1 (Camera1) (DSC-P10/ P12) or (Camera) (DSC-P8) with the date and time ...superimposed, the date and time cannot be removed later. • The date and time do not appear on the LCD screen during playback only. • On DSC-P10/P12, item is superimposed onto the image...
...screen appears. • When images are shot with v on the control button, then press B. Select [Date/Time] with v/V, then press B. • If you select [Date], the date is displayed as and (page 104). 1 2 2 , Select 1 (Camera1) (DSC-P10/ P12) or (Camera) (DSC-P8) with the date and time ...superimposed, the date and time cannot be removed later. • The date and time do not appear on the LCD screen during playback only. • On DSC-P10/P12, item is superimposed onto the image...
Operating Instructions
Page 30
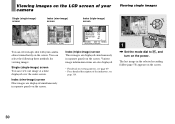
... image in the selected recording folder (page 58) appears on viewing movies, see page 69. • For a detailed description of your camera almost immediately on the screen. Various image information items are also displayed. • For details on the screen. 30 Viewing single images 60min...10:30PM BACK/NEXT VOLUME 1 , Set the mode dial to , and turn on the screen. Single (single-image) screen You can view images shot with your camera Single (single-image) screen 60min VGA 101 8/9 Index (nine-image) screen 101-0008 2003 7 4 10:30PM BACK/NEXT VOLUME SINGLE DISPLAY MOVE ...
... image in the selected recording folder (page 58) appears on viewing movies, see page 69. • For a detailed description of your camera almost immediately on the screen. Various image information items are also displayed. • For details on the screen. 30 Viewing single images 60min...10:30PM BACK/NEXT VOLUME 1 , Set the mode dial to , and turn on the screen. Single (single-image) screen You can view images shot with your camera Single (single-image) screen 60min VGA 101 8/9 Index (nine-image) screen 101-0008 2003 7 4 10:30PM BACK/NEXT VOLUME SINGLE DISPLAY MOVE ...
Operating Instructions
Page 32
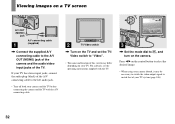
... TV with the TV. 101-0002 2003 7 4 10:30PM BACK/NEXT VOLUME 3 , Set the mode dial to select the desired image. • When using your camera abroad, it may differ depending on the TV and set the TV/ Video switch to "Video". • The name and location of this switch may... be necessary to switch the video output signal to the A/V OUT (MONO) jack of the camera and the audio/video input jacks of your TV. For a details, see the operating instructions supplied with the A/V connecting cable. 2 TV/Video switch , Turn on...
... TV with the TV. 101-0002 2003 7 4 10:30PM BACK/NEXT VOLUME 3 , Set the mode dial to select the desired image. • When using your camera abroad, it may differ depending on the TV and set the TV/ Video switch to "Video". • The name and location of this switch may... be necessary to switch the video output signal to the A/V OUT (MONO) jack of the camera and the audio/video input jacks of your TV. For a details, see the operating instructions supplied with the A/V connecting cable. 2 TV/Video switch , Turn on...
Operating Instructions
Page 33
The color system of the TV must match that of your digital still camera. PAL system Australia, Austria, Belgium, China, Czech Republic, Denmark, Finland, Germany, Holland, Hong Kong, Italy, Kuwait, Malaysia, New Zealand, Norway, Portugal, Singapore, Slovak Republic, Spain, ...
The color system of the TV must match that of your digital still camera. PAL system Australia, Austria, Belgium, China, Czech Republic, Denmark, Finland, Germany, Holland, Hong Kong, Italy, Kuwait, Malaysia, New Zealand, Norway, Portugal, Singapore, Slovak Republic, Spain, ...


