
Operating Instructions
Page 2
...a Class B digital device, pursuant to rain or moisture. For the Customers in the literature accompanying the appliance. 2 If you may be used with the equipment in a particular installation. Regulatory Information Declaration of Conformity Trade Name: SONY Model No.: DSC-M1 Responsible Party: Sony Electronics Inc. ... which the receiver is for a digital device pursuant to correct the interference by turning the equipment off and on a circuit different from that any changes or modifications not expressly approved in accordance with the Cyber-shot Station Model UC-MA and AC ...
...a Class B digital device, pursuant to rain or moisture. For the Customers in the literature accompanying the appliance. 2 If you may be used with the equipment in a particular installation. Regulatory Information Declaration of Conformity Trade Name: SONY Model No.: DSC-M1 Responsible Party: Sony Electronics Inc. ... which the receiver is for a digital device pursuant to correct the interference by turning the equipment off and on a circuit different from that any changes or modifications not expressly approved in accordance with the Cyber-shot Station Model UC-MA and AC ...
Operating Instructions
Page 8
... Table of contents Read this first 4 Before using your camera 6 Identifying the parts 10 Camera 10 Cyber-shot Station 12 How to handle the camera 13 Getting started Charging the battery pack 14 Using the AC adaptor 18 Using your camera abroad 18 Turning on/off your camera 19 How to scene conditions - White Balance 63 Adjusting...
... Table of contents Read this first 4 Before using your camera 6 Identifying the parts 10 Camera 10 Cyber-shot Station 12 How to handle the camera 13 Getting started Charging the battery pack 14 Using the AC adaptor 18 Using your camera abroad 18 Turning on/off your camera 19 How to scene conditions - White Balance 63 Adjusting...
Operating Instructions
Page 12
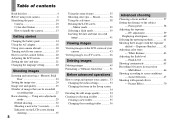
... the tray firmly. • Be sure to turn off the camera before you connect the camera to the Cyber-shot Station or disconnect the camera from the Cyber-shot Station. • Do not disconnect the camera from the Cyber-shot Station during the USB connection, as illustrated and disconnect the camera. 2 1 2 3 4 A Camera connector B (USB) jack (88) C A/V OUT (STEREO) jack (46) D DC IN...
... the tray firmly. • Be sure to turn off the camera before you connect the camera to the Cyber-shot Station or disconnect the camera from the Cyber-shot Station. • Do not disconnect the camera from the Cyber-shot Station during the USB connection, as illustrated and disconnect the camera. 2 1 2 3 4 A Camera connector B (USB) jack (88) C A/V OUT (STEREO) jack (46) D DC IN...
Operating Instructions
Page 14
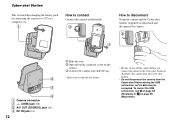
...mark on the side of the battery pack in the direction of the dirty plug may cause malfunction. • Clean the DC plug of the Cyber-shot Station (supplied). Battery insertion slot Facing the V marks on the battery insertion slot, insert the battery pack until it is firmly inserted all the... Make sure the battery pack is locked. 3 DC plug , Connect the AC Adaptor (supplied) to turn off your camera when charging the battery pack (page 19). • Your camera operates with a dry cotton bud. Slide the cover in the same direction as this may not properly charge the battery ...
...mark on the side of the battery pack in the direction of the dirty plug may cause malfunction. • Clean the DC plug of the Cyber-shot Station (supplied). Battery insertion slot Facing the V marks on the battery insertion slot, insert the battery pack until it is firmly inserted all the... Make sure the battery pack is locked. 3 DC plug , Connect the AC Adaptor (supplied) to turn off your camera when charging the battery pack (page 19). • Your camera operates with a dry cotton bud. Slide the cover in the same direction as this may not properly charge the battery ...
Operating Instructions
Page 15
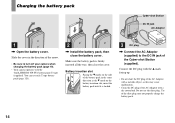
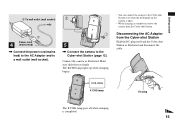
... socket). 2 1 3 5 , Connect the camera to the Cyber-shot Station even when the LCD panel on the camera is open. • When charging is completed. 15 Disconnecting the AC Adaptor from the Cyber-shot Station. Make sure slide the tray firmly. Connect the camera as illustrated and disconnect the cable. /CHG /CHG... lamp DC plug The /CHG lamp goes off when charging is completed, remove the camera from the Cyber-shot Station Hold the DC plug ...
... socket). 2 1 3 5 , Connect the camera to the Cyber-shot Station even when the LCD panel on the camera is open. • When charging is completed. 15 Disconnecting the AC Adaptor from the Cyber-shot Station. Make sure slide the tray firmly. Connect the camera as illustrated and disconnect the cable. /CHG /CHG... lamp DC plug The /CHG lamp goes off when charging is completed, remove the camera from the Cyber-shot Station Hold the DC plug ...
Operating Instructions
Page 16
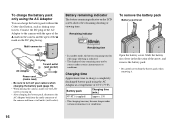
...a completely discharged battery pack using the AC Adaptor You can charge the battery pack without the Cyber-shot Station, such as during your camera when charging the battery pack (page 19). • When placing the camera, make sure the LCD screen is indicated. • The displayed time remaining may become longer... still image shooting is facing up. • After charging the battery pack, disconnect the AC Adaptor both from the multi connector of the camera and from a wall outlet (wall socket). To remove the battery pack Battery eject lever Open the battery cover. Connect the DC plug of...
...a completely discharged battery pack using the AC Adaptor You can charge the battery pack without the Cyber-shot Station, such as during your camera when charging the battery pack (page 19). • When placing the camera, make sure the LCD screen is indicated. • The displayed time remaining may become longer... still image shooting is facing up. • After charging the battery pack, disconnect the AC Adaptor both from the multi connector of the camera and from a wall outlet (wall socket). To remove the battery pack Battery eject lever Open the battery cover. Connect the DC plug of...
Operating Instructions
Page 19
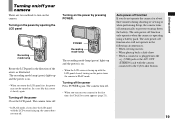
... you rotate the LCD panel fast, the power may not be turned on. The auto power-off your camera There are two methods to prevent wearing down the battery. Turning on the power by pressing POWER. Turning off automatically... • When viewing movies • When playing back a slide show • When a connector is facing up with the camera connected to PLAY mode. POWER Recording mode lamp The recording mode lamp (green) lights up and the power is on. •..., turning on the power by opening the LCD panel Turning on the power turns the camera to the Cyber-shot Station 19 Getting started The...
... you rotate the LCD panel fast, the power may not be turned on. The auto power-off your camera There are two methods to prevent wearing down the battery. Turning on the power by pressing POWER. Turning off automatically... • When viewing movies • When playing back a slide show • When a connector is facing up with the camera connected to PLAY mode. POWER Recording mode lamp The recording mode lamp (green) lights up and the power is on. •..., turning on the power by opening the LCD panel Turning on the power turns the camera to the Cyber-shot Station 19 Getting started The...
Operating Instructions
Page 46
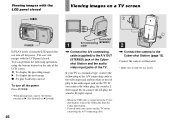
...right) signal. • When the USB cable is L (left) signal. If your camera and the TV before connecting the A/V connecting cable. 1 3 2 , Connect the camera to the Cybershot Station, remove the USB cable from the Cyber-shot Station. • Turn off the power Press POWER. • When playing back a ...8226; Make sure to the A/V OUT (STEREO) jack of the Cybershot Station and the audio/ video input jacks of the TV. If you connect the white plug, the sound is connected to the Cyber-shot Station (page 12). Connect the camera as B (fast-forward) or b (rewind). 46 To A/V OUT...
...right) signal. • When the USB cable is L (left) signal. If your camera and the TV before connecting the A/V connecting cable. 1 3 2 , Connect the camera to the Cybershot Station, remove the USB cable from the Cyber-shot Station. • Turn off the power Press POWER. • When playing back a ...8226; Make sure to the A/V OUT (STEREO) jack of the Cybershot Station and the audio/ video input jacks of the TV. If you connect the white plug, the sound is connected to the Cyber-shot Station (page 12). Connect the camera as B (fast-forward) or b (rewind). 46 To A/V OUT...

Operating Instructions
Page 81
... cable from the Cyber-shot Station and set to the Cyber-shot Station. MODE Still image printing After the connection is not set [USB Connect] to PLAY mode regardless of the Cyber-shot Station and the USB jack on the printer with the USB cable (supplied). Connecting the camera to the printer Connect... the camera to [PictBridge] on the Setup screen Even if you turn on the...
... cable from the Cyber-shot Station and set to the Cyber-shot Station. MODE Still image printing After the connection is not set [USB Connect] to PLAY mode regardless of the Cyber-shot Station and the USB jack on the printer with the USB cable (supplied). Connecting the camera to the printer Connect... the camera to [PictBridge] on the Setup screen Even if you turn on the...

Operating Instructions
Page 88
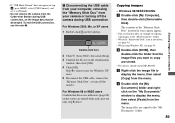
... on MENU Access indicators* "USB Mode Normal" appears on the desktop. f Connect the camera to the Cyber-shot Station and turn on your computer. c Connect the Cyber-shot Station (supplied) and the AC Adaptor (supplied), and plug the adaptor into the camera. shot Station. b Insert the "Memory Stick Duo" with the images you use the AC Adaptor...
... on MENU Access indicators* "USB Mode Normal" appears on the desktop. f Connect the camera to the Cyber-shot Station and turn on your computer. c Connect the Cyber-shot Station (supplied) and the AC Adaptor (supplied), and plug the adaptor into the camera. shot Station. b Insert the "Memory Stick Duo" with the images you use the AC Adaptor...
Operating Instructions
Page 89
... "Removable Disk" icon is unnecessary for Windows XP users. 5 Disconnect the USB cable, remove the "Memory Stick Duo", or turn off the camera during USB connection, as the image data may be destroyed. The image files are stored. • For movies, double-click [MP_ROOT]. The ...[Normal]. • Do not remove the camera from your computer Double-click here 2 Click (Sony DSC), then click [Stop]. 3 Confirm the device on the tasktray. P Disconnecting the USB cable from your computer, removing the "Memory Stick Duo" from the Cyber-shot Station during USB connection For Windows 2000, Me...
... "Removable Disk" icon is unnecessary for Windows XP users. 5 Disconnect the USB cable, remove the "Memory Stick Duo", or turn off the camera during USB connection, as the image data may be destroyed. The image files are stored. • For movies, double-click [MP_ROOT]. The ...[Normal]. • Do not remove the camera from your computer Double-click here 2 Click (Sony DSC), then click [Stop]. 3 Confirm the device on the tasktray. P Disconnecting the USB cable from your computer, removing the "Memory Stick Duo" from the Cyber-shot Station during USB connection For Windows 2000, Me...

Operating Instructions
Page 101
... battery pack is discharged. Re-insert the AC Adaptor and then charge the battery pack. • Properly install the camera to the Cyber-shot Station (page 12). 101 Consult your Sony dealer or local authorized Sony service facility. The /CHG lamp does not light up when charging a battery pack. Re-insert the AC Adaptor and...
... battery pack is discharged. Re-insert the AC Adaptor and then charge the battery pack. • Properly install the camera to the Cyber-shot Station (page 12). 101 Consult your Sony dealer or local authorized Sony service facility. The /CHG lamp does not light up when charging a battery pack. Re-insert the AC Adaptor and...

Operating Instructions
Page 102
... The battery pack is on the LCD screen. in the remaining battery time. Clean the battery terminal with a new one . • Properly install the camera to the Cyber-shot Station (page 12). • It is dead (page 121). Install a charged battery pack (page 14). • The battery pack is due to ... the DC plug from your Sony dealer or local authorized Sony service facility. • The battery pack is connected to open the LCD panel fast. Replace the battery pack with MODE (page 29). • The image size is set the image size to the Cyber-shot Station (page 12). The battery...
... The battery pack is on the LCD screen. in the remaining battery time. Clean the battery terminal with a new one . • Properly install the camera to the Cyber-shot Station (page 12). • It is dead (page 121). Install a charged battery pack (page 14). • The battery pack is due to ... the DC plug from your Sony dealer or local authorized Sony service facility. • The battery pack is connected to open the LCD panel fast. Replace the battery pack with MODE (page 29). • The image size is set the image size to the Cyber-shot Station (page 12). The battery...
Operating Instructions
Page 106
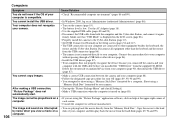
...Duo". You cannot install the USB driver. Delete the erroneously recognized device from both the computer and the Cyber-shot Station, and connect it again firmly. Your computer does not recognize your camera. • Start up the "Picture Package Menu" and check [Settings]. • Make a USB... connected directly to shoot using the "Picture Package" application software, click on the LCD screen (page 88). • Properly install the camera to the Cyber-shot Station (page 12). • Set [USB Connect] to the hard disk of your computer are interrupted by a computer. Make sure ...
...Duo". You cannot install the USB driver. Delete the erroneously recognized device from both the computer and the Cyber-shot Station, and connect it again firmly. Your computer does not recognize your camera. • Start up the "Picture Package Menu" and check [Settings]. • Make a USB... connected directly to shoot using the "Picture Package" application software, click on the LCD screen (page 88). • Properly install the camera to the Cyber-shot Station (page 12). • Set [USB Connect] to the hard disk of your computer are interrupted by a computer. Make sure ...

Operating Instructions
Page 109
... screen. The camera becomes warm when you • This is not working properly. all power sources and turn the power on again. (This will clear the date and time settings, etc.) (page 101) You cannot identify an indicator on the • Check the indicator (pages 123 to the Cyber-shot Station (page ...12). Turn off the camera and leave for about an hour at room temperature for the moisture to evaporate before use it for the long time. use...
... screen. The camera becomes warm when you • This is not working properly. all power sources and turn the power on again. (This will clear the date and time settings, etc.) (page 101) You cannot identify an indicator on the • Check the indicator (pages 123 to the Cyber-shot Station (page ...12). Turn off the camera and leave for about an hour at room temperature for the moisture to evaporate before use it for the long time. use...
Operating Instructions
Page 122
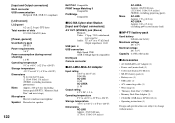
... Duo" and wrist strap) Microphone Electret condenser microphone Speaker Piezoelectric speaker 122 Exif Print Compatible PRINT Image Matching II Compatible PictBridge Compatible x UC-MA Cyber-shot Station [Input and Output connectors] A/V OUT (STEREO) jack (Stereo) Minijack Video: 1 Vp-p, 75 Ω, unbalanced, sync negative Audio: ...(at a 47 kΩ load) Output impedance 1 kΩ USB jack B USB connection High-Speed USB (USB 2.0 High-Speed compatible) DC IN jack Camera connector x AC-LM5/LM5A AC Adaptor Input rating 100 V to 240 V AC, 50/60 Hz AC-LM5 10 W AC-LM5A 11 W Output rating 4.2...
... Duo" and wrist strap) Microphone Electret condenser microphone Speaker Piezoelectric speaker 122 Exif Print Compatible PRINT Image Matching II Compatible PictBridge Compatible x UC-MA Cyber-shot Station [Input and Output connectors] A/V OUT (STEREO) jack (Stereo) Minijack Video: 1 Vp-p, 75 Ω, unbalanced, sync negative Audio: ...(at a 47 kΩ load) Output impedance 1 kΩ USB jack B USB connection High-Speed USB (USB 2.0 High-Speed compatible) DC IN jack Camera connector x AC-LM5/LM5A AC Adaptor Input rating 100 V to 240 V AC, 50/60 Hz AC-LM5 10 W AC-LM5A 11 W Output rating 4.2...
Operating Instructions
Page 127
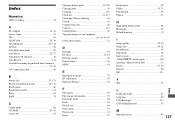
... 36 Cloudy 63 Compression ratio 26 Contrast 114 Control button 20 Copying images to your computer 89, 90, 96, 99 Cyber-shot Station 12 D Daylight 63 DC plug 14, 18 Deleting images 49 Digital zoom 36 DPOF 84 E Enlarging an image 72 EV adjustment 59 Exposure Bracket 62 F File names 92 File storage...
... 36 Cloudy 63 Compression ratio 26 Contrast 114 Control button 20 Copying images to your computer 89, 90, 96, 99 Cyber-shot Station 12 D Daylight 63 DC plug 14, 18 Deleting images 49 Digital zoom 36 DPOF 84 E Enlarging an image 72 EV adjustment 59 Exposure Bracket 62 F File names 92 File storage...


